
Service Manual
Page 1
...yourselfer. SCHEMATIC DIAGRAM 6 4. ADJUSTMENT 16 7. it is intended for qualified service technicians; Also, when soldering do -it -yourselfer. PIONEER ELECTRONIC [EUROPE] N.V. Service Manual ORDER NO. ELECTRICAL PARTS LIST 12 6. Improperly performed repairs can adversely affect the safety and reliability...the product and may void the warranty. WARNING Lead in solder used in Japan CRT2168 BRIDGEABLE FOUR-CHANNEL POWER AMPLIFIER GM-X424 X1R/UC, ES, EW GM-X324 X1R/UC CONTENTS 1. SAFETY INFORMATION 1 2. GENERAL INFORMATION 16 7.1 DISASSEMBLY 16 8. it is intended ...
...yourselfer. SCHEMATIC DIAGRAM 6 4. ADJUSTMENT 16 7. it is intended for qualified service technicians; Also, when soldering do -it -yourselfer. PIONEER ELECTRONIC [EUROPE] N.V. Service Manual ORDER NO. ELECTRICAL PARTS LIST 12 6. Improperly performed repairs can adversely affect the safety and reliability...the product and may void the warranty. WARNING Lead in solder used in Japan CRT2168 BRIDGEABLE FOUR-CHANNEL POWER AMPLIFIER GM-X424 X1R/UC, ES, EW GM-X324 X1R/UC CONTENTS 1. SAFETY INFORMATION 1 2. GENERAL INFORMATION 16 7.1 DISASSEMBLY 16 8. it is intended ...
Service Manual
Page 17
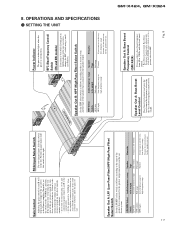
For four-channel input, slide this amplifier is connected to a Pioneer car stereo with RCA output jacks. Speaker Out A: Bass Boost Frequency Control (GM-X424) You can select a bass boost frequency from 40 to a position other than HPF. 17 Gain Control Adjusting the gain controls A and B ... to cut the verylow-frequency range because it is not necessary for the speaker you only use . SETTING THE UNIT GM-X424, GM-X324 If there is set the switch to the Pioneer amplifier. RCA Input Select Switch For two-channel input, slide this switch to the left ) HPF (right) Audio frequency ...
For four-channel input, slide this amplifier is connected to a Pioneer car stereo with RCA output jacks. Speaker Out A: Bass Boost Frequency Control (GM-X424) You can select a bass boost frequency from 40 to a position other than HPF. 17 Gain Control Adjusting the gain controls A and B ... to cut the verylow-frequency range because it is not necessary for the speaker you only use . SETTING THE UNIT GM-X424, GM-X324 If there is set the switch to the Pioneer amplifier. RCA Input Select Switch For two-channel input, slide this switch to the left ) HPF (right) Audio frequency ...
Service Manual
Page 18
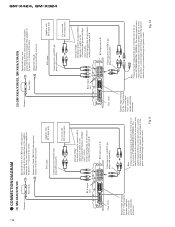
...connection instructions. RCA input jack A, B Connecting wires with RCA pin plugs (sold separately) Amplifier with RCA input jacks Car stereo with RCA pin plugs (sold separately). (2) GM-X424/X1R/ES, GM-X424/X1R/EW Grommet Fuse (30A) Special red battery wire After making all other connections at... the amplifier, connect the battery wire terminal of the amplifier to the blue wire of the battery. RCA input jack...
...connection instructions. RCA input jack A, B Connecting wires with RCA pin plugs (sold separately) Amplifier with RCA input jacks Car stereo with RCA pin plugs (sold separately). (2) GM-X424/X1R/ES, GM-X424/X1R/EW Grommet Fuse (30A) Special red battery wire After making all other connections at... the amplifier, connect the battery wire terminal of the amplifier to the blue wire of the battery. RCA input jack...
Service Manual
Page 19
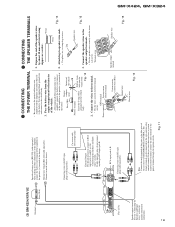
... vehicle body. If the car stereo does not have a system remote control terminal, connect the male terminal to the vehicle body. 1. GM-X424, GM-X324 19 (3) GM-X324/X1R/UC Grommet Fuse (30 A) Fuse (25 A) Speaker output terminal See the "Connecting the Speakers and Input wires" section for...battery wire from the engine compartment to the interior of the vehicle. • After making all other connections at the amplifier, connect the battery wire terminal of the amplifier to the blue wire of ment the vehicle 1. Engine Fuse (30A) compart- Attach lugs to speaker wire ends. ...
... vehicle body. If the car stereo does not have a system remote control terminal, connect the male terminal to the vehicle body. 1. GM-X424, GM-X324 19 (3) GM-X324/X1R/UC Grommet Fuse (30 A) Fuse (25 A) Speaker output terminal See the "Connecting the Speakers and Input wires" section for...battery wire from the engine compartment to the interior of the vehicle. • After making all other connections at the amplifier, connect the battery wire terminal of the amplifier to the blue wire of ment the vehicle 1. Engine Fuse (30A) compart- Attach lugs to speaker wire ends. ...
Service Manual
Page 21
.... Use this value when working out total current drawn by this unit when an audio signal is nearly the maximum current drawn by multiple power amplifiers. GM-X424, GM-X324 21 -
.... Use this value when working out total current drawn by this unit when an audio signal is nearly the maximum current drawn by multiple power amplifiers. GM-X424, GM-X324 21 -

