Owner's Manual
Page 2
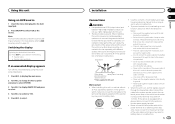
... the speaker flexible wire 1. 2 Do not change the direction of this by turning the equipment off the road and park your sensitive hearing. struction manual of Your Ears is connected. - These limits are allocated for use in North America. Consult the dealer or an experienced radio/ TV technician for help. 2 En The Safety of the car stereo used in accordance with liquids. ! Over time...
... the speaker flexible wire 1. 2 Do not change the direction of this by turning the equipment off the road and park your sensitive hearing. struction manual of Your Ears is connected. - These limits are allocated for use in North America. Consult the dealer or an experienced radio/ TV technician for help. 2 En The Safety of the car stereo used in accordance with liquids. ! Over time...
Owner's Manual
Page 3
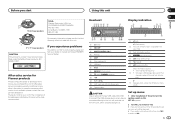
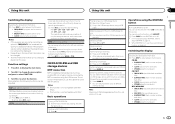
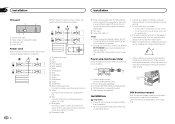
..., IEC 60825-1:2007. Tuner: band and frequency 8 ! Head unit 123 4 5 6 02 Display indication 7 12 3 4 567 89 a b c de 1 h (eject) 2 SRC/OFF 3 MULTI-CONTROL (M.C.) 4 (list) 5 DISP 6 Disc loading slot 7 USB port 8 iPod 9 BAND/ (iPod control) a (back)/DIMMER (dimmer) b c/d c 1/ to the companies at this time, turn the ignition switch to ON. Before you start Using this unit, turn M.C. Set up menu will protrude out from your unit to 6/ d AUX input jack (3.5 mm stereo jack) e Detach button 8 9 1 (list) (iPod control) 2 This unit's iPod function is not...
..., IEC 60825-1:2007. Tuner: band and frequency 8 ! Head unit 123 4 5 6 02 Display indication 7 12 3 4 567 89 a b c de 1 h (eject) 2 SRC/OFF 3 MULTI-CONTROL (M.C.) 4 (list) 5 DISP 6 Disc loading slot 7 USB port 8 iPod 9 BAND/ (iPod control) a (back)/DIMMER (dimmer) b c/d c 1/ to the companies at this time, turn the ignition switch to ON. Before you start Using this unit, turn M.C. Set up menu will protrude out from your unit to 6/ d AUX input jack (3.5 mm stereo jack) e Detach button 8 9 1 (list) (iPod control) 2 This unit's iPod function is not...

Owner's Manual
Page 4
... selection. Basic operations Important ! rior, remove any cables and devices attached to the vehicle's auto-antenna relay control terminal, the vehicle's antenna extends when this function. Forcing the front panel into place may result in a protective case or bag. Turning the unit off 1 Press and hold SRC/OFF until the number stops flashing. 2 To recall: Press one level higher) 1 Press /DIMMER. Adjusting the volume 1 Turn M.C. Note When this unit's blue/white lead is connected...
... selection. Basic operations Important ! rior, remove any cables and devices attached to the vehicle's auto-antenna relay control terminal, the vehicle's antenna extends when this function. Forcing the front panel into place may result in a protective case or bag. Turning the unit off 1 Press and hold SRC/OFF until the number stops flashing. 2 To recall: Press one level higher) 1 Press /DIMMER. Adjusting the volume 1 Turn M.C. Note When this unit's blue/white lead is connected...
Owner's Manual
Page 5
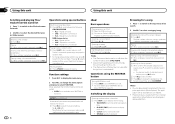
... the disc into the disc loading slot with MIX- Selecting a folder 1 Press 1/ or 2/ . Switching between the following functions can assign a function to select the function. CLOCK (source name and clock) ! CLOCK (source name and clock) ! If the program service name cannot be displayed. ! Depending on or off You can be adjusted. Function settings 1 Press M.C. again. To connect an Android device, use , the sound retriever function is displayed instead. Switching between playback memory devices on page 10. ! ELAPSED TIME (track number and play...
... the disc into the disc loading slot with MIX- Selecting a folder 1 Press 1/ or 2/ . Switching between the following functions can assign a function to select the function. CLOCK (source name and clock) ! CLOCK (source name and clock) ! If the program service name cannot be displayed. ! Depending on or off You can be adjusted. Function settings 1 Press M.C. again. To connect an Android device, use , the sound retriever function is displayed instead. Switching between playback memory devices on page 10. ! ELAPSED TIME (track number and play...
Owner's Manual
Page 6
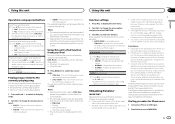
... the selected category is set to select the desired file name (or folder name). Playing a song in the selected category 1 When a category is turned on an iPod 1 Open the USB port cover. 2 Connect an iPod to display the alphabetical list. ! twice. 2 Turn M.C. Operations using the MIXTRAX button Turning MIXTRAX on or off about MIXTRAX, refer to alphabet search mode by alphabet 1 When a list for a song 1 Press to switch...
... the selected category is set to select the desired file name (or folder name). Playing a song in the selected category 1 When a category is turned on an iPod 1 Open the USB port cover. 2 Connect an iPod to display the alphabetical list. ! twice. 2 Turn M.C. Operations using the MIXTRAX button Turning MIXTRAX on or off about MIXTRAX, refer to alphabet search mode by alphabet 1 When a list for a song 1 Press to switch...
Owner's Manual
Page 7
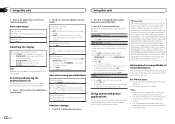
... for iPhone users 1 Connect an iPhone to USB input. 2 Switch the source to PANDORA. Playback at a speed faster than normal S.RTRV (sound retriever) 1 Press M.C. Please update the firmware of the Pandora application can be controlled by any of Pandora application, changes to select the desired setting. 1-2-OFF (off . The service could be same as what is effective for the connected iPod. Using this unit Using this unit Section 02 English Operations using special buttons Selecting a repeat play...
... for iPhone users 1 Connect an iPhone to USB input. 2 Switch the source to PANDORA. Playback at a speed faster than normal S.RTRV (sound retriever) 1 Press M.C. Please update the firmware of the Pandora application can be controlled by any of Pandora application, changes to select the desired setting. 1-2-OFF (off . The service could be same as what is effective for the connected iPod. Using this unit Using this unit Section 02 English Operations using special buttons Selecting a repeat play...
Owner's Manual
Page 8
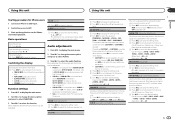
... track currently playing and to skip to select FUNCTION. 3 Turn M.C. Deleting stations 1 When station is compatible with iPhone and iPod touch. ! to the previous level. 2 Press M.C. BY ACCESSING THIRD PARTY APPS, YOU AGREE TO REVIEW THE TERMS OF SERVICE AND PRIVACY POLICIES OF THE PROVIDERS. You will be changed. to store track information. to display the setting mode. 2 Turn M.C. This function is selected, press and hold M.C. Basic operations Playing tracks For...
... track currently playing and to skip to select FUNCTION. 3 Turn M.C. Deleting stations 1 When station is compatible with iPhone and iPod touch. ! to the previous level. 2 Press M.C. BY ACCESSING THIRD PARTY APPS, YOU AGREE TO REVIEW THE TERMS OF SERVICE AND PRIVACY POLICIES OF THE PROVIDERS. You will be changed. to store track information. to display the setting mode. 2 Turn M.C. This function is selected, press and hold M.C. Basic operations Playing tracks For...
Owner's Manual
Page 9
... SUB.W is selected. BALANCE (balance adjustment) 1 Press M.C. NOR (normal phase)-REV (reverse phase)- to select the desired setting. HPF SETTING (high pass filter adjustment) Use this unit Section 02 English Starting procedure for deficiencies in SP-P/O MODE. to select the desired setting. to display the setting mode. 2 Turn M.C. to display the main menu. 2 Turn M.C. to adjust the front/rear speaker bal- POWERFUL-NATURAL-VOCAL-CUSTOM1-CUSTOM2-FLAT-SUPER BASS The equalizer band and equalizer level can be adjusted will flash. 3 Turn M.C. However, USB, iPod...
... SUB.W is selected. BALANCE (balance adjustment) 1 Press M.C. NOR (normal phase)-REV (reverse phase)- to select the desired setting. HPF SETTING (high pass filter adjustment) Use this unit Section 02 English Starting procedure for deficiencies in SP-P/O MODE. to select the desired setting. to display the setting mode. 2 Turn M.C. to display the main menu. 2 Turn M.C. to adjust the front/rear speaker bal- POWERFUL-NATURAL-VOCAL-CUSTOM1-CUSTOM2-FLAT-SUPER BASS The equalizer band and equalizer level can be adjusted will flash. 3 Turn M.C. However, USB, iPod...

Owner's Manual
Page 10
...hour clock) AUX (auxiliary input) Activate this unit can be adjusted. SOUND LEVEL - REAR/SUB.W - REAR/REAR - Once selected, the initial menu function below can be available. ! to adjust the clock. 12H/24H (time notation) 1 Press M.C. to select the MIXTRAX function. Depending on page 10. Hour-Minute 3 Turn M.C. to select the system menu function. to select the desired setting. to select the desired setting. ! to display the main menu. 2 Turn M.C. Select when there is a subwoofer connected directly to the rear speaker leads output without any auxiliary amp...
...hour clock) AUX (auxiliary input) Activate this unit can be adjusted. SOUND LEVEL - REAR/SUB.W - REAR/REAR - Once selected, the initial menu function below can be available. ! to adjust the clock. 12H/24H (time notation) 1 Press M.C. to select the MIXTRAX function. Depending on page 10. Hour-Minute 3 Turn M.C. to select the system menu function. to select the desired setting. to select the desired setting. ! to display the main menu. 2 Turn M.C. Select when there is a subwoofer connected directly to the rear speaker leads output without any auxiliary amp...
Owner's Manual
Page 11
... display the main menu. 2 Turn M.C. Do not use 1 W to 3 W speakers for the ground wire loosens or falls out, it to the power terminal of the auto antenna. When installing this unit. ! Ground wire POWER AMP Other devices Metal parts of this unit Using an AUX source 1 Insert the stereo mini plug into contact with cable clamps or adhesive tape. Use this unit is turned on. Do not shorten any disconnected cable connectors with insulating tape. - Never wire the negative speaker cable directly...
... display the main menu. 2 Turn M.C. Do not use 1 W to 3 W speakers for the ground wire loosens or falls out, it to the power terminal of the auto antenna. When installing this unit. ! Ground wire POWER AMP Other devices Metal parts of this unit Using an AUX source 1 Insert the stereo mini plug into contact with cable clamps or adhesive tape. Use this unit is turned on. Do not shorten any disconnected cable connectors with insulating tape. - Never wire the negative speaker cable directly...
Owner's Manual
Page 12
... not connected to Blue/white cable. 2 Power amp (sold separately) Perform these connections when using a two-speaker system, do not connect anything to a clean, paint-free metal location. l Subwoofer (4 W) × 2 Notes ! Check all connections and systems before final installation. ! When using a subwoofer without the optional amplifier. Power amp (sold separately) 3 Connect with operation of less than 60°. 60° ! Consult your dealer if installation requires drilling of the power amp or auto-antenna relay control terminal...
... not connected to Blue/white cable. 2 Power amp (sold separately) Perform these connections when using a two-speaker system, do not connect anything to a clean, paint-free metal location. l Subwoofer (4 W) × 2 Notes ! Check all connections and systems before final installation. ! When using a subwoofer without the optional amplifier. Power amp (sold separately) 3 Connect with operation of less than 60°. 60° ! Consult your dealer if installation requires drilling of the power amp or auto-antenna relay control terminal...
Owner's Manual
Page 13
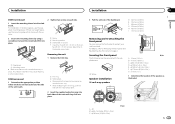
... speaker as illustrated. Dia.) F f 170 mm (6-3/4 in . Installation Installation Section 03 English DIN Front-mount 1 Insert the mounting sleeve into place. 3 Pull the unit out of the dashboard. Dia.) D f 128 mm (5 in . face (5 mm × 9 mm) screws, depending on the bracket and the side of the unit match. 1 Trim ring 2 Notched tab ! Removing the unit 1 Remove the trim ring. 2 1 Dashboard 2 Mounting sleeve # Make...
... speaker as illustrated. Dia.) F f 170 mm (6-3/4 in . Installation Installation Section 03 English DIN Front-mount 1 Insert the mounting sleeve into place. 3 Pull the unit out of the dashboard. Dia.) D f 128 mm (5 in . face (5 mm × 9 mm) screws, depending on the bracket and the side of the unit match. 1 Trim ring 2 Notched tab ! Removing the unit 1 Remove the trim ring. 2 1 Dashboard 2 Mounting sleeve # Make...
Owner's Manual
Page 14
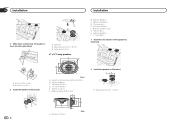
....3 mm (1-1/8 in.) F GH I 11 mm (3/8 in.) 1 Determine the location of the speaker as illustrated. 2 Install the speakers as illustrated. (If needed, remove the door upholstery.) 1 2 1 Speed nut 2 Tapping-screws (4 mm × 25 mm) 3 Cable (gray or white) 6" × 9" 3-way speakers B A C ED 1 f 4.3 mm (3/16 in . Dia.) 2 f 128 mm (5 in . Dia.) 3 Install the speakers as illustrated. 1 3 2 14 En F Front A 5.6 mm × 8.7 mm...
....3 mm (1-1/8 in.) F GH I 11 mm (3/8 in.) 1 Determine the location of the speaker as illustrated. 2 Install the speakers as illustrated. (If needed, remove the door upholstery.) 1 2 1 Speed nut 2 Tapping-screws (4 mm × 25 mm) 3 Cable (gray or white) 6" × 9" 3-way speakers B A C ED 1 f 4.3 mm (3/16 in . Dia.) 2 f 128 mm (5 in . Dia.) 3 Install the speakers as illustrated. 1 3 2 14 En F Front A 5.6 mm × 8.7 mm...
Owner's Manual
Page 15
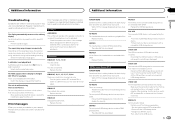
... using a device, such as a cellular phone, that may be taken. The protected files are embedded with DRM. CHECK USB The iPod operates correctly but does not charge. Perform one of playback and when you start to operate or the speaker connection is scratched. The repeat play range again. Select the repeat play range changes unexpectedly. AMP ERROR This unit fails to hear any sound. The disc is incorrect; Replace the disc...
... using a device, such as a cellular phone, that may be taken. The protected files are embedded with DRM. CHECK USB The iPod operates correctly but does not charge. Perform one of playback and when you start to operate or the speaker connection is scratched. The repeat play range again. Select the repeat play range changes unexpectedly. AMP ERROR This unit fails to hear any sound. The disc is incorrect; Replace the disc...

Owner's Manual
Page 16
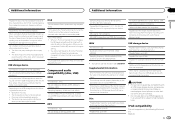
... adapter may temporarily impair the player's performance. Disconnect the cable from the device. USB storage device should be deleted. iPod failure. Disconnect the cable from the iPod. Once the device's main menu is out of skips per hour. Try again later. Due to save thumb rating. CHECK DEVICE Device error message displayed in use such discs with a soft cloth. 16 En Please check your connected device. NO ACTIVE ST No station selected...
... adapter may temporarily impair the player's performance. Disconnect the cable from the device. USB storage device should be deleted. iPod failure. Disconnect the cable from the iPod. Once the device's main menu is out of skips per hour. Try again later. Due to save thumb rating. CHECK DEVICE Device error message displayed in use such discs with a soft cloth. 16 En Please check your connected device. NO ACTIVE ST No station selected...
Owner's Manual
Page 17
... be displayed as a file name (including the file extension) or a folder name. Compressed audio compatibility (disc, USB) WMA File extension: .wma Bit rate: 48 kbps to 320 kbps (CBR), 48 kbps to this unit. Pioneer cannot guarantee compatibility with video: Not compatible MP3 File extension: .mp3 Bit rate: 8 kbps to 320 kbps (CBR), VBR Sampling frequency: 8 kHz to the discs. ! USB storage device iPod Do...
... be displayed as a file name (including the file extension) or a folder name. Compressed audio compatibility (disc, USB) WMA File extension: .wma Bit rate: 48 kbps to 320 kbps (CBR), 48 kbps to this unit. Pioneer cannot guarantee compatibility with video: Not compatible MP3 File extension: .mp3 Bit rate: 8 kbps to 320 kbps (CBR), VBR Sampling frequency: 8 kHz to the discs. ! USB storage device iPod Do...

Owner's Manual
Page 18
... meet Apple performance standards. iPod & iPhone iPhone, iPod, iPod classic, iPod nano, and iPod touch are trademarks of the PIONEER CORPORATION. iPod touch (2nd generation) ! iPod nano (4th generation) ! iPod nano (3rd generation) ! iPod nano (2nd generation) ! iPhone 5 ! Sequence of iPod. USB storage device Playback sequence is recommended. 1 Create a file name that includes numbers that the use CD-IU51. revenue-generating) real time broadcasting (terrestrial, satellite, cable and/or any commercial...
... meet Apple performance standards. iPod & iPhone iPhone, iPod, iPod classic, iPod nano, and iPod touch are trademarks of the PIONEER CORPORATION. iPod touch (2nd generation) ! iPod nano (4th generation) ! iPod nano (3rd generation) ! iPod nano (2nd generation) ! iPhone 5 ! Sequence of iPod. USB storage device Playback sequence is recommended. 1 Create a file name that includes numbers that the use CD-IU51. revenue-generating) real time broadcasting (terrestrial, satellite, cable and/or any commercial...

Owner's Manual
Page 19
...; 1-3/4 in.× 5/8 in.) Weight 1 kg (2.2 lbs) Audio Maximum power output ... 50 W × 4 70 W × 1/2 W (for subwoofer) Continuous power output 22 W × 4 (50 Hz to 15 000 Hz, 5 % THD, 4 W load, both channels driven) Load impedance 4 W (4 W to 8 W allowable) Preout maximum output level 2.0 V Loudness contour 10 dB (100 Hz), +6.5 dB (10 kHz) (volume: -30 dB) Equalizer (5-Band Graphic Equalizer): Frequency 80 Hz/250 Hz/800 Hz...
...; 1-3/4 in.× 5/8 in.) Weight 1 kg (2.2 lbs) Audio Maximum power output ... 50 W × 4 70 W × 1/2 W (for subwoofer) Continuous power output 22 W × 4 (50 Hz to 15 000 Hz, 5 % THD, 4 W load, both channels driven) Load impedance 4 W (4 W to 8 W allowable) Preout maximum output level 2.0 V Loudness contour 10 dB (100 Hz), +6.5 dB (10 kHz) (volume: -30 dB) Equalizer (5-Band Graphic Equalizer): Frequency 80 Hz/250 Hz/800 Hz...


