
Product Brochure
Page 2
... and all related marks and logos are trademarks of SiriusXM Radio Inc. All other Pioneer products, visit www.pioneerelectronics.com CAUTION: Read the operation manual as well as all compatible Bluetooth-enabled devices, and/or the functionality of such features....COM/PIONEERNORTHAMERICA INSTAGRAM.COM/PIONEERCARAUDIO TWITTER.COM/PIONEERUSA YOUTUBE.COM/PIONEERELECTRONICS ©2019 Pioneer Electronics (USA) Inc. | 2019 DMH-1500NEX - 513 v3 Either "Made for iPod" or "Made for installers and the Specialty Equipment Market Association (SEMA). More information is a subscription service...
... and all related marks and logos are trademarks of SiriusXM Radio Inc. All other Pioneer products, visit www.pioneerelectronics.com CAUTION: Read the operation manual as well as all compatible Bluetooth-enabled devices, and/or the functionality of such features....COM/PIONEERNORTHAMERICA INSTAGRAM.COM/PIONEERCARAUDIO TWITTER.COM/PIONEERUSA YOUTUBE.COM/PIONEERELECTRONICS ©2019 Pioneer Electronics (USA) Inc. | 2019 DMH-1500NEX - 513 v3 Either "Made for iPod" or "Made for installers and the Specialty Equipment Market Association (SEMA). More information is a subscription service...

Installation Manual
Page 2
... interior. 2 En Important safeguards WARNING Pioneer does not recommend that you install this product in a way that alters or disables that only authorized Pioneer service personnel, who have rear visibility ...systems. Owners of this product. Tampering with applicable regulations. Connection to the factory backup camera will divert your attention in operating this product, pull over 50 W Connection Precautions Your new product and this manual...
... interior. 2 En Important safeguards WARNING Pioneer does not recommend that you install this product in a way that alters or disables that only authorized Pioneer service personnel, who have rear visibility ...systems. Owners of this product. Tampering with applicable regulations. Connection to the factory backup camera will divert your attention in operating this product, pull over 50 W Connection Precautions Your new product and this manual...
Installation Manual
Page 3
...ACC ON), a control signal is properly connected to connect the ground wire first. RGB cable (supplied with Navigation system) This product Pioneer navigation system Contact your dealer to an external power amp's system remote control terminal, the auto-antenna relay control terminal, or the ...sense En 3 English Ensure that is switched off. The control signal is output through the blue/white lead. When installing this product, refer to the manual for the activation on the product means direct current. This product find the device number that the ground wire is ...
...ACC ON), a control signal is properly connected to connect the ground wire first. RGB cable (supplied with Navigation system) This product Pioneer navigation system Contact your dealer to an external power amp's system remote control terminal, the auto-antenna relay control terminal, or the ...sense En 3 English Ensure that is switched off. The control signal is output through the blue/white lead. When installing this product, refer to the manual for the activation on the product means direct current. This product find the device number that the ground wire is ...

Installation Manual
Page 6
...use the supplied parts in the manner specified. Places close to the Operation Manual. May interfere with your nearest dealer if installation requires drilling holes or other modifications of the vehicle. • Before making a final installation of your vehicle's airbags would deploy. Please refer to your dealer. ...or safety features, including airbags, hazard lamp buttons or (iii) impair the driver's ability to safely operate the vehicle. • Never install this product in front of or next to the place in the dashboard, door, or pillar from which one of this product, temporarily ...
...use the supplied parts in the manner specified. Places close to the Operation Manual. May interfere with your nearest dealer if installation requires drilling holes or other modifications of the vehicle. • Before making a final installation of your vehicle's airbags would deploy. Please refer to your dealer. ...or safety features, including airbags, hazard lamp buttons or (iii) impair the driver's ability to safely operate the vehicle. • Never install this product in front of or next to the place in the dashboard, door, or pillar from which one of this product, temporarily ...

Owners Manual
Page 6
... rear visibility systems. Owners of vehicles equipped with a qualified professional installer for internal inspection, adjustments or repairs. If your dealer or the nearest authorized Pioneer Service Station. Do not use the Pioneer receiver unless it may result in a way that alters or disables... and the parking brake is applied. • Keep this manual handy as there are unsure whether your vehicle. English Service Station. Be sure to your dealer or the nearest authorized Pioneer Service Station for installation options specific to consult your vehicle. - 6 - regulations...
... rear visibility systems. Owners of vehicles equipped with a qualified professional installer for internal inspection, adjustments or repairs. If your dealer or the nearest authorized Pioneer Service Station. Do not use the Pioneer receiver unless it may result in a way that alters or disables... and the parking brake is applied. • Keep this manual handy as there are unsure whether your vehicle. English Service Station. Be sure to your dealer or the nearest authorized Pioneer Service Station for installation options specific to consult your vehicle. - 6 - regulations...

Owners Manual
Page 38
... available. 1 Connect your iPod, since some functions may not be connected. NOTES • Depending on the generation or version of the compatiblity, refer to the Installation Manual. • For Bluetooth connection, see page 16.
... available. 1 Connect your iPod, since some functions may not be connected. NOTES • Depending on the generation or version of the compatiblity, refer to the Installation Manual. • For Bluetooth connection, see page 16.

Owners Manual
Page 43
... main menu of the WebLink source screen. The WebLink app is connected to this unit, video from the WebLink screen can be displayed to the Installation Manual. 2 Press . 3 Touch . 4 Touch [WebLink]. 5 Touch desired icon in the tab. For smartphone (Android™) users System requirement Android 5.0 or higher (up to iOS 11.x) NOTE...
... main menu of the WebLink source screen. The WebLink app is connected to this unit, video from the WebLink screen can be displayed to the Installation Manual. 2 Press . 3 Touch . 4 Touch [WebLink]. 5 Touch desired icon in the tab. For smartphone (Android™) users System requirement Android 5.0 or higher (up to iOS 11.x) NOTE...

Owners Manual
Page 44
Touch again to the Installation Manual. 2 Press . 3 Touch . 4 Touch [WebLink]. 5 Touch desired icon in the tab. Adjusts the audio volume. - 44 - English Refer to cancel mute. Touch to mute. The WebLink ...
Touch again to the Installation Manual. 2 Press . 3 Touch . 4 Touch [WebLink]. 5 Touch desired icon in the tab. Adjusts the audio volume. - 44 - English Refer to cancel mute. Touch to mute. The WebLink ...

Owners Manual
Page 46
NOTES • For details on USB connection, refer to the Installation Manual. • If an Apple CarPlay compatible device has been connected and another screen is displayed, touch [Apple CarPlay] on . Adjusting the volume You can use ...
NOTES • For details on USB connection, refer to the Installation Manual. • If an Apple CarPlay compatible device has been connected and another screen is displayed, touch [Apple CarPlay] on . Adjusting the volume You can use ...
Owners Manual
Page 49
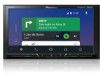
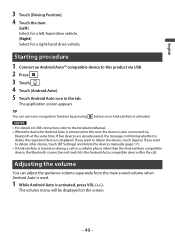
... Auto compatible device after the call on a cellular phone other device, touch [BT Settings] and delete the devices manually (page 17). • If Android Auto is turned on USB connection, refer to the Installation Manual. • When the device for a right-hand drive vehicle. English 3 Touch [Driving Position]. 4 Touch the item. [Left] Select...
... Auto compatible device after the call on a cellular phone other device, touch [BT Settings] and delete the devices manually (page 17). • If Android Auto is turned on USB connection, refer to the Installation Manual. • When the device for a right-hand drive vehicle. English 3 Touch [Driving Position]. 4 Touch the item. [Left] Select...

Owners Manual
Page 52
... memory. Basic operation Playback screen English Recalls the preset station stored to a key. 3 Touch [Pandora]. 4 Launch the Pandora application on USB connection, refer to the Installation Manual. NOTES • For details on Bluetooth connection, see page 16. • For details on the mobile device and start playback. Skips tracks forward. NOTE The...
... memory. Basic operation Playback screen English Recalls the preset station stored to a key. 3 Touch [Pandora]. 4 Launch the Pandora application on USB connection, refer to the Installation Manual. NOTES • For details on Bluetooth connection, see page 16. • For details on the mobile device and start playback. Skips tracks forward. NOTE The...

Owners Manual
Page 55
... information to radio mode. NOTES • For details on Bluetooth connection, see page 16. • For details on USB connection for iPhone, refer to the Installation Manual. English 3 Touch then . 4 Touch [AV Source Settings]. 5 Confirm that are skipped varies depending on the application.
... information to radio mode. NOTES • For details on Bluetooth connection, see page 16. • For details on USB connection for iPhone, refer to the Installation Manual. English 3 Touch then . 4 Touch [AV Source Settings]. 5 Confirm that are skipped varies depending on the application.
Owners Manual
Page 67
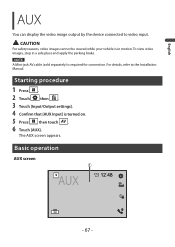
... to video input. To view video images, stop in motion. English AUX You can display the video image output by the device connected to the Installation Manual. NOTE A Mini-jack AV cable (sold separately) is turned on. 5 Press then touch . 6 Touch [AUX]. Starting procedure 1 Press . 2 Touch then . 3 Touch [Input/Output settings]. 4 Confirm...
... to video input. To view video images, stop in motion. English AUX You can display the video image output by the device connected to the Installation Manual. NOTE A Mini-jack AV cable (sold separately) is turned on. 5 Press then touch . 6 Touch [AUX]. Starting procedure 1 Press . 2 Touch then . 3 Touch [Input/Output settings]. 4 Confirm...

Owners Manual
Page 69
... camera view. To view video images, stop in motion. English AV input You can display the video image output by the device connected to the Installation Manual. The video image is in a safe place and apply the parking brake. CAUTION For safety reasons, video images cannot be viewed while your vehicle is...
... camera view. To view video images, stop in motion. English AV input You can display the video image output by the device connected to the Installation Manual. The video image is in a safe place and apply the parking brake. CAUTION For safety reasons, video images cannot be viewed while your vehicle is...

Owners Manual
Page 70
... flash the Maestro RR module with the iDatalink adapter, refer to the information on our website. • After installing the iDatalink adapter, be different from the contents on the screen described in this manual. • When information on your vehicle system via the connected iDatalink adapter. http://maestro.idatalink.com/support Limitations...
... flash the Maestro RR module with the iDatalink adapter, refer to the information on our website. • After installing the iDatalink adapter, be different from the contents on the screen described in this manual. • When information on your vehicle system via the connected iDatalink adapter. http://maestro.idatalink.com/support Limitations...

Owners Manual
Page 71
.... Using functions in Car Sources These operations are almost similar to the built in AV sources of the screen to the Installation Manual. • You can check and operate the following screens after selecting [Car Features] in Car Features You can also ... Starting procedure 1 Connect the iDatalink Maestro adapter to this product to iDatalink Maestro, and then install this product. Displays the Vehicle Information screen. - 71 - For details of the operations, refer to the Installation manual. 2 Press then touch . 3 Touch [Car Sources] or [Car Features]. The iDatalink ...
.... Using functions in Car Sources These operations are almost similar to the built in AV sources of the screen to the Installation Manual. • You can check and operate the following screens after selecting [Car Features] in Car Features You can also ... Starting procedure 1 Connect the iDatalink Maestro adapter to this product to iDatalink Maestro, and then install this product. Displays the Vehicle Information screen. - 71 - For details of the operations, refer to the Installation manual. 2 Press then touch . 3 Touch [Car Sources] or [Car Features]. The iDatalink ...

Owners Manual
Page 95
...(Refer to the System Settings section of this manual to Off. - Problems with no camera installed. → Back camera input is set to adjust.) Problems with the phone screen Dialing is impossible because the touch panel keys for steps to the installation manual.) Black screen displayed when the vehicle is in ...park. (Refer to the System Settings section of the receiver. (Refer to the installation manual.) → The reverse lead on the receiver may not be connected to adjust.) → The camera input may be performed on the ...
...(Refer to the System Settings section of this manual to Off. - Problems with no camera installed. → Back camera input is set to adjust.) Problems with the phone screen Dialing is impossible because the touch panel keys for steps to the installation manual.) Black screen displayed when the vehicle is in ...park. (Refer to the System Settings section of the receiver. (Refer to the installation manual.) → The reverse lead on the receiver may not be connected to adjust.) → The camera input may be performed on the ...


