Owner's Manual
Page 2
...countries not mentioned above, please contact your dealer for the unit, you will be removed and appropriate one ). If the AC plug of this Pioneer product. The equipment should also be obtained from your local dealer. Do not place the unit, a piece of furniture, etc., on the ... shown in the explanatory drawings. Installation of the unit in a damp or dusty environment may return their used inside a carrying case or DJ booth, separate it will corrode the surfaces. After you find it is refitted when the fuse is unsuitable for the correct method of disposal...
...countries not mentioned above, please contact your dealer for the unit, you will be removed and appropriate one ). If the AC plug of this Pioneer product. The equipment should also be obtained from your local dealer. Do not place the unit, a piece of furniture, etc., on the ... shown in the explanatory drawings. Installation of the unit in a damp or dusty environment may return their used inside a carrying case or DJ booth, separate it will corrode the surfaces. After you find it is refitted when the fuse is unsuitable for the correct method of disposal...
Owner's Manual
Page 3
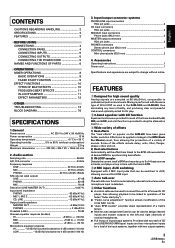
... Other functions ¶ A control cable can be used to connect the unit to a Pioneer DJ CD player, thus allowing playback to be linked to -∞. 3 Wide variety of effects 1) Beat ...effects The "beat effects" so popular on the DJM-600 have been given further evolution. Mixing is performed with the same type of 32...PANEL 4 CONNECTING INPUTS 5 CONNECTING OUTPUTS 5 CONNECTING THE POWER CORD 5 NAMES AND FUNCTIONS OF PARTS 6 OPERATIONS MIXER OPERATIONS 8 BASIC OPERATIONS 8 FADER START FUNCTION 9 EFFECT FUNCTIONS 10 TYPES OF BEAT EFFECTS 10 PRODUCING BEAT ...
... Other functions ¶ A control cable can be used to connect the unit to a Pioneer DJ CD player, thus allowing playback to be linked to -∞. 3 Wide variety of effects 1) Beat ...effects The "beat effects" so popular on the DJM-600 have been given further evolution. Mixing is performed with the same type of 32...PANEL 4 CONNECTING INPUTS 5 CONNECTING OUTPUTS 5 CONNECTING THE POWER CORD 5 NAMES AND FUNCTIONS OF PARTS 6 OPERATIONS MIXER OPERATIONS 8 BASIC OPERATIONS 8 FADER START FUNCTION 9 EFFECT FUNCTIONS 10 TYPES OF BEAT EFFECTS 10 PRODUCING BEAT ...
Owner's Manual
Page 4
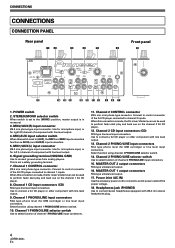
...LINE selector switch Use to perform fader start play and back cue on the channel 1 DJ CD player. 8. When this switch is set to the [MONO] position, master output is made , the DJ mixer's fader lever can be used to select function of component with line level output. 9.... connectors. 15. Signal grounding terminal (SIGNAL GND) Use to an AC power outlet of the proper voltage. 18. This is made , the DJ mixer's fader lever can be used to connect stereo headphones equipped with line level output. 6. Channel 2 CONTROL connector Ø3.5 mm mini-phone type connector...
...LINE selector switch Use to perform fader start play and back cue on the channel 1 DJ CD player. 8. When this switch is set to the [MONO] position, master output is made , the DJ mixer's fader lever can be used to select function of component with line level output. 9.... connectors. 15. Signal grounding terminal (SIGNAL GND) Use to an AC power outlet of the proper voltage. 18. This is made , the DJ mixer's fader lever can be used to connect stereo headphones equipped with line level output. 6. Channel 2 CONTROL connector Ø3.5 mm mini-phone type connector...
Owner's Manual
Page 5
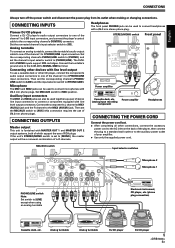
... the channel's input selector switch to [PHONO/LINE]. Set the connected channel's input selector switch to the DJM-400's SIGNAL GND terminal. Analog turntable Analog turntable DJ CD player DJ CD player 5 En CONNECTING INPUTS Pioneer DJ CD players Connect a DJ CD player's audio output connectors to 2 PHONO/LINE input connectors. Then set to [MONO], the master...
... the channel's input selector switch to [PHONO/LINE]. Set the connected channel's input selector switch to the DJM-400's SIGNAL GND terminal. Analog turntable Analog turntable DJ CD player DJ CD player 5 En CONNECTING INPUTS Pioneer DJ CD players Connect a DJ CD player's audio output connectors to 2 PHONO/LINE input connectors. Then set to [MONO], the master...
Owner's Manual
Page 6
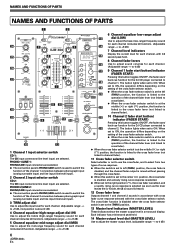
...Channel 2 fader start button/ indicator (FADER START) Pressing this button toggles ON/OFF, the fader start / back cue function for the DJ CD player connected to channel 2. NAMES AND FUNCTIONS OF PARTS NAMES AND FUNCTIONS OF PARTS 1 2 POWER 6 Channel equalizer low-range adjust...2 TRIM MASTER LEVEL 13 dial (LOW) Use to adjust the bass (low-range) frequency sound for each channel (includes kill function). (Adjustable 24 3 2 CHANNEL DJ MIXER 3 14 range: -∞ to +9 dB) 0 0 7 Channel level indicators MIC 2 LEVEL + 9 BEAT EFFECTS + 9 Display the current level for each ...
...Channel 2 fader start button/ indicator (FADER START) Pressing this button toggles ON/OFF, the fader start / back cue function for the DJ CD player connected to channel 2. NAMES AND FUNCTIONS OF PARTS NAMES AND FUNCTIONS OF PARTS 1 2 POWER 6 Channel equalizer low-range adjust...2 TRIM MASTER LEVEL 13 dial (LOW) Use to adjust the bass (low-range) frequency sound for each channel (includes kill function). (Adjustable 24 3 2 CHANNEL DJ MIXER 3 14 range: -∞ to +9 dB) 0 0 7 Channel level indicators MIC 2 LEVEL + 9 BEAT EFFECTS + 9 Display the current level for each ...

Owner's Manual
Page 7
when sound is input to a connected microphone, the TALK OVER function operates and all sound other than that from the intervals at which beat effects are disabled (OFF), the button lights. Headphones output section 28 Headphone cue button/indicator (CH-1, CH-2, MASTER) Press the button for synchronizing effects (P.11) The selected button lights. During in-loop sampler play, the loop play , the buttons function as follows: AUTO mode: The AUTO button lights and the BPM is first turned on the unit's front panel. 7 En Microphone input control 24 Microphone 1 level control ...
when sound is input to a connected microphone, the TALK OVER function operates and all sound other than that from the intervals at which beat effects are disabled (OFF), the button lights. Headphones output section 28 Headphone cue button/indicator (CH-1, CH-2, MASTER) Press the button for synchronizing effects (P.11) The selected button lights. During in-loop sampler play, the loop play , the buttons function as follows: AUTO mode: The AUTO button lights and the BPM is first turned on the unit's front panel. 7 En Microphone input control 24 Microphone 1 level control ...
Owner's Manual
Page 8
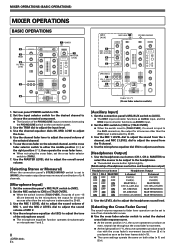
... headphones. ¶ The selected source button lights brightly. [Relationship of the microphone sound. ¶ The microphone equalizer function operates simultaneously on both sides [< 1] and [2 >]. MIXER OPERATIONS (BASIC OPERATIONS) MIXER OPERATIONS BASIC OPERATIONS 2 MIC 3 TRIM 4 HI, MID, LOW 1 POWER MASTER BEAT EFFECTS 7 MASTER LEVEL HEADPHONES 5 [MIC] [AUX] MIC/AUX 1 MIC 3 MIC 1 LEVEL, MIC...
... headphones. ¶ The selected source button lights brightly. [Relationship of the microphone sound. ¶ The microphone equalizer function operates simultaneously on both sides [< 1] and [2 >]. MIXER OPERATIONS (BASIC OPERATIONS) MIXER OPERATIONS BASIC OPERATIONS 2 MIC 3 TRIM 4 HI, MID, LOW 1 POWER MASTER BEAT EFFECTS 7 MASTER LEVEL HEADPHONES 5 [MIC] [AUX] MIC/AUX 1 MIC 3 MIC 1 LEVEL, MIC...
Owner's Manual
Page 9
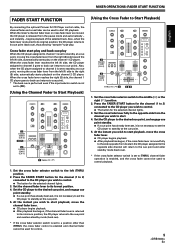
When the mixer's channel fader lever or cross fader lever are moved, the CD player is returned to its original position, the CD player returns to its start ... player begins playback. ¶ After playback has begun, if the channel fader lever is returned to its lowest position. 4. MIXER OPERATIONS (FADER START FUNCTION) English FADER START FUNCTION By connecting the optional Pioneer DJ CD Player control cable, the channel fader and cross fader can be used to start . 4. Cross fader start , the...
When the mixer's channel fader lever or cross fader lever are moved, the CD player is returned to its original position, the CD player returns to its start ... player begins playback. ¶ After playback has begun, if the channel fader lever is returned to its lowest position. 4. MIXER OPERATIONS (FADER START FUNCTION) English FADER START FUNCTION By connecting the optional Pioneer DJ CD Player control cable, the channel fader and cross fader can be used to start . 4. Cross fader start , the...
Owner's Manual
Page 10
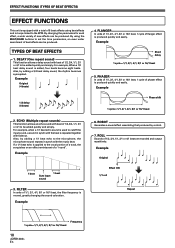
EFFECT FUNCTIONS (TYPES OF BEAT EFFECTS) EFFECT FUNCTIONS This unit is equipped with a total of 1/2, 3/4, 1/1, 2/1 or 4/1 to be added quickly and simply. TYPES OF BEAT EFFECTS 1. ECHO (Multiple repeat sounds) This function allows an echo sound with beat of 1/1, 2/1, 4/1, 8/1 or 16/1 beat, the filter frequency is moved, greatly changing the sound coloration. Example 1 beat 1 beat Cuts input sound 3. FILTER In units of 1/2, 3/4, 1/1, 2/1 or 4/1 to set the time parameters, an even wider assortment of new effects can be produced. Example Original Effect ON 1/1 roll Repeat Frequency...
EFFECT FUNCTIONS (TYPES OF BEAT EFFECTS) EFFECT FUNCTIONS This unit is equipped with a total of 1/2, 3/4, 1/1, 2/1 or 4/1 to be added quickly and simply. TYPES OF BEAT EFFECTS 1. ECHO (Multiple repeat sounds) This function allows an echo sound with beat of 1/1, 2/1, 4/1, 8/1 or 16/1 beat, the filter frequency is moved, greatly changing the sound coloration. Example 1 beat 1 beat Cuts input sound 3. FILTER In units of 1/2, 3/4, 1/1, 2/1 or 4/1 to set the time parameters, an even wider assortment of new effects can be produced. Example Original Effect ON 1/1 roll Repeat Frequency...
Owner's Manual
Page 11
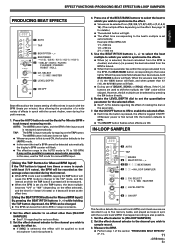
Set the effect channel selector to the channel you wish to apply the effect to the beat's multiple is selected, the effect will be skipped. See page 10 for Manual BPM Input] By pressing the BEAT/PITCH buttons (-, +) while holding the TAP button depressed, the BPM can be changed. ¶ The BPM can be set as the effect time. [Using the BEAT/PITCH buttons for details.) ¶ The selected button will flash. ¶ The effective range in the AUTO mode is input manually by pressing the 3/4 button directly. 6. However, the 3/4 multiple can be detected automatically, the display's ...
Set the effect channel selector to the channel you wish to apply the effect to the beat's multiple is selected, the effect will be skipped. See page 10 for Manual BPM Input] By pressing the BEAT/PITCH buttons (-, +) while holding the TAP button depressed, the BPM can be changed. ¶ The BPM can be set as the effect time. [Using the BEAT/PITCH buttons for details.) ¶ The selected button will flash. ¶ The effective range in the AUTO mode is input manually by pressing the 3/4 button directly. 6. However, the 3/4 multiple can be detected automatically, the display's ...
Owner's Manual
Page 12
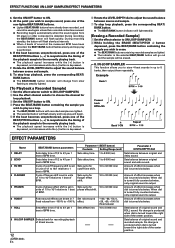
During recording standby, the button will flash slowly and loop play is output. 6 ROBOT Robot sound effects can be set Sets cycle for recording/playback of 1/1 to 16/1 relative to 1 beat phase effect shift. beat of BPM. 10 to 32 000 (ms) Amount of effect increases when dial is turned clockwise. 4 FLANGER Cycle of flanger shift is set in Sets cycle for 10 to 32 000 (ms) units of 1/1 to 16/1 relative to 1 beat of sound at the measured BPM have already been recorded, and cannot be erased. 8. When dial is turned fully counterclockwise, only original sound is output. 5 ...
During recording standby, the button will flash slowly and loop play is output. 6 ROBOT Robot sound effects can be set Sets cycle for recording/playback of 1/1 to 16/1 relative to 1 beat phase effect shift. beat of BPM. 10 to 32 000 (ms) Amount of effect increases when dial is turned clockwise. 4 FLANGER Cycle of flanger shift is set in Sets cycle for 10 to 32 000 (ms) units of 1/1 to 16/1 relative to 1 beat of sound at the measured BPM have already been recorded, and cannot be erased. 8. When dial is turned fully counterclockwise, only original sound is output. 5 ...
Owner's Manual
Page 13
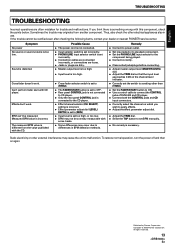
...are connected incorrectly, or connections are loose. ÷ Jacks or plugs are often mistaken for trouble and malfunctions. Published by Pioneer Corporation. Copyright © 2006 Pioneer Corporation. Thus, also check the other external interference may cause the unit to malfunction. Can't perform fader start with this component... other than [THRU]. ÷ Set the FADER START button to ON. ÷ Use a control cable to connect the CONTROL jacks of DJM-400 and CD player. ÷ Connect both the CONTROL jacks and CD input connectors. ÷ Correctly select the channel on again. If you ...
...are connected incorrectly, or connections are loose. ÷ Jacks or plugs are often mistaken for trouble and malfunctions. Published by Pioneer Corporation. Copyright © 2006 Pioneer Corporation. Thus, also check the other external interference may cause the unit to malfunction. Can't perform fader start with this component... other than [THRU]. ÷ Set the FADER START button to ON. ÷ Use a control cable to connect the CONTROL jacks of DJM-400 and CD player. ÷ Connect both the CONTROL jacks and CD input connectors. ÷ Correctly select the channel on again. If you ...
Owner's Manual
Page 76
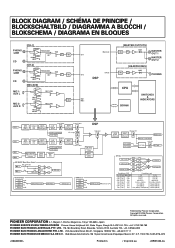
.... Blvd.Manuel Avila Camacho 138 10 piso Col.Lomas de Chapultepec, Mexico, D.F. PIONEER CORPORATION 4-1, Meguro 1-Chome, Meguro-ku, Tokyo 153-8654, Japan PIONEER EUROPE NV MULTIMEDIA DIVISION Pioneer House Hollybush Hill, Stoke Poges, Slough SL2 4QP U.K. TEL: +44-1-753-789-789 PIONEER ELECTRONICS AUSTRALIA PTY. C.P. 11000 TEL: 52-55-9178-4270 Printed in / Imprim...
.... Blvd.Manuel Avila Camacho 138 10 piso Col.Lomas de Chapultepec, Mexico, D.F. PIONEER CORPORATION 4-1, Meguro 1-Chome, Meguro-ku, Tokyo 153-8654, Japan PIONEER EUROPE NV MULTIMEDIA DIVISION Pioneer House Hollybush Hill, Stoke Poges, Slough SL2 4QP U.K. TEL: +44-1-753-789-789 PIONEER ELECTRONICS AUSTRALIA PTY. C.P. 11000 TEL: 52-55-9178-4270 Printed in / Imprim...
