Owners Manual
Page 7
Otherwise, auto-equalization cannot be carried out and the effects of the sound field control cannot be sure to disconnect the battery 8 cable before beginning installation. • Refer to the owner's manual for vehicles with cable clamps or adhesive tape. This will be exceeded, causing over heating. •...holder. • When the 2-speaker system is employed in the PRO mode, use the front outputs of this unit. Otherwise, auto-equalization cannot be sure to use only fuse of the rating prescribed on connecting the various cords of the power amp and other equipment by ...
Otherwise, auto-equalization cannot be carried out and the effects of the sound field control cannot be sure to disconnect the battery 8 cable before beginning installation. • Refer to the owner's manual for vehicles with cable clamps or adhesive tape. This will be exceeded, causing over heating. •...holder. • When the 2-speaker system is employed in the PRO mode, use the front outputs of this unit. Otherwise, auto-equalization cannot be sure to use only fuse of the rating prescribed on connecting the various cords of the power amp and other equipment by ...
Owners Manual
Page 10
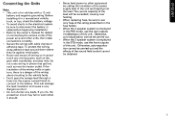
... or fittings. • Before drilling any mounting holes always check behind where you can cause malfunctions. • Consult with your nearest dealer if installation requires the drilling of the leads are not going to affix the front panel to the mounting base with the unit to the mounting base...heater outlet, where it would be affected by heat, or near the doors, where rainwater might splash onto it. • If Hide-away unit is installed in the mechanism and cause a short circuit. • If you are trapped between this unit, make sure none of holes or other important parts....
... or fittings. • Before drilling any mounting holes always check behind where you can cause malfunctions. • Consult with your nearest dealer if installation requires the drilling of the leads are not going to affix the front panel to the mounting base with the unit to the mounting base...heater outlet, where it would be affected by heat, or near the doors, where rainwater might splash onto it. • If Hide-away unit is installed in the mechanism and cause a short circuit. • If you are trapped between this unit, make sure none of holes or other important parts....
Owners Manual
Page 11
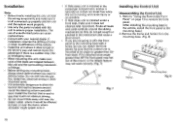
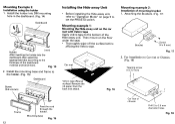
...described in Examples 1 and 2. (Fig. 13) Mounting base Screw Mounting base Fig. 11 Front panel Fig. 13 11 Fig. 9 Mounting Example 2: Installation of mounting bracket 1. Adjust the angle so that the control unit is easy to the console. Drill 2 to 2.5 mm diameter holes r Wood screw...and attach. Temporarily assemble the bracket. (Fig. 10) 0 O 0 7 O Screw O (4 x 6 mm) Fig. 10 2. Use wood screws (4 x 16 mm) to install the bracket to see and fix with Velcro tape • Thoroughly wipe off the surface before affixing the Velcro tape. Velcro tape (Soft surface) Remove...
...described in Examples 1 and 2. (Fig. 13) Mounting base Screw Mounting base Fig. 11 Front panel Fig. 13 11 Fig. 9 Mounting Example 2: Installation of mounting bracket 1. Adjust the angle so that the control unit is easy to the console. Drill 2 to 2.5 mm diameter holes r Wood screw...and attach. Temporarily assemble the bracket. (Fig. 10) 0 O 0 7 O Screw O (4 x 6 mm) Fig. 10 2. Use wood screws (4 x 16 mm) to install the bracket to see and fix with Velcro tape • Thoroughly wipe off the surface before affixing the Velcro tape. Velcro tape (Soft surface) Remove...
Owners Manual
Page 12
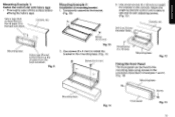
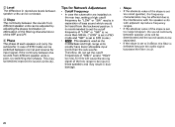
...Mode" on the floor under the seat. • Thoroughly wipe off the surface before affixing the Velcro tape. Fig. 16 Mounting example 2: Installation of the Hide-away unit. For Installation to Car mat or Chassis. (Fig. 18) Tapping screw (4 x 12 mm) 7 Car mat or chassis 7 Drill 2 to the ... the dashboard material and bend them. Attaching the Brackets. (Fig. 17) 0 0 ear Bracket 44" ---„Screw (4 x 8 mm) Fig. 17 2. Install the holder into DIN mounting hole in the dashboard. (Fig. 14) Dashboard 782 -L_ Holder (mm) After inserting the holder into the dashboard, then select...
...Mode" on the floor under the seat. • Thoroughly wipe off the surface before affixing the Velcro tape. Fig. 16 Mounting example 2: Installation of the Hide-away unit. For Installation to Car mat or Chassis. (Fig. 18) Tapping screw (4 x 12 mm) 7 Car mat or chassis 7 Drill 2 to the ... the dashboard material and bend them. Attaching the Brackets. (Fig. 17) 0 0 ear Bracket 44" ---„Screw (4 x 8 mm) Fig. 17 2. Install the holder into DIN mounting hole in the dashboard. (Fig. 14) Dashboard 782 -L_ Holder (mm) After inserting the holder into the dashboard, then select...
Owners Manual
Page 20
...; Slope • If the absolute value of STD mode) can be corrected. Tips for Network Adjustment • Cutoff Frequency • In case the subwoofer are installed on the rear tray, setting a high cutoff frequency for "LOW" or "SW" results in separation of bass sound which would be heard from different speaker...
...; Slope • If the absolute value of STD mode) can be corrected. Tips for Network Adjustment • Cutoff Frequency • In case the subwoofer are installed on the rear tray, setting a high cutoff frequency for "LOW" or "SW" results in separation of bass sound which would be heard from different speaker...
Owners Manual
Page 25
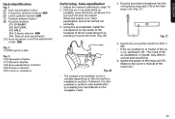
.... (Fig. 27) * Fig. 27 Fig. 26 • The created auto-equalizer curve is on , switched it is on , autoequalization cannot be carried out correctly. 3. Using the provided belt, install the microphone on the navigator's seat. 5. Plug the provided microphone into the microphone...Microphone jack Fig. 3 [15] Operation display [17] Numeric display [19] Auto-equalization indicator [20] Position indicator [22] Function indicators Performing Auto-equalization 1. The noise of driver's seat securely by installing the microphone on the center of the headrest of the air conditioner or hearter may...
.... (Fig. 27) * Fig. 27 Fig. 26 • The created auto-equalizer curve is on , switched it is on , autoequalization cannot be carried out correctly. 3. Using the provided belt, install the microphone on the navigator's seat. 5. Plug the provided microphone into the microphone...Microphone jack Fig. 3 [15] Operation display [17] Numeric display [19] Auto-equalization indicator [20] Position indicator [22] Function indicators Performing Auto-equalization 1. The noise of driver's seat securely by installing the microphone on the center of the headrest of the air conditioner or hearter may...
Owners Manual
Page 26
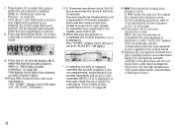
... measurement tone sounds repeatedly and an error code (example: AEQ Err E 2) is applied to quit autoequalization mode. When the auto-equalization is completed, the auto-equalizer is switched on page 28. 13. I 11.A 10-second countdown starts. Press and hold button [2] for the high temperature may ... out and "AUTO EQ" [19] lights.) 9. In PRO mode, the user can fine-adjust the created auto-equalizer curve. 7. Press button [7] to select the position where the microphone is installed. (Refer to "Setting the Listening Position" on next page. 14.Press button [2] to the output sound. 15...
... measurement tone sounds repeatedly and an error code (example: AEQ Err E 2) is applied to quit autoequalization mode. When the auto-equalization is completed, the auto-equalizer is switched on page 28. 13. I 11.A 10-second countdown starts. Press and hold button [2] for the high temperature may ... out and "AUTO EQ" [19] lights.) 9. In PRO mode, the user can fine-adjust the created auto-equalizer curve. 7. Press button [7] to select the position where the microphone is installed. (Refer to "Setting the Listening Position" on next page. 14.Press button [2] to the output sound. 15...

Owners Manual
Page 28
... properly if the speakers mentioned on the left are not connected. Install the supplied microphone properly. Switching the Auto-equalizer ON/ OFF The compensation with the auto-equalizer curve can be switched ON/OFF. Error Codes of Auto-equalizing Function When the auto-equalizing function failed to set to ON, the "AUTO EQ" [19] lights...
... properly if the speakers mentioned on the left are not connected. Install the supplied microphone properly. Switching the Auto-equalizer ON/ OFF The compensation with the auto-equalizer curve can be switched ON/OFF. Error Codes of Auto-equalizing Function When the auto-equalizing function failed to set to ON, the "AUTO EQ" [19] lights...
