Installation Manual
Page 2
... Installing the microphone 26 - Adjusting the microphone angle 27 After Installation After Installing this Navigation System 28 Notice for the blue/white lead 7 Parts supplied 7 Connecting the system 8 Connecting the power cord (1) 10 Connecting the power cord (2) 12 When connecting to rear video output 17 ... notes 21 - Mounting on the side of the navigation unit 22 Installing the GPS antenna 23 - Using "AV1 Input" (AV1) 17 - Parts supplied 22 - Installation using a rear display connected to separately sold power amp 14 When connecting a rear view camera 16 When connecting the rear ...
... Installing the microphone 26 - Adjusting the microphone angle 27 After Installation After Installing this Navigation System 28 Notice for the blue/white lead 7 Parts supplied 7 Connecting the system 8 Connecting the power cord (1) 10 Connecting the power cord (2) 12 When connecting to rear video output 17 ... notes 21 - Mounting on the side of the navigation unit 22 Installing the GPS antenna 23 - Using "AV1 Input" (AV1) 17 - Parts supplied 22 - Installation using a rear display connected to separately sold power amp 14 When connecting a rear view camera 16 When connecting the rear ...
Installation Manual
Page 5
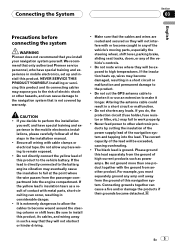
.... Do not allow the cables to perform the installation yourself, and have special training and experience in any of the vehicle's moving parts, especially the steering wheel, shift lever, parking brake, sliding seat tracks, doors, or any bare wiring to the navigation system that... Altering the antenna cable could result in considerable danger. ! En 5 Connecting the System Section 03 English Precautions before connecting the system WARNING Pioneer does not recommend that you do, the protection circuit (fuse holder, fuse resistor or filter, etc.) may fail to high temperatures. Please...
.... Do not allow the cables to perform the installation yourself, and have special training and experience in any of the vehicle's moving parts, especially the steering wheel, shift lever, parking brake, sliding seat tracks, doors, or any bare wiring to the navigation system that... Altering the antenna cable could result in considerable danger. ! En 5 Connecting the System Section 03 English Precautions before connecting the system WARNING Pioneer does not recommend that you do, the protection circuit (fuse holder, fuse resistor or filter, etc.) may fail to high temperatures. Please...
Installation Manual
Page 7
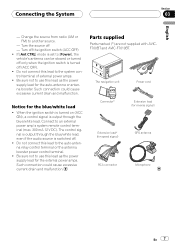
... control terminal. ! Do not connect this lead to use this lead as the power supply lead for the external power amps. Parts supplied Parts marked (*) are not supplied with AVICF700BT and AVIC-F7010BT. Notice for speed signal) GPS antenna RCA connector Microphone En 7 Change the source from radio (AM or FM) to [Power...
... control terminal. ! Do not connect this lead to use this lead as the power supply lead for the external power amps. Parts supplied Parts marked (*) are not supplied with AVICF700BT and AVIC-F7010BT. Notice for speed signal) GPS antenna RCA connector Microphone En 7 Change the source from radio (AM or FM) to [Power...
Installation Manual
Page 20
...the manner specified. Please refer to your vehicle's airbags would deploy. Refer all applicable laws and regulations regarding the use the supplied parts in your navigation system yourself. Never install the navigation system in a place where it may damage wires or insulation, leading to... your navigation system. ! Do not install the navigation system in front of or next to authorized Pioneer service personnel. Section 04 Installation Precautions before installation WARNING Pioneer does not recommend that you to risk of electric shock or other cables or leads: ! It ...
...the manner specified. Please refer to your vehicle's airbags would deploy. Refer all applicable laws and regulations regarding the use the supplied parts in your navigation system yourself. Never install the navigation system in a place where it may damage wires or insulation, leading to... your navigation system. ! Do not install the navigation system in front of or next to authorized Pioneer service personnel. Section 04 Installation Precautions before installation WARNING Pioneer does not recommend that you to risk of electric shock or other cables or leads: ! It ...
Installation Manual
Page 22
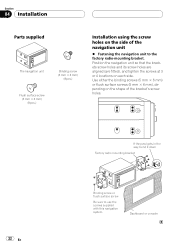
... the brackets screw holes and its screw holes are aligned (are fitted), and tighten the screws at 3 or 4 locations on each side. Section 04 Installation Parts supplied The navigation unit Binding screw (5 mm × 6 mm) (8 pcs.) Flush surface screw (5 mm × 6 mm) (8 pcs.) Installation using the screw holes on the side...
... the brackets screw holes and its screw holes are aligned (are fitted), and tighten the screws at 3 or 4 locations on each side. Section 04 Installation Parts supplied The navigation unit Binding screw (5 mm × 6 mm) (8 pcs.) Flush surface screw (5 mm × 6 mm) (8 pcs.) Installation using the screw holes on the side...

Installation Manual
Page 23
... antenna is blocked. If this may affect its performance. Installation Section 04 English Installing the GPS antenna CAUTION Do not cut the accessory metal sheet. Parts supplied GPS antenna Metal sheet Clamp (5 pcs.) Waterproof pad Trunk lid Roof Rear shelf ! This would reduce the sensitivity of the vehicle, always put it...
... antenna is blocked. If this may affect its performance. Installation Section 04 English Installing the GPS antenna CAUTION Do not cut the accessory metal sheet. Parts supplied GPS antenna Metal sheet Clamp (5 pcs.) Waterproof pad Trunk lid Roof Rear shelf ! This would reduce the sensitivity of the vehicle, always put it...
Installation Manual
Page 26
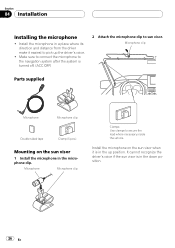
Section 04 Installation Installing the microphone ! Microphone clip Parts supplied Microphone Microphone clip Double-sided tape Clamp (5 pcs.) Mounting on the sun visor when it easiest to sun visor. Microphone Microphone clip Clamps Use ...
Section 04 Installation Installing the microphone ! Microphone clip Parts supplied Microphone Microphone clip Double-sided tape Clamp (5 pcs.) Mounting on the sun visor when it easiest to sun visor. Microphone Microphone clip Clamps Use ...
Owner's Manual
Page 2
...the on-screen keyboard 24 Searching for and selecting a location Searching for a location by coordinates 32 Selecting a location you for buying this Pioneer product. Disconnecting your iPod 16 Flow from the actual screens. What you want to use the map 20 - About the definition of Interest... (POI) 27 - Resetting the microprocessor 11 Basic operation Checking part names and functions 13 Inserting/ejecting a disc 14 - Inserting an SD memory card 15 - Scrolling the map to operate your home 34 Setting...
...the on-screen keyboard 24 Searching for and selecting a location Searching for a location by coordinates 32 Selecting a location you for buying this Pioneer product. Disconnecting your iPod 16 Flow from the actual screens. What you want to use the map 20 - About the definition of Interest... (POI) 27 - Resetting the microprocessor 11 Basic operation Checking part names and functions 13 Inserting/ejecting a disc 14 - Inserting an SD memory card 15 - Scrolling the map to operate your home 34 Setting...
Owner's Manual
Page 13
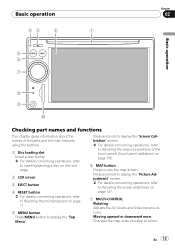
...13 Press and hold to display the "Screen Calibration" screen. = For details concerning operations, refer to Adjusting the response positions of the parts and the main features using the buttons. 1 Disc loading slot Insert a disc to play. = For details concerning operations, refer to...to Resetting the microprocessor on page 137. 7 MULTI-CONTROL Rotating; Basic operation 43 2 1 Chapter 02 Basic operation 5 6 7 8 9 a Checking part names and functions This chapter gives information about the names of the touch panels (touch panel calibration) on page 136. 6 MAP button Press to view...
...13 Press and hold to display the "Screen Calibration" screen. = For details concerning operations, refer to Adjusting the response positions of the parts and the main features using the buttons. 1 Disc loading slot Insert a disc to play. = For details concerning operations, refer to...to Resetting the microprocessor on page 137. 7 MULTI-CONTROL Rotating; Basic operation 43 2 1 Chapter 02 Basic operation 5 6 7 8 9 a Checking part names and functions This chapter gives information about the names of the touch panels (touch panel calibration) on page 136. 6 MAP button Press to view...
Owner's Manual
Page 65
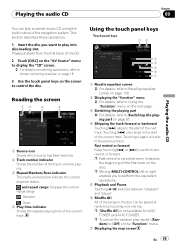
... the "Function" menu = For details, refer to Using the "Function" menu on the next page. 3 Switching the playing part = For details, refer to Switching the playing part on the screen to the previous track. p [Shuffle All] is canceled when it again will skip to control the disc. ...p Fast rewind is not available for AVICF700BT and AVIC-F7010BT. This section describes these operations. 1 Insert the disc you to...
... the "Function" menu = For details, refer to Using the "Function" menu on the next page. 3 Switching the playing part = For details, refer to Switching the playing part on the screen to the previous track. p [Shuffle All] is canceled when it again will skip to control the disc. ...p Fast rewind is not available for AVICF700BT and AVIC-F7010BT. This section describes these operations. 1 Insert the disc you to...
Owner's Manual
Page 67
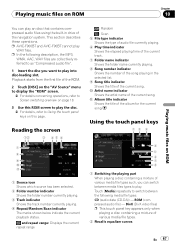
...you want to play the disc. = For details, refer to Using the touch panel keys on this ROM screen to play. p AVIC-F900BT and AVIC-F90BT cannot play an disc that contains compressed audio files using the built-in the selected list. 9 Song title indicator Shows the title... files. ROM (compressed audio file) - This section describes these operations. Using the touch panel keys 12 3 4 5 6 7 8 1 Switching the playing part When playing a disc containing a mixture of various media file types. 2 Recalls equalizer curves En 67 a Artist name indicator Shows the artist name of the navigation...
...you want to play the disc. = For details, refer to Using the touch panel keys on this ROM screen to play. p AVIC-F900BT and AVIC-F90BT cannot play an disc that contains compressed audio files using the built-in the selected list. 9 Song title indicator Shows the title... files. ROM (compressed audio file) - This section describes these operations. Using the touch panel keys 12 3 4 5 6 7 8 1 Switching the playing part When playing a disc containing a mixture of various media file types. 2 Recalls equalizer curves En 67 a Artist name indicator Shows the artist name of the navigation...

Owner's Manual
Page 68
.... Touching [o] once skips to perform fast rewind or forward. If you touch a folder on a disc. If the uppermost folder is not available for AVICF700BT and AVIC-F7010BT. Artist Name : (artist name) If specific information has not been recorded on compressed audio files on the list. The list of the songs in... the list. Touching displays the content of various media file types, all tracks within the current part ("CD" or "ROM") are played randomly. p If the disc contains a mixture of the upper folder (parent folder).
.... Touching [o] once skips to perform fast rewind or forward. If you touch a folder on a disc. If the uppermost folder is not available for AVICF700BT and AVIC-F7010BT. Artist Name : (artist name) If specific information has not been recorded on compressed audio files on the list. The list of the songs in... the list. Touching displays the content of various media file types, all tracks within the current part ("CD" or "ROM") are played randomly. p If the disc contains a mixture of the upper folder (parent folder).

Owner's Manual
Page 80
... touching [r] until is no sound during frame-by specifying a folder or a file, and the time. File name display 7 Displaying the map screen 8 Switching the playing part When playing a disc containing a mixture of [Audio] switches between the subtitle languages. To resume playback at a time during playback. % Touch [r] during playback. Searching for a desired...
... touching [r] until is no sound during frame-by specifying a folder or a file, and the time. File name display 7 Displaying the map screen 8 Switching the playing part When playing a disc containing a mixture of [Audio] switches between the subtitle languages. To resume playback at a time during playback. % Touch [r] during playback. Searching for a desired...

Owner's Manual
Page 126
... route is activated. Chapter 25 Customizing preferences ! "Full Screen Cockpit" Shows-hides the "Multi-Info window" and "Second manoeuvre arrow". 3 Touch the key on each part of "Top field:" to display on the right of the "Multi-Info window". Displayed Info Allows you to select what options you want to display...
... route is activated. Chapter 25 Customizing preferences ! "Full Screen Cockpit" Shows-hides the "Multi-Info window" and "Second manoeuvre arrow". 3 Touch the key on each part of "Top field:" to display on the right of the "Multi-Info window". Displayed Info Allows you to select what options you want to display...

Owner's Manual
Page 173
... cannot be used for each DivX file. Srt format subtitle files with the extension ".srt" can be operated until playing back is different from DivX part- Only one subtitle file in the same folder as the DivX file before the extension must be exactly the same. Subtitle files that of audio...
... cannot be used for each DivX file. Srt format subtitle files with the extension ".srt" can be operated until playing back is different from DivX part- Only one subtitle file in the same folder as the DivX file before the extension must be exactly the same. Subtitle files that of audio...


