Installation Manual
Page 2
... ABOUT YOUR NEW NAVIGATION SYSTEM AND THIS MANUAL 3 IMPORTANT SAFEGUARDS PLEASE READ ALL OF THESE INSTRUCTIONS REGARDING YOUR NAVIGATION SYSTEM AND RETAIN THEM FOR FUTURE REFERENCE 4 Connecting the System Precautions before installation 20 To guard against electromagnetic interference 20 Before installing 21 2 En Installing this navigation system 21 - Installation using a rear display connected to separately...
... ABOUT YOUR NEW NAVIGATION SYSTEM AND THIS MANUAL 3 IMPORTANT SAFEGUARDS PLEASE READ ALL OF THESE INSTRUCTIONS REGARDING YOUR NAVIGATION SYSTEM AND RETAIN THEM FOR FUTURE REFERENCE 4 Connecting the System Precautions before installation 20 To guard against electromagnetic interference 20 Before installing 21 2 En Installing this navigation system 21 - Installation using a rear display connected to separately...
Installation Manual
Page 3
... ! Operation of safety features, including airbags, hazard lamp buttons or (iii) impair the driver's ability to install this navigation system in the separate manuals for your vehicle. Never use this navigation system to route to install this product because of the vehicle type or the shape of your vehicle. Traffic restrictions and advisories... vehicle interior. In some cases, it may not be possible to safely operate the vehicle. IMPORTANT INFORMATION ABOUT YOUR NEW NAVIGATION SYSTEM AND THIS MANUAL ! Do not install this product provides contrary advice. !
... ! Operation of safety features, including airbags, hazard lamp buttons or (iii) impair the driver's ability to install this navigation system in the separate manuals for your vehicle. Never use this navigation system to route to install this product because of the vehicle type or the shape of your vehicle. Traffic restrictions and advisories... vehicle interior. In some cases, it may not be possible to safely operate the vehicle. IMPORTANT INFORMATION ABOUT YOUR NEW NAVIGATION SYSTEM AND THIS MANUAL ! Do not install this product provides contrary advice. !

Installation Manual
Page 4
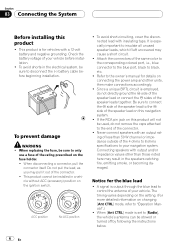
... SAFEGUARDS PLEASE READ ALL OF THESE INSTRUCTIONS REGARDING YOUR NAVIGATION SYSTEM AND RETAIN THEM FOR FUTURE REFERENCE 1 Read this manual fully and carefully before installing your vehicle, the distance of objects shown on the screen, and compass directions. In addition, the system has... certain limitations, including the inability to wear your seat belt at all warnings in this manual handy for future reference. 3 Pay close attention to install or service your navigation system. stances display erroneous information regarding the position of your navigation system. 2...
... SAFEGUARDS PLEASE READ ALL OF THESE INSTRUCTIONS REGARDING YOUR NAVIGATION SYSTEM AND RETAIN THEM FOR FUTURE REFERENCE 1 Read this manual fully and carefully before installing your vehicle, the distance of objects shown on the screen, and compass directions. In addition, the system has... certain limitations, including the inability to wear your seat belt at all warnings in this manual handy for future reference. 3 Pay close attention to install or service your navigation system. stances display erroneous information regarding the position of your navigation system. 2...
Installation Manual
Page 5
...in such a way that only authorized Pioneer service personnel, who have special training and experience in mobile electronics, set up , wires may fail to perform the installation yourself, and have special training and experience in the installation manual. ! Do not directly connect the... yellow lead of electric shock or other electronic products by warranty. Make sure that you install your navigation system yourself. It...
...in such a way that only authorized Pioneer service personnel, who have special training and experience in mobile electronics, set up , wires may fail to perform the installation yourself, and have special training and experience in the installation manual. ! Do not directly connect the... yellow lead of electric shock or other electronic products by warranty. Make sure that you install your navigation system yourself. It...
Installation Manual
Page 6
... port, black to "Operation Manual".) ! When [Ant CTRL] mode is especially important to disconnect the (-) battery cable before installation. ! Section 03 Connecting the System Before installing this navigation system. ! Refer to [Radio], the vehicle's antenna can be installed in the speakers catching fire,...is for the blue lead ! This product is output through the blue lead to the * side of your vehicle before beginning installation. Never connect speakers with output and/or impedance values other units, then make connections accordingly. ! Check the battery voltage of ...
... port, black to "Operation Manual".) ! When [Ant CTRL] mode is especially important to disconnect the (-) battery cable before installation. ! Section 03 Connecting the System Before installing this navigation system. ! Refer to [Radio], the vehicle's antenna can be installed in the speakers catching fire,...is for the blue lead ! This product is output through the blue lead to the * side of your vehicle before beginning installation. Never connect speakers with output and/or impedance values other units, then make connections accordingly. ! Check the battery voltage of ...
Installation Manual
Page 17
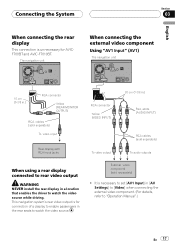
... driving. This navigation system's rear video output is necessary to set [AV1 Input] in a location that enables the driver to "Operation Manual".) En 17 The navigation unit When connecting the external video component Using "AV1 Input" (AV1) The navigation unit 15 cm (5-7/8 in...white (AUDIO INPUT) RCA cables (sold separately) ! It is for AVICF700BT and AVIC-F7010BT. External video component (sold separately) To audio outputs When using a rear display connected to rear video output WARNING NEVER install the rear display in [AV Settings] to [Video] when connecting the external ...
... driving. This navigation system's rear video output is necessary to set [AV1 Input] in a location that enables the driver to "Operation Manual".) En 17 The navigation unit When connecting the external video component Using "AV1 Input" (AV1) The navigation unit 15 cm (5-7/8 in...white (AUDIO INPUT) RCA cables (sold separately) ! It is for AVICF700BT and AVIC-F7010BT. External video component (sold separately) To audio outputs When using a rear display connected to rear video output WARNING NEVER install the rear display in [AV Settings] to [Video] when connecting the external ...
Installation Manual
Page 20
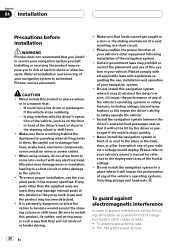
...or paneling when drilling holes in them to safely operate the vehicle. ! Please confirm the proper function of your vehicle's owner's manual for reference to the deployment area of your navigation system to your vehicle's other than the supplied ones are used, they may become... wound around the steering column or shift lever. Certain government laws may interfere with all installation and servicing of the frontal airbags. ! Please refer to authorized Pioneer service personnel. It could injure the driver or passengers if the vehicle stops suddenly. - Be careful ...
...or paneling when drilling holes in them to safely operate the vehicle. ! Please confirm the proper function of your vehicle's owner's manual for reference to the deployment area of your navigation system to your vehicle's other than the supplied ones are used, they may become... wound around the steering column or shift lever. Certain government laws may interfere with all installation and servicing of the frontal airbags. ! Please refer to authorized Pioneer service personnel. It could injure the driver or passengers if the vehicle stops suddenly. - Be careful ...

Installation Manual
Page 28
First, double-check that all vehicle components that you prefer Note After installing this navigation system, be sure to "Operation Manual". 1 Set the language. 2 Drive an unobstructed road until the GPS starts receiving the signal normally. 3 Make some necessary ...2 Start the engine. 3 Press RESET button. Setting the time ! Section 05 After Installation After Installing this product is performing normally. 28 En Reassemble all connections are correct and that the vehicle is installed correctly. Setting the units and the date format, etc. ! Then reconnect the negative ...
First, double-check that all vehicle components that you prefer Note After installing this navigation system, be sure to "Operation Manual". 1 Set the language. 2 Drive an unobstructed road until the GPS starts receiving the signal normally. 3 Make some necessary ...2 Start the engine. 3 Press RESET button. Setting the time ! Section 05 After Installation After Installing this product is performing normally. 28 En Reassemble all connections are correct and that the vehicle is installed correctly. Setting the units and the date format, etc. ! Then reconnect the negative ...

Owner's Manual
Page 1
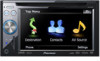
...Manual FLASH MEMORY MULTIMEDIA AV NAVIGATION RECEIVER AVIC-F900BT AVIC-F700BT AVIC-F7010BT Notice to all users: Be sure to read "Important Information for the user" includes the important information that the navigation system is properly connected to your vehicle's parking brake and depending on your Authorized Pioneer... Electronics retailer or call us at (800) 421-1404. This software requires that you must understand before using this navigation system. For more information, please contact your vehicle, additional installation may be required. ...
...Manual FLASH MEMORY MULTIMEDIA AV NAVIGATION RECEIVER AVIC-F900BT AVIC-F700BT AVIC-F7010BT Notice to all users: Be sure to read "Important Information for the user" includes the important information that the navigation system is properly connected to your vehicle's parking brake and depending on your Authorized Pioneer... Electronics retailer or call us at (800) 421-1404. This software requires that you must understand before using this navigation system. For more information, please contact your vehicle, additional installation may be required. ...
Owner's Manual
Page 120
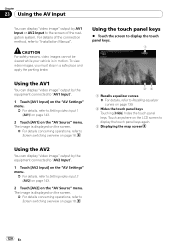
... Using the AV input You can display "video image" output by AV1 Input or AV2 Input to the screen of the connection method, refer to "Installation Manual". Touch anywhere on the LCD screen to display the touch panel keys again. 3 Displaying the map screen Using the AV2 You can display "video image...
... Using the AV input You can display "video image" output by AV1 Input or AV2 Input to the screen of the connection method, refer to "Installation Manual". Touch anywhere on the LCD screen to display the touch panel keys again. 3 Displaying the map screen Using the AV2 You can display "video image...
Owner's Manual
Page 121
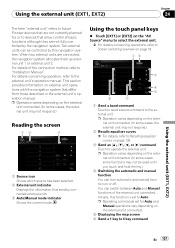
...or to Auto. p Operating commands set to devices that allow control of the connection method, refer to the external unit's operation manual. For details concerning operation, refer to "Installation Manual". p Operation varies depending on page 18. 12 3 4 5 6 7 1 Send a band command Touch to send a...navigation system. Using the external unit (EXT1, EXT2) Chapter 24 The term "external unit" refers to future Pioneer devices that are not currently planned for Auto and Manual operations vary depending on or off. This section provides information on page 139. 3 Send an [a], [b], [c],...
...or to Auto. p Operating commands set to devices that allow control of the connection method, refer to the external unit's operation manual. For details concerning operation, refer to "Installation Manual". p Operation varies depending on page 18. 12 3 4 5 6 7 1 Send a band command Touch to send a...navigation system. Using the external unit (EXT1, EXT2) Chapter 24 The term "external unit" refers to future Pioneer devices that are not currently planned for Auto and Manual operations vary depending on or off. This section provides information on page 139. 3 Send an [a], [b], [c],...
Owner's Manual
Page 124
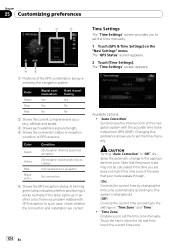
...Red Signal communication Yes Yes No Used in another color, there is works normally. In such case, check whether the connection and installation are correct. Color Green Yellow Red Black with GPS reception. Chapter 25 Customizing preferences 1 2 3 45 1 Positions of the... GPS constellation being received by changing the time zone automatically according to this preference allows you to set the time manually. A blinking green lamp indicates whether positioning is a problem related with x Condition 3D reception (Normal positional accuracy) 2D reception (lower ...
...Red Signal communication Yes Yes No Used in another color, there is works normally. In such case, check whether the connection and installation are correct. Color Green Yellow Red Black with GPS reception. Chapter 25 Customizing preferences 1 2 3 45 1 Positions of the... GPS constellation being received by changing the time zone automatically according to this preference allows you to set the time manually. A blinking green lamp indicates whether positioning is a problem related with x Condition 3D reception (Normal positional accuracy) 2D reception (lower ...
Owner's Manual
Page 157
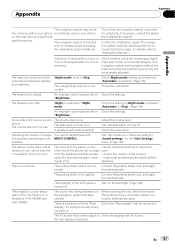
... of your vehicle. the navigation system has been This problem may not be installed within the allowed installation angle. An improper value has been set on the Use the following methods to "Installation Manual".) Indication of the position of naviga- Check the setting of the phone call... before ing an echo. The parking brake is installed with the "Rear Check the "Rear display" and its connection. The display is very dim. [Night] is intended for example a faulty wiring connection. display", for AVIC-F900BT and AVIC-F90BT.) The voice from the speakers and then picked...
... of your vehicle. the navigation system has been This problem may not be installed within the allowed installation angle. An improper value has been set on the Use the following methods to "Installation Manual".) Indication of the position of naviga- Check the setting of the phone call... before ing an echo. The parking brake is installed with the "Rear Check the "Rear display" and its connection. The display is very dim. [Night] is intended for example a faulty wiring connection. display", for AVIC-F900BT and AVIC-F90BT.) The voice from the speakers and then picked...


