
Installation Manual
Page 28
... system, be sure to "Operation Manual". 1 Set the language. 2 Drive an unobstructed road until the GPS starts receiving the signal normally. 3 Make some necessary adjustments. ! Change other settings as the tip of the battery. 2 Start the engine. 3 Press RESET button. First, double-check that all vehicle components that the vehicle is installed...
... system, be sure to "Operation Manual". 1 Set the language. 2 Drive an unobstructed road until the GPS starts receiving the signal normally. 3 Make some necessary adjustments. ! Change other settings as the tip of the battery. 2 Start the engine. 3 Press RESET button. First, double-check that all vehicle components that the vehicle is installed...
Owner's Manual
Page 3
... a number in "Saved Routes" 45 Deleting the current route 45 Browsing information on the map 51 - Removing a map pin 39 Registering the location as the start point 37 Viewing the information of a specified location 38 Placing a map pin on the "Map Confirmation Screen" 58 - Deleting a waypoint 44 Storing the current route...
... a number in "Saved Routes" 45 Deleting the current route 45 Browsing information on the map 51 - Removing a map pin 39 Registering the location as the start point 37 Viewing the information of a specified location 38 Placing a map pin on the "Map Confirmation Screen" 58 - Deleting a waypoint 44 Storing the current route...

Owner's Manual
Page 4
...VOD registration code 84 Setting "Auto Play" 84 Setting the subtitle file for DivX® 85 Language code chart for a desired scene and starting playback from the list 66 Using the "Function" menu 66 Playing music files on or off 82 Setting the angle icon display 83 Setting the... aspect ratio 83 Setting the parental lock 83 - Stopping Bluetooth wave transmission 61 - Searching for a desired scene and starting playback from the list 68 - Searching for hands-free phoning 63 Updating the Bluetooth wireless technology software 64 Playing the audio CD Reading the ...
...VOD registration code 84 Setting "Auto Play" 84 Setting the subtitle file for DivX® 85 Language code chart for a desired scene and starting playback from the list 66 Using the "Function" menu 66 Playing music files on or off 82 Setting the angle icon display 83 Setting the... aspect ratio 83 Setting the parental lock 83 - Stopping Bluetooth wave transmission 61 - Searching for a desired scene and starting playback from the list 68 - Searching for hands-free phoning 63 Updating the Bluetooth wireless technology software 64 Playing the audio CD Reading the ...

Owner's Manual
Page 5
...Storing and recalling broadcast stations 111 - Selecting a channel from a specified time 92 Using the "Function" menu 93 Using the iPod® (iPod) Starting procedures 94 Reading the screen 94 Using the touch panel keys (Music) 95 - Using the direct traffic announcement function 112 Using the "Function" menu... 112 - Browsing for a song 95 Starting the video playback 96 Using the touch panel keys (Video) 97 - Switching the reception mode 105 Using the radio (AM) Reading the screen...
...Storing and recalling broadcast stations 111 - Selecting a channel from a specified time 92 Using the "Function" menu 93 Using the iPod® (iPod) Starting procedures 94 Reading the screen 94 Using the touch panel keys (Music) 95 - Using the direct traffic announcement function 112 Using the "Function" menu... 112 - Browsing for a song 95 Starting the video playback 96 Using the touch panel keys (Video) 97 - Switching the reception mode 105 Using the radio (AM) Reading the screen...
Owner's Manual
Page 7
Starting voice operation 148 Operating iPod by "Dead Reckoning" 165 - Basic commands 149 - Voice operation for playable media 171 - Positioning by voice 148 Calling the entry ...
Starting voice operation 148 Operating iPod by "Dead Reckoning" 165 - Basic commands 149 - Voice operation for playable media 171 - Positioning by voice 148 Calling the entry ...
Owner's Manual
Page 14
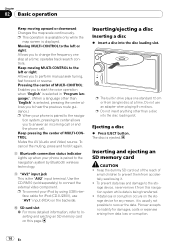
...again. 8 Bluetooth connection status indicator Lights up when your iPod by Bluetooth wireless technology. 9 "AV2" input jack This is being transferred. ! Pioneer accepts no liability for any reason, it . ! Keep pressing the center of small children to the navigation system by using USB interface cable for ... % Press EJECT button. Keep the dummy SD card out of the reach of MULTI-CONTROL; Changes the map scale continuously. Allows you to start the voice operation when "English" is selected in drive plays one step at a time. p To connect your phone is paired to prevent ...
...again. 8 Bluetooth connection status indicator Lights up when your iPod by Bluetooth wireless technology. 9 "AV2" input jack This is being transferred. ! Pioneer accepts no liability for any reason, it . ! Keep pressing the center of small children to the navigation system by using USB interface cable for ... % Press EJECT button. Keep the dummy SD card out of the reach of MULTI-CONTROL; Changes the map scale continuously. Allows you to start the voice operation when "English" is selected in drive plays one step at a time. p To connect your phone is paired to prevent ...
Owner's Manual
Page 16
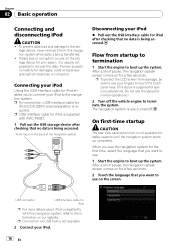
...your iPod Using the USB interface cable for iPod p For more details about iPod compatibility with AVIC-F90BT. 1 Pull out the USB storage device after checking that no data is also turned off...loss and damage to boot up the system. If data loss or corruption occurs on our website. Pioneer accepts no data is being accessed. p USB interface cable for any reason, it from damage,... first time, select the language that you want to the navigation system. Do not use . 1 Start the engine to the information on the storage device for iPod is supplied with this navigation system while...
...your iPod Using the USB interface cable for iPod p For more details about iPod compatibility with AVIC-F90BT. 1 Pull out the USB storage device after checking that no data is also turned off...loss and damage to boot up the system. If data loss or corruption occurs on our website. Pioneer accepts no data is being accessed. p USB interface cable for any reason, it from damage,... first time, select the language that you want to the navigation system. Do not use . 1 Start the engine to the information on the storage device for iPod is supplied with this navigation system while...

Owner's Manual
Page 17
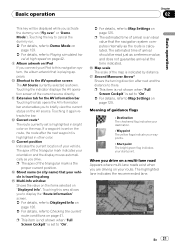
... the system. If you must enter your password. Read the disclaimer carefully, checking its details, and then touch [OK] if you agree to the conditions. % Start the engine to use for a few seconds. Regular startup CAUTION The rear view camera function is activated, you enter the navigation screen first, the disclaimer...
... the system. If you must enter your password. Read the disclaimer carefully, checking its details, and then touch [OK] if you agree to the conditions. % Start the engine to use for a few seconds. Regular startup CAUTION The rear view camera function is activated, you enter the navigation screen first, the disclaimer...

Owner's Manual
Page 19
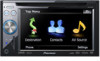
... rear view camera on page 136. 1 Press MENU button to display the "Top Menu", and then touch [Settings]. p [MSN Direct] is available for AVICF900BT and AVIC-F90BT. 3 Contacts screen You can access the list of contacts to call histories and change the settings on the top left corner displays the "AV...] can be displayed the full-screen rear camera image. [RearView] is useful if you play . 5 Phone Menu You can access the screen that is the starting menu to display the "Top Menu" and then touch [AV Source]. 5 Touch [RearView] on this menu.
... rear view camera on page 136. 1 Press MENU button to display the "Top Menu", and then touch [Settings]. p [MSN Direct] is available for AVICF900BT and AVIC-F90BT. 3 Contacts screen You can access the list of contacts to call histories and change the settings on the top left corner displays the "AV...] can be displayed the full-screen rear camera image. [RearView] is useful if you play . 5 Phone Menu You can access the screen that is the starting menu to display the "Top Menu" and then touch [AV Source]. 5 Touch [RearView] on this menu.
Owner's Manual
Page 21
... The bright green flag indicates your route. d Current position Indicates the current location of arrival should be displayed while you are driving on your start point. Touching this tab opens the AV information bar and enables you connect your orientation and the display moves automatically as the route is highlighted ...
... The bright green flag indicates your route. d Current position Indicates the current location of arrival should be displayed while you are driving on your start point. Touching this tab opens the AV information bar and enables you connect your orientation and the display moves automatically as the route is highlighted ...

Owner's Manual
Page 34
... destination and calculate the route up a route to your home If your home position on the list provides an easy way to set , route calculation starts immediately. Selecting the item on page 134. Touch [Yes] to 30 locations. 1 Touch [Destination] on the "Top Menu", and then touch [Favorites]. p ... Screen" on the "Top Menu", and then touch [Return Home]. Deleting an entry in "Favorites" All entries in "Favorites" can store up to start the route calculation. p "Favorites" can be calculated by recalling a saved route Saving a route enables you to cancel the current route.
... destination and calculate the route up a route to your home If your home position on the list provides an easy way to set , route calculation starts immediately. Selecting the item on page 134. Touch [Yes] to 30 locations. 1 Touch [Destination] on the "Top Menu", and then touch [Favorites]. p ... Screen" on the "Top Menu", and then touch [Return Home]. Deleting an entry in "Favorites" All entries in "Favorites" can store up to start the route calculation. p "Favorites" can be calculated by recalling a saved route Saving a route enables you to cancel the current route.

Owner's Manual
Page 35
Searching for and selecting a location When the route is recalled and the guidance will start immediately. Touching [Route...] and [Go Here Now] sequentially enables you to set your selected position as your destination and calculate the route up that point. = ...
Searching for and selecting a location When the route is recalled and the guidance will start immediately. Touching [Route...] and [Go Here Now] sequentially enables you to set your selected position as your destination and calculate the route up that point. = ...

Owner's Manual
Page 36
... new destination. on page 38. on this screen: Map Shows a full-screen 2D map centered on the cursor position. Route... Sets the destination, waypoints, and starting point positions. = For more details concerning the operation, refer to Save as a new destination on this page. Places a map pin, and saves the position. = For...
... new destination. on page 38. on this screen: Map Shows a full-screen 2D map centered on the cursor position. Route... Sets the destination, waypoints, and starting point positions. = For more details concerning the operation, refer to Save as a new destination on this page. Places a map pin, and saves the position. = For...

Owner's Manual
Page 37
...on the "Map Confirmation Screen". 2 Touch [Add Via]. p When the cursor overlaps with a destination that has already been set , route calculation starts immediately. Touch [Yes] to Replacing the location as the destination. Setting the location as a new destination 1 Touch [Route...] on the "Map... the location is decided (Map Confirmation Screen) = For more details concerning the operation, refer to Registering the location as the start point on this page. The previous destination becomes a waypoint. Save as the new destination. Add Favorite Stores the cursor position...
...on the "Map Confirmation Screen". 2 Touch [Add Via]. p When the cursor overlaps with a destination that has already been set , route calculation starts immediately. Touch [Yes] to Replacing the location as the destination. Setting the location as a new destination 1 Touch [Route...] on the "Map... the location is decided (Map Confirmation Screen) = For more details concerning the operation, refer to Registering the location as the start point on this page. The previous destination becomes a waypoint. Save as the new destination. Add Favorite Stores the cursor position...

Owner's Manual
Page 38
...POI list and then touch the desired POI. p When the cursor overlaps with a focus on the "Map Confirma- 1 tion Screen". 2 Touch [Starting Point]. The "Map Confirmation Screen" appears. 4 Touch [Info] at the bottom of the listed POIs enables you to view detailed information about the ...Screen". Placing a map pin on the map makes the position stand out and helps you touch [OK], the "Map Confirmation Screen" appears with a starting point already set are deleted. Chapter 04 After the location is decided (Map Confirmation Screen) 1 Touch [Route...] on the selected POI. 3 Touch ...
...POI list and then touch the desired POI. p When the cursor overlaps with a focus on the "Map Confirma- 1 tion Screen". 2 Touch [Starting Point]. The "Map Confirmation Screen" appears. 4 Touch [Info] at the bottom of the listed POIs enables you to view detailed information about the ...Screen". Placing a map pin on the map makes the position stand out and helps you touch [OK], the "Map Confirmation Screen" appears with a starting point already set are deleted. Chapter 04 After the location is decided (Map Confirmation Screen) 1 Touch [Route...] on the selected POI. 3 Touch ...

Owner's Manual
Page 41
The "Route Information" screen appears. 1 23 4 5 6 7 8 1 Starting point 2 Current position 3 Waypoint 4 Destination 5 Time and distance up to the point currently shown Touching the icon enables you with two waypoints. Checking the current ...
The "Route Information" screen appears. 1 23 4 5 6 7 8 1 Starting point 2 Current position 3 Waypoint 4 Destination 5 Time and distance up to the point currently shown Touching the icon enables you with two waypoints. Checking the current ...

Owner's Manual
Page 42
... you are set and your vehicle position is set , each touch of the streets you want to the second waypoint screen. A 2D map screen will start. The simulation will appear with the current overall route fitted onto the screen. Scroll the list as necessary. 12 3 1 Turning direction 2 Driving distance 3 Names of...
... you are set and your vehicle position is set , each touch of the streets you want to the second waypoint screen. A 2D map screen will start. The simulation will appear with the current overall route fitted onto the screen. Scroll the list as necessary. 12 3 1 Turning direction 2 Driving distance 3 Names of...

Owner's Manual
Page 44
... the route. 1 Touch [Destination] on the "Map Confirmation Screen". 3 Touch [Add Via]. Storing the current route Storing the current route allows you set , route calculation starts immediately. = For more details, refer to the descriptions from page 25 to your vehicle position is recalculated and the map of the current position appears...
... the route. 1 Touch [Destination] on the "Map Confirmation Screen". 3 Touch [Add Via]. Storing the current route Storing the current route allows you set , route calculation starts immediately. = For more details, refer to the descriptions from page 25 to your vehicle position is recalculated and the map of the current position appears...

Owner's Manual
Page 55
...you no specific action is waiting for some cellular phones, no longer need to use a registered phone with the navigation system, you start connection. When a connection is successfully established, a connection complete message appears, the screen returns to the cellular phone name. Disconnecting a...manually in the following procedure. For some reason. p If another phone. p If connection fails, check to disconnect it, and start connection manually, carry out the following cases: ! You want to manually select the cellular phone to your cellular phone, touch [...
...you no specific action is waiting for some cellular phones, no longer need to use a registered phone with the navigation system, you start connection. When a connection is successfully established, a connection complete message appears, the screen returns to the cellular phone name. Disconnecting a...manually in the following procedure. For some reason. p If another phone. p If connection fails, check to disconnect it, and start connection manually, carry out the following cases: ! You want to manually select the cellular phone to your cellular phone, touch [...
Owner's Manual
Page 57
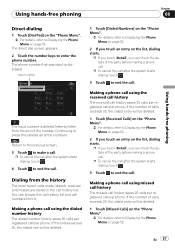
... history The most recent calls made (dialed), received and missed are stored in the call history list. p To cancel the call after the system starts dialing, touch . 3 Touch to Displaying the Phone Menu on page 52. Dialing from the end of the party before making a phone call....Detail], you can browse the call history list and call history saves 30 calls per registered cellular phone. p To cancel the call after the system starts dialing, touch . 3 Touch to enter the phone number. Using hands-free phoning Chapter 08 Using hands-free phoning Direct dialing 1 Touch [Dial...
... history The most recent calls made (dialed), received and missed are stored in the call history list. p To cancel the call after the system starts dialing, touch . 3 Touch to Displaying the Phone Menu on page 52. Dialing from the end of the party before making a phone call....Detail], you can browse the call history list and call history saves 30 calls per registered cellular phone. p To cancel the call after the system starts dialing, touch . 3 Touch to enter the phone number. Using hands-free phoning Chapter 08 Using hands-free phoning Direct dialing 1 Touch [Dial...


