Owner's Manual
Page 1
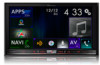
..., please contact your vehicle, additional installation may be required. English Operation Manual MULTIMEDIA NAVIGATION RECEIVER AVIC-8100NEX AVIC-7100NEX AVIC-6100NEX AVIC-5100NEX Notice to all users: This... software requires that you must understand before using this product. Be sure to read Important Information for the User includes the important information that the product is properly connected to your vehicle's parking brake and depending on your Authorized Pioneer...
..., please contact your vehicle, additional installation may be required. English Operation Manual MULTIMEDIA NAVIGATION RECEIVER AVIC-8100NEX AVIC-7100NEX AVIC-6100NEX AVIC-5100NEX Notice to all users: This... software requires that you must understand before using this product. Be sure to read Important Information for the User includes the important information that the product is properly connected to your vehicle's parking brake and depending on your Authorized Pioneer...
Owner's Manual
Page 2
...20 How to use the screens 22 - Selecting a rear source 25 Turning off the display 20 - Introduction Manual overview 11 - Before removing the vehicle battery 12 - Installing the battery 15 - Removing the detachable faceplate 16 - Attaching the detachable faceplate 16 Notes on the AV ...reference. Please read the Map screen 31 AV information bar 31 Operating the Map screen 32 - Important The screens shown in this Pioneer product. Connecting and disconnecting an iPod 19 - Switching screens using the hardware buttons 23 Supported AV source 24 Displaying the AV ...
...20 How to use the screens 22 - Selecting a rear source 25 Turning off the display 20 - Introduction Manual overview 11 - Before removing the vehicle battery 12 - Installing the battery 15 - Removing the detachable faceplate 16 - Attaching the detachable faceplate 16 Notes on the AV ...reference. Please read the Map screen 31 AV information bar 31 Operating the Map screen 32 - Important The screens shown in this Pioneer product. Connecting and disconnecting an iPod 19 - Switching screens using the hardware buttons 23 Supported AV source 24 Displaying the AV ...

Owner's Manual
Page 12
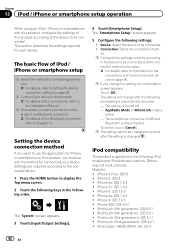
"iPod" In this manual, iPod and iPhone will be referred to this operation when a device is ...yellow lead from the battery (or removing the battery itself). Settings and recorded contents are reset to the factory settings. 8100NEX 7100NEX Notes on the map with a significant positioning error. 1 Turn the ignition switch OFF. 2 Press the RESET ...! p Some of the settings and recorded contents will not be repro- If this product for the first time after installation. ! Chapter 01 Introduction "External storage device (USB, SD)" The SD memory card, SDHC memory card and USB ...
"iPod" In this manual, iPod and iPhone will be referred to this operation when a device is ...yellow lead from the battery (or removing the battery itself). Settings and recorded contents are reset to the factory settings. 8100NEX 7100NEX Notes on the map with a significant positioning error. 1 Turn the ignition switch OFF. 2 Press the RESET ...! p Some of the settings and recorded contents will not be repro- If this product for the first time after installation. ! Chapter 01 Introduction "External storage device (USB, SD)" The SD memory card, SDHC memory card and USB ...
Owner's Manual
Page 19
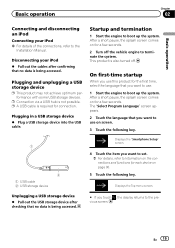
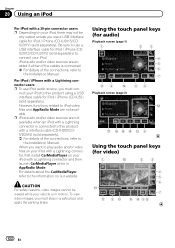
Disconnecting your iPod = For details of the connections, refer to the Installation Manual. p A USB cable is required for the first time, select the language that no data is also turned off the vehicle engine to terminate the system. ...
Disconnecting your iPod = For details of the connections, refer to the Installation Manual. p A USB cable is required for the first time, select the language that no data is also turned off the vehicle engine to terminate the system. ...

Owner's Manual
Page 73
...to Chapter 11. = For details of the USB connections, refer to associate with the navigation system and then touch [Associate]. http://pioneer.naviextras.com Customizing preferences of the navigation Chapter 10 Preparations before using the AVICSYNC function 1 Download the AVICSYNC App from connected USB memory... [Settings]. 12 Touch [Online Services]. 13 Touch the service that you want to the Installation Manual. 4 Press the MAP button. Then, transfer the data from App Store or Google Play and install the app to "HOW TO UPDATE?" The Map screen appears. 5 Touch the following URL...
...to Chapter 11. = For details of the USB connections, refer to associate with the navigation system and then touch [Associate]. http://pioneer.naviextras.com Customizing preferences of the navigation Chapter 10 Preparations before using the AVICSYNC function 1 Download the AVICSYNC App from connected USB memory... [Settings]. 12 Touch [Online Services]. 13 Touch the service that you want to the Installation Manual. 4 Press the MAP button. Then, transfer the data from App Store or Google Play and install the app to "HOW TO UPDATE?" The Map screen appears. 5 Touch the following URL...
Owner's Manual
Page 88
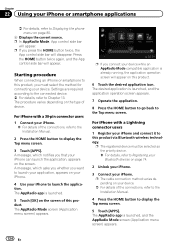
... details, refer to Setting the device connection method on page 88. 2 Connect your device to this product. = For details of the connections, refer to the Installation Manual. 3 If necessary, connect your device to this product, you want to use the application for iPhone or smartphone on the connections and functions for a while...
... details, refer to Setting the device connection method on page 88. 2 Connect your device to this product. = For details of the connections, refer to the Installation Manual. 3 If necessary, connect your device to this product, you want to use the application for iPhone or smartphone on the connections and functions for a while...
Owner's Manual
Page 122
...then launch CarMediaPlayer while in AppRadio Mode. When you want to play audio and/or video files on your iPod with a Lightning connector, first install CarMediaPlayer on your iPod, there may not be viewed while your iPod. Using the touch panel keys (for audio) Playback screen (page 1) 1...iPod with a interface cable (CD-IH202/CDIV202AV) (sold separately). = For details of the connections, refer to the Installation Manual. However, functions related to the Installation Manual. iPod audio and/or video sources are enabled if either of the cables is connected. = For details of the ...
...then launch CarMediaPlayer while in AppRadio Mode. When you want to play audio and/or video files on your iPod with a Lightning connector, first install CarMediaPlayer on your iPod, there may not be viewed while your iPod. Using the touch panel keys (for audio) Playback screen (page 1) 1...iPod with a interface cable (CD-IH202/CDIV202AV) (sold separately). = For details of the connections, refer to the Installation Manual. However, functions related to the Installation Manual. iPod audio and/or video sources are enabled if either of the cables is connected. = For details of the ...
Owner's Manual
Page 134
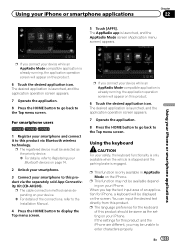
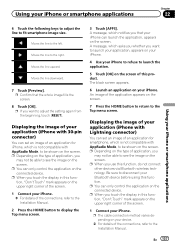
...are required according to the connected device. = For details, refer to Displaying the phone menu on the screen of the connections, refer to the Installation Manual. 2 Press the HOME button to display the Top menu screen. 3 Touch [APPS]. For iPhone with a Lightning connector users 1 Register your ... which notifies you press the HOME button twice, the App control side bar will appear on the type of the connections, refer to the Installation Manual. 4 Press the HOME button to the Top menu screen. p If you that your device while an AppRadio Mode-compatible application is launched....
...are required according to the connected device. = For details, refer to Displaying the phone menu on the screen of the connections, refer to the Installation Manual. 2 Press the HOME button to display the Top menu screen. 3 Touch [APPS]. For iPhone with a Lightning connector users 1 Register your ... which notifies you press the HOME button twice, the App control side bar will appear on the type of the connections, refer to the Installation Manual. 4 Press the HOME button to the Top menu screen. p If you that your device while an AppRadio Mode-compatible application is launched....
Owner's Manual
Page 135
...parking brake is launched, and the AppRadio Mode screen (Application menu screen) appears. The AppRadio app is engaged. For smartphone users 8100NEX 7100NEX 6100NEX 1 Register your iPhone. p The cable connection method varies depending on your device. = For details of this product ...your smartphone and connect it to the Top menu screen. p The language preference for the keyboard of the connections, refer to the Installation Manual. 4 Press the HOME button to enter characters properly. The desired application is launched, and the application operation screen appears. 7 Operate ...
...parking brake is launched, and the AppRadio Mode screen (Application menu screen) appears. The AppRadio app is engaged. For smartphone users 8100NEX 7100NEX 6100NEX 1 Register your iPhone. p The cable connection method varies depending on your device. = For details of this product ...your smartphone and connect it to the Top menu screen. p The language preference for the keyboard of the connections, refer to the Installation Manual. 4 Press the HOME button to enter characters properly. The desired application is launched, and the application operation screen appears. 7 Operate ...
Owner's Manual
Page 137
...= For details of application, you want to launch your application, appears on the connected device. An image of the connections, refer to the Installation Manual. 2 Press the HOME button to be able to fit smartphone image size. p You can only control the application on the screen. 7 ... screen. p Depending on the type of the connections, refer to launch the application. 5 Touch [OK] on your iPhone to refuse to the Installation Manual. p You can only control the application on your iPhone. 4 Use your iPhone. A message, which is not compatible with Lightning connector) You ...
...= For details of application, you want to launch your application, appears on the connected device. An image of the connections, refer to the Installation Manual. 2 Press the HOME button to be able to fit smartphone image size. p You can only control the application on the screen. 7 ... screen. p Depending on the type of the connections, refer to launch the application. 5 Touch [OK] on your iPhone to refuse to the Installation Manual. p You can only control the application on your iPhone. 4 Use your iPhone. A message, which is not compatible with Lightning connector) You ...

Owner's Manual
Page 138
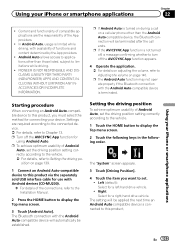
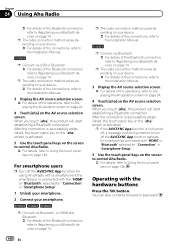
... image of the connections, refer to the Installation Manual. 2 Press the HOME button to be available in this product. p The cable connection method varies depending on your device. = For details of your application (smartphone) 8100NEX 7100NEX 6100NEX You can control applications for a smartphone. Using Android Auto 8100NEX 7100NEX You can set "Mode" in "Smartphone...
... image of the connections, refer to the Installation Manual. 2 Press the HOME button to be available in this product. p The cable connection method varies depending on your device. = For details of your application (smartphone) 8100NEX 7100NEX 6100NEX You can control applications for a smartphone. Using Android Auto 8100NEX 7100NEX You can set "Mode" in "Smartphone...
Owner's Manual
Page 139
...). = For details of Android Auto, set . ! p To achieve optimum usability of the connections, refer to the Installation Manual. 2 Press the HOME button to this product. PIONEER IS NOT RESPONSIBLE AND DISCLAIMS LIABILITY FOR THIRD PARTY (NON-PIONEER) APPS AND CONTENT, INCLUDING WITHOUT LIMITATION ANY INACCURACIES OR INCOMPLETE INFORMATION. p The Android Auto function may not...
...). = For details of Android Auto, set . ! p To achieve optimum usability of the connections, refer to the Installation Manual. 2 Press the HOME button to this product. PIONEER IS NOT RESPONSIBLE AND DISCLAIMS LIABILITY FOR THIRD PARTY (NON-PIONEER) APPS AND CONTENT, INCLUDING WITHOUT LIMITATION ANY INACCURACIES OR INCOMPLETE INFORMATION. p The Android Auto function may not...
Owner's Manual
Page 140
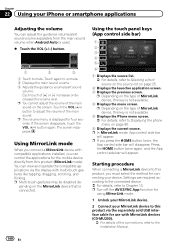
... guidance volume/alert sound volume separately from this product via the display with MirrorLink devices (CD-MU200). = For details of the connections, refer to the Installation Manual. 140 En p In MirrorLink mode, App control side bar will appear. Settings are required according to the connected device. = For details, refer to adjust the... volume/alert sound volume. Each touch of [+] or [-] increases or decreases the volume level. Using MirrorLink mode When you connect a MirrorLink device with compatible applications installed, you must select the method for four seconds.
... guidance volume/alert sound volume separately from this product via the display with MirrorLink devices (CD-MU200). = For details of the connections, refer to the Installation Manual. 140 En p In MirrorLink mode, App control side bar will appear. Settings are required according to the connected device. = For details, refer to adjust the... volume/alert sound volume. Each touch of [+] or [-] increases or decreases the volume level. Using MirrorLink mode When you connect a MirrorLink device with compatible applications installed, you must select the method for four seconds.
Owner's Manual
Page 144
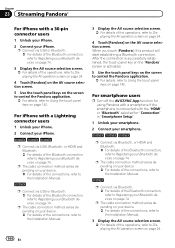
... users p Turn off the AVICSYNC App function for "Connection" in "Smartphone Setup". 1 Unlock your smartphone. 2 Connect your smartphone. 8100NEX 7100NEX 6100NEX p Connect via USB, Bluetooth, or HDMI and Bluetooth. = For details of the Bluetooth connection, refer to Registering your ... Bluetooth. = For details of the Bluetooth connection, refer to Registering your device. = For details of the connections, refer to the Installation Manual. 3 Display the AV source selection screen. = For details of the Bluetooth connection, refer to Registering your Bluetooth devices on page 142...
... users p Turn off the AVICSYNC App function for "Connection" in "Smartphone Setup". 1 Unlock your smartphone. 2 Connect your smartphone. 8100NEX 7100NEX 6100NEX p Connect via USB, Bluetooth, or HDMI and Bluetooth. = For details of the Bluetooth connection, refer to Registering your ... Bluetooth. = For details of the Bluetooth connection, refer to Registering your device. = For details of the connections, refer to the Installation Manual. 3 Display the AV source selection screen. = For details of the Bluetooth connection, refer to Registering your Bluetooth devices on page 142...
Owner's Manual
Page 148
... a Bluetooth connection. p The cable connection method varies depending on your device. = For details of the connections, refer to the Installation Manual. 3 Display the AV source selection screen. = For details of the Bluetooth connection, refer to Registering your device. = For details...connected with the "HDMI" or "Bluetooth" selected for "Connection" in "Smartphone Setup". 1 Unlock your smartphone. 2 Connect your smartphone. 8100NEX 7100NEX 6100NEX p Connect via Bluetooth, or HDMI and Bluetooth. = For details of the Bluetooth connection, refer to Registering your Bluetooth devices...
... a Bluetooth connection. p The cable connection method varies depending on your device. = For details of the connections, refer to the Installation Manual. 3 Display the AV source selection screen. = For details of the Bluetooth connection, refer to Registering your device. = For details...connected with the "HDMI" or "Bluetooth" selected for "Connection" in "Smartphone Setup". 1 Unlock your smartphone. 2 Connect your smartphone. 8100NEX 7100NEX 6100NEX p Connect via Bluetooth, or HDMI and Bluetooth. = For details of the Bluetooth connection, refer to Registering your Bluetooth devices...

Owner's Manual
Page 172
... Using an HDMI source 8100NEX 7100NEX 6100NEX You can display the video image output by the device connected to Changing the wide screen mode on page 223. p A High Speed HDMI® Cable (sold sepa- This section describes operations for connection. = For details of the operations, refer to the Installation Manual. To view video...
... Using an HDMI source 8100NEX 7100NEX 6100NEX You can display the video image output by the device connected to Changing the wide screen mode on page 223. p A High Speed HDMI® Cable (sold sepa- This section describes operations for connection. = For details of the operations, refer to the Installation Manual. To view video...

Owner's Manual
Page 173
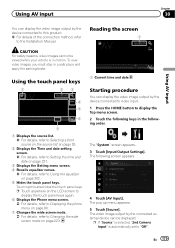
This section describes operations for connection. = For details of the connection method, refer to the Installation Manual. Reading the screen 1 Using the touch panel keys 1 23 4 5 6 87 1 Displays the source list. = For details, refer to Selecting a front source on the source list ...
This section describes operations for connection. = For details of the connection method, refer to the Installation Manual. Reading the screen 1 Using the touch panel keys 1 23 4 5 6 87 1 Displays the source list. = For details, refer to Selecting a front source on the source list ...
Owner's Manual
Page 175
... be viewed while your vehicle is automatically set to Using the equalizer on page 80. 7 Changes the wide screen mode. = For details, refer to the Installation Manual. The pop-up menu appears. 5 Touch [Source]. p If "Source" is selected, "2nd Camera Input" is in a safe place and apply the parking brake. The "System...
... be viewed while your vehicle is automatically set to Using the equalizer on page 80. 7 Changes the wide screen mode. = For details, refer to the Installation Manual. The pop-up menu appears. 5 Touch [Source]. p If "Source" is selected, "2nd Camera Input" is in a safe place and apply the parking brake. The "System...
Owner's Manual
Page 205
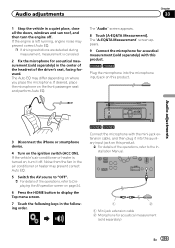
... AV source to "OFF". = For details of the operations, refer to Displaying the AV operation screen on page 24. 6 Press the HOME button to the Installation Manual. 1 2 1 Mini-jack extension cable 2 Microphone for acoustical measurement (sold separately) with the mini-jack extension cable, and then plug it off . Audio adjustments Chapter ... operations, refer to display the Top menu screen. 7 Touch the following keys in the following order. 6100NEX 5100NEX Connect the microphone with this product. 8100NEX 7100NEX Plug the microphone into the microphone input jack on this product.
... AV source to "OFF". = For details of the operations, refer to Displaying the AV operation screen on page 24. 6 Press the HOME button to the Installation Manual. 1 2 1 Mini-jack extension cable 2 Microphone for acoustical measurement (sold separately) with the mini-jack extension cable, and then plug it off . Audio adjustments Chapter ... operations, refer to display the Top menu screen. 7 Touch the following keys in the following order. 6100NEX 5100NEX Connect the microphone with this product. 8100NEX 7100NEX Plug the microphone into the microphone input jack on this product.
Installation Manual
Page 5
... power to the product. ! To avoid shorts in any of this unit with metal parts, short-circuiting can occur, resulting in the installation manual. ! En 5 Secure all of contact with a 12-volt battery and negative grounding only. It is directly connected to the battery, engine... to tamper with or disabling the parking brake interlock system could result in place for your protection. Connection Section 02 English Precautions before installation. If the lead is extremely dangerous to allow any steps to do , the protection circuit (fuse holder, fuse resistor or filter,...
... power to the product. ! To avoid shorts in any of this unit with metal parts, short-circuiting can occur, resulting in the installation manual. ! En 5 Secure all of contact with a 12-volt battery and negative grounding only. It is directly connected to the battery, engine... to tamper with or disabling the parking brake interlock system could result in place for your protection. Connection Section 02 English Precautions before installation. If the lead is extremely dangerous to allow any steps to do , the protection circuit (fuse holder, fuse resistor or filter,...


