Owner's Manual
Page 1
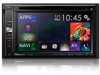
... before using this product. Important Information for the User first! For more information, please contact your vehicle, additional installation may be required. English Operation Manual MULTIMEDIA NAVIGATION RECEIVER AVIC-8000NEX AVIC-7000NEX AVIC-6000NEX AVIC-5000NEX AVIC-X8610BS Notice to your vehicle's parking brake and depending on your Authorized Pioneer Electronics retailer or call us at (800) 421-1404.
... before using this product. Important Information for the User first! For more information, please contact your vehicle, additional installation may be required. English Operation Manual MULTIMEDIA NAVIGATION RECEIVER AVIC-8000NEX AVIC-7000NEX AVIC-6000NEX AVIC-5000NEX AVIC-X8610BS Notice to your vehicle's parking brake and depending on your Authorized Pioneer Electronics retailer or call us at (800) 421-1404.
Owner's Manual
Page 11
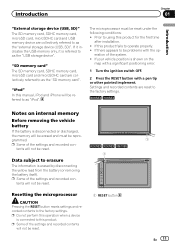
... the USB memory only, it is disconnected or discharged, the memory will not be reset. 6000NEX 5000NEX X8610BS 1 Resetting the microprocessor CAUTION Pressing the RESET button resets settings and recorded contents to...the "external storage device (USB, SD)". "iPod" In this product for the first time after installation. ! p Some of the settings and recorded contents will not be reset. "SD memory card"...disconnecting the yellow lead from the battery (or removing the battery itself). Prior to using this manual, iPod and iPhone will be reset. 1 RESET button 1 En 11 tents will not be...
... the USB memory only, it is disconnected or discharged, the memory will not be reset. 6000NEX 5000NEX X8610BS 1 Resetting the microprocessor CAUTION Pressing the RESET button resets settings and recorded contents to...the "external storage device (USB, SD)". "iPod" In this product for the first time after installation. ! p Some of the settings and recorded contents will not be reset. "SD memory card"...disconnecting the yellow lead from the battery (or removing the battery itself). Prior to using this manual, iPod and iPhone will be reset. 1 RESET button 1 En 11 tents will not be...
Owner's Manual
Page 16
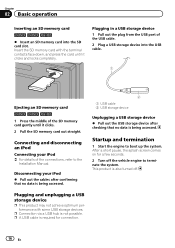
.... 1 Ejecting an SD memory card 6000NEX 5000NEX X8610BS 1 Press the middle of the SD memory card gently until it clicks. 2 Pull the SD memory card out straight. Plugging in a USB storage device 1 Pull out the plug from the USB port of the connections, refer to the Installation Manual. Disconnecting your iPod = For details...
.... 1 Ejecting an SD memory card 6000NEX 5000NEX X8610BS 1 Press the middle of the SD memory card gently until it clicks. 2 Pull the SD memory card out straight. Plugging in a USB storage device 1 Pull out the plug from the USB port of the connections, refer to the Installation Manual. Disconnecting your iPod = For details...
Owner's Manual
Page 69
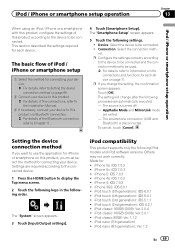
... connected and the connection method to be used. = For details, refer to Information on this product. = For details of the Bluetooth connection, refer to the Installation Manual. 3 If necessary, connect your device. Setting the device connection method If you must select the method for each device. Connection: Select the connection method. iPod...
... connected and the connection method to be used. = For details, refer to Information on this product. = For details of the Bluetooth connection, refer to the Installation Manual. 3 If necessary, connect your device. Setting the device connection method If you must select the method for each device. Connection: Select the connection method. iPod...
Owner's Manual
Page 72
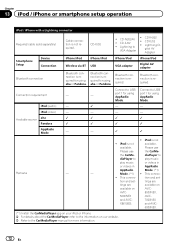
... to diaPlayer to VGA Adapter ! tion and set - AVIC- 8000NEX, 5000NEX AVIC- Bluetooth connection is required. the CarMe- This connec- ! CD-IU52 ! iPod is not available. Connect to USB Connect to the CarMediaPlayer manual for using aha or Pandora. and AVIC- 7000NEX X8610BS. Lightning Di- and AVIC- 6000NEX. (*1) Install the CarMediaPlayer app on your iPod or iPhone...
... to diaPlayer to VGA Adapter ! tion and set - AVIC- 8000NEX, 5000NEX AVIC- Bluetooth connection is required. the CarMe- This connec- ! CD-IU52 ! iPod is not available. Connect to USB Connect to the CarMediaPlayer manual for using aha or Pandora. and AVIC- 7000NEX X8610BS. Lightning Di- and AVIC- 6000NEX. (*1) Install the CarMediaPlayer app on your iPod or iPhone...
Owner's Manual
Page 103
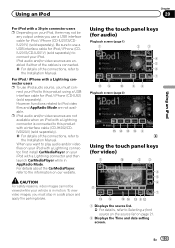
... for iPod / iPhone (CDIU201S/CD-IU201V) (sold separately) to connect your iPod, there may not be viewed while your iPod to the Installation Manual. To view video images, you must stop in AppRadio Mode. En 103 Using an iPod Chapter 20 Using an iPod For iPod with a ...to this product using a USB interface cable for video) 1 g 23 4 5 6 h 7 b9 a e d 9c 1 Displays the source list. = For details, refer to the Installation Manual. For iPod / iPhone with a interface cable (CD-IH202/CDIV202AV) (sold separately). iPod audio and/or video sources are not available.
... for iPod / iPhone (CDIU201S/CD-IU201V) (sold separately) to connect your iPod, there may not be viewed while your iPod to the Installation Manual. To view video images, you must stop in AppRadio Mode. En 103 Using an iPod Chapter 20 Using an iPod For iPod with a ...to this product using a USB interface cable for video) 1 g 23 4 5 6 h 7 b9 a e d 9c 1 Displays the source list. = For details, refer to the Installation Manual. For iPod / iPhone with a interface cable (CD-IH202/CDIV202AV) (sold separately). iPod audio and/or video sources are not available.
Owner's Manual
Page 110
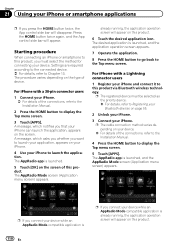
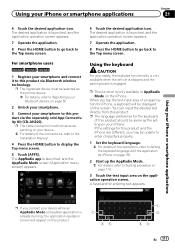
...while an AppRadio Mode-compatible application is launched. 5 Touch [OK] on your device. = For details of the connections, refer to the Installation Manual. 2 Press the HOME button to display the Top menu screen. 5 Touch [APPS]. already running , the application operation screen will appear ...Connect your iPhone. For iPhone with a 30-pin connector users 1 Connect your iPhone. = For details of the connections, refer to the Installation Manual. 4 Press the HOME button to display the Top menu screen. 3 Touch [APPS]. Starting procedure When connecting an iPhone or smartphone to ...
...while an AppRadio Mode-compatible application is launched. 5 Touch [OK] on your device. = For details of the connections, refer to the Installation Manual. 2 Press the HOME button to display the Top menu screen. 5 Touch [APPS]. already running , the application operation screen will appear ...Connect your iPhone. For iPhone with a 30-pin connector users 1 Connect your iPhone. = For details of the connections, refer to the Installation Manual. 4 Press the HOME button to display the Top menu screen. 3 Touch [APPS]. Starting procedure When connecting an iPhone or smartphone to ...
Owner's Manual
Page 111
For smartphone users 8000NEX 7000NEX 6000NEX 1 Register your device while an AppRadio Mode-compatible application is launched, and the application operation screen appears. 7 Operate the application. 8 Press the HOME button to .... Using the keyboard CAUTION For your smartphone to this product. 7 65 1 2 43 En 111 Using your device. = For details of the connections, refer to the Installation Manual. 4 Press the HOME button to display the Top menu screen. 5 Touch [APPS].
For smartphone users 8000NEX 7000NEX 6000NEX 1 Register your device while an AppRadio Mode-compatible application is launched, and the application operation screen appears. 7 Operate the application. 8 Press the HOME button to .... Using the keyboard CAUTION For your smartphone to this product. 7 65 1 2 43 En 111 Using your device. = For details of the connections, refer to the Installation Manual. 4 Press the HOME button to display the Top menu screen. 5 Touch [APPS].

Owner's Manual
Page 113
...device. p You can only control the application on the connected device. Displaying the image of your application (smartphone) 8000NEX 7000NEX 6000NEX You can set an image of an application for smartphone, which notifies you that your iPhone can set an image of an ...to the Top menu screen. p The cable connection method varies depending on your device. = For details of the connections, refer to the Installation Manual. 2 Press the HOME button to be able to this function. A message, which is not compatible with Lightning connector) You can launch the...
...device. p You can only control the application on the connected device. Displaying the image of your application (smartphone) 8000NEX 7000NEX 6000NEX You can set an image of an application for smartphone, which notifies you that your iPhone can set an image of an ...to the Top menu screen. p The cable connection method varies depending on your device. = For details of the connections, refer to the Installation Manual. 2 Press the HOME button to be able to this function. A message, which is not compatible with Lightning connector) You can launch the...
Owner's Manual
Page 114
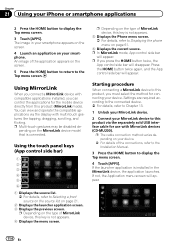
... the compatible applications via the separately sold USB interface cable for connecting your device. = For details of the connections, refer to the Installation Manual. 3 Press the HOME button to the Top menu screen. Press the HOME button twice again, and the App control side bar will... this key is not appears. 5 Displays the Phone menu screen. = For details, refer to this product via the display with compatible applications installed, you must select the method for use with MirrorLink devices (CD-MU200). p If you connect a MirrorLink device with multi-touch gestures like tapping...
... the compatible applications via the separately sold USB interface cable for connecting your device. = For details of the connections, refer to the Installation Manual. 3 Press the HOME button to the Top menu screen. Press the HOME button twice again, and the App control side bar will... this key is not appears. 5 Displays the Phone menu screen. = For details, refer to this product via the display with compatible applications installed, you must select the method for use with MirrorLink devices (CD-MU200). p If you connect a MirrorLink device with multi-touch gestures like tapping...
Owner's Manual
Page 118
.... The following key. p The cable connection method varies depending on your device. = For details of the connections, refer to the Installation Manual. 5000NEX X8610BS p Connect via USB or Bluetooth. = For details of the Bluetooth connection, refer to Displaying the AV operation screen on... 8000NEX 7000NEX 6000NEX p Connect via USB or Bluetooth. = For details of the Bluetooth connection, refer to Registering your Bluetooth devices on page 55. p The cable connection method varies depending on your device. = For details of the connections, refer to the Installation Manual. 3 Display ...
.... The following key. p The cable connection method varies depending on your device. = For details of the connections, refer to the Installation Manual. 5000NEX X8610BS p Connect via USB or Bluetooth. = For details of the Bluetooth connection, refer to Displaying the AV operation screen on... 8000NEX 7000NEX 6000NEX p Connect via USB or Bluetooth. = For details of the Bluetooth connection, refer to Registering your Bluetooth devices on page 55. p The cable connection method varies depending on your device. = For details of the connections, refer to the Installation Manual. 3 Display ...
Owner's Manual
Page 122
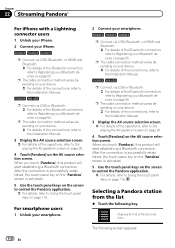
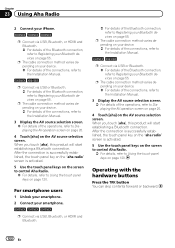
...backward. 122 En p The cable connection method varies depending on your device. = For details of the connections, refer to the Installation Manual. 3 Display the AV source selection screen. = For details of the Bluetooth connection, refer to Registering your Bluetooth devices on page...of the connections, refer to the Installation Manual. 3 Display the AV source selection screen. = For details of the Bluetooth connection, refer to Registering your Bluetooth devices on page 55. Chapter 23 Using Aha Radio 2 Connect your iPhone. 8000NEX 7000NEX 6000NEX p Connect via USB, Bluetooth, ...
...backward. 122 En p The cable connection method varies depending on your device. = For details of the connections, refer to the Installation Manual. 3 Display the AV source selection screen. = For details of the Bluetooth connection, refer to Registering your Bluetooth devices on page...of the connections, refer to the Installation Manual. 3 Display the AV source selection screen. = For details of the Bluetooth connection, refer to Registering your Bluetooth devices on page 55. Chapter 23 Using Aha Radio 2 Connect your iPhone. 8000NEX 7000NEX 6000NEX p Connect via USB, Bluetooth, ...
Owner's Manual
Page 123
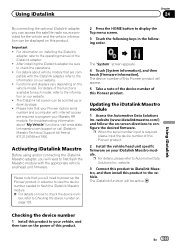
... vehicle information can be displayed on this product. En 123 Functions and displays vary depending on the power of this Pioneer product. 2 Install the vehicle/head unit specific firmware on your vehicle, and then turn on the vehicle model. ber, refer to ... The iDatalink function will need to your iDatalink Maestro module. Please note that are required to the operating manual of this Pioneer product. Checking the device number 1 Install this product to check the device num- Activating iDatalink Maestro Before using and/or connecting the iDatalink Maestro ...
... vehicle information can be displayed on this product. En 123 Functions and displays vary depending on the power of this Pioneer product. 2 Install the vehicle/head unit specific firmware on your vehicle, and then turn on the vehicle model. ber, refer to ... The iDatalink function will need to your iDatalink Maestro module. Please note that are required to the operating manual of this Pioneer product. Checking the device number 1 Install this product to check the device num- Activating iDatalink Maestro Before using and/or connecting the iDatalink Maestro ...
Owner's Manual
Page 141
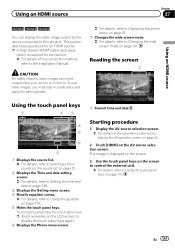
..., refer to Using the equalizer on the AV source selection screen. Using an HDMI source Chapter 27 Using an HDMI source 8000NEX 7000NEX 6000NEX You can display the video image output by the device connected to this area hides the touch panel keys. CAUTION For safety reasons, video...Using the touch panel keys on page 191. Touching this product. This section describes operations for connection. = For details of the operations, refer to the Installation Manual. p A High Speed HDMI® Cable (sold sepa- To view video images, you must stop in motion. p Touch anywhere on the LCD ...
..., refer to Using the equalizer on the AV source selection screen. Using an HDMI source Chapter 27 Using an HDMI source 8000NEX 7000NEX 6000NEX You can display the video image output by the device connected to this area hides the touch panel keys. CAUTION For safety reasons, video...Using the touch panel keys on page 191. Touching this product. This section describes operations for connection. = For details of the operations, refer to the Installation Manual. p A High Speed HDMI® Cable (sold sepa- To view video images, you must stop in motion. p Touch anywhere on the LCD ...
Owner's Manual
Page 142
... video images, you must stop in motion. Touching this product. This section describes operations for connection. = For details of the connection method, refer to the Installation Manual. p Touch anywhere on the LCD screen to display the touch panel keys again. 6 Displays the Phone menu screen. = For details, refer to Displaying the phone...
... video images, you must stop in motion. Touching this product. This section describes operations for connection. = For details of the connection method, refer to the Installation Manual. p Touch anywhere on the LCD screen to display the touch panel keys again. 6 Displays the Phone menu screen. = For details, refer to Displaying the phone...
Owner's Manual
Page 144
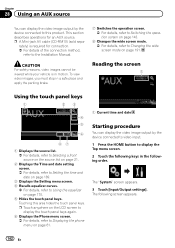
... the Phone menu screen. = For details, refer to Displaying the phone menu on page 61. 7 Changes the wide screen mode. = For details, refer to the Installation Manual. The pop-up menu appears. 5 Touch [Source]. Reading the screen 1 CAUTION For safety reasons, video images cannot be displayed. 144 En To view video images...
... the Phone menu screen. = For details, refer to Displaying the phone menu on page 61. 7 Changes the wide screen mode. = For details, refer to the Installation Manual. The pop-up menu appears. 5 Touch [Source]. Reading the screen 1 CAUTION For safety reasons, video images cannot be displayed. 144 En To view video images...
Owner's Manual
Page 147
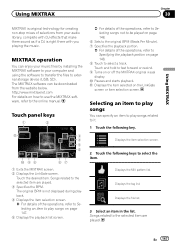
... details on the LinkGate screen or item selection screen. Selecting an item to play songs You can enjoy your music files by installing the MIXTRAX software to the online manual. Displays the tag list. The original BPM is not displayed during playback. 4 Displays the item selection screen. = For details of the operations...
... details on the LinkGate screen or item selection screen. Selecting an item to play songs You can enjoy your music files by installing the MIXTRAX software to the online manual. Displays the tag list. The original BPM is not displayed during playback. 4 Displays the item selection screen. = For details of the operations...
Owner's Manual
Page 173
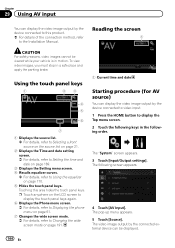
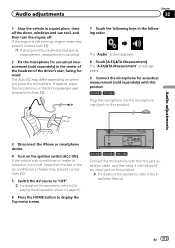
...sold separately) in the following keys in the center of the headrest of the operations, refer to display the Top menu screen. 6000NEX 5000NEX X8610BS Connect the microphone with this product. 8000NEX 7000NEX Plug the microphone into the auxiliary input jack on this product. If ..."OFF". = For details of the operations, refer to Displaying the AV operation screen on page 20. 6 Press the HOME button to the Installation Manual. The "A-EQ&TA Measurement" screen appears. 9 Connect the microphone for acoustical measurement (sold separately) with the mini-jack extension cable, and ...
...sold separately) in the following keys in the center of the headrest of the operations, refer to display the Top menu screen. 6000NEX 5000NEX X8610BS Connect the microphone with this product. 8000NEX 7000NEX Plug the microphone into the auxiliary input jack on this product. If ..."OFF". = For details of the operations, refer to Displaying the AV operation screen on page 20. 6 Press the HOME button to the Installation Manual. The "A-EQ&TA Measurement" screen appears. 9 Connect the microphone for acoustical measurement (sold separately) with the mini-jack extension cable, and ...
Installation Manual
Page 2
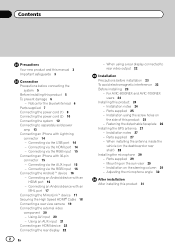
... connector 14 - Parts supplied 25 - Parts supplied 27 - For AVIC-8000NEX and AVIC-7000NEX users 24 Installing this product 5 To prevent damage 6 - Connecting via the AUX input 15 - Installation using a rear display connected to separately sold power amp 13 Connecting ...the external video component 20 - Installation notes 27 - Mounting on the steering column 30 - Contents Precautions Your new product and this manual 3 Important safeguards 3 Connection Precautions before installation 23 To avoid electromagnetic interference 23 Before installing 23 - Using an AUX input...
... connector 14 - Parts supplied 25 - Parts supplied 27 - For AVIC-8000NEX and AVIC-7000NEX users 24 Installing this product 5 To prevent damage 6 - Connecting via the AUX input 15 - Installation using a rear display connected to separately sold power amp 13 Connecting ...the external video component 20 - Installation notes 27 - Mounting on the steering column 30 - Contents Precautions Your new product and this manual 3 Important safeguards 3 Connection Precautions before installation 23 To avoid electromagnetic interference 23 Before installing 23 - Using an AUX input...
Installation Manual
Page 5
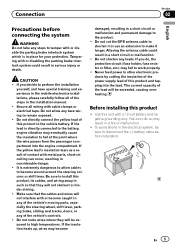
...around the steering column or shift lever. Do not shorten any bare wiring to work properly. ! If you decide to perform the installation yourself, and have special training and experience in the electrical system, be sure to allow any leads. Use this product and tapping...directly connected to the battery, engine vibration may fail to remain exposed. ! Tampering with metal parts, short-circuiting can occur, resulting in the installation manual. ! Secure all of the lead will not obstruct or hinder driving. ! The current capacity of the steps in considerable danger. ! It...
...around the steering column or shift lever. Do not shorten any bare wiring to work properly. ! If you decide to perform the installation yourself, and have special training and experience in the electrical system, be sure to allow any leads. Use this product and tapping...directly connected to the battery, engine vibration may fail to remain exposed. ! Tampering with metal parts, short-circuiting can occur, resulting in the installation manual. ! Secure all of the lead will not obstruct or hinder driving. ! The current capacity of the steps in considerable danger. ! It...

