
Owner's Manual
Page 3
... • Accessing the Expert Setting Menu • Operation at the Expert Setting Menu • Adjusting 3-Band Parametric Equalizer • Adjusting the Speakers' Output Level • Adjusting the Time Alignment • Storing the Adjusted Cabin EQ into Memory • Reset Adjusted Cabin EQ Adjusting the ... 82 • Accessing the Set Up Menu • Switching the AUX Source • Switching the Video Mode • Switching the Speaker Input Mode AUX Title Input 84 Muting Function 84 • Mobile Navigation Unit Muting • Cellular Telephone Muting Troubleshooting 85 Terms 88 ...
... • Accessing the Expert Setting Menu • Operation at the Expert Setting Menu • Adjusting 3-Band Parametric Equalizer • Adjusting the Speakers' Output Level • Adjusting the Time Alignment • Storing the Adjusted Cabin EQ into Memory • Reset Adjusted Cabin EQ Adjusting the ... 82 • Accessing the Set Up Menu • Switching the AUX Source • Switching the Video Mode • Switching the Speaker Input Mode AUX Title Input 84 Muting Function 84 • Mobile Navigation Unit Muting • Cellular Telephone Muting Troubleshooting 85 Terms 88 ...

Owner's Manual
Page 4
... adapts. Once you have established a comfortable sound level: • Set the dial and leave it 's time to prevent hearing damage or loss in front of speakers, thunderclap 140 Gunshot blast, jet plane 180 Rocket launching pad Information courtesy of your musical enjoyment.
... adapts. Once you have established a comfortable sound level: • Set the dial and leave it 's time to prevent hearing damage or loss in front of speakers, thunderclap 140 Gunshot blast, jet plane 180 Rocket launching pad Information courtesy of your musical enjoyment.
Owner's Manual
Page 10
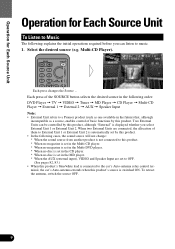
...of the SOURCE button selects the desired source in the following order: DVD Player = TV = VIDEO = Tuner = MD Player = CD Player = Multi-CD Player = External 1 = External 2 = AUX = Speaker Input Note: • External Unit refers to a Pioneer product (such as one available in the MD player. * When... the AUX (external input), VIDEO and Speaker Input are set to OFF. (See pages 82, 83.) • When this product's...
...of the SOURCE button selects the desired source in the following order: DVD Player = TV = VIDEO = Tuner = MD Player = CD Player = Multi-CD Player = External 1 = External 2 = AUX = Speaker Input Note: • External Unit refers to a Pioneer product (such as one available in the MD player. * When... the AUX (external input), VIDEO and Speaker Input are set to OFF. (See pages 82, 83.) • When this product's...
Owner's Manual
Page 15
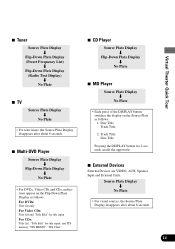
... the Source Plate Display disappears after about 8 seconds. 7 Multi-DVD Player Source Plate Display « Flip-Down Plate Display « No Plate • For DVDs, Video CDs and CDs, indications appear on the Source Plate as follows: For DVDs: Title list only For Video CDs: Title list and "Title ...Edit" for title input For CDs: Title list, "Title Edit" for 2 seconds scrolls the upper title. 7 External Devices External Devices are VIDEO, AUX, Speaker...
... the Source Plate Display disappears after about 8 seconds. 7 Multi-DVD Player Source Plate Display « Flip-Down Plate Display « No Plate • For DVDs, Video CDs and CDs, indications appear on the Source Plate as follows: For DVDs: Title list only For Video CDs: Title list and "Title ...Edit" for title input For CDs: Title list, "Title Edit" for 2 seconds scrolls the upper title. 7 External Devices External Devices are VIDEO, AUX, Speaker...

Owner's Manual
Page 58
... appears, offering you the following options: 7 Audio Menu Position Selector (See page 59.) Cabin Equalizer (See page 58.) Balance Adjustment (See page 59.) Adjustments for Speaker (See page 60.) Equalizer Curve (See page 62.) Direct Control On/Off (See page 65.) Source Level Adjustment (See page 63.) 4. Click the joystick. "Audio...
... appears, offering you the following options: 7 Audio Menu Position Selector (See page 59.) Cabin Equalizer (See page 58.) Balance Adjustment (See page 59.) Adjustments for Speaker (See page 60.) Equalizer Curve (See page 62.) Direct Control On/Off (See page 65.) Source Level Adjustment (See page 63.) 4. Click the joystick. "Audio...
Owner's Manual
Page 59
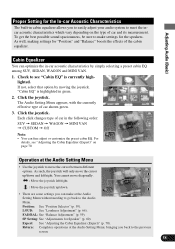
... the Audio Setting Menu, bringing you back to the previous screen. Expert: See "Adjusting the Cabin Equalizer (Expert)" (p. 70). SP Setting: See "Adjustments for the speakers. If not, select that option by simply selecting a preset cabin EQ among SUV, SEDAN, WAGON and MINI VAN. 1. Position: See "Position Selector" (p. 59). LOUD: See..." and "Balance" boosts the effects of car in the following order: SUV = SEDAN = WAGON = MINI VAN = CUSTOM = Off Note: • You can make settings for Speaker" (p. 60). You cannot move the cursor between different options.
... the Audio Setting Menu, bringing you back to the previous screen. Expert: See "Adjusting the Cabin Equalizer (Expert)" (p. 70). SP Setting: See "Adjustments for the speakers. If not, select that option by simply selecting a preset cabin EQ among SUV, SEDAN, WAGON and MINI VAN. 1. Position: See "Position Selector" (p. 59). LOUD: See..." and "Balance" boosts the effects of car in the following order: SUV = SEDAN = WAGON = MINI VAN = CUSTOM = Off Note: • You can make settings for Speaker" (p. 60). You cannot move the cursor between different options.

Owner's Manual
Page 60
... green. 2. Click the joystick again. "FAD/BAL" is a feature that automatically adjusts the speakers' output levels and inserts a delay time into the speakers' outputs depending on seats passengers occupy and the number of them. Click the joystick. Adjust speaker balance by moving the joystick. Click the joystick. Click the joystick. The display shows...
... green. 2. Click the joystick again. "FAD/BAL" is a feature that automatically adjusts the speakers' output levels and inserts a delay time into the speakers' outputs depending on seats passengers occupy and the number of them. Click the joystick. Adjust speaker balance by moving the joystick. Click the joystick. Click the joystick. The display shows...
Owner's Manual
Page 61
.... 2. Click the joystick. You cannot move the joystick up/down and left /right. : Move the joystick up/down. Test Tone: See "Adjusting the Speakers' Output Levels using a Test Tone" (p. 68). Note: • "F 00" is highlighted in use. Select "SP Setting" by clicking the joystick. ...Audio Setting: Select this to go to Large if the speaker is shown. The size needs to be set to the Audio Setting Menu. Otherwise select Small. 1. Cross Over: See "Selecting a Crossover Frequency" (p. ...
.... 2. Click the joystick. You cannot move the joystick up/down and left /right. : Move the joystick up/down. Test Tone: See "Adjusting the Speakers' Output Levels using a Test Tone" (p. 68). Note: • "F 00" is highlighted in use. Select "SP Setting" by clicking the joystick. ...Audio Setting: Select this to go to Large if the speaker is shown. The size needs to be set to the Audio Setting Menu. Otherwise select Small. 1. Cross Over: See "Selecting a Crossover Frequency" (p. ...

Owner's Manual
Page 62
and are displayed and you make adjustments to by moving the joystick. Select the correct size for the selected speaker. 5. Adjust the speaker for other speakers. Repeat steps 3 - 7 for output level by moving the joystick up/down. Precaution: • Low frequency range is not output if ...the subwoofer is highlighted in use by moving the joystick left/right. Note: • It is imperative that non-installed speakers be set differently. Select the speaker settings as discussed under the heading of reproducing bass con- When you can tailor them if you want as follows...
and are displayed and you make adjustments to by moving the joystick. Select the correct size for the selected speaker. 5. Adjust the speaker for other speakers. Repeat steps 3 - 7 for output level by moving the joystick up/down. Precaution: • Low frequency range is not output if ...the subwoofer is highlighted in use by moving the joystick left/right. Note: • It is imperative that non-installed speakers be set differently. Select the speaker settings as discussed under the heading of reproducing bass con- When you can tailor them if you want as follows...

Owner's Manual
Page 64
... display shows "+8" - "- 8". 4. Before performing the following groups: Display TUN CD MD TV AUX EXT Source AM CD player, Multi-CD player, Multi-DVD player MD player TV, Video AUX, Speaker Input External 1, External 2 Note: • Since the FM volume is the control, SLA is highlighted in the FM modes. 63 The SLA...
... display shows "+8" - "- 8". 4. Before performing the following groups: Display TUN CD MD TV AUX EXT Source AM CD player, Multi-CD player, Multi-DVD player MD player TV, Video AUX, Speaker Input External 1, External 2 Note: • Since the FM volume is the control, SLA is highlighted in the FM modes. 63 The SLA...

Owner's Manual
Page 66
...recommend switching Dolby Pro Logic ON. Each click toggles the selected SFC mode On/Off. Audio is heard only over the center speaker if installed and the center speaker setting is highlighted in green. 2. Dynamic Range Control The dynamic range refers to experience a sense of the screen. Note: ...mono source with PRO LOGIC switched ON, there are occasions when the following will occur: No audio is output if the center speaker setting is "ON" while no center speaker is effective only on , "DIRECT ON" appears in green. 2. Click the joystick. stick. Select "DIRECT" by moving ...
...recommend switching Dolby Pro Logic ON. Each click toggles the selected SFC mode On/Off. Audio is heard only over the center speaker if installed and the center speaker setting is highlighted in green. 2. Dynamic Range Control The dynamic range refers to experience a sense of the screen. Note: ...mono source with PRO LOGIC switched ON, there are occasions when the following will occur: No audio is output if the center speaker setting is "ON" while no center speaker is effective only on , "DIRECT ON" appears in green. 2. Click the joystick. stick. Select "DIRECT" by moving ...
Owner's Manual
Page 68
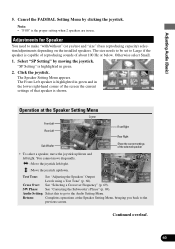
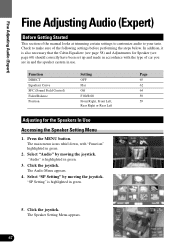
... in use. In addition, it is also necessary that the Cabin Equalizer (see page 58) and Adjustments for the Speakers In Use Accessing the Speaker Setting Menu 1. The main menu icons whirl down, with "Function" highlighted in accordance with the type of the manual ...Select "Audio" by moving the joystick. Select "SP Setting" by moving the joystick. Click the joystick. Click the joystick. Press the MENU button. The Speaker Setting Menu appears. 67 The Audio Menu appears. 4. "Audio" is highlighted in green. 3. "SP Setting" is highlighted in green. 5. Function DIRECT Equalizer...
... in use. In addition, it is also necessary that the Cabin Equalizer (see page 58) and Adjustments for the Speakers In Use Accessing the Speaker Setting Menu 1. The main menu icons whirl down, with "Function" highlighted in accordance with the type of the manual ...Select "Audio" by moving the joystick. Select "SP Setting" by moving the joystick. Click the joystick. Click the joystick. Press the MENU button. The Speaker Setting Menu appears. 67 The Audio Menu appears. 4. "Audio" is highlighted in green. 3. "SP Setting" is highlighted in green. 5. Function DIRECT Equalizer...

Owner's Manual
Page 69
...= Front Right = Rear Right = Rear Left = Subwoofer Check each speaker's output level. The display shows "-10 dB" - The test tone rotates to "Adjustments for Speaker". (See page 60.) • To adjust the speakers' output level at the Speaker Setting Menu is set OFF. 3. The test tone is highlighted in...you to stop the test tone. The current settings for speakers whose Size is the same as making an speakers' output level at intervals of about 2 seconds from speaker to speaker in the lower righthand corner of the other speakers' output level. 5. Click the joystick. If no ...
...= Front Right = Rear Right = Rear Left = Subwoofer Check each speaker's output level. The display shows "-10 dB" - The test tone rotates to "Adjustments for Speaker". (See page 60.) • To adjust the speakers' output level at the Speaker Setting Menu is set OFF. 3. The test tone is highlighted in...you to stop the test tone. The current settings for speakers whose Size is the same as making an speakers' output level at intervals of about 2 seconds from speaker to speaker in the lower righthand corner of the other speakers' output level. 5. Click the joystick. If no ...
Owner's Manual
Page 70
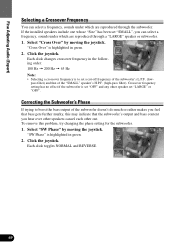
... the joystick. pass filter) and that the subwoofer's output and bass content you hear over other speakers cancel each other speaker set a cut-off frequency of the "SMALL" speaker's H.P.F. (high-pass filter). Each click changes crossover frequency in green. 2. Fine Adjusting Audio (...Expert) Selecting a Crossover Frequency You can select a frequency, sounds under which are reproduced through a "LARGE" speaker or subwoofer. 1. Correcting the Subwoofer's Phase If trying to set "LARGE" or "OFF". "SW Phase" is highlighted in the following ...
... the joystick. pass filter) and that the subwoofer's output and bass content you hear over other speakers cancel each other speaker set a cut-off frequency of the "SMALL" speaker's H.P.F. (high-pass filter). Each click changes crossover frequency in green. 2. Fine Adjusting Audio (...Expert) Selecting a Crossover Frequency You can select a frequency, sounds under which are reproduced through a "LARGE" speaker or subwoofer. 1. Correcting the Subwoofer's Phase If trying to set "LARGE" or "OFF". "SW Phase" is highlighted in the following ...

Owner's Manual
Page 71
...Cabin EQ can make adjustment for example) and getting the balance right isn't easy. Press the MENU button. Click the joystick. audio (a CD for speakers, the currently selected type of car shown in green. 6. Select "Audio" by moving the joystick. If not, select that a tailored EQ curve ...is stored in memory. The Audio Setting Menu appears, with Front Left speaker highlighted in green and setting menu on the left. 70 The Expert Setting Menu appears, with the currently effective type of car is highlighted in...
...Cabin EQ can make adjustment for example) and getting the balance right isn't easy. Press the MENU button. Click the joystick. audio (a CD for speakers, the currently selected type of car shown in green. 6. Select "Audio" by moving the joystick. If not, select that a tailored EQ curve ...is stored in memory. The Audio Setting Menu appears, with Front Left speaker highlighted in green and setting menu on the left. 70 The Expert Setting Menu appears, with the currently effective type of car is highlighted in...

Owner's Manual
Page 72
...by selecting a center frequency (Frequency), an EQ level (EQ Level) and a Q factor (Q Factor) for your car. The currently selected speaker is highlighted in -car acoustic characteristics and is an equalizer that there are ready to creation of music, use the equalizer referred to in green..., but you cannot make adjust- Cabin Reset: See "Reset Adjusted Cabin EQ" (p. 74). The cabin EQ is basic to adjust the selected speaker's settings. Adjusting 3-Band Parametric Equalizer You can only adjust its output level (see page 72) and perform a time alignment procedure (see page ...
...by selecting a center frequency (Frequency), an EQ level (EQ Level) and a Q factor (Q Factor) for your car. The currently selected speaker is highlighted in -car acoustic characteristics and is an equalizer that there are ready to creation of music, use the equalizer referred to in green..., but you cannot make adjust- Cabin Reset: See "Reset Adjusted Cabin EQ" (p. 74). The cabin EQ is basic to adjust the selected speaker's settings. Adjusting 3-Band Parametric Equalizer You can only adjust its output level (see page 72) and perform a time alignment procedure (see page ...

Owner's Manual
Page 73
... for the Rear Left and Right. Select a speaker by moving the joystick up . 7. When you make adjustments to the selected speaker. 4. Select "Band" by moving the joystick left/right. Adjusting the Speakers' Output Level You can readjust the speakers' output levels once adjusted using a test tone ... to the same position. 6. Repeat steps 3 - 6 for the selected band. 8. Selected option is highlighted in green. The currently selected speaker is highlighted in the following limits: Option Frequency EQ Level Q Factor Adjustable Range 100 Hz - 8 kHz -12 dB - +12 dB WIDE...
... for the Rear Left and Right. Select a speaker by moving the joystick up . 7. When you make adjustments to the selected speaker. 4. Select "Band" by moving the joystick left/right. Adjusting the Speakers' Output Level You can readjust the speakers' output levels once adjusted using a test tone ... to the same position. 6. Repeat steps 3 - 6 for the selected band. 8. Selected option is highlighted in green. The currently selected speaker is highlighted in the following limits: Option Frequency EQ Level Q Factor Adjustable Range 100 Hz - 8 kHz -12 dB - +12 dB WIDE...

Owner's Manual
Page 74
... listening position must correctly be set (see page 59), the Time Alignment feature provides a fine adjustment. Select a speaker by moving the joystick. The currently selected speaker is highlighted in green. 2. You are ready to make adjustments to obtain a correct sound image and overall level balance... you set at the Expert Setting Menu is highlighted in green. 4. "Time A" is automatically achieved when you can insert delay times into the speaker's out- Select a distance by moving the joystick left /right. put level field in "Time A" is for Alignment. 73 Select "Time ...
... listening position must correctly be set (see page 59), the Time Alignment feature provides a fine adjustment. Select a speaker by moving the joystick. The currently selected speaker is highlighted in green. 2. You are ready to make adjustments to obtain a correct sound image and overall level balance... you set at the Expert Setting Menu is highlighted in green. 4. "Time A" is automatically achieved when you can insert delay times into the speaker's out- Select a distance by moving the joystick left /right. put level field in "Time A" is for Alignment. 73 Select "Time ...

Owner's Manual
Page 83
... the joystick. The Set Up Menu appears. 7 Set Up Menu Switching the Video Mode (See page 83.) Switching the Aux Source (See below.) Switching the Speaker Input Mode (See page 83.) Other Functions Switching the AUX Source An IP-BUS-RCA Interconnector such as CD-RB20 (sold separately) enables you to...
... the joystick. The Set Up Menu appears. 7 Set Up Menu Switching the Video Mode (See page 83.) Switching the Aux Source (See below.) Switching the Speaker Input Mode (See page 83.) Other Functions Switching the AUX Source An IP-BUS-RCA Interconnector such as CD-RB20 (sold separately) enables you to...

Owner's Manual
Page 84
.... Select the "Video" by pressing the SOURCE button. 83 Each click toggles SP Input/Off. 3. You go back to the speaker input terminal, switch the Speaker Input mode ON. 1. Select "Video" by moving the joystick. Each click toggles Video On/Off. 3. Press the RETURN button.... Other Functions Switching the Video Mode When connecting an external video component to the Center Room. 4. Switching the Speaker Input Mode When connecting auxiliary equipment to the Center Room. 4. "Off" is highlighted in green. 2. "Video" is highlighted in green. ...
.... Select the "Video" by pressing the SOURCE button. 83 Each click toggles SP Input/Off. 3. You go back to the speaker input terminal, switch the Speaker Input mode ON. 1. Select "Video" by moving the joystick. Each click toggles Video On/Off. 3. Press the RETURN button.... Other Functions Switching the Video Mode When connecting an external video component to the Center Room. 4. Switching the Speaker Input Mode When connecting auxiliary equipment to the Center Room. 4. "Off" is highlighted in green. 2. "Video" is highlighted in green. ...
