Installation Manual
Page 2
...UNE AUTRE SORTIE DE COURANT, SAUF SI LES LAMES PEUVENT ETRE INSEREES A FOND SANS EN LAISSER AUCUNE PARTIE A DECOUVVERT. If this Pioneer product. For U.S. C67-7-3_En If the socket outlets on the associated equipment are not suitable for buying this equipment does cause harmful ...supply cord of this product or cords associated with accessories sold with Canadian ICES-003. D1-4-2-6-1_En NOTE: This equipment has been tested and found to comply with electric appliances such as an electrical shock hazard could exist if connected to a socket outlet. Please ...
...UNE AUTRE SORTIE DE COURANT, SAUF SI LES LAMES PEUVENT ETRE INSEREES A FOND SANS EN LAISSER AUCUNE PARTIE A DECOUVVERT. If this Pioneer product. For U.S. C67-7-3_En If the socket outlets on the associated equipment are not suitable for buying this equipment does cause harmful ...supply cord of this product or cords associated with accessories sold with Canadian ICES-003. D1-4-2-6-1_En NOTE: This equipment has been tested and found to comply with electric appliances such as an electrical shock hazard could exist if connected to a socket outlet. Please ...
Installation Manual
Page 14
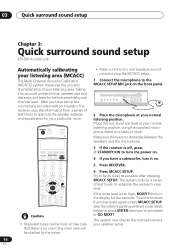
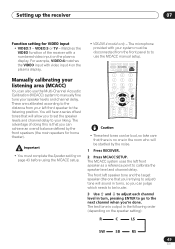
...-D914 model only Automatically calibrating your listening area (MCACC) The Multi-Channel Acoustic Calibration (MCACC) system measures the acoustic characteristics of test tones to establish the ambient noise level. Make sure there are not moved during the MCACC setup. 1 Connect the microphone to ...optimize the speaker settings and equalization for your listening area, taking into account ambient noise, speaker size and distance, and tests for five seconds. To exit and check the noise levels again, press MCACC SETUP (see the notes regarding ambient noise levels below)...
...-D914 model only Automatically calibrating your listening area (MCACC) The Multi-Channel Acoustic Calibration (MCACC) system measures the acoustic characteristics of test tones to establish the ambient noise level. Make sure there are not moved during the MCACC setup. 1 Connect the microphone to ...optimize the speaker settings and equalization for your listening area, taking into account ambient noise, speaker size and distance, and tests for five seconds. To exit and check the noise levels again, press MCACC SETUP (see the notes regarding ambient noise levels below)...
Installation Manual
Page 31
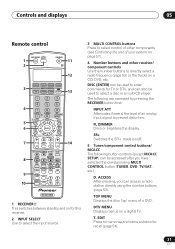
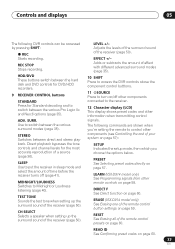
... MCACC SETUP) can be accessed after you can also be used to enter commands for recall (page 54). 31 En SURR STEREO SLEEP MIDNIGHT/ LOUDNESS TEST TONE SHIFT CHSELECT LEVEL EFFECT RECEIVER 1 RECEIVER This switches between standby and on for this receiver. 2 INPUT SELECT Use to select the input source. 3 MULTI...
... MCACC SETUP) can be accessed after you can also be used to enter commands for recall (page 54). 31 En SURR STEREO SLEEP MIDNIGHT/ LOUDNESS TEST TONE SHIFT CHSELECT LEVEL EFFECT RECEIVER 1 RECEIVER This switches between standby and on for this receiver. 2 INPUT SELECT Use to select the input source. 3 MULTI...
Installation Manual
Page 33
... bypasses the tone controls and channel levels for Standard decoding and to switch between the various Pro Logic IIx and Neo:6 options (page 35). TEST TONE Sounds the test tone when setting up the surround sound of the receiver (page 50). RESET See Erasing all of your system on page 57. Adjusts...
... bypasses the tone controls and channel levels for Standard decoding and to switch between the various Pro Logic IIx and Neo:6 options (page 35). TEST TONE Sounds the test tone when setting up the surround sound of the receiver (page 50). RESET See Erasing all of your system on page 57. Adjusts...
Installation Manual
Page 49
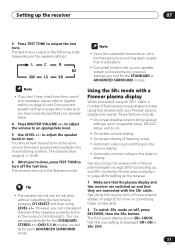
You will hear a series of test tones that you're trying to adjust) tone will allow you to set the speaker levels and channel delay to your ...uses the left front speaker to calibrate the speaker level and channel delay. For example, VIDEO:4 matches the VIDEO input with your liking. The test tone is no one that will sound in the following order (depending on the speaker setting): R C LS SW SB RS 49 En ... ST T.EDIT ENTER ST MCACC SETUP BAND GUIDE TUNE TV CONTROL RETURN TV VOL INPUT SELECT TV CH VOL • These test tones can also use the MCACC manual setup.
You will hear a series of test tones that you're trying to adjust) tone will allow you to set the speaker levels and channel delay to your ...uses the left front speaker to calibrate the speaker level and channel delay. For example, VIDEO:4 matches the VIDEO input with your liking. The test tone is no one that will sound in the following order (depending on the speaker setting): R C LS SW SB RS 49 En ... ST T.EDIT ENTER ST MCACC SETUP BAND GUIDE TUNE TV CONTROL RETURN TV VOL INPUT SELECT TV CH VOL • These test tones can also use the MCACC manual setup.
Installation Manual
Page 50
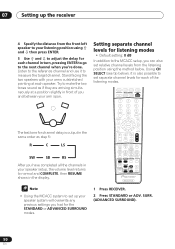
.... 2 Press STANDARD or ADV. Using CH SELECT (see tip below . DVD/LD TV/SAT DVR/VCR TVCONT MULTI CONTROL CD CD-R/TAPE TUNER RECEIVER The test tone for each speaker. SURR. (ADVANCED SURROUND). 50 En Try to make the two tones sound as step 5: R C LS SW SB RS After you 're...
.... 2 Press STANDARD or ADV. Using CH SELECT (see tip below . DVD/LD TV/SAT DVR/VCR TVCONT MULTI CONTROL CD CD-R/TAPE TUNER RECEIVER The test tone for each speaker. SURR. (ADVANCED SURROUND). 50 En Try to make the two tones sound as step 5: R C LS SW SB RS After you 're...
Installation Manual
Page 51
... SR+ cable, a number of features become available to make sure you don't hear a test tone from each ADVANCED SURROUND mode. 1 Make sure that the plasma display and this receiver with your Pioneer plasma display even easier. The front panel display shows SR+ CHECK, then the new setting is...for the STANDARD or ADVANCED SURROUND modes. • If you have correctly specified your speakers, please refer to output the test tone. See also Using this receiver with a Pioneer plasma display on page 26 for more on connecting these components. 2 To switch SR+ mode on the plasma display. ...
... SR+ cable, a number of features become available to make sure you don't hear a test tone from each ADVANCED SURROUND mode. 1 Make sure that the plasma display and this receiver with your Pioneer plasma display even easier. The front panel display shows SR+ CHECK, then the new setting is...for the STANDARD or ADVANCED SURROUND modes. • If you have correctly specified your speakers, please refer to output the test tone. See also Using this receiver with a Pioneer plasma display on page 26 for more on connecting these components. 2 To switch SR+ mode on the plasma display. ...