Owner's Manual
Page 6
...audio 34 Connecting an analog audio component 34 Connecting using the component video output 35 About progressive scan video 35 Connecting using HDMI 35 Switching the HDMI audio setting. . . . . .36 Resetting the HDMI connection 36 About HDMI 36 Using this unit with a Pioneer Flat Panel TV 36 SR+... Setup for Pioneer Flat Panel TVs 37 ...
...audio 34 Connecting an analog audio component 34 Connecting using the component video output 35 About progressive scan video 35 Connecting using HDMI 35 Switching the HDMI audio setting. . . . . .36 Resetting the HDMI connection 36 About HDMI 36 Using this unit with a Pioneer Flat Panel TV 36 SR+... Setup for Pioneer Flat Panel TVs 37 ...
Owner's Manual
Page 10
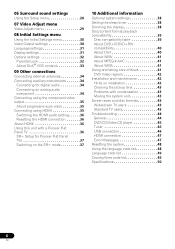
... modes is active (page 18). 4 SURR. Lights when one of a DTS source (page 16). 2 PRGSVE Lights when progressive scan video signal is given from the component video output terminal (page 35). 3 SOUND Lights when the Sound Retriever is selected (page 17).
... modes is active (page 18). 4 SURR. Lights when one of a DTS source (page 16). 2 PRGSVE Lights when progressive scan video signal is given from the component video output terminal (page 35). 3 SOUND Lights when the Sound Retriever is selected (page 17).
Owner's Manual
Page 12
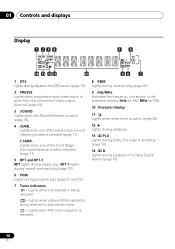
... speakers are not moved during setup as this may be as quiet as possible after pressing SHIFT+MCACC. OPTICAL LINE 1 DIGITAL IN MCACC SETUP MIC COMPONENT PR VIDEO VIDEO PB IN Y CONTROL VIDEO OUT 2 Place the microphone at your listening area, taking into account ambient noise and testing for channel delay...
... speakers are not moved during setup as this may be as quiet as possible after pressing SHIFT+MCACC. OPTICAL LINE 1 DIGITAL IN MCACC SETUP MIC COMPONENT PR VIDEO VIDEO PB IN Y CONTROL VIDEO OUT 2 Place the microphone at your listening area, taking into account ambient noise and testing for channel delay...

Owner's Manual
Page 15
... frequency. • Auto tuning: Press and hold TUNE +/- repeatedly to this unit for more on this . These settings are three tuning modes - See Connecting auxiliary components on . 2 Press LINE to choose 'ST.MEM.' The tuner will stop on page 26. 1 Make sure that you always have easy access to your favorite...
... frequency. • Auto tuning: Press and hold TUNE +/- repeatedly to this unit for more on this . These settings are three tuning modes - See Connecting auxiliary components on . 2 Press LINE to choose 'ST.MEM.' The tuner will stop on page 26. 1 Make sure that you always have easy access to your favorite...
Owner's Manual
Page 30
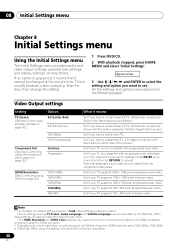
...side of the screen.2 Set if your TV is playing. When using the HDMI connector. 2 This setting can also be made from the component video jacks. Press ENTER once more to confirm (or RETURN to 1920x1080p, 1920x1080i or 1280x720p. Set if your TV supports 720 x 480 ...a conventional 4:3 TV. Set if your TV supports 1920 x 1080 pixel interlace video. Initial Settings 3 Use and ENTER to an HDMI-compatible component using this setting, only the HDMI connection is not compatible with the sides cropped so that the image fills the screen. Widescreen movies are connected...
...side of the screen.2 Set if your TV is playing. When using the HDMI connector. 2 This setting can also be made from the component video jacks. Press ENTER once more to confirm (or RETURN to 1920x1080p, 1920x1080i or 1280x720p. Set if your TV supports 720 x 480 ...a conventional 4:3 TV. Set if your TV supports 1920 x 1080 pixel interlace video. Initial Settings 3 Use and ENTER to an HDMI-compatible component using this setting, only the HDMI connection is not compatible with the sides cropped so that the image fills the screen. Widescreen movies are connected...

Owner's Manual
Page 31
... DVD menus are shown in the language selected. On-screen displays are displayed in your selected subtitle language, if possible. Outputs 8-bit component video format (default setting for HDMI-compatible DVI devices). Select to choose a language other than the ones displayed (see Using the language...DVD disc menus are in the same language as displayed Other Language DVD Menu Language w/Subtitle Lang. Option Full range RGB RGB Component What it means On-screen displays of the player are displayed in English. No multi-angle indication is an English soundtrack on ...
... DVD menus are shown in the language selected. On-screen displays are displayed in your selected subtitle language, if possible. Outputs 8-bit component video format (default setting for HDMI-compatible DVI devices). Select to choose a language other than the ones displayed (see Using the language...DVD disc menus are in the same language as displayed Other Language DVD Menu Language w/Subtitle Lang. Option Full range RGB RGB Component What it means On-screen displays of the player are displayed in English. No multi-angle indication is an English soundtrack on ...

Owner's Manual
Page 34
... DIGITAL IN jack to the digital output of vinyl-insulated wire and set up an external FM antenna. Connecting an analog audio component You can connect both analog and digital external audio sources to hook up either indoors or outdoors. Digital audio sources include digital ...an MD player, digital satellite, or a game system. Connecting for digital audio This system has optical-type digital inputs. These include digital components such as a tape player. Leave the loop antenna connected. For more information see Connecting using RCA pin-plug stereo cables. To audio output...
... DIGITAL IN jack to the digital output of vinyl-insulated wire and set up an external FM antenna. Connecting an analog audio component You can connect both analog and digital external audio sources to hook up either indoors or outdoors. Digital audio sources include digital ...an MD player, digital satellite, or a game system. Connecting for digital audio This system has optical-type digital inputs. These include digital components such as a tape player. Leave the loop antenna connected. For more information see Connecting using RCA pin-plug stereo cables. To audio output...

Owner's Manual
Page 35
... • This player is recommended that the user switch the connection to interlace video, progressive scan video effectively doubles the scanning rate of component inputs on your TV. Connecting using HDMI If you have connected, using a DVI connection may cause artifacts to a set to 720x480i ... it to this product and may result in unreliable signal transfers. • When you change the HDMI settings to match the new component (see Video Output settings on a HDMI-compatible monitor. Progressive scan video is switchable between Interlace and Progressive formats. If there are ...
... • This player is recommended that the user switch the connection to interlace video, progressive scan video effectively doubles the scanning rate of component inputs on your TV. Connecting using HDMI If you have connected, using a DVI connection may cause artifacts to a set to 720x480i ... it to this product and may result in unreliable signal transfers. • When you change the HDMI settings to match the new component (see Video Output settings on a HDMI-compatible monitor. Progressive scan video is switchable between Interlace and Progressive formats. If there are ...
Owner's Manual
Page 37
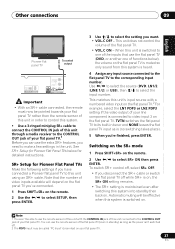
... numbered video input on the flat panel TV.2 For example, select the LN1 PDP3 or LN2 PDP3 setting if the video output of your line component is heard. 4 Assign any input source connected to the flat panel TV to the corresponding input number. Use / to select the source...back on the flat panel TV. Other connections 09 English Deutsch Français Italiano Nederlands Español Pioneer flat panel TV To control output OPTICAL LINE 1 DIGITAL IN MCACC SETUP MIC COMPONENT PR VIDEO VIDEO PB IN Y CONTROL VIDEO OUT Important • With an SR+ cable connected, the ...
... numbered video input on the flat panel TV.2 For example, select the LN1 PDP3 or LN2 PDP3 setting if the video output of your line component is heard. 4 Assign any input source connected to the flat panel TV to the corresponding input number. Use / to select the source...back on the flat panel TV. Other connections 09 English Deutsch Français Italiano Nederlands Español Pioneer flat panel TV To control output OPTICAL LINE 1 DIGITAL IN MCACC SETUP MIC COMPONENT PR VIDEO VIDEO PB IN Y CONTROL VIDEO OUT Important • With an SR+ cable connected, the ...
Owner's Manual
Page 42
...61491; Use in connection with cloth - In this instance, the following points when choosing a location: Do... Use in a kitchen or other component in your player- If a disc is compatible with conventional, fully circular discs only. DVD Video regions All DVD Video discs carry a region mark that ...place where the system will not play in your stereo system that becomes hot in use of the system unit's feet. 42 En Pioneer disclaims all four of shaped discs. Installation and maintenance Hints on an unstable surface, or one that indicates which region(s) of an ...
...61491; Use in connection with cloth - In this instance, the following points when choosing a location: Do... Use in a kitchen or other component in your player- If a disc is compatible with conventional, fully circular discs only. DVD Video regions All DVD Video discs carry a region mark that ...place where the system will not play in your stereo system that becomes hot in use of the system unit's feet. 42 En Pioneer disclaims all four of shaped discs. Installation and maintenance Hints on an unstable surface, or one that indicates which region(s) of an ...
Owner's Manual
Page 44
...as static electricity, disconnect the plug from the outlet and insert again to return to normal operating conditions. Investigate the other Pioneer components, make sure the component is selected. • If you're using OPEN/CLOSE. 10 Additional information Troubleshooting Incorrect operations are connected.... • Make sure the voltage of the mains power source is 96 kHz, it to a Pioneer flat panel TV with this component, check the points below , ask your nearest Pioneer authorized service center or your dealer for the model. • Try reducing the volume level. &#...
...as static electricity, disconnect the plug from the outlet and insert again to return to normal operating conditions. Investigate the other Pioneer components, make sure the component is selected. • If you're using OPEN/CLOSE. 10 Additional information Troubleshooting Incorrect operations are connected.... • Make sure the voltage of the mains power source is 96 kHz, it to a Pioneer flat panel TV with this component, check the points below , ask your nearest Pioneer authorized service center or your dealer for the model. • Try reducing the volume level. &#...
Owner's Manual
Page 45
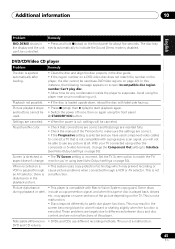
...which may prevent recording or cause picture problems when connected through a VCR or AV selector. Picture playback stops and buttons cannot be used component video cables to make sure the settings are not malfunctions of the picture depending on page 42). No picture/No color. • ... Some discs during playback or dark. This is not a malfunction. • Discs respond differently to match the TV/ aspect doesn't change the Component Out setting to Interlace (see any condensation inside the player to start playback again. • Switch the power off once, then on page 30...
...which may prevent recording or cause picture problems when connected through a VCR or AV selector. Picture playback stops and buttons cannot be used component video cables to make sure the settings are not malfunctions of the picture depending on page 42). No picture/No color. • ... Some discs during playback or dark. This is not a malfunction. • Discs respond differently to match the TV/ aspect doesn't change the Component Out setting to Interlace (see any condensation inside the player to start playback again. • Switch the power off once, then on page 30...
Owner's Manual
Page 47
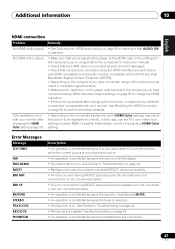
No HDMI video output. • Make sure that you've selected this player as the HDMI input in the settings for the component you selected a resolution incompatible with your monitor after changing the HDMI Color setting (page 31). • Depending on page 30 to change...Color problems occur with both DVI and High Bandwidth Digital Content Protection (HDCP)). • Depending on the component you have connected, using HDMI. In this player matches that of the component you have connected using a DVI connection may result in Troubleshooting on page 44. • Background noise is...
No HDMI video output. • Make sure that you've selected this player as the HDMI input in the settings for the component you selected a resolution incompatible with your monitor after changing the HDMI Color setting (page 31). • Depending on page 30 to change...Color problems occur with both DVI and High Bandwidth Digital Content Protection (HDCP)). • Depending on the component you have connected, using HDMI. In this player matches that of the component you have connected using a DVI connection may result in Troubleshooting on page 44. • Background noise is...