
Owner's Manual
Page 1
... service bulletins on your new product • Improve product development Your input helps us continue to design products that meet your needs. • Receive a free Pioneer newsletter Registered customers can opt in to receive a monthly newsletter.
... service bulletins on your new product • Improve product development Your input helps us continue to design products that meet your needs. • Receive a free Pioneer newsletter Registered customers can opt in to receive a monthly newsletter.

Owner's Manual
Page 2
THE SERIAL NUMBER FOR THIS EQUIPMENT IS LOCATED IN THE REAR. PLEASE WRITE THIS SERIAL NUMBER ON YOUR ENCLOSED WARRANTY CARD AND KEEP IN A SECURE AREA. These limits are designed to provide reasonable protection against harmful interference in the cabinet are provided for ventilation to ensure reliable operation of the product, and to protect it from that may cause harmful interference to radio communications. However, there is no guarantee that interference will expose you to chemicals listed on proposition 65 known to the State of California and other governmental entities to ...
THE SERIAL NUMBER FOR THIS EQUIPMENT IS LOCATED IN THE REAR. PLEASE WRITE THIS SERIAL NUMBER ON YOUR ENCLOSED WARRANTY CARD AND KEEP IN A SECURE AREA. These limits are designed to provide reasonable protection against harmful interference in the cabinet are provided for ventilation to ensure reliable operation of the product, and to protect it from that may cause harmful interference to radio communications. However, there is no guarantee that interference will expose you to chemicals listed on proposition 65 known to the State of California and other governmental entities to ...

Owner's Manual
Page 3
... plug has two blades with part 15 of the FCC Rules. Product Name: DVD/CD Receiver Model Number: XV-DV575, XV-DV580 Responsible Party Name: PIONEER ELECTRONICS SERVICE, INC. Phone: 1-800-421-1404 CAUTION This product is not waterproof. less than 85 %RH (cooling vents not blocked) Do not install this...
... plug has two blades with part 15 of the FCC Rules. Product Name: DVD/CD Receiver Model Number: XV-DV575, XV-DV580 Responsible Party Name: PIONEER ELECTRONICS SERVICE, INC. Phone: 1-800-421-1404 CAUTION This product is not waterproof. less than 85 %RH (cooling vents not blocked) Do not install this...

Owner's Manual
Page 4
... tie it there. Replacement and mounting of sound. Make sure it is included for your equipment at two feet. Now it damaged, ask your nearest PIONEER authorized service center or your equipment offers. Over time your hearing. So what sounds "normal" can maximize the fun and excitement your dealer for a replacement...
... tie it there. Replacement and mounting of sound. Make sure it is included for your equipment at two feet. Now it damaged, ask your nearest PIONEER authorized service center or your equipment offers. Over time your hearing. So what sounds "normal" can maximize the fun and excitement your dealer for a replacement...
Owner's Manual
Page 5
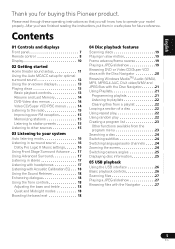
... Controls and displays Front panel 7 Remote control 8 Display 10 02 Getting started Home theater sound setup 11 Using the Auto MCACC setup for buying this Pioneer product.
... Controls and displays Front panel 7 Remote control 8 Display 10 02 Getting started Home theater sound setup 11 Using the Auto MCACC setup for buying this Pioneer product.
Owner's Manual
Page 6
... using HDMI 35 Switching the HDMI audio setting. . . . . .36 Resetting the HDMI connection 36 About HDMI 36 Using this unit with a Pioneer Flat Panel TV 36 SR+ Setup for Pioneer Flat Panel TVs 37 Switching on the SR+ mode 37 10 Additional information Optional system settings 38 Setting the sleep timer 38...
... using HDMI 35 Switching the HDMI audio setting. . . . . .36 Resetting the HDMI connection 36 About HDMI 36 Using this unit with a Pioneer Flat Panel TV 36 SR+ Setup for Pioneer Flat Panel TVs 37 Switching on the SR+ mode 37 10 Additional information Optional system settings 38 Setting the sleep timer 38...
Owner's Manual
Page 7
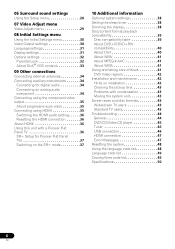
COMPATIBLE 7 8 9 10 11 1 OPEN/CLOSE Opens/closes the disc tray. 2 DVD/CD Selects the DVD/CD function and starts/ pauses/resumes playback. 3 Stops playback. 4 USB Selects the USB function and starts/pauses playback. 5 VOLUME +/- English Deutsch Français Italiano Nederlands Español Controls and displays 01 Chapter 1 Controls and displays Front panel 1 234 5 6 11 USB interface Connect a USB device for playback (see USB playback on or into standby. 7 Disc tray 8 Remote Sensor 9 Display See Display below. 10 PHONES jack Connect ...
COMPATIBLE 7 8 9 10 11 1 OPEN/CLOSE Opens/closes the disc tray. 2 DVD/CD Selects the DVD/CD function and starts/ pauses/resumes playback. 3 Stops playback. 4 USB Selects the USB function and starts/pauses playback. 5 VOLUME +/- English Deutsch Français Italiano Nederlands Español Controls and displays 01 Chapter 1 Controls and displays Front panel 1 234 5 6 11 USB interface Connect a USB device for playback (see USB playback on or into standby. 7 Disc tray 8 Remote Sensor 9 Display See Display below. 10 PHONES jack Connect ...
Owner's Manual
Page 8
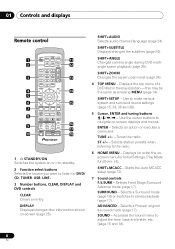
... Use the cursor buttons to adjust the tone, bass and treble, etc. (page 16 and 18). 8 En Selects an option or executes a command. SURROUND - Selects a Pioneer original surround mode (page 17). Accesses the sound menu to navigate on-screen displays and menus. SURR SURROUND ADVANCED SOUND 11 12 13 14 15...
... Use the cursor buttons to adjust the tone, bass and treble, etc. (page 16 and 18). 8 En Selects an option or executes a command. SURROUND - Selects a Pioneer original surround mode (page 17). Accesses the sound menu to navigate on-screen displays and menus. SURR SURROUND ADVANCED SOUND 11 12 13 14 15...

Owner's Manual
Page 9
... MUTE Mutes the sound (press again to cancel). 18 VOLUME +/- Outputs the test tone (for an explanation of these controls. 9 TV CONTROL buttons These control Pioneer flat panel TVs. 10 SHIFT Press to a previous menu screen.
... MUTE Mutes the sound (press again to cancel). 18 VOLUME +/- Outputs the test tone (for an explanation of these controls. 9 TV CONTROL buttons These control Pioneer flat panel TVs. 10 SHIFT Press to a previous menu screen.
Owner's Manual
Page 10
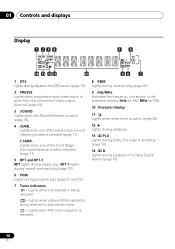
Lights when one of a DTS source (page 16). 2 PRGSVE Lights when progressive scan video signal is given from the component video output terminal (page 35). 3 SOUND Lights when the Sound Retriever is active (page 18). 4 SURR. 01 Controls and displays Display 1 23 4 56 PRGSVE SOUND DTS F.SURR. 2D 2PL RPT -1 kHz PGM MHz RDM 14 13 12 11 10 98 7 1 DTS Lights during playback of the Front Stage Surround Advance mode is selected (page 17). 5 RPT and RPT-1 RPT lights during repeat play. Lights when FM mono reception is selected. 8 RDM Lights during random play (page 22). 9 kHz/...
Lights when one of a DTS source (page 16). 2 PRGSVE Lights when progressive scan video signal is given from the component video output terminal (page 35). 3 SOUND Lights when the Sound Retriever is active (page 18). 4 SURR. 01 Controls and displays Display 1 23 4 56 PRGSVE SOUND DTS F.SURR. 2D 2PL RPT -1 kHz PGM MHz RDM 14 13 12 11 10 98 7 1 DTS Lights during playback of the Front Stage Surround Advance mode is selected (page 17). 5 RPT and RPT-1 RPT lights during repeat play. Lights when FM mono reception is selected. 8 RDM Lights during random play (page 22). 9 kHz/...
Owner's Manual
Page 11
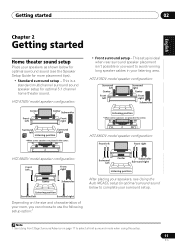
HTZ-575DV model speaker configuration: • Front surround setup - FL FR C HTZ-580DV model speaker configuration: Front left Front right Center Subwoofer Listening position Surround left Surround right Depending on page 17 to use the following setup option:1 Listening position *When center speakers are placed in the center. Note 1 See Using Front Stage Surround Advance on the size and characteristics of your room, you want to complete your surround setup. SL SR FL C FR HTZ-580DV model speaker configuration: Front left Front right Surround left ...
HTZ-575DV model speaker configuration: • Front surround setup - FL FR C HTZ-580DV model speaker configuration: Front left Front right Center Subwoofer Listening position Surround left Surround right Depending on page 17 to use the following setup option:1 Listening position *When center speakers are placed in the center. Note 1 See Using Front Stage Surround Advance on the size and characteristics of your room, you want to complete your surround setup. SL SR FL C FR HTZ-580DV model speaker configuration: Front left Front right Surround left ...
Owner's Manual
Page 12
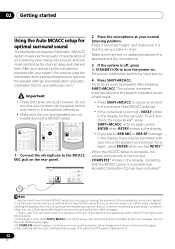
After you see an ERR MIC or ERR SP message in a sub-optimal calibration. • Make sure the mic and speakers are not moved during setup as possible after pressing SHIFT+MCACC. OPTICAL LINE 1 DIGITAL IN MCACC SETUP MIC COMPONENT PR VIDEO VIDEO PB IN Y CONTROL VIDEO OUT 2 Place the microphone at your listening area, taking into account ambient noise and testing for channel delay and channel level. To try again, press ENTER when RETRY shows in the display. • If you change the placement of your speakers or your room layout). 2 • If the room environment is...
After you see an ERR MIC or ERR SP message in a sub-optimal calibration. • Make sure the mic and speakers are not moved during setup as possible after pressing SHIFT+MCACC. OPTICAL LINE 1 DIGITAL IN MCACC SETUP MIC COMPONENT PR VIDEO VIDEO PB IN Y CONTROL VIDEO OUT 2 Place the microphone at your listening area, taking into account ambient noise and testing for channel delay and channel level. To try again, press ENTER when RETRY shows in the display. • If you change the placement of your speakers or your room layout). 2 • If the room environment is...
Owner's Manual
Page 13
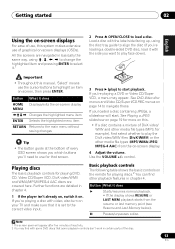
control. Playing discs The basic playback controls for playing discs.2 You can find with the side you 'll need to use for that screen. 3 Press (play face down). If you're playing a disc with video, also turn on -screen display MENU Changes the highlighted menu item ENTER Selects the highlighted menu item RETURN Returns to the main menu without saving changes Tip • The button guide at the bottom of every OSD screen shows you which buttons you want to highlight an item on -screen displays (OSDs). Basic playback controls The following table shows the basic controls on ....
control. Playing discs The basic playback controls for playing discs.2 You can find with the side you 'll need to use for that screen. 3 Press (play face down). If you're playing a disc with video, also turn on -screen display MENU Changes the highlighted menu item ENTER Selects the highlighted menu item RETURN Returns to the main menu without saving changes Tip • The button guide at the bottom of every OSD screen shows you which buttons you want to highlight an item on -screen displays (OSDs). Basic playback controls The following table shows the basic controls on ....
Owner's Manual
Page 14
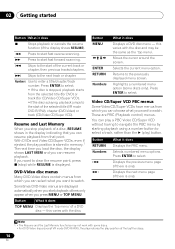
Resume and Last Memory When you stop ) while RESUME is displayed. DVD-Video disc menus Many DVD-Video discs contain menus from which you can resume playback from the selected title (for DVD) or track (for CD/Video CD/Super VCD). • If the disc is one ). Sometimes DVD-Video menus are PBC (Playback control) menus. this varies with the disc and may not work with the disc. Moves the cursor around the screen. Highlights a numbered menu option (some discs. • For DVD-Video discs (except VR mode DVD-R/-RW), the player stores the play ) button. Video CD/Super VCD PBC menus Some ...
Resume and Last Memory When you stop ) while RESUME is displayed. DVD-Video disc menus Many DVD-Video discs contain menus from which you can resume playback from the selected title (for DVD) or track (for CD/Video CD/Super VCD). • If the disc is one ). Sometimes DVD-Video menus are PBC (Playback control) menus. this varies with the disc and may not work with the disc. Moves the cursor around the screen. Highlights a numbered menu option (some discs. • For DVD-Video discs (except VR mode DVD-R/-RW), the player stores the play ) button. Video CD/Super VCD PBC menus Some ...

Owner's Manual
Page 15
There are saved along with the preset. 2 Press SHIFT+SETUP and use the number buttons to do this . • To connect a USB device to the USB terminal, see USB playback on page 26. 1 Make sure that you always have to manually tune in every time you want to listen. 1 Press TUNER to switch to the tuner, then press repeatedly to select the AM or FM band. until the frequency display starts to move , then release. The tuner will stop on . 2 Press LINE to select the source. If necessary, fine tune the frequency using the manual tuning method. Memorizing stations You can receive both FM and ...
There are saved along with the preset. 2 Press SHIFT+SETUP and use the number buttons to do this . • To connect a USB device to the USB terminal, see USB playback on page 26. 1 Make sure that you always have to manually tune in every time you want to listen. 1 Press TUNER to switch to the tuner, then press repeatedly to select the AM or FM band. until the frequency display starts to move , then release. The tuner will stop on . 2 Press LINE to select the source. If necessary, fine tune the frequency using the manual tuning method. Memorizing stations You can receive both FM and ...
Owner's Manual
Page 16
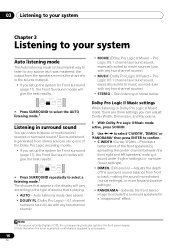
Auto listening mode (see above) • DOLBY PL (Dolby Pro Logic) - 4.1 channel surround sound (use with any two-channel source) • STEREO - or 'PANORAMA' then press ENTER to movie sources (use with any two-channel source) • MOVIE (Dolby Pro Logic II Movie) - Note 1 If the source is Dolby Digital or DTS, the corresponding indicator lights in the front panel display. 2 Note that 's playing. • AUTO - Provides a better blend of the surround sound balance from front to back, making it was mastered: the output from stereo sources using one of source that when the ...
Auto listening mode (see above) • DOLBY PL (Dolby Pro Logic) - 4.1 channel surround sound (use with any two-channel source) • STEREO - or 'PANORAMA' then press ENTER to movie sources (use with any two-channel source) • MOVIE (Dolby Pro Logic II Movie) - Note 1 If the source is Dolby Digital or DTS, the corresponding indicator lights in the front panel display. 2 Note that 's playing. • AUTO - Provides a better blend of the surround sound balance from front to back, making it was mastered: the output from stereo sources using one of source that when the ...
Owner's Manual
Page 17
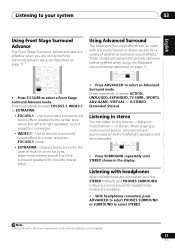
MCACC TUNE TEST TONE F.S.SURR SURROUND ADVANCED SOUND • Press ADVANCED to select FOCUS5.1, WIDE5.1 or EXTRAPWR. • FOCUS5.1 - in the display. Press repeatedly to select an Advanced Surround mode. stereo or multichannel - When playing a multichannel source, all channels are downmixed to the center area where the left /right speakers and the subwoofer. Note 1 Note that when the tuner is selected, multichannel playback is not possible. 17 En Outputs stereo sound (in stereo You can be used with headphones When headphones are connected, only the STEREO (default) and ...
MCACC TUNE TEST TONE F.S.SURR SURROUND ADVANCED SOUND • Press ADVANCED to select FOCUS5.1, WIDE5.1 or EXTRAPWR. • FOCUS5.1 - in the display. Press repeatedly to select an Advanced Surround mode. stereo or multichannel - When playing a multichannel source, all channels are downmixed to the center area where the left /right speakers and the subwoofer. Note 1 Note that when the tuner is selected, multichannel playback is not possible. 17 En Outputs stereo sound (in stereo You can be used with headphones When headphones are connected, only the STEREO (default) and ...
Owner's Manual
Page 18
The Bass/Treble, Quiet and Midnight features cannot be used at low volume levels. • After pressing ENTER, the setting switches on/off. • To cancel the Quiet or Midnight listening modes, select BASS/TRE. Enhancing dialogue The Dialogue Enhancement feature is designed to make the dialogue stand out from an uneven sound image. Select between OFF, MUSIC or CINEMA. 03 Listening to your system Listening with Acoustic Calibration EQ You can change the tonal balance of the sound by restoring sound pressure and smoothing jagged artifacts left over after the Auto MCACC setup is ...
The Bass/Treble, Quiet and Midnight features cannot be used at low volume levels. • After pressing ENTER, the setting switches on/off. • To cancel the Quiet or Midnight listening modes, select BASS/TRE. Enhancing dialogue The Dialogue Enhancement feature is designed to make the dialogue stand out from an uneven sound image. Select between OFF, MUSIC or CINEMA. 03 Listening to your system Listening with Acoustic Calibration EQ You can change the tonal balance of the sound by restoring sound pressure and smoothing jagged artifacts left over after the Auto MCACC setup is ...

Owner's Manual
Page 19
With Video CD/Super VCDs and DivX video/WMV you want to use of some functions (random or repeat, for DivX video/WMV discs. 2 • Depending on the disc, normal playback may automatically resume when a new chapter is reached on -screen). • To resume playback, press (play).2 Playing in slow motion You can play DVDs, Video CD/Super VCDs and DivX video/WMV at various different speeds.1 • During playback, press or to start a slideshow from the first folder/picture on -screen). • To resume playback, press (play ).2 Scanning discs You can...
With Video CD/Super VCDs and DivX video/WMV you want to use of some functions (random or repeat, for DivX video/WMV discs. 2 • Depending on the disc, normal playback may automatically resume when a new chapter is reached on -screen). • To resume playback, press (play).2 Playing in slow motion You can play DVDs, Video CD/Super VCDs and DivX video/WMV at various different speeds.1 • During playback, press or to start a slideshow from the first folder/picture on -screen). • To resume playback, press (play ).2 Scanning discs You can...

Owner's Manual
Page 20
Press again to toggle between 1x, 2x and 4x zoom (Press (play ) to restart slideshow). Disc Navigator 2 Select a view option. Playlist titles from a DVD-Video disc. • Chapter - Thumbnails from the Original content at 10 minute intervals. Thumbnails from the current title of disc loaded and whether the disc is running: Button What it does Pauses the slideshow (or audio); 04 Disc playback features While the slideshow is playing or not, but include: • Title - Pauses the slideshow and rotates/flips the displayed picture (Press (play ) to ...
Press again to toggle between 1x, 2x and 4x zoom (Press (play ) to restart slideshow). Disc Navigator 2 Select a view option. Playlist titles from a DVD-Video disc. • Chapter - Thumbnails from the Original content at 10 minute intervals. Thumbnails from the current title of disc loaded and whether the disc is running: Button What it does Pauses the slideshow (or audio); 04 Disc playback features While the slideshow is playing or not, but include: • Title - Pauses the slideshow and rotates/flips the displayed picture (Press (play ) to ...
