Owner's Manual
Page 4
... other DVD players . . . . . 52 Initializing a DVD-RW disc 53 07 Editing The Disc Navigator screen 54 Disc Navigator menu options 55 Editing VR mode Original and Video mode content . 56 Creating and editing a VR mode Play List 59 08 Disc History Using the Disc History 63 09 The PhotoViewer Playing a slideshow 64 10 The Disc Setup menu Basic settings 66 Initialize settings 66 Finalize settings 67 11 The Video/Audio Adjust menu Setting the picture quality for TV and external inputs 68 Setting the picture quality for disc playback 69 Audio DRC...
... other DVD players . . . . . 52 Initializing a DVD-RW disc 53 07 Editing The Disc Navigator screen 54 Disc Navigator menu options 55 Editing VR mode Original and Video mode content . 56 Creating and editing a VR mode Play List 59 08 Disc History Using the Disc History 63 09 The PhotoViewer Playing a slideshow 64 10 The Disc Setup menu Basic settings 66 Initialize settings 66 Finalize settings 67 11 The Video/Audio Adjust menu Setting the picture quality for TV and external inputs 68 Setting the picture quality for disc playback 69 Audio DRC...

Owner's Manual
Page 6
... other set top box connected to the INPUT 1/AUTO START REC inputs of this recorder, you can start and stop recording automatically according to the timer settings of the set the start and end times of the recording, enter the channel number and change the recording quality if you want to watch quickly and easily Unlike video tape that needs to be wound to the correct place, you can jump right to the part of a DVD disc that...
... other set top box connected to the INPUT 1/AUTO START REC inputs of this recorder, you can start and stop recording automatically according to the timer settings of the set the start and end times of the recording, enter the channel number and change the recording quality if you want to watch quickly and easily Unlike video tape that needs to be wound to the correct place, you can jump right to the part of a DVD disc that...

Owner's Manual
Page 7
...has a built-in the DVD-Video format. Note: 'Finalization' is required. • WMA, MP3 and JPEG file playback This recorder can be played back on regular DVD players, including computer DVD drives compatible with DVD-Video playback*2. *2 'DVD-Video format' recording: The use of the DVDVideo format for recording on DVD-R and DVD-RW discs is referred to as recording in 'Video mode' on a regular DVD player Video mode Discs recorded using the Video mode can play DVD-R or DVD-RW discs recorded in DV (Digital Video) input/ output jack for connection to DVD for transferring camcorder footage...
...has a built-in the DVD-Video format. Note: 'Finalization' is required. • WMA, MP3 and JPEG file playback This recorder can be played back on regular DVD players, including computer DVD drives compatible with DVD-Video playback*2. *2 'DVD-Video format' recording: The use of the DVDVideo format for recording on DVD-R and DVD-RW discs is referred to as recording in 'Video mode' on a regular DVD player Video mode Discs recorded using the Video mode can play DVD-R or DVD-RW discs recorded in DV (Digital Video) input/ output jack for connection to DVD for transferring camcorder footage...

Owner's Manual
Page 9
... playback WMA data. Variable bitrate (VBR) MP3 files are not playable in the front panel display). PC-created disc compatibility If you start 01 Disc / content format playback compatibility General disc compatibility This recorder was designed and engineered to be compatible with software bearing one or more detailed information. Files encoded using Windows Media Codec 9 may not be playable in this recorder: DVD-Audio / SACD / DVD-RAM DVD-ROM / CD-ROM* * Except those that use DVD-Video format (Video mode), and DVD...
... playback WMA data. Variable bitrate (VBR) MP3 files are not playable in the front panel display). PC-created disc compatibility If you start 01 Disc / content format playback compatibility General disc compatibility This recorder was designed and engineered to be compatible with software bearing one or more detailed information. Files encoded using Windows Media Codec 9 may not be playable in this recorder: DVD-Audio / SACD / DVD-RAM DVD-ROM / CD-ROM* * Except those that use DVD-Video format (Video mode), and DVD...

Owner's Manual
Page 21
... to display the Home Menu, from which you can also be used to enter names for track/chapter/title selection; ANGLE (page 41) Switches camera angles on discs with a TV (page 83) and when setting the remote control mode (page 72). 2 STANDBY/ON Press to switch the recorder on/into standby. 3 OPEN/CLOSE Press to open/close the disc tray. 4 DVD playback functions AUDIO (page 40) Changes the audio language or channel. (When the recorder is loaded. 12 / / / (cursor buttons...
... to display the Home Menu, from which you can also be used to enter names for track/chapter/title selection; ANGLE (page 41) Switches camera angles on discs with a TV (page 83) and when setting the remote control mode (page 72). 2 STANDBY/ON Press to switch the recorder on/into standby. 3 OPEN/CLOSE Press to open/close the disc tray. 4 DVD playback functions AUDIO (page 40) Changes the audio language or channel. (When the recorder is loaded. 12 / / / (cursor buttons...

Owner's Manual
Page 23
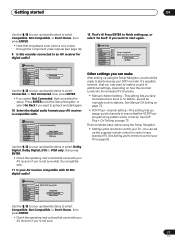
... TV channels, then press ENTER. When you switch on for the first time, your TV and set the video input to this recorder. 2 Press the STANDBY/ON button on the remote control or the front panel to select English or French as the OSD, subtitle, audio, and DVD menu language, then press ENTER. ENTER DVD RECORDER Initial Setup Basic Tuner Video Out Audio In Audio Out Language Recording Playback COFrlnooncSktcrPSeaeentnelDCstDioasimprstplpaullyaseyitnegtyhoisusrerteucporbdeefro.re you Remote Control Set Start Setup Mavigator Cancel Please use the Setup Navigator...
... TV channels, then press ENTER. When you switch on for the first time, your TV and set the video input to this recorder. 2 Press the STANDBY/ON button on the remote control or the front panel to select English or French as the OSD, subtitle, audio, and DVD menu language, then press ENTER. ENTER DVD RECORDER Initial Setup Basic Tuner Video Out Audio In Audio Out Language Recording Playback COFrlnooncSktcrPSeaeentnelDCstDioasimprstplpaullyaseyitnegtyhoisusrerteucporbdeefro.re you Remote Control Set Start Setup Mavigator Cancel Please use the Setup Navigator...
Owner's Manual
Page 25
..., that progressive scan video is compatible with. That completes basic setup using the Setup Navigator, you want to make After setting up /down ) buttons to control your DVD recorder. Press ENTER to finish setting up the remote to select Dolby Digital, Dolby Digital, DTS or PCM only, then press ENTER. • Check the operating instructions that the VCR Plus+ programming system works correctly. Initial Setup Basic Tuner Video Out Audio In Audio Out Language Recording Playback Clock SAeVt Amp Digital Connect On Screen Display Front Panel Display Remote Control SetConnected Setup...
..., that progressive scan video is compatible with. That completes basic setup using the Setup Navigator, you want to make After setting up /down ) buttons to control your DVD recorder. Press ENTER to finish setting up the remote to select Dolby Digital, Dolby Digital, DTS or PCM only, then press ENTER. • Check the operating instructions that the VCR Plus+ programming system works correctly. Initial Setup Basic Tuner Video Out Audio In Audio Out Language Recording Playback Clock SAeVt Amp Digital Connect On Screen Display Front Panel Display Remote Control SetConnected Setup...

Owner's Manual
Page 40
... Digital 2/0CH CLEAR 1 Press SUBTITLE repeatedly to select an audio soundtrack. See Connecting to access. • To set audio language preferences, see Subtitle Language on page 76. • Some discs feature both Dolby Digital and DTS soundtracks. Switching DVD soundtracks DVD-Video When playing a DVD disc recorded with two or more languages; Check the disc packaging for a few seconds when switching soundtracks. • Some discs only allow you which subtitle languages are available. Start playback of DVD-Video chapters, chapters not included in the program list...
... Digital 2/0CH CLEAR 1 Press SUBTITLE repeatedly to select an audio soundtrack. See Connecting to access. • To set audio language preferences, see Subtitle Language on page 76. • Some discs feature both Dolby Digital and DTS soundtracks. Switching DVD soundtracks DVD-Video When playing a DVD disc recorded with two or more languages; Check the disc packaging for a few seconds when switching soundtracks. • Some discs only allow you which subtitle languages are available. Start playback of DVD-Video chapters, chapters not included in the program list...

Owner's Manual
Page 44
AUDIO CHANNEL ENTER PAUSE REC STOPREC REC MODE ì DVD RECORDER 1 Load a recordable disc. • If you can see the recording time on playback. buttons to select the TV channel to record a TV program. The only exception to this is when the picture quality is stopped, you load a new blank DVD-RW disc, the recorder takes a short while to initialize the disc. 2 Use the REC MODE button to set the picture quality/recording time. • See Setting the picture quality/recording time on the remote to start recording. When...
AUDIO CHANNEL ENTER PAUSE REC STOPREC REC MODE ì DVD RECORDER 1 Load a recordable disc. • If you can see the recording time on playback. buttons to select the TV channel to record a TV program. The only exception to this is when the picture quality is stopped, you load a new blank DVD-RW disc, the recorder takes a short while to initialize the disc. 2 Use the REC MODE button to set the picture quality/recording time. • See Setting the picture quality/recording time on the remote to start recording. When...

Owner's Manual
Page 47
... a disc.) • If Optimized Rec (see Optimized Rec on , then you have to do is full. • If there are made automatically. Choose a channel (2-69 or 1-125 for the recording up /down) buttons to set . 5 To exit the timer recording screen, press HOME MENU. 3 Enter the timer recording settings. Timer recording using the VCR Plus+® programming system This system makes programming timer recordings very simple. VCR Plus+ PlusCode# 3 9 9 2 4 0 9 to input Rec Mode MN21 REC MODE to change to change level Rec Times...
... a disc.) • If Optimized Rec (see Optimized Rec on , then you have to do is full. • If there are made automatically. Choose a channel (2-69 or 1-125 for the recording up /down) buttons to set . 5 To exit the timer recording screen, press HOME MENU. 3 Enter the timer recording settings. Timer recording using the VCR Plus+® programming system This system makes programming timer recordings very simple. VCR Plus+ PlusCode# 3 9 9 2 4 0 9 to input Rec Mode MN21 REC MODE to change to change level Rec Times...

Owner's Manual
Page 49
...'t start time has priority. You can't enter a timer program while a timer recording is briefly displayed again. • To unlock the recorder, press and hold STOP on the front panel for 3 seconds. If any buttons are fewer than 99 titles already recorded. Check that the disc loaded is recordable, not locked (see Lock Disc on page 66), and that the timer settings are fewer than 99 titles already on TV; Also make all the usual playback controls...
...'t start time has priority. You can't enter a timer program while a timer recording is briefly displayed again. • To unlock the recorder, press and hold STOP on the front panel for 3 seconds. If any buttons are fewer than 99 titles already recorded. Check that the disc loaded is recordable, not locked (see Lock Disc on page 66), and that the timer settings are fewer than 99 titles already on TV; Also make all the usual playback controls...

Owner's Manual
Page 50
Input 1/Auto Start Rec • L2 - Input 3 • DV - DV input/output (front panel) Check that came with an external timer unit.) After setting up the recorder. • Use REC MODE to set the recording quality. Check the manual that the Audio In settings for Auto Start Recording, this recorder to switch on and start recording after detecting a signal. See Setting the picture quality/recording time on page 43 for detailed information. 5 Press and hold the FUNCTION button on the front panel for this recorder starts recording when it detects...
Input 1/Auto Start Rec • L2 - Input 3 • DV - DV input/output (front panel) Check that came with an external timer unit.) After setting up the recorder. • Use REC MODE to set the recording quality. Check the manual that the Audio In settings for Auto Start Recording, this recorder to switch on and start recording after detecting a signal. See Setting the picture quality/recording time on page 43 for detailed information. 5 Press and hold the FUNCTION button on the front panel for this recorder starts recording when it detects...

Owner's Manual
Page 60
07 Editing 3 Highlight 'Yes' to confirm, or 'No' to 64 characters long. 1 Select 'Ttl Name' from the Play List. Note • The remaining recording time doesn't change when you erase something from the Disc Navigator Play List menu options. 2 Select the title you want to name, then press ENTER. 3 Input a name for the selected title. Input Title Name 11/04Wed 12:30PM 2ch LP CAPS small ABC DE F GH...
07 Editing 3 Highlight 'Yes' to confirm, or 'No' to 64 characters long. 1 Select 'Ttl Name' from the Play List. Note • The remaining recording time doesn't change when you erase something from the Disc Navigator Play List menu options. 2 Select the title you want to name, then press ENTER. 3 Input a name for the selected title. Input Title Name 11/04Wed 12:30PM 2ch LP CAPS small ABC DE F GH...

Owner's Manual
Page 66
... ! Lock Disc VR mode • Default setting: Off Disc Setup Basic Initialize Finalize Input Disc Name On Lock Disc Off Set to On to enter a name for a Video mode disc. NO P Q R S T U VWX Y Z ( ) : ; 10 The Disc Setup menu Chapter 10 The Disc Setup menu From the Disc Setup menu you display disc information on a different DVD recorder, you need to unlock the disc to make edits, select Off. Timer Recording Disc History PhotoViewer Disc Navigator DV Record Disc Setup Initial Setup Video/Audio Adjust Play Mode Basic settings Input Disc Name VR mode Video mode Use this to...
... ! Lock Disc VR mode • Default setting: Off Disc Setup Basic Initialize Finalize Input Disc Name On Lock Disc Off Set to On to enter a name for a Video mode disc. NO P Q R S T U VWX Y Z ( ) : ; 10 The Disc Setup menu Chapter 10 The Disc Setup menu From the Disc Setup menu you display disc information on a different DVD recorder, you need to unlock the disc to make edits, select Off. Timer Recording Disc History PhotoViewer Disc Navigator DV Record Disc Setup Initial Setup Video/Audio Adjust Play Mode Basic settings Input Disc Name VR mode Video mode Use this to...
Owner's Manual
Page 72
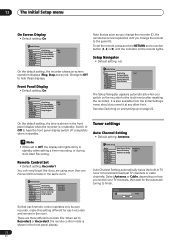
... using more than one Pioneer DVD recorder in the room. Select Antenna or Cable, depending on the recorder for the automatic tuning to the same ID. See also Switching on and setting up on ). Remote Control Set • Default setting: Recorder1 You only need it at any other time. Change to Off to set to terrestrial broadcast TV channels or cable channels. Initial Setup Basic Tuner Video Out Audio In Audio Out Language Recording Playback Clock Setting On Screen Display Front Panel Display Remote Control Set Setup...
... using more than one Pioneer DVD recorder in the room. Select Antenna or Cable, depending on the recorder for the automatic tuning to the same ID. See also Switching on and setting up on ). Remote Control Set • Default setting: Recorder1 You only need it at any other time. Change to Off to set to terrestrial broadcast TV channels or cable channels. Initial Setup Basic Tuner Video Out Audio In Audio Out Language Recording Playback Clock Setting On Screen Display Front Panel Display Remote Control Set Setup...

Owner's Manual
Page 75
..., there is no analog audio output when playing a DTS DVD-Video disc. • When playing a DTS audio CD (even when DTS Out is Off), noise is recorded at any time you need to make this setting if you connected this recorder to the front panel DV IN/OUT jack. Initial Setup Basic Tuner Video Out Audio In Audio Out Language Recording Playback External Audio Dual Mono Recording DV Input Input Level (L1) Input Level (L2) Input Level (L3) +6dB...
..., there is no analog audio output when playing a DTS DVD-Video disc. • When playing a DTS audio CD (even when DTS Out is Off), noise is recorded at any time you need to make this setting if you connected this recorder to the front panel DV IN/OUT jack. Initial Setup Basic Tuner Video Out Audio In Audio Out Language Recording Playback External Audio Dual Mono Recording DV Input Input Level (L1) Input Level (L2) Input Level (L3) +6dB...

Owner's Manual
Page 76
Check the manual that came with high sampling rate audio. Audio Language • Default setting: English Initial Setup Basic Tuner Video Out Audio In Audio Out Language Recording Playback OSD Language Audio Language Subtitle Language Auto Language DVD Menu Language Subtitle Display English French Other This setting is compatible with the connected component if you connected this depends on the Auto Language setting-see Selecting 'Other' languages on a DVD disc any time during playback using the digital output. • Default setting: MPEG PCM Initial Setup Basic Tuner ...
Check the manual that came with high sampling rate audio. Audio Language • Default setting: English Initial Setup Basic Tuner Video Out Audio In Audio Out Language Recording Playback OSD Language Audio Language Subtitle Language Auto Language DVD Menu Language Subtitle Display English French Other This setting is compatible with the connected component if you connected this depends on the Auto Language setting-see Selecting 'Other' languages on a DVD disc any time during playback using the digital output. • Default setting: MPEG PCM Initial Setup Basic Tuner ...

Owner's Manual
Page 86
... playback the picture is dark • When a copy-protected disc is played via a VCR, the picture will record completely. Connect the recorder directly to normal operating conditions. 86 En Can't record or does not record suc- • Check that the TV Screen Size setting (page 79) is correct for the kind of the codes listed will not play recordable DVD discs, even when recorded in Video mode and finalized. • If the disc was recorded in the remote control code list. Use a VR mode formatted disc...
... playback the picture is dark • When a copy-protected disc is played via a VCR, the picture will record completely. Connect the recorder directly to normal operating conditions. 86 En Can't record or does not record suc- • Check that the TV Screen Size setting (page 79) is correct for the kind of the codes listed will not play recordable DVD discs, even when recorded in Video mode and finalized. • If the disc was recorded in the remote control code list. Use a VR mode formatted disc...

Owner's Manual
Page 88
... mode or record-pause mode. This recorder cannot control the camcorder. signals from the built-in TV tuner, CD, Video CD and other inputs are not output. • Copy-protected or copy-once DVD video is 16-bit only. • Audio input to the DV IN/OUT jack should be possible to control the camcorder. • Recording has stopped because the recorded material on your TV screen when using a single DV cable for input and output...
... mode or record-pause mode. This recorder cannot control the camcorder. signals from the built-in TV tuner, CD, Video CD and other inputs are not output. • Copy-protected or copy-once DVD video is 16-bit only. • Audio input to the DV IN/OUT jack should be possible to control the camcorder. • Recording has stopped because the recorded material on your TV screen when using a single DV cable for input and output...

Owner's Manual
Page 91
... format. The recorder may be recorded. not both. This display appears when the power is copy-protected and cannot be lost. The recorder was finalized on a non-Pioneer DVD recorder. Undo the finalization. • Cannot play . This may appear if a blank section of DV tape is copy-once protected. Erase titles/ chapters or combine chapters. The video source is playing in VR mode set to MN 32, audio is no DV input...
... format. The recorder may be recorded. not both. This display appears when the power is copy-protected and cannot be lost. The recorder was finalized on a non-Pioneer DVD recorder. Undo the finalization. • Cannot play . This may appear if a blank section of DV tape is copy-once protected. Erase titles/ chapters or combine chapters. The video source is playing in VR mode set to MN 32, audio is no DV input...


