
Leaflet
Page 1
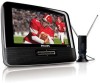
... control PVD700 Experience the digital interactive TV phenomenon • 7" TFT color LCD display in HDTV tuner With the Philips Portable TV PVD700, you connect to 3 hours. The built-in rechargeable battery lasts up to 3 hours playback with a built-in battery* • Detachable antenna design lets you can enjoy digital television with built-in 16:9 wide screen format • Free-to-air digital TV channel reception • Easy installation and automatic channel...
... control PVD700 Experience the digital interactive TV phenomenon • 7" TFT color LCD display in HDTV tuner With the Philips Portable TV PVD700, you connect to 3 hours. The built-in rechargeable battery lasts up to 3 hours playback with a built-in battery* • Detachable antenna design lets you can enjoy digital television with built-in 16:9 wide screen format • Free-to-air digital TV channel reception • Easy installation and automatic channel...
Leaflet
Page 2
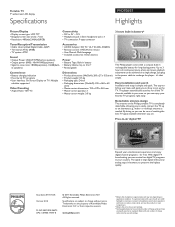
..., connect to be achieved on TV, Multiple subtitles supported Video Decoding • Aspect Ratio: 16:9, 4:3 Accessories • AC/DC Adaptor: DC 9V, 1A, 110-240v, 50/60Hz • Remote control: AY5524 slim remote • User Manual: Multi lanaguage • Included accessories: Aerial antenna Power • Battery Type: Built-in rechargeable battery for long-lasting power. in speakers) Convenience • Battery charging indication • Favorite list TV programs • User Interface: On Screen Display on...
..., connect to be achieved on TV, Multiple subtitles supported Video Decoding • Aspect Ratio: 16:9, 4:3 Accessories • AC/DC Adaptor: DC 9V, 1A, 110-240v, 50/60Hz • Remote control: AY5524 slim remote • User Manual: Multi lanaguage • Included accessories: Aerial antenna Power • Battery Type: Built-in rechargeable battery for long-lasting power. in speakers) Convenience • Battery charging indication • Favorite list TV programs • User Interface: On Screen Display on...
User manual
Page 3
Contents 1 Important Important safety instructions Notice 2 Your portable TV Introduction What's in the box Overview of the main unit Overview of the remote control 3 Get started Preparation Charge the battery Install remote control battery Connect TV antenna 4 Watch TV Turn on First time installation Switch channels View program information Manage channels Play options 5 Adjust settings View closed captions (subtitles) 6 Product information 7 Troubleshooting 6 6 9 10 10 11 11 13 15 15 16 17 17 18 18 19 20 21 21 22 22 23 27 28 EN 3 English
Contents 1 Important Important safety instructions Notice 2 Your portable TV Introduction What's in the box Overview of the main unit Overview of the remote control 3 Get started Preparation Charge the battery Install remote control battery Connect TV antenna 4 Watch TV Turn on First time installation Switch channels View program information Manage channels Play options 5 Adjust settings View closed captions (subtitles) 6 Product information 7 Troubleshooting 6 6 9 10 10 11 11 13 15 15 16 17 17 18 18 19 20 21 21 22 22 23 27 28 EN 3 English
User manual
Page 9
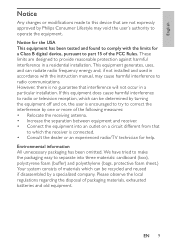
... by Philips Consumer Lifestyle may cause harmful interference to part 15 of the FCC Rules. Notice for the USA This equipment has been tested and found to comply with the instruction manual, may void the user's authority to provide reasonable protection against harmful interference in a particular installation. This equipment generates, uses, and can be determined by turning the...
... by Philips Consumer Lifestyle may cause harmful interference to part 15 of the FCC Rules. Notice for the USA This equipment has been tested and found to comply with the instruction manual, may void the user's authority to provide reasonable protection against harmful interference in a particular installation. This equipment generates, uses, and can be determined by turning the...
User manual
Page 10
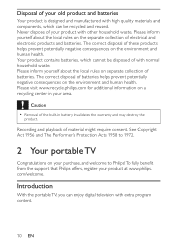
...contains batteries, which can enjoy digital television with high quality materials and components, which cannot be recycled and reused. Recording and playback of these products helps prevent potentially negative consequences on a recycling center in battery invalidates the warranty ...Removal of batteries helps prevent potentially negative consequences on your area. See Copyright Act 1956 and The Performer's Protection Acts 1958 to Philips! To fully benefit from the support that Philips offers, register your product at www.philips. Disposal of your old product and batteries...
...contains batteries, which can enjoy digital television with high quality materials and components, which cannot be recycled and reused. Recording and playback of these products helps prevent potentially negative consequences on a recycling center in battery invalidates the warranty ...Removal of batteries helps prevent potentially negative consequences on your area. See Copyright Act 1956 and The Performer's Protection Acts 1958 to Philips! To fully benefit from the support that Philips offers, register your product at www.philips. Disposal of your old product and batteries...

User manual
Page 12
...; Turns on/off the unit. 12 EN d OPTIONS • Accesses options relating to the next or previous channel. h , ,, • Navigates menus. , • Switches to the current activity or selection. PREV CH • Returns to the previously viewed channel. j DC IN • Power supply socket. e SETUP • Accesses or exits the setup menu. a VOL+/• Increases or decreases volume. i CHR • Charging indicator. g IR • Remote control...
...; Turns on/off the unit. 12 EN d OPTIONS • Accesses options relating to the next or previous channel. h , ,, • Navigates menus. , • Switches to the current activity or selection. PREV CH • Returns to the previously viewed channel. j DC IN • Power supply socket. e SETUP • Accesses or exits the setup menu. a VOL+/• Increases or decreases volume. i CHR • Charging indicator. g IR • Remote control...

User manual
Page 14
... channel list. f MUTE • Mutes or restores volume. l CC • Turn off or on display captions. i Color keys • Selects tasks or options. n SETUP • Accesses or exits the setup menu. 14 EN d FAV • Accesses or exits the favorite list. e INFO • Displays program information. h • Adjusts screen aspect ratio. j- • Inputs a separator for digital channel numbers. c PREV CH • Returns to the next or previous channel. g 0-9 • Numeric keypad. k AUDIO • Selects the audio language. m DISPLAY • Adjusts...
... channel list. f MUTE • Mutes or restores volume. l CC • Turn off or on display captions. i Color keys • Selects tasks or options. n SETUP • Accesses or exits the setup menu. 14 EN d FAV • Accesses or exits the favorite list. e INFO • Displays program information. h • Adjusts screen aspect ratio. j- • Inputs a separator for digital channel numbers. c PREV CH • Returns to the next or previous channel. g 0-9 • Numeric keypad. k AUDIO • Selects the audio language. m DISPLAY • Adjusts...
User manual
Page 15
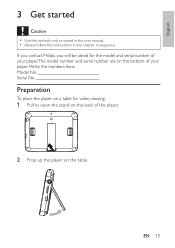
English 3 Get started Caution • Use the controls only as stated in this user manual. • Always follow the instructions in this chapter in sequence. PULL TO OPEN 2 Prop up the player on the back of your player.Write the numbers here: Model No Serial No Preparation To place the player on a table for video viewing: 1 Pull to open the stand on the table. EN 15 If you contact Philips, you will be asked for the model and serial number of your player.The model number and serial number are on the bottom of the player.
English 3 Get started Caution • Use the controls only as stated in this user manual. • Always follow the instructions in this chapter in sequence. PULL TO OPEN 2 Prop up the player on the back of your player.Write the numbers here: Model No Serial No Preparation To place the player on a table for video viewing: 1 Pull to open the stand on the table. EN 15 If you contact Philips, you will be asked for the model and serial number of your player.The model number and serial number are on the bottom of the player.

User manual
Page 16
It takes less than 6 hours to fully charge the battery. » When the battery is fully charged, the charge indicator turns off mode. 1 Slide the POWERON/OFF switch to OFF position. 2 Connect the supplied AC adaptor to the player and to the AC outlet. » The charge indicator turns on. Ensure that the power supply voltage corresponds to the voltage printed on the back...
It takes less than 6 hours to fully charge the battery. » When the battery is fully charged, the charge indicator turns off mode. 1 Slide the POWERON/OFF switch to OFF position. 2 Connect the supplied AC adaptor to the player and to the AC outlet. » The charge indicator turns on. Ensure that the power supply voltage corresponds to the voltage printed on the back...

User manual
Page 17
... first-time use: 1 Remove the protective tab to receive digital TV program. Connect TV antenna You can connect your player to the supplied antenna or home antenna to activate the remote control battery. English Install remote control battery Caution • Risk of explosion if battery is incorrectly replaced. EN 17 special handling may apply. See www.dtsc.ca.gov/ hazardouswaste/perchlorate. To replace the remote control battery: 1 Open the battery compartment. 2 Insert 1 CR2025 battery with the...
... first-time use: 1 Remove the protective tab to receive digital TV program. Connect TV antenna You can connect your player to the supplied antenna or home antenna to activate the remote control battery. English Install remote control battery Caution • Risk of explosion if battery is incorrectly replaced. EN 17 special handling may apply. See www.dtsc.ca.gov/ hazardouswaste/perchlorate. To replace the remote control battery: 1 Open the battery compartment. 2 Insert 1 CR2025 battery with the...

User manual
Page 19
... press OK to confirm. » You are prompted to next step : Browse OK Select SETUP Exit EN 19 First Time Installation Please connect the product to air antenna Air/Cable Cable Go to select the menu language. English First time installation 1 When the unit is turned on for the first time, follow the on-screen instructions. » You are prompted to confirm.
... press OK to confirm. » You are prompted to next step : Browse OK Select SETUP Exit EN 19 First Time Installation Please connect the product to air antenna Air/Cable Cable Go to select the menu language. English First time installation 1 When the unit is turned on for the first time, follow the on-screen instructions. » You are prompted to confirm.

User manual
Page 20
... connect the portable TV to a cable TV socket, select [Yes], and then press OK. » Auto channel search (Cable) starts and will take a few minutes. » When auto channel search is complete, the total number of TV and radio channels found is displayed. • To view the programs of the first found channel, press OK. RF Channel: 10 TV Channels Found: 0 Radio Channels Found: 0 Signal Quality: SETUP Exit Channel Search Channel...
... connect the portable TV to a cable TV socket, select [Yes], and then press OK. » Auto channel search (Cable) starts and will take a few minutes. » When auto channel search is complete, the total number of TV and radio channels found is displayed. • To view the programs of the first found channel, press OK. RF Channel: 10 TV Channels Found: 0 Radio Channels Found: 0 Signal Quality: SETUP Exit Channel Search Channel...

User manual
Page 21
... channel, press the yellow button. You can press AUDIO or OPTIONS to change the channel name. EN 21 Edit channels 1 Press SETUP. » The setup menu is displayed. 2 Select [Channel management] > [Channel name], and press OK. 3 Select a channel, and then press , , , to access this function. Tip • : Program containing different audio languages. English View program information To view brief information of the current program, press INFO. 18-1 WB18HD 04:48 AM Daily Buzz Audio Language: CC: Video: RF Channel: English...
... channel, press the yellow button. You can press AUDIO or OPTIONS to change the channel name. EN 21 Edit channels 1 Press SETUP. » The setup menu is displayed. 2 Select [Channel management] > [Channel name], and press OK. 3 Select a channel, and then press , , , to access this function. Tip • : Program containing different audio languages. English View program information To view brief information of the current program, press INFO. 18-1 WB18HD 04:48 AM Daily Buzz Audio Language: CC: Video: RF Channel: English...
User manual
Page 22
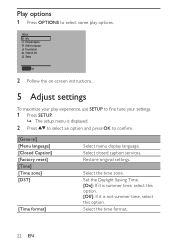
... Audio Language Favorite List Channel List Setup OPTION Exit 2 Follow the on-screen instructions. 5 Adjust settings To maximize your play experience, use SETUP to fine tune your settings. 1 Press SETUP. » The setup menu is not summer time, select this option. Set the Daylight Saving Time. [On]: If it is summer time, select this option. [Off]: If it is displayed. 2 Press to select an option and press OK to select some play options. Select the time zone. Select closed caption services. Play...
... Audio Language Favorite List Channel List Setup OPTION Exit 2 Follow the on-screen instructions. 5 Adjust settings To maximize your play experience, use SETUP to fine tune your settings. 1 Press SETUP. » The setup menu is not summer time, select this option. Set the Daylight Saving Time. [On]: If it is summer time, select this option. [Off]: If it is displayed. 2 Press to select an option and press OK to select some play options. Select the time zone. Select closed caption services. Play...
User manual
Page 23
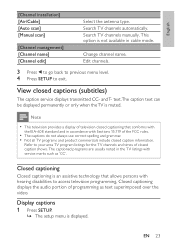
English [Channel installation] [Air/Cable] [Auto scan] [Manual scan] [Channel management] [Channel name] [Channel edit] Select the antenna type. Search TV channels manually. Change channel name. text.The caption text can be displayed permanently or only when the TV is displayed. Note • This television provides a display of television closed captioning that allows persons with service marks such as text superimposed over the video. The captioned programs are usually noted in cable mode. Display captions 1 Press SETUP. » The...
English [Channel installation] [Air/Cable] [Auto scan] [Manual scan] [Channel management] [Channel name] [Channel edit] Select the antenna type. Search TV channels manually. Change channel name. text.The caption text can be displayed permanently or only when the TV is displayed. Note • This television provides a display of television closed captioning that allows persons with service marks such as text superimposed over the video. The captioned programs are usually noted in cable mode. Display captions 1 Press SETUP. » The...
User manual
Page 24
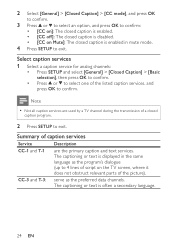
... obstruct relevant parts of the picture). Note • Not all caption services are the primary caption and text services. serve as the program's dialogue (up to 4 lines of the listed caption services, and press OK to exit. The captioning or text is often a secondary language. 24 EN Select caption services 1 Select a caption service for analog channels: • Press SETUP and select [General] > [Closed Caption] > [Basic selection], then...
... obstruct relevant parts of the picture). Note • Not all caption services are the primary caption and text services. serve as the program's dialogue (up to 4 lines of the listed caption services, and press OK to exit. The captioning or text is often a secondary language. 24 EN Select caption services 1 Select a caption service for analog channels: • Press SETUP and select [General] > [Closed Caption] > [Basic selection], then...

User manual
Page 25
... programs: Paint-on mode: Displays input characters on mode: Once characters are stored in special conditions, such as when [CC-1] and [CC-3] or [T-1] and [T-3] are not available. • There are displayed You can choose the size, font, color, background and other item in [Closed Caption] menu. This is the default. Select DTV caption services 1 Select a caption service for digital channels: • Press SETUP and select [General] > [Closed Caption] > [Advanced selection...
... programs: Paint-on mode: Displays input characters on mode: Once characters are stored in special conditions, such as when [CC-1] and [CC-3] or [T-1] and [T-3] are not available. • There are displayed You can choose the size, font, color, background and other item in [Closed Caption] menu. This is the default. Select DTV caption services 1 Select a caption service for digital channels: • Press SETUP and select [General] > [Closed Caption] > [Advanced selection...

User manual
Page 26
... opacity. 4 Press / to select a setting for the option, and press OK to confirm. 5 Press SETUP to view closed captions on DTV programming, you should contact your subscription television provider for DTV programming provided by your subscription television provider; • ensure that the captioning function on your DTV is turned on DTV programming, including HDTV, received from your subscription television...
... opacity. 4 Press / to select a setting for the option, and press OK to confirm. 5 Press SETUP to view closed captions on DTV programming, you should contact your subscription television provider for DTV programming provided by your subscription television provider; • ensure that the captioning function on your DTV is turned on DTV programming, including HDTV, received from your subscription television...
User manual
Page 28
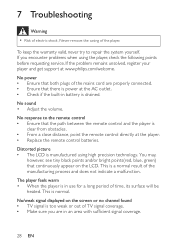
... path between the remote control and the player is power at www.philips.com/welcome. No sound • Adjust the volume. 7 Troubleshooting Warning • Risk of the player. You may, however, see tiny black points and/or bright points(red, blue, green) that there is clear from obstacles. • From a close distance, point the remote control directly at the player. • Replace the remote control batteries. No/weak signal displayed on the LCD...
... path between the remote control and the player is power at www.philips.com/welcome. No sound • Adjust the volume. 7 Troubleshooting Warning • Risk of the player. You may, however, see tiny black points and/or bright points(red, blue, green) that there is clear from obstacles. • From a close distance, point the remote control directly at the player. • Replace the remote control batteries. No/weak signal displayed on the LCD...
Quick start guide
Page 2
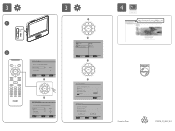
... AUDIO PREV CH FAV INFO MUTE First Time Installation Please select your prefer language : Menu Language English Go to next step : Browse OK Select SETUP Exit First Time Installation Select the time zone & Daylight saving time Time Zone DST Time Format Go to next step : Hawaii Off 12-hour Browse OK Select SETUP Exit General General Time Channel installation Air/Cable Auto Scan Manual Scan Browse OK Select SETUP Exit First Time Installation Channel searching please wait... RF Channel: 10 TV Channels Found: 0 Radio Channels Found: 0 Signal...
... AUDIO PREV CH FAV INFO MUTE First Time Installation Please select your prefer language : Menu Language English Go to next step : Browse OK Select SETUP Exit First Time Installation Select the time zone & Daylight saving time Time Zone DST Time Format Go to next step : Hawaii Off 12-hour Browse OK Select SETUP Exit General General Time Channel installation Air/Cable Auto Scan Manual Scan Browse OK Select SETUP Exit First Time Installation Channel searching please wait... RF Channel: 10 TV Channels Found: 0 Radio Channels Found: 0 Signal...


