Leaflet
Page 1
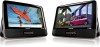
...; View JPEG images from picture disc Enrich your AV entertainment experience • 9" TFT color widescreen LCD display • Dual TFT LCD screens for great movie enjoyment • Watch movies separately or share one movie on both players • Built-in stereo speakers Extra touches for quick installation in the car! The mounting kits make installation faster and easily. Philips Portable DVD Player 9" widescreen LCD display PET9422...
...; View JPEG images from picture disc Enrich your AV entertainment experience • 9" TFT color widescreen LCD display • Dual TFT LCD screens for great movie enjoyment • Watch movies separately or share one movie on both players • Built-in stereo speakers Extra touches for quick installation in the car! The mounting kits make installation faster and easily. Philips Portable DVD Player 9" widescreen LCD display PET9422...
Leaflet
Page 2
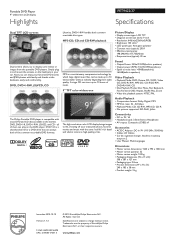
... of music. 9" TFT color widescreen Sound • Output Power: 250mW RMS(built-in speakers) • Output power (RMS): 10mW RMS(earphone) • Signal to noise ratio: >80dB(earphone), >62dB(built-in speakers) Video Playback • Playback Media: DVD, Picture CD, SVCD, Video CD, DVD-R/-RW, MP3-CD, CD-R/CD-RW, DVD+R/+RW, CD • Disc Playback Modes: Disc Menu, Fast Backward, Fast Forward, OSD, Repeat, Shuffle Play, Zoom • Video disc playback system: NTSC, PAL Audio Playback • Compression format: Dolby Digital, MP3 • MP3...
... of music. 9" TFT color widescreen Sound • Output Power: 250mW RMS(built-in speakers) • Output power (RMS): 10mW RMS(earphone) • Signal to noise ratio: >80dB(earphone), >62dB(built-in speakers) Video Playback • Playback Media: DVD, Picture CD, SVCD, Video CD, DVD-R/-RW, MP3-CD, CD-R/CD-RW, DVD+R/+RW, CD • Disc Playback Modes: Disc Menu, Fast Backward, Fast Forward, OSD, Repeat, Shuffle Play, Zoom • Video disc playback system: NTSC, PAL Audio Playback • Compression format: Dolby Digital, MP3 • MP3...
User manual
Page 3
Contents 1 Important Important safety instructions Notice 2 Your portable DVD player Introduction What's in the box Overview of the main unit 3 Get started Preparation Connect a main unit as the second screen Connect power 4 Use your player Turn on Select OSD language Play discs Play options 5 Adjust settings Set the main unit 6 Use more of your player Connect additional equipment Connect power from household source 7 Product information 8 Troubleshooting 6 6 8 11 11 11 12 13 14 14 15 16 16 16 16 17 17 17 18 18 19 20 21 EN 3 English
Contents 1 Important Important safety instructions Notice 2 Your portable DVD player Introduction What's in the box Overview of the main unit 3 Get started Preparation Connect a main unit as the second screen Connect power 4 Use your player Turn on Select OSD language Play discs Play options 5 Adjust settings Set the main unit 6 Use more of your player Connect additional equipment Connect power from household source 7 Product information 8 Troubleshooting 6 6 8 11 11 11 12 13 14 14 15 16 16 16 16 17 17 17 18 18 19 20 21 EN 3 English
User manual
Page 6
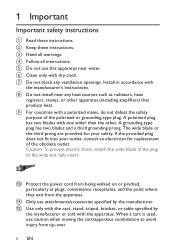
... other apparatus (including amplifiers) that produce heat. k Only use this apparatus near any ventilation openings. c Heed all instructions. The wide blade or the third prong are provided for your outlet, consult an electrician for replacement of the obsolete outlet. j Protect the power cord from being walked on or pinched, particularly at plugs, convenience receptacles...
... other apparatus (including amplifiers) that produce heat. k Only use this apparatus near any ventilation openings. c Heed all instructions. The wide blade or the third prong are provided for your outlet, consult an electrician for replacement of the obsolete outlet. j Protect the power cord from being walked on or pinched, particularly at plugs, convenience receptacles...
User manual
Page 7
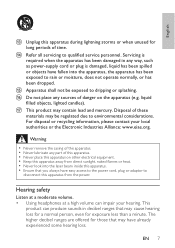
... Servicing is damaged, liquid has been spilled or objects have easy access to the power cord, plug or adaptor to disconnect this apparatus. • Never lubricate any sources of time....filled objects, lighted candles). Hearing safety Listen at a moderate volume. • Using headphones at a high volume can produce sounds in any way, such as power-supply cord or plug is required.... n Refer all servicing to rain or moisture, does not operate normally, or has been dropped. Warning • Never remove the casing of this apparatus from direct sunlight, naked fl...
... Servicing is damaged, liquid has been spilled or objects have easy access to the power cord, plug or adaptor to disconnect this apparatus. • Never lubricate any sources of time....filled objects, lighted candles). Hearing safety Listen at a moderate volume. • Using headphones at a high volume can produce sounds in any way, such as power-supply cord or plug is required.... n Refer all servicing to rain or moisture, does not operate normally, or has been dropped. Warning • Never remove the casing of this apparatus from direct sunlight, naked fl...
User manual
Page 8
...' adapts to higher volumes of time. • Be careful not to adjust the volume as your hearing adapts. • Do not turn up the volume so high that you can't hear what sounds 'normal' can be loud and harmful to sound, even at a low setting. • Slowly increase the sound until you . • You should use caution or temporarily discontinue use headphones while operating a motorized...
...' adapts to higher volumes of time. • Be careful not to adjust the volume as your hearing adapts. • Do not turn up the volume so high that you can't hear what sounds 'normal' can be loud and harmful to sound, even at a low setting. • Slowly increase the sound until you . • You should use caution or temporarily discontinue use headphones while operating a motorized...
User manual
Page 9
... consists of your area. This equipment generates, uses, and can be determined by turning the equipment off and on the separate collection of your product with the instruction manual, may void the user's authority to radio communications. Never dispose of electrical and electronic products and batteries. However, there is connected. • Consult the dealer or an experienced...
... consists of your area. This equipment generates, uses, and can be determined by turning the equipment off and on the separate collection of your product with the instruction manual, may void the user's authority to radio communications. Never dispose of electrical and electronic products and batteries. However, there is connected. • Consult the dealer or an experienced...

User manual
Page 10
... material might require consent. Recording and playback of the built-in battery invalidates the warranty and may be used for home and other rights owners. Manufactured under license from Dolby Laboratories. Use of Dolby Laboratories. This apparatus includes this copyright protection technology must be authorized by Macrovision Corporation, and is intended for such purposes. "Dolby" and the double-D symbol are trademarks...
... material might require consent. Recording and playback of the built-in battery invalidates the warranty and may be used for home and other rights owners. Manufactured under license from Dolby Laboratories. Use of Dolby Laboratories. This apparatus includes this copyright protection technology must be authorized by Macrovision Corporation, and is intended for such purposes. "Dolby" and the double-D symbol are trademarks...
User manual
Page 11
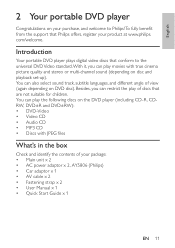
... What's in the box Check and identify the contents of discs that are not suitable for children. com/welcome. Introduction Your portable DVD player plays digital video discs that Philips offers, register your package: • Main unit x 2 • AC power adaptor x 2, AY5806 (Philips) • Car adaptor x 1 • AV cable x 2 • Fastening strap x 2 • User Manual x 1 • Quick Start Guide x 1 EN 11 English 2 Your portable DVD player Congratulations on disc and playback set-up).
... What's in the box Check and identify the contents of discs that are not suitable for children. com/welcome. Introduction Your portable DVD player plays digital video discs that Philips offers, register your package: • Main unit x 2 • AC power adaptor x 2, AY5806 (Philips) • Car adaptor x 1 • AV cable x 2 • Fastening strap x 2 • User Manual x 1 • Quick Start Guide x 1 EN 11 English 2 Your portable DVD player Congratulations on disc and playback set-up).

User manual
Page 12
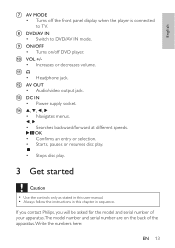
e DISC MENU • For DVD, accesses or exits disc menu. • For VCD, turns on or off PBC (Playback Control) mode. • For VCD version 2.0 or SVCD with PBC turned on, returns to the previous or next title, chapter, or track. Overview of the main unit ab c d ef g h i j k l m n a BRIGHTNESS • Adjusts screen brightness. c, • Skips to the menu. f OPTIONS • Accesses options relating to the current activity or selection. 12 EN b SETUP • Accesses or exits the setup menu. d OPEN • Opens the disc compartment.
e DISC MENU • For DVD, accesses or exits disc menu. • For VCD, turns on or off PBC (Playback Control) mode. • For VCD version 2.0 or SVCD with PBC turned on, returns to the previous or next title, chapter, or track. Overview of the main unit ab c d ef g h i j k l m n a BRIGHTNESS • Adjusts screen brightness. c, • Skips to the menu. f OPTIONS • Accesses options relating to the current activity or selection. 12 EN b SETUP • Accesses or exits the setup menu. d OPEN • Opens the disc compartment.
User manual
Page 13
English g AV MODE • Turns off DVD player. m DC IN • Power supply socket. n ,,, • Navigates menus. , • Searches backward/forward at different speeds. /OK • Confirms an entry or selection. • Starts, pauses or resumes disc play. • Stops disc play. 3 Get started Caution • Use the controls only as stated in this user manual. • Always follow the instructions in this chapter in sequence. j VOL...
English g AV MODE • Turns off DVD player. m DC IN • Power supply socket. n ,,, • Navigates menus. , • Searches backward/forward at different speeds. /OK • Confirms an entry or selection. • Starts, pauses or resumes disc play. • Stops disc play. 3 Get started Caution • Use the controls only as stated in this user manual. • Always follow the instructions in this chapter in sequence. j VOL...
User manual
Page 14
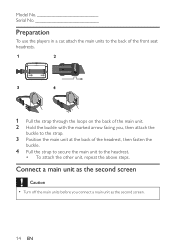
Connect a main unit as the second screen Caution • Turn off the main units before you , then attach the buckle to the strap. 3 Position the main unit at the back of the headrest, then fasten ... headrests. 1 Pull the strap through the loops on the back of the main unit. 2 Hold the buckle with the marked arrow facing you connect a main unit as the second screen. 14 EN Model No Serial No Preparation To use the players in a car, attach the main units to the headrest. • To attach the other unit...
Connect a main unit as the second screen Caution • Turn off the main units before you , then attach the buckle to the strap. 3 Position the main unit at the back of the headrest, then fasten ... headrests. 1 Pull the strap through the loops on the back of the main unit. 2 Hold the buckle with the marked arrow facing you connect a main unit as the second screen. 14 EN Model No Serial No Preparation To use the players in a car, attach the main units to the headrest. • To attach the other unit...
User manual
Page 15
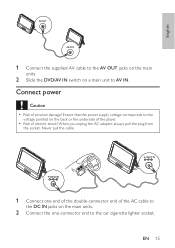
... pull the cable. 1 Connect one -connector end to AV IN. When you unplug the AC adapter, always pull the plug from the socket. Ensure that the power supply voltage corresponds to the voltage pointed on the back or the underside of the player. • Risk of the AC cable to the DC... unit to the car cigarette lighter socket. EN 15 English 1 Connect the supplied AV cable to the AV OUT jacks on the main units. 2 Slide the DVD/AV IN switch on the main units. 2 Connect the one end of the double-connector end of electric shock! Connect power Caution • Risk of product damage!
... pull the cable. 1 Connect one -connector end to AV IN. When you unplug the AC adapter, always pull the plug from the socket. Ensure that the power supply voltage corresponds to the voltage pointed on the back or the underside of the player. • Risk of the AC cable to the DC... unit to the car cigarette lighter socket. EN 15 English 1 Connect the supplied AV cable to the AV OUT jacks on the main units. 2 Slide the DVD/AV IN switch on the main units. 2 Connect the one end of the double-connector end of electric shock! Connect power Caution • Risk of product damage!
User manual
Page 16
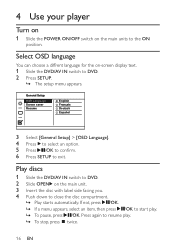
... Language Screen saver Resume English Français Deutsch Español 3 Select [General Setup] > [OSD Language]. 4 Press to select an option. 5 Press /OK to confirm. 6 Press SETUP to close the disc compartment. » Play starts automatically. 4 Use your player Turn on 1 Slide the POWER ON/OFF switch on -screen display text. 1 Slide the DVD/AV IN switch to DVD. 2 Press SETUP. » The setup menu appears. Play discs 1 Slide the DVD/AV IN switch to DVD...
... Language Screen saver Resume English Français Deutsch Español 3 Select [General Setup] > [OSD Language]. 4 Press to select an option. 5 Press /OK to confirm. 6 Press SETUP to close the disc compartment. » Play starts automatically. 4 Use your player Turn on 1 Slide the POWER ON/OFF switch on -screen display text. 1 Slide the DVD/AV IN switch to DVD. 2 Press SETUP. » The setup menu appears. Play discs 1 Slide the DVD/AV IN switch to DVD...
User manual
Page 17
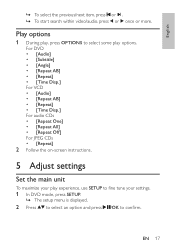
... select some play experience, use SETUP to confirm. For DVD • [Audio] • [Subtitle] • [Angle] • [Repeat AB] • [Repeat] • [Time Disp.] For VCD • [Audio] • [Repeat AB] • [Repeat] • [Time Disp.] For audio CDs • [Repeat One] • [Repeat All] • [Repeat Off] For JPEG CDs • [Repeat] 2 Follow the on-screen instructions. 5 Adjust settings Set the main unit To maximize your settings. 1 In DVD mode, press SETUP. » The setup menu is displayed...
... select some play experience, use SETUP to confirm. For DVD • [Audio] • [Subtitle] • [Angle] • [Repeat AB] • [Repeat] • [Time Disp.] For VCD • [Audio] • [Repeat AB] • [Repeat] • [Time Disp.] For audio CDs • [Repeat One] • [Repeat All] • [Repeat Off] For JPEG CDs • [Repeat] 2 Follow the on-screen instructions. 5 Adjust settings Set the main unit To maximize your settings. 1 In DVD mode, press SETUP. » The setup menu is displayed...
User manual
Page 18
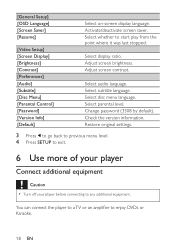
... play from the point where it was last stopped. Activate/deactivate screen saver. Select audio language. Select disc menu language. [General Setup] [OSD Language] [Screen Saver] [Resume] [Video Setup] [Screen Display] [Brightness] [Contrast] [Preferences] [Audio] [Subtitle] [Disc Menu] [Parental Control] [Password] [Version Info] [Default] Select on-screen display language. Select display ratio. Adjust screen contrast. Check the version information. Restore original settings. 3 Press to go back to previous menu level. 4 Press SETUP to exit. 6 Use more of your player Connect...
... play from the point where it was last stopped. Activate/deactivate screen saver. Select audio language. Select disc menu language. [General Setup] [OSD Language] [Screen Saver] [Resume] [Video Setup] [Screen Display] [Brightness] [Contrast] [Preferences] [Audio] [Subtitle] [Disc Menu] [Parental Control] [Password] [Version Info] [Default] Select on-screen display language. Select display ratio. Adjust screen contrast. Check the version information. Restore original settings. 3 Press to go back to previous menu level. 4 Press SETUP to exit. 6 Use more of your player Connect...
User manual
Page 19
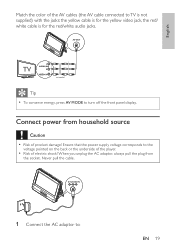
... cables (the AV cable connected to TV is not supplied) with the jacks: the yellow cable is for the yellow video jack, the red/ white cable is for the red/white audio jacks. Connect power from the socket. TV not supplied Tip • To conserve energy, press AV MODE to : EN 19 Never pull the cable. 1 Connect the AC adaptor to turn off the front panel display...
... cables (the AV cable connected to TV is not supplied) with the jacks: the yellow cable is for the yellow video jack, the red/ white cable is for the red/white audio jacks. Connect power from the socket. TV not supplied Tip • To conserve energy, press AV MODE to : EN 19 Never pull the cable. 1 Connect the AC adaptor to turn off the front panel display...
User manual
Page 20
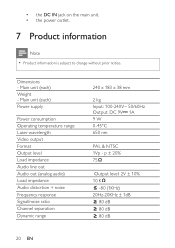
... to change without prior notice. Main unit (each ) Power supply Power consumption Operating temperature range Laser wavelength Video output Format Output level Load impedance Audio line out Audio out (analog audio) Load impedance Audio distortion + noise Frequency response Signal/noise ratio Channel separation Dynamic range 240 x 183 x 38 mm 2 kg Input: 100-240V~ 50/60Hz Output: DC 9V 1A 9 W 0-45°C 650 nm PAL & NTSC 1Vp - p ± 20% 75 Output level...
... to change without prior notice. Main unit (each ) Power supply Power consumption Operating temperature range Laser wavelength Video output Format Output level Load impedance Audio line out Audio out (analog audio) Load impedance Audio distortion + noise Frequency response Signal/noise ratio Channel separation Dynamic range 240 x 183 x 38 mm 2 kg Input: 100-240V~ 50/60Hz Output: DC 9V 1A 9 W 0-45°C 650 nm PAL & NTSC 1Vp - p ± 20% 75 Output level...
User manual
Page 21
... AC outlet. No sound • Adjust the volume. • Ensure that there is power at www.philips.com/welcome. English 8 Troubleshooting Warning • Risk of the player. If you encounter problems when using high precision technology. No power • Ensure that continuously appear on the LCD. EN 21 Never remove the casing of electric shock. Cannot play disc • Ensure the disc label is connected correctly.
... AC outlet. No sound • Adjust the volume. • Ensure that there is power at www.philips.com/welcome. English 8 Troubleshooting Warning • Risk of the player. If you encounter problems when using high precision technology. No power • Ensure that continuously appear on the LCD. EN 21 Never remove the casing of electric shock. Cannot play disc • Ensure the disc label is connected correctly.
User manual
Page 22
BOX 671539, Marietta, GA. 30006-0026 Meet Philips at the Internet http://www.philips.com/welcome © 2009 Koninklijke Philips Electronics N.V. Philips Consumer Lifestyle A Division of Philips Electronics North America Corporation P.O. All rights reserved. Printed in China PET9422_37_UM_V1.0
BOX 671539, Marietta, GA. 30006-0026 Meet Philips at the Internet http://www.philips.com/welcome © 2009 Koninklijke Philips Electronics N.V. Philips Consumer Lifestyle A Division of Philips Electronics North America Corporation P.O. All rights reserved. Printed in China PET9422_37_UM_V1.0


