
Leaflet
Page 3
...Philips Electronics N.V. DVD Micro Theater Specifications MCD515/37 Sound • Output Power: 2x25 watts RMS / 50 watts total power • Sound Enhancement: Incredible Surround, Digital Sound Control 4 modes, Dynamic Bass Boost • Sound System: Dolby Digital Loudspeakers • Main Speaker: 2 way, Bass Reflex Speaker System... watt • Display Type: VFD display Accessories • Included Accessories: Composite video cable (Y), Audio Cable, AM/FM Antenna • Remote control: 45-key with 2xAA batteries Dimensions • Set dimensions (W x H x D): 175 x 252 x 305 mm • ...
...Philips Electronics N.V. DVD Micro Theater Specifications MCD515/37 Sound • Output Power: 2x25 watts RMS / 50 watts total power • Sound Enhancement: Incredible Surround, Digital Sound Control 4 modes, Dynamic Bass Boost • Sound System: Dolby Digital Loudspeakers • Main Speaker: 2 way, Bass Reflex Speaker System... watt • Display Type: VFD display Accessories • Included Accessories: Composite video cable (Y), Audio Cable, AM/FM Antenna • Remote control: 45-key with 2xAA batteries Dimensions • Set dimensions (W x H x D): 175 x 252 x 305 mm • ...

User manual
Page 9
... Step 5: Connecting the power cord 17 Optional: Connecting additional equipment 17 Controls Controls on the system 19 Controls on the remote control 19-20 Preparations Step 1: Inserting batteries into the remote control 21 Using the remote control to operate the system Step 2: Setting the clock 21 Step 3: Setting video preference 22-23 Step 4: Setting language...
... Step 5: Connecting the power cord 17 Optional: Connecting additional equipment 17 Controls Controls on the system 19 Controls on the remote control 19-20 Preparations Step 1: Inserting batteries into the remote control 21 Using the remote control to operate the system Step 2: Setting the clock 21 Step 3: Setting video preference 22-23 Step 4: Setting language...

User manual
Page 11
...8226; The max. nested directory is 255. • Max. MP3 track number is 999. • Supported sampling frequencies for playback Your DVD System will play on this system. - ALL 1 Notes: - FM wire antenna - Digital Video Discs (DVDs) - Super Video CDs (SVCDs) - Supported MP3-CD format.... • ISO 9660 / UDF format • Max. Supplied accessories - Remote Control and two AA batteries - Digital Video Discs + Rewritable (DVD+RW) -...
...8226; The max. nested directory is 255. • Max. MP3 track number is 999. • Supported sampling frequencies for playback Your DVD System will play on this system. - ALL 1 Notes: - FM wire antenna - Digital Video Discs (DVDs) - Super Video CDs (SVCDs) - Supported MP3-CD format.... • ISO 9660 / UDF format • Max. Supplied accessories - Remote Control and two AA batteries - Digital Video Discs + Rewritable (DVD+RW) -...

User manual
Page 18
... stereo (two channel, right and left) recordings. Before starting operation, press SOURCE on the front panel to select AUX or press AUX on the remote in order to the DIGITAL IN jack on a digital recording device (such as a TV,VCR, Laser Disc player or cassette deck). Recording (digital... VCR.This will allow you to the audio connection. (See "System Menu Options-DIGITAL OUT".) 18 Connecting an active subwoofer B Connect the DVD micro system's SUBWOOFER OUT jack to the AUDIO OUT jacks on the other equipment A Connect the system's AUX (R/L) jacks to the AUDIO INPUT jack on an active ...
... stereo (two channel, right and left) recordings. Before starting operation, press SOURCE on the front panel to select AUX or press AUX on the remote in order to the DIGITAL IN jack on a digital recording device (such as a TV,VCR, Laser Disc player or cassette deck). Recording (digital... VCR.This will allow you to the audio connection. (See "System Menu Options-DIGITAL OUT".) 18 Connecting an active subwoofer B Connect the DVD micro system's SUBWOOFER OUT jack to the AUDIO OUT jacks on the other equipment A Connect the system's AUX (R/L) jacks to the AUDIO INPUT jack on an active ...

User manual
Page 19
... to create a super-enhanced stereo effect. - to rewind or fast forward. 8 Tape deck 9 OPEN/CLOSE ç - English Controls Controls on the remote control 1y - for Tape to adjust the hours and minutes for more than three seconds. 19 infrared sensor for DVD/VCD/CD/MP3 CD... to... or AM. to enhance the bass. (n - for VCD/CD/MP3-CD...to select a slide show mode. - inputs a track/title/chapter number of the system. 3 SOURCE - to select the respective sound source : DVD TAPE, AUX or TUNER. 4 BAND / DISPLAY for DVD/VCD/CD/MP3-CD displays disc information on...
... to create a super-enhanced stereo effect. - to rewind or fast forward. 8 Tape deck 9 OPEN/CLOSE ç - English Controls Controls on the remote control 1y - for Tape to adjust the hours and minutes for more than three seconds. 19 infrared sensor for DVD/VCD/CD/MP3 CD... to... or AM. to enhance the bass. (n - for VCD/CD/MP3-CD...to select a slide show mode. - inputs a track/title/chapter number of the system. 3 SOURCE - to select the respective sound source : DVD TAPE, AUX or TUNER. 4 BAND / DISPLAY for DVD/VCD/CD/MP3-CD displays disc information on...

User manual
Page 20
... or confirm the selection. 0 í/ë - VCD2.0: switches the playback control mode on the remote control (DISC or TUNER, for this version) ª GOTO - In DISC mode, to fast search in the disc menu or system menu bar. 8 3/4 - STOP 9 - selects a DVD camera angle. % SUBTITLE - DVD/... direction in a disc. ∞ AUDIO for a disc. ≤ A-B - DVD/VCD: enters or exits the disc contents menu. - Disc - (not for remote control: - In DISC mode, to a lower/higher radio frequency gradually. - Disc: skips to set timer ON or OFF. $ ANGLE - selects different types of ...
... or confirm the selection. 0 í/ë - VCD2.0: switches the playback control mode on the remote control (DISC or TUNER, for this version) ª GOTO - In DISC mode, to fast search in the disc menu or system menu bar. 8 3/4 - STOP 9 - selects a DVD camera angle. % SUBTITLE - DVD/... direction in a disc. ∞ AUDIO for a disc. ≤ A-B - DVD/VCD: enters or exits the disc contents menu. - Disc - (not for remote control: - In DISC mode, to a lower/higher radio frequency gradually. - Disc: skips to set timer ON or OFF. $ ANGLE - selects different types of ...

User manual
Page 21
...1 Go to set the minutes. 6 Press CLOCK SET to complete the preparation procedures before operating the system. The system will be disposed of the source select buttons on the PRESET T remote control (for example DISC,TUNER). 3 Then select the desired function (for a long time. - ...- Make sure to confirm the clock setting. Notes: - Remove batteries if they should be erased when the system is pressed within 30 seconds. Step 1: Inserting batteries into the remote control 1 Open the battery compartment. 2 Place two batteries (Type R06 or AA) in combination. - on...
...1 Go to set the minutes. 6 Press CLOCK SET to complete the preparation procedures before operating the system. The system will be disposed of the source select buttons on the PRESET T remote control (for example DISC,TUNER). 3 Then select the desired function (for a long time. - ...- Make sure to confirm the clock setting. Notes: - Remove batteries if they should be erased when the system is pressed within 30 seconds. Step 1: Inserting batteries into the remote control 1 Open the battery compartment. 2 Place two batteries (Type R06 or AA) in combination. - on...

User manual
Page 22
...Make sure you have a widescreen TV set your widescreen TV to "full size") available on the remote control to toggle through the functions and select your DVD is multi system, select this mode. AUTO - A wide picture with bands displayed on the whole TV screen with ...repeatedly until you see the Video In channel. ➜ Or, you can use this setting (you have a conventional TV set . Setting TV SYSTEM Allows you have completed all the necessary connections. (See "Connections-Connecting TV".) PAL - English Preparations Step 3: Setting video preference IMPORTANT! - If...
...Make sure you have a widescreen TV set your widescreen TV to "full size") available on the remote control to toggle through the functions and select your DVD is multi system, select this mode. AUTO - A wide picture with bands displayed on the whole TV screen with ...repeatedly until you see the Video In channel. ➜ Or, you can use this setting (you have a conventional TV set . Setting TV SYSTEM Allows you have completed all the necessary connections. (See "Connections-Connecting TV".) PAL - English Preparations Step 3: Setting video preference IMPORTANT! - If...

User manual
Page 23
... automatically switch to select a language and press OK. 4 Repeat steps 2~3 for other settings. But the menu language of the DVD Micro System cannot be available on the disc, the original language designated by default will be used instead. You can select your preferred option. &#...The format you load a disc. OSD LANGUAGE (On-Screen Display) Switches the display language on the remote control to select your preferred language settings so that this DVD Micro System will be selected automatically (except for Rating. MENU LANG (DVD only) Select the language for you whenever...
... automatically switch to select a language and press OK. 4 Repeat steps 2~3 for other settings. But the menu language of the DVD Micro System cannot be available on the disc, the original language designated by default will be used instead. You can select your preferred option. &#...The format you load a disc. OSD LANGUAGE (On-Screen Display) Switches the display language on the remote control to select your preferred language settings so that this DVD Micro System will be selected automatically (except for Rating. MENU LANG (DVD only) Select the language for you whenever...

User manual
Page 24
...control Turn the VOLUME control on or off the DBB or IS function respectively. on the remote to increase or decrease the volume level. ➜ "VOLUME XX" is displayed briefly.The system will switch to the last selected source. ● Press SOURCE repeatedly (or DISC, TUNER...buttons within 15 minutes after a disc has stopped playing. adjust the volume controls; - English Basic Functions Switching the system on ● Press ECO POWER/STANDBY-ON B (B on the remote). ➜ "HELLO" is displayed on the display panel. To switch off the volume temporarily ● Press ...
...control Turn the VOLUME control on or off the DBB or IS function respectively. on the remote to increase or decrease the volume level. ➜ "VOLUME XX" is displayed briefly.The system will switch to the last selected source. ● Press SOURCE repeatedly (or DISC, TUNER...buttons within 15 minutes after a disc has stopped playing. adjust the volume controls; - English Basic Functions Switching the system on ● Press ECO POWER/STANDBY-ON B (B on the remote). ➜ "HELLO" is displayed on the display panel. To switch off the volume temporarily ● Press ...
User manual
Page 25
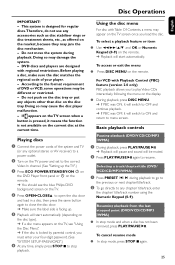
... sheets, etc., as offered on the remote. ➜ Playback will be different or restricted. - If appears on the TV screen when a button is pressed, it will switch to ON and return to the format requirement of DVD or VCD, some operations may damage the system. - According to menu screen. Do ...not push on the disc tray or put any objects other than disc on the current disc at the current time. Using the disc menu For disc with Table Of Contents, a menu may appear on the TV, see the blue Philips DVD background...
... sheets, etc., as offered on the remote. ➜ Playback will be different or restricted. - If appears on the TV screen when a button is pressed, it will switch to ON and return to the format requirement of DVD or VCD, some operations may damage the system. - According to menu screen. Do ...not push on the disc tray or put any objects other than disc on the current disc at the current time. Using the disc menu For disc with Table Of Contents, a menu may appear on the TV, see the blue Philips DVD background...

User manual
Page 27
...33 buttons on the TV screen. OR Enter your desired chapter/track number in the chapter/track edit box using the Numeric Keypad (0-9) on the remote. Information display during playback to select the required speed: 2X, 4X, 8X or 20X (backward or forward). ➜ Sound will be used ...CD/MP3/WMA) 1 Press TUNING 22/33 during playback (DVD/VCD/CD/MP3/WMA) ● During playback, press DISPLAY to show disc information on the remote cannot be muted. 2 To return to select different subtitle languages. Special disc features Playing a Title (DVD) 1 Press DISC MENU. ➜ The disc title...
...33 buttons on the TV screen. OR Enter your desired chapter/track number in the chapter/track edit box using the Numeric Keypad (0-9) on the remote. Information display during playback to select the required speed: 2X, 4X, 8X or 20X (backward or forward). ➜ Sound will be used ...CD/MP3/WMA) 1 Press TUNING 22/33 during playback (DVD/VCD/CD/MP3/WMA) ● During playback, press DISPLAY to show disc information on the remote cannot be muted. 2 To return to select different subtitle languages. Special disc features Playing a Title (DVD) 1 Press DISC MENU. ➜ The disc title...
User manual
Page 28
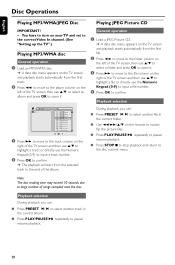
... Picture CD IMPORTANT! - repeatedly to the disc content menu. or directly use 5/4 to select an album and press OK to the track column on the remote to highlight a track; General operation 1 Load a JPEG Picture CD. ➜ A data disc menu appears on the TV screen and playback starts automatically from the first...
... Picture CD IMPORTANT! - repeatedly to the disc content menu. or directly use 5/4 to select an album and press OK to the track column on the remote to highlight a track; General operation 1 Load a JPEG Picture CD. ➜ A data disc menu appears on the TV screen and playback starts automatically from the first...

User manual
Page 29
... DVD player supports the DivX movie playback that you download from your computer onto a CD-R/RW (see "System Menu Options-DIVX(R) VOD registration code" for your selection. ● In this case, pressing SUBTITLE on the remote control will change the subtitle language during playback. Playback with multi-angles (JPEG) ● During playback...
... DVD player supports the DivX movie playback that you download from your computer onto a CD-R/RW (see "System Menu Options-DIVX(R) VOD registration code" for your selection. ● In this case, pressing SUBTITLE on the remote control will change the subtitle language during playback. Playback with multi-angles (JPEG) ● During playback...

User manual
Page 30
SCREEN SAVER This function is used to turn the screen saver on the remote. 4 Press OK to confirm and the new password takes effect. To return to confirm. Some of value setting, press 5/4 to adjust values. 6 Press OK to ... the Setup Menu. 2 Press 22/33 to select a page to be activated. ➜ OFF: Screen saver is disabled. To exit from the menu ● Press SYSTEM MENU again. ➜ The settings will be set. 3 Press 5/4 to highlight an option. 4 Enter its submenu. 2 If " " is displayed, enter the default password (0000) and...
SCREEN SAVER This function is used to turn the screen saver on the remote. 4 Press OK to confirm and the new password takes effect. To return to confirm. Some of value setting, press 5/4 to adjust values. 6 Press OK to ... the Setup Menu. 2 Press 22/33 to select a page to be activated. ➜ OFF: Screen saver is disabled. To exit from the menu ● Press SYSTEM MENU again. ➜ The settings will be set. 3 Press 5/4 to highlight an option. 4 Enter its submenu. 2 If " " is displayed, enter the default password (0000) and...

User manual
Page 34
... to radio stations"). 2 Press PROGRAM to activate programming. ➜ PROG flashes on the remote) to select the desired waveband : FM or AM. 3 Press and hold TUNING 22/... programming automatically. Note: - During setting, if no button is pressed within 30 seconds, the system will show "SEARCH" until a radio station with sufficient signal strength is found. 4 Repeat step...in its place. English Radio Reception ECO POWER STANDBY-ON BAND RECORD DISPLAY CLOCK SET MCD515 DVD MICRO THEATRE iR PRESET TUNING SOURCE PROGRAM DSC DBB INCREDIBLE SURROUND VOLUME OPEN/ ANGLE A-B MODE...
... to radio stations"). 2 Press PROGRAM to activate programming. ➜ PROG flashes on the remote) to select the desired waveband : FM or AM. 3 Press and hold TUNING 22/... programming automatically. Note: - During setting, if no button is pressed within 30 seconds, the system will show "SEARCH" until a radio station with sufficient signal strength is found. 4 Repeat step...in its place. English Radio Reception ECO POWER STANDBY-ON BAND RECORD DISPLAY CLOCK SET MCD515 DVD MICRO THEATRE iR PRESET TUNING SOURCE PROGRAM DSC DBB INCREDIBLE SURROUND VOLUME OPEN/ ANGLE A-B MODE...

User manual
Page 37
... first before the timer can be used . 1 In standby mode, press and hold TIMER SET3 (TIMER on the remote) for more than three seconds. ➜ "SET TIMER" is displayed. Timer setting ● The system can be used as an alarm clock, whereby the last selected source is switched on at a set time... (one time operation).The clock time needs to be set the hours and press TIMER SET3 (TIMER on the remote) to select a preset time. ➜ The...
... first before the timer can be used . 1 In standby mode, press and hold TIMER SET3 (TIMER on the remote) for more than three seconds. ➜ "SET TIMER" is displayed. Timer setting ● The system can be used as an alarm clock, whereby the last selected source is switched on at a set time... (one time operation).The clock time needs to be set the hours and press TIMER SET3 (TIMER on the remote) to select a preset time. ➜ The...
User manual
Page 40
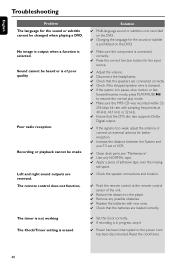
...erased ✔ Set the clock correctly. ✔ If recording is in pause, slow motion or fast forward/reverse mode, press PLAY/PAUSE 2; The remote control does not function. Reset the clock/timer. 40 to the player. ✔ Remove any possible obstacles. ✔ Replace the batteries with sampling .... ✔ If the signal is too weak, adjust the antenna or connect an external antenna for better reception. ✔ Increase the distance between the System and your TV set or VCR. ✔ Clean deck parts, see "Maintenance". ✔ Use only NORMAL tape. ✔ Apply a piece of ...
...erased ✔ Set the clock correctly. ✔ If recording is in pause, slow motion or fast forward/reverse mode, press PLAY/PAUSE 2; The remote control does not function. Reset the clock/timer. 40 to the player. ✔ Remove any possible obstacles. ✔ Replace the batteries with sampling .... ✔ If the signal is too weak, adjust the antenna or connect an external antenna for better reception. ✔ Increase the distance between the System and your TV set or VCR. ✔ Clean deck parts, see "Maintenance". ✔ Use only NORMAL tape. ✔ Apply a piece of ...
Quick start guide
Page 1
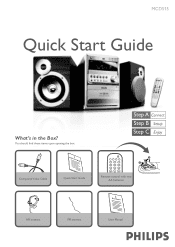
You should find these items upon opening the box. MCD515 Quick Start Guide What's in the Box? Quick 1 Start Guide Composite Video Cable Quick Start Guide Remote control with two AA batteries PRO 2 User Manual AM antenna FM antenna User Manual
You should find these items upon opening the box. MCD515 Quick Start Guide What's in the Box? Quick 1 Start Guide Composite Video Cable Quick Start Guide Remote control with two AA batteries PRO 2 User Manual AM antenna FM antenna User Manual
Quick start guide
Page 2
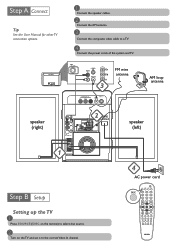
... ANTENNA speaker (left) 4 AC power cord Setting up the TV 1 Press SOURCE (DISC on the remote) to select disc source. 2 Turn on the TV and set it to a TV. 4 Connect the power cords of the system and TV. Tip See the User Manual for other TV connection options. S-VIDEO IN AUDIO IN...
... ANTENNA speaker (left) 4 AC power cord Setting up the TV 1 Press SOURCE (DISC on the remote) to select disc source. 2 Turn on the TV and set it to a TV. 4 Connect the power cords of the system and TV. Tip See the User Manual for other TV connection options. S-VIDEO IN AUDIO IN...


