
Leaflet
Page 1
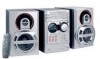
Micro Hi-Fi System with 5 CD Tray Changer MC 500 USB PC Link for MP3 Streaming Remote Control your MP3 music on your PC • USB PC Link • Song titles from PC on audio system display Power and Performance • 100W RMS Total Power • MAX Sound for instant Power Boost • 2 way Bass Reflex Speaker System with MAX Bass Port Personalized sound settings • Digital Sound Control (Rock, Techno, Jazz, Optimal) • Virtual Environment Control (Cinema, Hall, Concert, Cyber)
Micro Hi-Fi System with 5 CD Tray Changer MC 500 USB PC Link for MP3 Streaming Remote Control your MP3 music on your PC • USB PC Link • Song titles from PC on audio system display Power and Performance • 100W RMS Total Power • MAX Sound for instant Power Boost • 2 way Bass Reflex Speaker System with MAX Bass Port Personalized sound settings • Digital Sound Control (Rock, Techno, Jazz, Optimal) • Virtual Environment Control (Cinema, Hall, Concert, Cyber)

Leaflet
Page 2
... © 2002 Koninklijke Philips Electronics N.V. In addition, personal setting on the audio system will give the track information such as Song title and playtime. Micro Hi-Fi System with 5 CD Tray Changer standard product information MC 500 USB PC link • Bundled MusicMatch Jukebox software • Track info display • Navigate via set remote control for Play...
... © 2002 Koninklijke Philips Electronics N.V. In addition, personal setting on the audio system will give the track information such as Song title and playtime. Micro Hi-Fi System with 5 CD Tray Changer standard product information MC 500 USB PC link • Bundled MusicMatch Jukebox software • Track info display • Navigate via set remote control for Play...

User manual
Page 8
... 3: Connecting to PC 13 Step 4: Connecting the AC power cord ........ 13 Step 5: Inserting batteries into the remote control 13 Using the remote control to operate the system 13 USB PC Link Quick Setup Guide 14 PC system requirement 14 Install MusicMatch software 14 Enable digital CD audio output 15 Connecting USB PC Link 15...
... 3: Connecting to PC 13 Step 4: Connecting the AC power cord ........ 13 Step 5: Inserting batteries into the remote control 13 Using the remote control to operate the system 13 USB PC Link Quick Setup Guide 14 PC system requirement 14 Install MusicMatch software 14 Enable digital CD audio output 15 Connecting USB PC Link 15...
User manual
Page 9
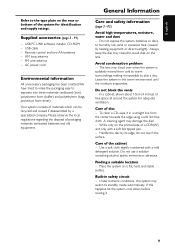
... until the moisture evaporates. P1) - Remote control and two AA batteries - Do not block the vents - In a cabinet, allows about 10cm (4 inches) of the system for adequate ventilation. Under extreme conditions, this happens, let the system cool down before reusing it in a ...and polyethylene (bags, protective foam sheet). Care of materials which can be recycled and reused if disassembled by a specialized company. Place the system on the printed side of a CDR(W) and only with a mild detergent solution. Avoid condensation problem - Use a soft cloth slightly moistened...
... until the moisture evaporates. P1) - Remote control and two AA batteries - Do not block the vents - In a cabinet, allows about 10cm (4 inches) of the system for adequate ventilation. Under extreme conditions, this happens, let the system cool down before reusing it in a ...and polyethylene (bags, protective foam sheet). Care of materials which can be recycled and reused if disassembled by a specialized company. Place the system on the printed side of a CDR(W) and only with a mild detergent solution. Avoid condensation problem - Use a soft cloth slightly moistened...
User manual
Page 10
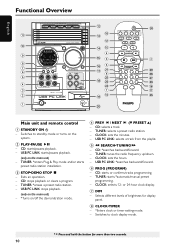
...PAUSE DSC VEC MASTER VOLUME CD TUNER PREV NEXT PRESET STOP •DEMO STOP MICRO SYSTEM AUX USB PC LINK STANDBY ON @ #* @ $% 4 %3 ^5 &¡ 6 7 ($ ) º 2 Main unit and remote control 1 STANDBY ON B - TUNER: starts *automatic/manual preset programming. ...- Switches to standby mode or turns on the system. 2 PLAY•PAUSE ÉÅ - USB PC LINK: starts/pauses playback. (only on /off the ...
...PAUSE DSC VEC MASTER VOLUME CD TUNER PREV NEXT PRESET STOP •DEMO STOP MICRO SYSTEM AUX USB PC LINK STANDBY ON @ #* @ $% 4 %3 ^5 &¡ 6 7 ($ ) º 2 Main unit and remote control 1 STANDBY ON B - TUNER: starts *automatic/manual preset programming. ...- Switches to standby mode or turns on the system. 2 PLAY•PAUSE ÉÅ - USB PC LINK: starts/pauses playback. (only on /off the ...

User manual
Page 11
...VOLUME (VOL +-) - CD: toggles between FM and AM band. - AUX: toggles between AUX and CDR mode. ( Connect the USB cable between the system and PC's USB port. )n - Switches to clock display mode. ≤ SNOOZE - Turns on /off the random play mode. ª DISPLAY - ...Plug in the headphones jack. Selects the relevant active mode. - Turns on the remote only ¡ REPEAT - Repeats a track/disc/all discs/all programmed tracks. ™ SLEEP - English Functional Overview 9 Display screen 0 iR - Opens...
...VOLUME (VOL +-) - CD: toggles between FM and AM band. - AUX: toggles between AUX and CDR mode. ( Connect the USB cable between the system and PC's USB port. )n - Switches to clock display mode. ≤ SNOOZE - Turns on /off the random play mode. ª DISPLAY - ...Plug in the headphones jack. Selects the relevant active mode. - Turns on the remote only ¡ REPEAT - Repeats a track/disc/all discs/all programmed tracks. ™ SLEEP - English Functional Overview 9 Display screen 0 iR - Opens...
User manual
Page 13
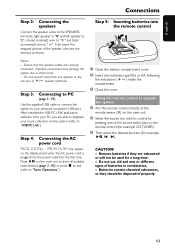
...the main unit to "USB PC Link"). P5) Use the supplied USB cable to connect the system to short-circuit. - Press ÉÅ on the display panel when the AC power cord is plugged into the remote control 3 1 2 Notes: - Do not use old and new or different types of properly.... port. Do not connect more than one of the speaker wire into the terminal as shown. Using the remote control to operate the system 1 Aim the remote control directly at the remote sensor (iR) on the remote control (for example CD,TUNER). 3 Then select the desired function (for a long time. - Step 4: Connecting ...
...the main unit to "USB PC Link"). P5) Use the supplied USB cable to connect the system to short-circuit. - Press ÉÅ on the display panel when the AC power cord is plugged into the remote control 3 1 2 Notes: - Do not use old and new or different types of properly.... port. Do not connect more than one of the speaker wire into the terminal as shown. Using the remote control to operate the system 1 Aim the remote control directly at the remote sensor (iR) on the remote control (for example CD,TUNER). 3 Then select the desired function (for a long time. - Step 4: Connecting ...

User manual
Page 16
...•TIMER on the main unit until "DEMO OFF" is displayed. To activate the demonstration In standby mode, press and hold CLOCK on the remote until "DEMO ON" is displayed. Demonstration mode If the demonstration mode is disconnected from the power supply. - Then press ë to change... to store the setting. ➜ The clock will start working. Setting the clock The clock can be erased when the system is active, whenever you switch the system to active mode Press CD, TUNER, AUX or USB PC LINK. English Basic Operations Switching on/off Switching to standby mode...
...•TIMER on the main unit until "DEMO OFF" is displayed. To activate the demonstration In standby mode, press and hold CLOCK on the remote until "DEMO ON" is displayed. Demonstration mode If the demonstration mode is disconnected from the power supply. - Then press ë to change... to store the setting. ➜ The clock will start working. Setting the clock The clock can be erased when the system is active, whenever you switch the system to active mode Press CD, TUNER, AUX or USB PC LINK. English Basic Operations Switching on/off Switching to standby mode...
User manual
Page 17
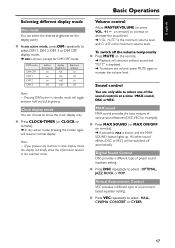
... Operations Volume control Adjust MASTER VOLUME (or press VOL +/- All other sound effects (DSC or VEC) will toggle between half and full brightness. on remote) to increase or decrease the sound level. ➜ "VOL MUTE" is the minimum volume level and "0 dB" is shown, except for example)....DIM mode DIM OFF DIM 1 DIM 2 DIM 3 button illumination on on on off display brightness full full half half Spectrum analyzer on off on remote). ➜ If activated, MAX is displayed. ➜ To restore the volume, press MUTE again or increase the volume level. English Selecting different ...
... Operations Volume control Adjust MASTER VOLUME (or press VOL +/- All other sound effects (DSC or VEC) will toggle between half and full brightness. on remote) to increase or decrease the sound level. ➜ "VOL MUTE" is the minimum volume level and "0 dB" is shown, except for example)....DIM mode DIM OFF DIM 1 DIM 2 DIM 3 button illumination on on on off display brightness full full half half Spectrum analyzer on off on remote). ➜ If activated, MAX is displayed. ➜ To restore the volume, press MUTE again or increase the volume level. English Selecting different ...
User manual
Page 18
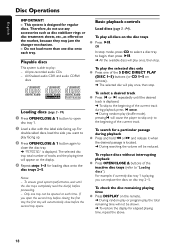
...up . To replace discs without interrupting playback Press OPEN/CLOSE 0 buttons of the 5 DISC DIRECT PLAY (DISC 1~5) buttons (or CD 1~5 on the remote. ➜ During random play or program play, the total remaining time will play once, then stop. All pre-recorded audio CDs - P4) 1 Press...number of the current track. OR In stop . To check the disc remaining playing time Press DISPLAY on remote). ➜ The selected disc will appear on disc tray 2~5. To ensure good system performance, wait until the desired track is playing, you open disc tray 1. 2 Load a disc with ...
...up . To replace discs without interrupting playback Press OPEN/CLOSE 0 buttons of the 5 DISC DIRECT PLAY (DISC 1~5) buttons (or CD 1~5 on the remote. ➜ During random play or program play, the total remaining time will play once, then stop. All pre-recorded audio CDs - P4) 1 Press...number of the current track. OR In stop . To check the disc remaining playing time Press DISPLAY on remote). ➜ The selected disc will appear on disc tray 2~5. To ensure good system performance, wait until the desired track is playing, you open disc tray 1. 2 Load a disc with ...
User manual
Page 19
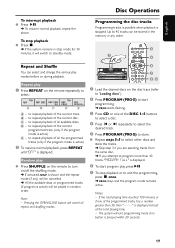
...tracks (only if the program mode is active) 2 To resume normal playback, press REPEAT until "OFF" is pressed within 20 seconds. 19 The system will be stored in the memory in any ) will be cancelled. ➜ All the available discs or programmed tracks (if program is displayed. 6... normal playback, repeat the above. To stop playback Press Ç. ➜ If the system remains in random order. Up to 40 tracks can select and change the various play 1 Press REPEAT on the remote repeatedly to turn on the remote to select : A B C D E A - to repeat playback of the current track. B ...
...tracks (only if the program mode is active) 2 To resume normal playback, press REPEAT until "OFF" is pressed within 20 seconds. 19 The system will be stored in the memory in any ) will be cancelled. ➜ All the available discs or programmed tracks (if program is displayed. 6... normal playback, repeat the above. To stop playback Press Ç. ➜ If the system remains in random order. Up to 40 tracks can select and change the various play 1 Press REPEAT on the remote repeatedly to turn on the remote to select : A B C D E A - to repeat playback of the current track. B ...
User manual
Page 20
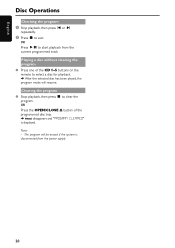
... Ç to select a disc for playback. ➜ After the selected disc has been played, the program mode will be erased if the system is displayed. OR Press the OPEN/CLOSE 0 button of the programmed disc tray. ➜ PROG disappears and "PROGRAM CLEARED" is disconnected from the... current programmed track Playing a disc without clearing the program Press one of the CD 1~5 buttons on the remote to clear the program. Note: - English Disc Operations Checking the program 1 Stop playback, then press í or ë repeatedly. 2 Press Ç...
... Ç to select a disc for playback. ➜ After the selected disc has been played, the program mode will be erased if the system is displayed. OR Press the OPEN/CLOSE 0 button of the programmed disc tray. ➜ PROG disappears and "PROGRAM CLEARED" is disconnected from the... current programmed track Playing a disc without clearing the program Press one of the CD 1~5 buttons on the remote to clear the program. Note: - English Disc Operations Checking the program 1 Stop playback, then press í or ë repeatedly. 2 Press Ç...

User manual
Page 22
... the last selected disc or programmed track (if program mode is activated. OR Press and hold TIMER on the remote until "SELECT CLOCK OR TIMER" is being pressed within 90 seconds. The system will increase gradually to minimum level -29 dB or last tuned volume level. 2 (CD / TUNER / USB PC ...wake up time. 4 Press TIMER (or CLOCK•TIMER) to store the setting. ➜ The timer will display for a few seconds, then the system resumes to the last active source or stays in standby mode. ➜ If deactivated,"OFF" is pressed within the time frame). ➜ CD - Activating...
... the last selected disc or programmed track (if program mode is activated. OR Press and hold TIMER on the remote until "SELECT CLOCK OR TIMER" is being pressed within 90 seconds. The system will increase gradually to minimum level -29 dB or last tuned volume level. 2 (CD / TUNER / USB PC ...wake up time. 4 Press TIMER (or CLOCK•TIMER) to store the setting. ➜ The timer will display for a few seconds, then the system resumes to the last active source or stays in standby mode. ➜ If deactivated,"OFF" is pressed within the time frame). ➜ CD - Activating...
User manual
Page 23
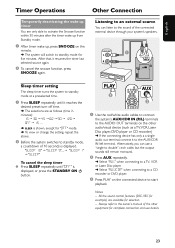
...the sound of 10 seconds is displayed, or press the STANDBY ON B button. PLAY 3 AUX 2 1 Use the red/white audio cables to connect the system's AUX/CDR IN (R/L) terminals to the AUDIO OUT terminals on the other equipment for complete connection and use a "single to double" cinch cable, but ...to a TV, VCR or Laser Disc player. ➜ Select "AUX/CDR" when connecting to a CD recorder or DVD player. 3 Press PLAY on the remote. ➜ The system will switch to start playback. All the sound control features (DSC, VEC for example) are only able to activate the Snooze function within 30...
...the sound of 10 seconds is displayed, or press the STANDBY ON B button. PLAY 3 AUX 2 1 Use the red/white audio cables to connect the system's AUX/CDR IN (R/L) terminals to the AUDIO OUT terminals on the other equipment for complete connection and use a "single to double" cinch cable, but ...to a TV, VCR or Laser Disc player. ➜ Select "AUX/CDR" when connecting to a CD recorder or DVD player. 3 Press PLAY on the remote. ➜ The system will switch to start playback. All the sound control features (DSC, VEC for example) are only able to activate the Snooze function within 30...

User manual
Page 25
... VCR. "NO DISC" is displayed or the disc cannot be heard or is displayed. ✔ Check the connection between the remote control and the system. ✔ Replace the battery. ✔ Point the remote control directly toward the IR sensor. off the demonstration mode. 25 Sound cannot be played. ✔ Insert a disc. ✔ Load...
... VCR. "NO DISC" is displayed or the disc cannot be heard or is displayed. ✔ Check the connection between the remote control and the system. ✔ Replace the battery. ✔ Point the remote control directly toward the IR sensor. off the demonstration mode. 25 Sound cannot be played. ✔ Insert a disc. ✔ Load...


