Leaflet
Page 3
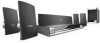
... Connections: Component Video output, S- Trademarks are subject to change without notice. DVD home theater system DivX Ultra Specifications HTS3450/37 Picture/Display • D/A converter: 12 bit, 108 MHz • Picture enhancement: Progressive Scan Sound •...Subwoofer type: Active Video Playback • Compression formats: DivX 3.11, DivX 4.x, DivX 5.x, DivX 6.0, DivX Ultra, MPEG1, MPEG2, MPEG4 • Playback Media: DVD-Video, DVD+R/+RW, DVDR/-RW, Video CD/SVCD, CD-R/CD-RW • Video disc playback system: NTSC, PAL Tuner/Reception/Transmission • No. www.philips...
... Connections: Component Video output, S- Trademarks are subject to change without notice. DVD home theater system DivX Ultra Specifications HTS3450/37 Picture/Display • D/A converter: 12 bit, 108 MHz • Picture enhancement: Progressive Scan Sound •...Subwoofer type: Active Video Playback • Compression formats: DivX 3.11, DivX 4.x, DivX 5.x, DivX 6.0, DivX Ultra, MPEG1, MPEG2, MPEG4 • Playback Media: DVD-Video, DVD+R/+RW, DVDR/-RW, Video CD/SVCD, CD-R/CD-RW • Video disc playback system: NTSC, PAL Tuner/Reception/Transmission • No. www.philips...

User manual
Page 6
... ...10-12 Using the remote control ...12 Connections Basic Connections ...13-18 Step 1 : Placing the speakers ...13 Step 2 : Connecting the speakers to AV subwoofer 14 Step 3 : Connecting the AV subwoofer to DVD system 15 Step 4 : Connecting the FM/AM antennas 15 Step 5 : Connecting to TV ...16 Option 1: Using the Video (CVBS) jack...
... ...10-12 Using the remote control ...12 Connections Basic Connections ...13-18 Step 1 : Placing the speakers ...13 Step 2 : Connecting the speakers to AV subwoofer 14 Step 3 : Connecting the AV subwoofer to DVD system 15 Step 4 : Connecting the FM/AM antennas 15 Step 5 : Connecting to TV ...16 Option 1: Using the Video (CVBS) jack...

User manual
Page 8
...About recycling These operating instructions have been printed on a carpet. - Setup precautions Finding a suitable location - Space for connecting between the AV subwoofer and the DVD system) - 1 composite video cable (yellow) - 1 FM wire antenna - 1 AM loop antenna - Place the apparatus ...Please observe the local regulations regarding disposal of the set on the apparatus (e.g., liquid filled objects, lighted candles.) Accessories supplied - 1 AV subwoofer - 1 center speaker - 2 front and 2 rear speakers - 1 remote control with adequate ventilation to a recycling center. Do not use...
...About recycling These operating instructions have been printed on a carpet. - Setup precautions Finding a suitable location - Space for connecting between the AV subwoofer and the DVD system) - 1 composite video cable (yellow) - 1 FM wire antenna - 1 AM loop antenna - Place the apparatus ...Please observe the local regulations regarding disposal of the set on the apparatus (e.g., liquid filled objects, lighted candles.) Accessories supplied - 1 AV subwoofer - 1 center speaker - 2 front and 2 rear speakers - 1 remote control with adequate ventilation to a recycling center. Do not use...
User manual
Page 13
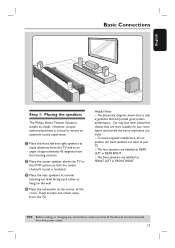
...center speaker above the TV or the DVD system so that the center channel's sound is critical to install. Helpful Hints: - D Place the subwoofer at an angle of the room. The rear speakers are labelled as REAR LEFT or REAR RIGHT. - However, proper system placement is localized....the listening position. The front speakers are labelled as FRONT LEFT or FRONT RIGHT. Basic Connections English Step 1: Placing the speakers The Philips Home Theater System is only a guideline that will provide great system performance. The placement diagram shown here is simple to ensure an ...
...center speaker above the TV or the DVD system so that the center channel's sound is critical to install. Helpful Hints: - D Place the subwoofer at an angle of the room. The rear speakers are labelled as REAR LEFT or REAR RIGHT. - However, proper system placement is localized....the listening position. The front speakers are labelled as FRONT LEFT or FRONT RIGHT. Basic Connections English Step 1: Placing the speakers The Philips Home Theater System is only a guideline that will provide great system performance. The placement diagram shown here is simple to ensure an ...

User manual
Page 14
Make sure that all the speakers to AV subwoofer Connect all the devices are matched. TIPS: Before making or changing any connections, make sure that the colors of the AV subwoofer. English Basic Connections (continued) FRONT RIGHT OR REAR RIGHT CENTER FRONT LEFT REAR LEFT Step 2: Connecting the speakers to the speaker jacks at the rear of the plugs and jacks are disconnected from the power outlet. 14
Make sure that all the speakers to AV subwoofer Connect all the devices are matched. TIPS: Before making or changing any connections, make sure that the colors of the AV subwoofer. English Basic Connections (continued) FRONT RIGHT OR REAR RIGHT CENTER FRONT LEFT REAR LEFT Step 2: Connecting the speakers to the speaker jacks at the rear of the plugs and jacks are disconnected from the power outlet. 14

User manual
Page 15
... the interconnect cable to a stand or wall. English Basic Connections (continued) fix the claw into the slot AM 1 antenna FM antenna 2 Step 3: Connecting the AV subwoofer to DVD system Step 4: Connecting the FM/ AM antennas A Use the supplied inter-connect cable to connect TO AV...
... the interconnect cable to a stand or wall. English Basic Connections (continued) fix the claw into the slot AM 1 antenna FM antenna 2 Step 3: Connecting the AV subwoofer to DVD system Step 4: Connecting the FM/ AM antennas A Use the supplied inter-connect cable to connect TO AV...

User manual
Page 18
English Basic Connections (continued) L R Step 6: Connecting the power cord After everything is connected properly, plug the AC power cord into the power outlet. Helpful Hints: - Refer to the type plate at the rear or bottom of the product for identification and supply ratings. The Eco Power LED on . Never make or change any connections, make sure that all the devices are disconnected from the power outlet. 18 TIPS: Before making or changing any connections with the power turned on the DVD system and the AV subwoofer will light up.
English Basic Connections (continued) L R Step 6: Connecting the power cord After everything is connected properly, plug the AC power cord into the power outlet. Helpful Hints: - Refer to the type plate at the rear or bottom of the product for identification and supply ratings. The Eco Power LED on . Never make or change any connections, make sure that all the devices are disconnected from the power outlet. 18 TIPS: Before making or changing any connections with the power turned on the DVD system and the AV subwoofer will light up.

User manual
Page 24
... on the remote control. Audio Setup Page Speakers Volume Speakers Delay Night Mode CD UpsamplSinpgeakers Level Setup Front Left 0dB Front Right 0dB Center 0dB Subwoofer 0dB Rear Left 0dB Rear Right 0dB Audio Setup Page Speakers Volume Speakers Delay Night Mode CD Upsampling Speakers Distance Setup Center 0ms Rear Left...
... on the remote control. Audio Setup Page Speakers Volume Speakers Delay Night Mode CD UpsamplSinpgeakers Level Setup Front Left 0dB Front Right 0dB Center 0dB Subwoofer 0dB Rear Left 0dB Rear Right 0dB Audio Setup Page Speakers Volume Speakers Delay Night Mode CD Upsampling Speakers Distance Setup Center 0ms Rear Left...
User manual
Page 47
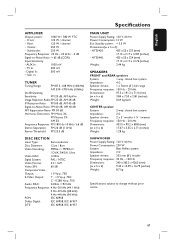
... 150 Hz - 20 kHz Dimensions: 433.5 x 90.2 x 68.8 (mm) (w x h x d) 17.07 x 3.55 x 2.71 (inches) Weight: 1.28 kg SUBWOOFER Power Supply Rating: 120 V; 60 Hz Power Consumption: 230 W System: Bass Reflex system Impedance: 2 Ω Speaker drivers: 203 mm (8") woofer Frequency response: 30 Hz - ... 60958, IEC 61937 MAIN UNIT Power Supply Rating: 120 V; 60 Hz Power Consumption: 12 W Eco Standby power: < 0.5 W Dimensions(w x h x d): - HTS3450: 435 x 55 x 327 (mm) 17.13 x 2.17 x 12.87 (inches) - AUX In : 1000 mV - English Specifications AMPLIFIER Output power: 1000 W...
... 150 Hz - 20 kHz Dimensions: 433.5 x 90.2 x 68.8 (mm) (w x h x d) 17.07 x 3.55 x 2.71 (inches) Weight: 1.28 kg SUBWOOFER Power Supply Rating: 120 V; 60 Hz Power Consumption: 230 W System: Bass Reflex system Impedance: 2 Ω Speaker drivers: 203 mm (8") woofer Frequency response: 30 Hz - ... 60958, IEC 61937 MAIN UNIT Power Supply Rating: 120 V; 60 Hz Power Consumption: 12 W Eco Standby power: < 0.5 W Dimensions(w x h x d): - HTS3450: 435 x 55 x 327 (mm) 17.13 x 2.17 x 12.87 (inches) - AUX In : 1000 mV - English Specifications AMPLIFIER Output power: 1000 W...

User manual
Page 48
... visual quality. Analog sound varies, while digital sound has specific numerical values. These jacks send audio through two channels, the left and right, center and subwoofer). "MP3" is different from the Dolby Digital. JPEG: A very common digital still picture format. vertical ratio of conventional TVs is 4:3, and that has not been...
... visual quality. Analog sound varies, while digital sound has specific numerical values. These jacks send audio through two channels, the left and right, center and subwoofer). "MP3" is different from the Dolby Digital. JPEG: A very common digital still picture format. vertical ratio of conventional TVs is 4:3, and that has not been...
Quick start guide
Page 1
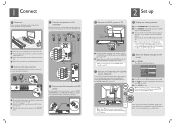
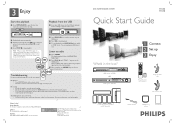
... supplied inter-connect cable to the FM jack. D Press SETUP to the TV. D CA C B D A Place the center speaker above or close to exit. AV subwoofer (rear) L AM AM R DVD System (rear) 2 Set up E Connect the DVD system to TV VIDEO IN (CVBS) Television ( rear) VIDEO IN (CVBS) ... control repeatedly (or AV, SELECT, ° button) until "DISC" appears on the floor, at least one metre away from the speakers to AV subwoofer Connect the various colored plugs from the TV. C Connect the speakers to the same colored jacks at normal listening ear level. Television ( rear) AUDIO ...
... supplied inter-connect cable to the FM jack. D Press SETUP to the TV. D CA C B D A Place the center speaker above or close to exit. AV subwoofer (rear) L AM AM R DVD System (rear) 2 Set up E Connect the DVD system to TV VIDEO IN (CVBS) Television ( rear) VIDEO IN (CVBS) ... control repeatedly (or AV, SELECT, ° button) until "DISC" appears on the floor, at least one metre away from the speakers to AV subwoofer Connect the various colored plugs from the TV. C Connect the speakers to the same colored jacks at normal listening ear level. Television ( rear) AUDIO ...
Quick start guide
Page 2
... panel will be stored automatically. Box 671539 Marietta, GA 30006-0026 Printed in China 12 NC 3139 246 19152 DVD HOME THEATER SYSTEM HTS3450 HTS3440 Quick Start Guide What's in multi-channel surround mode. DVD system - To start automatically. B Press PLAY X until "START ... Electronics A Division of Philips Electronics North America Corp P.O. HTS3440 1 Connect 2 Set up 3 Enjoy Remote Control and 2 batteries Composite video cable Inter-connect cable 1 center, 2 front, 2 rear speakers and AV subwoofer FM wire antenna AM/MW loop antenna User Manual D Press STOP x to stop ...
... panel will be stored automatically. Box 671539 Marietta, GA 30006-0026 Printed in China 12 NC 3139 246 19152 DVD HOME THEATER SYSTEM HTS3450 HTS3440 Quick Start Guide What's in multi-channel surround mode. DVD system - To start automatically. B Press PLAY X until "START ... Electronics A Division of Philips Electronics North America Corp P.O. HTS3440 1 Connect 2 Set up 3 Enjoy Remote Control and 2 batteries Composite video cable Inter-connect cable 1 center, 2 front, 2 rear speakers and AV subwoofer FM wire antenna AM/MW loop antenna User Manual D Press STOP x to stop ...


