Leaflet
Page 1
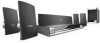
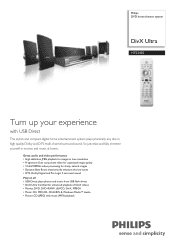
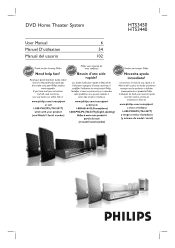
... any disc in movies and music at home. So just relax and fully immerse yourself in high quality Dolby and DTS multi-channel surround sound. Philips DVD home theater system DivX Ultra HTS3450 Turn up your experience with music (MP3) playback
... any disc in movies and music at home. So just relax and fully immerse yourself in high quality Dolby and DTS multi-channel surround sound. Philips DVD home theater system DivX Ultra HTS3450 Turn up your experience with music (MP3) playback
Leaflet
Page 2
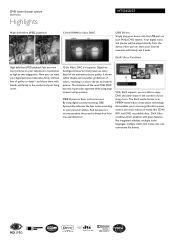
... in resolutions as high as two megapixels. With DivX support, you view your pictures on your living room. DVD home theater system DivX Ultra Highlights HTS3450/37 High definition JPEG playback 12-bit/108MHz video DAC USB Direct Simply plug your device into one convenient file format. 1000 The limitation of... on media like integrated subtitles, multiple audio languages, multiple tracks and menus into the USB port on your digital pictures in the comfort of your Philips DVD system.
... in resolutions as high as two megapixels. With DivX support, you view your pictures on your living room. DVD home theater system DivX Ultra Highlights HTS3450/37 High definition JPEG playback 12-bit/108MHz video DAC USB Direct Simply plug your device into one convenient file format. 1000 The limitation of... on media like integrated subtitles, multiple audio languages, multiple tracks and menus into the USB port on your digital pictures in the comfort of your Philips DVD system.
Leaflet
Page 3
...8226; Issue date 2009-07-02 Version: 2.0.5 12 NC: 8622 810 13312 UPC: 6 09585 11079 3 © 2009 Koninklijke Philips Electronics N.V. of Koninklijke Philips Electronics N.V. Specifications are the property of preset Audio Channels: 40 • Tuner Bands: AM, FM Connectivity • Front / ...Side connections: USB • Rear Connections: Component Video output, S- www.philips.com or their respective owners. All Rights reserved. DVD home theater system DivX Ultra Specifications HTS3450/37 Picture/Display • D/A converter: 12 bit, 108 MHz • Picture enhancement...
...8226; Issue date 2009-07-02 Version: 2.0.5 12 NC: 8622 810 13312 UPC: 6 09585 11079 3 © 2009 Koninklijke Philips Electronics N.V. of Koninklijke Philips Electronics N.V. Specifications are the property of preset Audio Channels: 40 • Tuner Bands: AM, FM Connectivity • Front / ...Side connections: USB • Rear Connections: Component Video output, S- www.philips.com or their respective owners. All Rights reserved. DVD home theater system DivX Ultra Specifications HTS3450/37 Picture/Display • D/A converter: 12 bit, 108 MHz • Picture enhancement...
User manual
Page 1
DVD Home Theater System User Manual 6 Manuel D'utilisation 54 Manual del usuario 102 HTS3450 HTS3440 English
DVD Home Theater System User Manual 6 Manuel D'utilisation 54 Manual del usuario 102 HTS3450 HTS3440 English
User manual
Page 2
...and special offers for investing in our power to keep you should not be exposed to your household, please do everything in a PHILIPS product. This "bolt of saying welcome and thanks for which you 'll receive notification directly from our convenient home shopping network.... which is our way of lightning" indicates uninsulated material within your Product Registration Card at once, or register online at http://www.philips.com/usasupport 2 Retain this apparatus should read the enclosed literature closely to prevent operating and maintenance problems. WARNING: To reduce the ...
...and special offers for investing in our power to keep you should not be exposed to your household, please do everything in a PHILIPS product. This "bolt of saying welcome and thanks for which you 'll receive notification directly from our convenient home shopping network.... which is our way of lightning" indicates uninsulated material within your Product Registration Card at once, or register online at http://www.philips.com/usasupport 2 Retain this apparatus should read the enclosed literature closely to prevent operating and maintenance problems. WARNING: To reduce the ...

User manual
Page 3
Install in accordance with one wider than the other apparatus (including amplifiers) that the unit has a double insulation system 12. If the provided plug does not fit into the apparatus, the apparatus has been exposed to rain or moisture, does not operate normally, or has been dropped. 15.Battery usage CAUTION - as marked on the unit. ● Do not mix batteries (old and new or carbon and alkaline, etc.). ● Remove batteries when the unit is not used , use attachments/accessories specified by the manufacturer or sold with dry cloth. 7. For disposal...
Install in accordance with one wider than the other apparatus (including amplifiers) that the unit has a double insulation system 12. If the provided plug does not fit into the apparatus, the apparatus has been exposed to rain or moisture, does not operate normally, or has been dropped. 15.Battery usage CAUTION - as marked on the unit. ● Do not mix batteries (old and new or carbon and alkaline, etc.). ● Remove batteries when the unit is not used , use attachments/accessories specified by the manufacturer or sold with dry cloth. 7. For disposal...
User manual
Page 4
...WITH THIS MODEL 525p AND 625p DVD PLAYER, PLEASE CONTACT OUR CUSTOMER SERVICE CENTER.' O. Box 671539 Marietta, GA 30006-0026 1-800-PHILIPS (744-5477) 4 This Class B digital apparatus complies with Canadian ICES-003. CAUTION: INVISIBLE LASER RADIATION WHEN OPEN. VARO! AVATTAESSA... on the rearside and inside this laser product. EXPOSURE TO BEAM. Declaration of Conformity Model number: HTS3450, HTS3440 Trade Name: Philips Responsible Party: Philips Consumer Electronics A Division of Philips Electronics North America Corp. P. Français: Cet appareil numérique n'emet pas de ...
...WITH THIS MODEL 525p AND 625p DVD PLAYER, PLEASE CONTACT OUR CUSTOMER SERVICE CENTER.' O. Box 671539 Marietta, GA 30006-0026 1-800-PHILIPS (744-5477) 4 This Class B digital apparatus complies with Canadian ICES-003. CAUTION: INVISIBLE LASER RADIATION WHEN OPEN. VARO! AVATTAESSA... on the rearside and inside this laser product. EXPOSURE TO BEAM. Declaration of Conformity Model number: HTS3450, HTS3440 Trade Name: Philips Responsible Party: Philips Consumer Electronics A Division of Philips Electronics North America Corp. P. Français: Cet appareil numérique n'emet pas de ...

User manual
Page 5
U.S. All Rights Reserved. Español 102 Environmental information All unnecessary packaging has been omitted. Please observe the local regulations regarding the disposal of Digital Theater Systems, Inc. Reorient or relocate the receiving antenna. - Pat. "DTS" and "DTS Digital Surround" are registered trademarks of packaging materials, exhausted batteries and old equipment. We have tried to make the packaging easy to separate into an outlet on , the user is no guarantee that to which can radiate radio frequency energy and, if not installed and used under ...
U.S. All Rights Reserved. Español 102 Environmental information All unnecessary packaging has been omitted. Please observe the local regulations regarding the disposal of Digital Theater Systems, Inc. Reorient or relocate the receiving antenna. - Pat. "DTS" and "DTS Digital Surround" are registered trademarks of packaging materials, exhausted batteries and old equipment. We have tried to make the packaging easy to separate into an outlet on , the user is no guarantee that to which can radiate radio frequency energy and, if not installed and used under ...

User manual
Page 6
English Table of contents General General Information ...8 Setup precautions...8 Accessories supplied ...8 Cleaning discs ...8 About recycling...8 Product Overview Main Unit ...9 Remote Control ...10-12 Using the remote control ...12 Connections Basic Connections ...13-18 Step 1 : Placing the speakers ...13 Step 2 : Connecting the speakers to AV subwoofer 14 Step 3 : Connecting the AV subwoofer to DVD system 15 Step 4 : Connecting the FM/AM antennas 15 Step 5 : Connecting to TV ...16 Option 1: Using the Video (CVBS) jack (good picture quality 16 Option 2: Using the S-Video jack (excellent...
English Table of contents General General Information ...8 Setup precautions...8 Accessories supplied ...8 Cleaning discs ...8 About recycling...8 Product Overview Main Unit ...9 Remote Control ...10-12 Using the remote control ...12 Connections Basic Connections ...13-18 Step 1 : Placing the speakers ...13 Step 2 : Connecting the speakers to AV subwoofer 14 Step 3 : Connecting the AV subwoofer to DVD system 15 Step 4 : Connecting the FM/AM antennas 15 Step 5 : Connecting to TV ...16 Option 1: Using the Video (CVBS) jack (good picture quality 16 Option 2: Using the S-Video jack (excellent...
User manual
Page 7
English Table of contents Other playback features for video discs (DVD/VCD/SVCD 27 Using the Disc Menu ...27 Viewing playback information...28 Resuming playback from the last stopped point 28 Zooming in...28 Changing subtitle language (DVD only 28 Changing sound track language...29 Selecting camera angles...29 Playback Control (VCD only)...29 Preview function (VCD/SVCD only) ...29 Playing an MP3/ JPEG/Window Media Audio disc 30 Playing a JPEG image file (slide show) ...31 Preview function...31 Zoom picture ...31 Rotating/flipping the picture ...31 Playing MP3 music and JPEG pictures ...
English Table of contents Other playback features for video discs (DVD/VCD/SVCD 27 Using the Disc Menu ...27 Viewing playback information...28 Resuming playback from the last stopped point 28 Zooming in...28 Changing subtitle language (DVD only 28 Changing sound track language...29 Selecting camera angles...29 Playback Control (VCD only)...29 Preview function (VCD/SVCD only) ...29 Playing an MP3/ JPEG/Window Media Audio disc 30 Playing a JPEG image file (slide show) ...31 Preview function...31 Zoom picture ...31 Rotating/flipping the picture ...31 Playing MP3 music and JPEG pictures ...

User manual
Page 8
Do not place the set on a flat, hard and stable surface. Do not position the set on top of danger on a carpet. - About recycling These operating instructions have been printed on a regular basis. Setup precautions Finding a suitable location - Do not place any user-serviceable parts. Quick Start Guide Cleaning discs Some problems occur (frozen picture, sound disruptions, picture distortions) because the disc inside the unit is dirty. CAUTION! Please observe the local regulations regarding disposal of materials that might heat it to prevent overheating. 5cm (2.3") ...
Do not place the set on a flat, hard and stable surface. Do not position the set on top of danger on a carpet. - About recycling These operating instructions have been printed on a regular basis. Setup precautions Finding a suitable location - Do not place any user-serviceable parts. Quick Start Guide Cleaning discs Some problems occur (frozen picture, sound disruptions, picture distortions) because the disc inside the unit is dirty. CAUTION! Please observe the local regulations regarding disposal of materials that might heat it to prevent overheating. 5cm (2.3") ...
User manual
Page 9
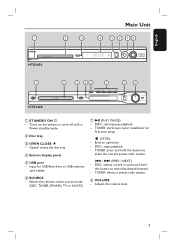
.../AM,) TV or AUX/DI. b Disc tray c OPEN CLOSE ç - TUNER: press and hold this button to Eco Power standby mode. English Main Unit 1 2 3 4 5 6 78 HTS3450 1 2 3 46 7 5 8 HTS3440 a STANDBY ON 2 - Opens/ closes the disc tray. TUNER: selects a preset radio station. DISC: starts/pauses playback. - Input for first time setup. Ç (STOP...
.../AM,) TV or AUX/DI. b Disc tray c OPEN CLOSE ç - TUNER: press and hold this button to Eco Power standby mode. English Main Unit 1 2 3 4 5 6 78 HTS3450 1 2 3 46 7 5 8 HTS3440 a STANDBY ON 2 - Opens/ closes the disc tray. TUNER: selects a preset radio station. DISC: starts/pauses playback. - Input for first time setup. Ç (STOP...

User manual
Page 10
... the disc tray. - l VOCAL / KARAOKE - TUNER: toggles between AUX and DIGITAL IN external source mode. 10 c ZOOM - Enlarges a picture on the TV. Adjusts TV volume (Philips TV only.) j Numeric keypad (0-9) - k REPEAT - Enters or exits the system setup menu. g PLAY É - DISC: press and hold this model.
... the disc tray. - l VOCAL / KARAOKE - TUNER: toggles between AUX and DIGITAL IN external source mode. 10 c ZOOM - Enlarges a picture on the TV. Adjusts TV volume (Philips TV only.) j Numeric keypad (0-9) - k REPEAT - Enters or exits the system setup menu. g PLAY É - DISC: press and hold this model.

User manual
Page 11
... title menu or return to start automatic/ manual preset programming. t PAUSE Å - x SURR. - DISC: selects movement direction in the menu. - TV: selects previous/next channel (Philips TV only.) - DISC: pauses playback. Mutes or restores the volume. 13 14 15 16 17 18 19 20 21 22 23 24 25 w PROGRAM - Selects...
... title menu or return to start automatic/ manual preset programming. t PAUSE Å - x SURR. - DISC: selects movement direction in the menu. - TV: selects previous/next channel (Philips TV only.) - DISC: pauses playback. Mutes or restores the volume. 13 14 15 16 17 18 19 20 21 22 23 24 25 w PROGRAM - Selects...

User manual
Page 12
A Open the battery compartment. Batteries contain chemical substances, so they are exhausted or if the remote control is not to control by pressing the DISC, TUNER, TV or AUX/DI button on the front panel. F Then select the desired function (for a long time. - Do not mix batteries (old and new or carbon and alkaline, etc.). - B Insert two batteries type R03 or AAA, following the indications (+-) inside the compartment. E Select the source you wish to be disposed of properly. Remove batteries if they should be used for example , .) 12 English Remote Control (continued) ...
A Open the battery compartment. Batteries contain chemical substances, so they are exhausted or if the remote control is not to control by pressing the DISC, TUNER, TV or AUX/DI button on the front panel. F Then select the desired function (for a long time. - Do not mix batteries (old and new or carbon and alkaline, etc.). - B Insert two batteries type R03 or AAA, following the indications (+-) inside the compartment. E Select the source you wish to be disposed of properly. Remove batteries if they should be used for example , .) 12 English Remote Control (continued) ...
User manual
Page 13
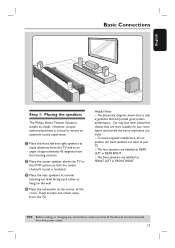
... devices are more suitable for your TV. - C Place the rear speakers at an angle of the room. Basic Connections English Step 1: Placing the speakers The Philips Home Theater System is only a guideline that will provide great system performance. Keep at the corner of approximately 45 degrees from the TV.
... devices are more suitable for your TV. - C Place the rear speakers at an angle of the room. Basic Connections English Step 1: Placing the speakers The Philips Home Theater System is only a guideline that will provide great system performance. Keep at the corner of approximately 45 degrees from the TV.

User manual
Page 14
Make sure that all the speakers to AV subwoofer Connect all the devices are matched. English Basic Connections (continued) FRONT RIGHT OR REAR RIGHT CENTER FRONT LEFT REAR LEFT Step 2: Connecting the speakers to the speaker jacks at the rear of the plugs and jacks are disconnected from the power outlet. 14 TIPS: Before making or changing any connections, make sure that the colors of the AV subwoofer.
Make sure that all the speakers to AV subwoofer Connect all the devices are matched. English Basic Connections (continued) FRONT RIGHT OR REAR RIGHT CENTER FRONT LEFT REAR LEFT Step 2: Connecting the speakers to the speaker jacks at the rear of the plugs and jacks are disconnected from the power outlet. 14 TIPS: Before making or changing any connections, make sure that the colors of the AV subwoofer.

User manual
Page 15
Extend the FM antenna and fix its ends to the AM jack. Adjust the position of the AV subwoofer. A Connect the supplied AM loop antenna to the wall. For better FM stereo reception, connect an external FM antenna (not supplied.) Helpful Hints: - TIPS: Before making or changing any unwanted interference. English Basic Connections (continued) fix the claw into the slot AM 1 antenna FM antenna 2 Step 3: Connecting the AV subwoofer to DVD system Step 4: Connecting the FM/ AM antennas A Use the supplied inter-connect cable to connect TO AV SUBWOOFER jack at the rear of the DVD ...
Extend the FM antenna and fix its ends to the AM jack. Adjust the position of the AV subwoofer. A Connect the supplied AM loop antenna to the wall. For better FM stereo reception, connect an external FM antenna (not supplied.) Helpful Hints: - TIPS: Before making or changing any unwanted interference. English Basic Connections (continued) fix the claw into the slot AM 1 antenna FM antenna 2 Step 3: Connecting the AV subwoofer to DVD system Step 4: Connecting the FM/ AM antennas A Use the supplied inter-connect cable to connect TO AV SUBWOOFER jack at the rear of the DVD ...

User manual
Page 16
English Basic Connections (continued) Option 1 L R Option 2 Step 5: Connecting to TV This connection enables you to view the playback from the power outlet. 16 Option 1: Using the Video (CVBS) jack (good picture quality) Use the supplied composite video cable (yellow) to connect the CVBS jack on the DVD system to make sure that all the devices are disconnected from this DVD system. You only need to choose one of the options below to the video input jack (or labelled as Y/C or S-VHS) on the TV. TIPS: Before making or changing any connections, make the video connection. - For...
English Basic Connections (continued) Option 1 L R Option 2 Step 5: Connecting to TV This connection enables you to view the playback from the power outlet. 16 Option 1: Using the Video (CVBS) jack (good picture quality) Use the supplied composite video cable (yellow) to connect the CVBS jack on the DVD system to make sure that all the devices are disconnected from this DVD system. You only need to choose one of the options below to the video input jack (or labelled as Y/C or S-VHS) on the TV. TIPS: Before making or changing any connections, make the video connection. - For...

User manual
Page 17
... (example only) Antenna L L R R Option 3: Connecting to the ANTENNA IN jack on the TV. Option 4: Using an accessory RF modulator If your electronics retailer or contact Philips for detailed progressive feature setup. Disconnect it from the power outlet. 17 A Use the supplied composite video cable (yellow) to connect the DVD system's CVBS...
... (example only) Antenna L L R R Option 3: Connecting to the ANTENNA IN jack on the TV. Option 4: Using an accessory RF modulator If your electronics retailer or contact Philips for detailed progressive feature setup. Disconnect it from the power outlet. 17 A Use the supplied composite video cable (yellow) to connect the DVD system's CVBS...