Leaflet
Page 2
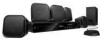
5.1 Home theater 1000W RMS power DVD playback Highlights HTS3371D/F7 Dock included for iPod/iPhone Use the docking station... to -life pictures. Plays it all your living room. Experience unbeatable flexibility and the convenience of your discs on the one remote. Hi-Speed USB 2.0 Link The Universal Serial Bus or USB is conveniently used ... convenient file format. DivX Ultra combines DivX playback with great features like CD-R/ RW, and DVD recordable discs. Movies in the comfort of playing all Play virtually any media format you control multiple devices with absolute ease...
5.1 Home theater 1000W RMS power DVD playback Highlights HTS3371D/F7 Dock included for iPod/iPhone Use the docking station... to -life pictures. Plays it all your living room. Experience unbeatable flexibility and the convenience of your discs on the one remote. Hi-Speed USB 2.0 Link The Universal Serial Bus or USB is conveniently used ... convenient file format. DivX Ultra combines DivX playback with great features like CD-R/ RW, and DVD recordable discs. Movies in the comfort of playing all Play virtually any media format you control multiple devices with absolute ease...
Leaflet
Page 3
Specifications are the property of Koninklijke Philips Electronics N.V. 5.1 Home theater 1000W RMS power DVD playback Specifications HTS3371D/F7 Picture/Display • D/A converter: 12 bit, 108 MHz • Picture enhancement: High Def (720p, 1080i, 1080p), Progressive scan Sound • ...DivX 4.x, DivX 5.x, DivX 6.0, DivX Ultra, WMV • Playback Media: DVD-Video, DVD+R/+RW, DVDR/-RW, Video CD/SVCD, CD-R/CD-RW • Video disc playback system: NTSC Audio Playback • Compression format: MP3, WMA • Playback Media: CD, CD-R/RW, DVD+R/+RW, DVD-R/-RW, USB flash drive •...
Specifications are the property of Koninklijke Philips Electronics N.V. 5.1 Home theater 1000W RMS power DVD playback Specifications HTS3371D/F7 Picture/Display • D/A converter: 12 bit, 108 MHz • Picture enhancement: High Def (720p, 1080i, 1080p), Progressive scan Sound • ...DivX 4.x, DivX 5.x, DivX 6.0, DivX Ultra, WMV • Playback Media: DVD-Video, DVD+R/+RW, DVDR/-RW, Video CD/SVCD, CD-R/CD-RW • Video disc playback system: NTSC Audio Playback • Compression format: MP3, WMA • Playback Media: CD, CD-R/RW, DVD+R/+RW, DVD-R/-RW, USB flash drive •...
User manual
Page 3
... Find the correct viewing channel 19 Select menu display language 19 Turn on Progressive Scan 20 Change speaker settings 21 Use Philips EasyLink 22 Select a play source 24 5 Play 25 Play a disc 25 Play video 25 Play music 28 Play photo 29 Play from USB device 31 Play from portable media player...
... Find the correct viewing channel 19 Select menu display language 19 Turn on Progressive Scan 20 Change speaker settings 21 Use Philips EasyLink 22 Select a play source 24 5 Play 25 Play a disc 25 Play video 25 Play music 28 Play photo 29 Play from USB device 31 Play from portable media player...
User manual
Page 7
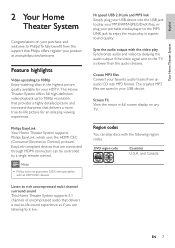
...surround sound This Home Theater System supports 5.1 channels of uncompressed audio that Philips offers, register your MP3/WMA/JPEG/DivX Àles; or plug your purchase, and welcome to 1080p Enjoy watching discs in the highest picture quality available for an amazing viewing experience. Feature ...highlights Video upscaling to Philips! The created MP3 Àles are listening to enjoy the music play Synchronize audio...
...surround sound This Home Theater System supports 5.1 channels of uncompressed audio that Philips offers, register your MP3/WMA/JPEG/DivX Àles; or plug your purchase, and welcome to 1080p Enjoy watching discs in the highest picture quality available for an amazing viewing experience. Feature ...highlights Video upscaling to Philips! The created MP3 Àles are listening to enjoy the music play Synchronize audio...
User manual
Page 8
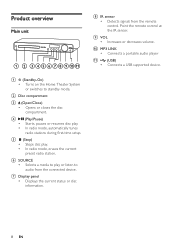
... or decreases volume. j MP3 LINK • Connects a portable audio player k (USB) • Connects a USB supported device. 8 EN e (Stop) • Stops disc play . Product overview Main unit a b cdefghijk a (Standby-On) • Turns on the Home Theater System or switches to audio from the remote control. f SOURCE •...rst-time setup. Point the remote control at the IR sensor. d • • (Play/Pause) Starts, pauses or resumes disc play . • In radio mode, erases the current preset radio station. g Display panel • Displays the current status or...
... or decreases volume. j MP3 LINK • Connects a portable audio player k (USB) • Connects a USB supported device. 8 EN e (Stop) • Stops disc play . Product overview Main unit a b cdefghijk a (Standby-On) • Turns on the Home Theater System or switches to audio from the remote control. f SOURCE •...rst-time setup. Point the remote control at the IR sensor. d • • (Play/Pause) Starts, pauses or resumes disc play . • In radio mode, erases the current preset radio station. g Display panel • Displays the current status or...

User manual
Page 9
... to FM band. • USB: Switches to the USB source. • DOCK: Switches to the iPod in the dock. • DISC: Switches to supported surround sound or stereo sound. h (Stop) • Stops disc play . English Your Home Theater System Remote control a b c d o e p f q g r h s t i j k u l v m w n a (... Press and hold to access the setting for fast backward or forward search. i SURR (Surround Sound) • Switches to the disc source. In radio mode, automatically tunes radio stations during Àrst-time setup. to play. k Numeric buttons • Selects an...
... to FM band. • USB: Switches to the USB source. • DOCK: Switches to the iPod in the dock. • DISC: Switches to supported surround sound or stereo sound. h (Stop) • Stops disc play . English Your Home Theater System Remote control a b c d o e p f q g r h s t i j k u l v m w n a (... Press and hold to access the setting for fast backward or forward search. i SURR (Surround Sound) • Switches to the disc source. In radio mode, automatically tunes radio stations during Àrst-time setup. to play. k Numeric buttons • Selects an...
User manual
Page 11
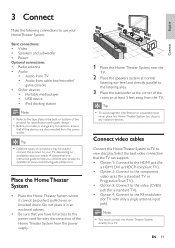
...place it cannot be used to connect this product to use your product is available at normal listening ear-level and directly parallel to view disc play. EN 11 Connect English 3 Connect Make the following connections to your TV, depending on availability and your needs. Tip • Different... 3 feet away from the TV. Connect video cables Connect this Home Theater System near the TV. 2 Place the speakers system at www.connectivityguide.philips.com. Note • You must connect this Home Theater System too close to the RF modulator (for TV with only a single antenna input jack...
...place it cannot be used to connect this product to use your product is available at normal listening ear-level and directly parallel to view disc play. EN 11 Connect English 3 Connect Make the following connections to your TV, depending on availability and your needs. Tip • Different... 3 feet away from the TV. Connect video cables Connect this Home Theater System near the TV. 2 Place the speakers system at www.connectivityguide.philips.com. Note • You must connect this Home Theater System too close to the RF modulator (for TV with only a single antenna input jack...
User manual
Page 13
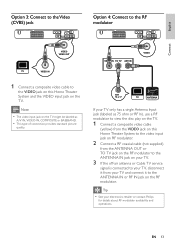
...A/V IN, VIDEO IN, COMPOSITE or BASEBAND. • This type of connection provides standard picture quality. Tip • See your electronics retailer or contact Philips for details about RF modulator availability and operations. English Connect Option 3: Connect to the Video (CVBS) jack Option 4: Connect to the RF modulator VIDEO ...the off-air antenna or Cable TV service signal is connected to your TV, disconnect it from your TV and connect it to view the disc play on the TV. 1 Connect a composite video cable (yellow) from the VIDEO jack on this Home Theater System and the VIDEO input...
...A/V IN, VIDEO IN, COMPOSITE or BASEBAND. • This type of connection provides standard picture quality. Tip • See your electronics retailer or contact Philips for details about RF modulator availability and operations. English Connect Option 3: Connect to the Video (CVBS) jack Option 4: Connect to the RF modulator VIDEO ...the off-air antenna or Cable TV service signal is connected to your TV, disconnect it from your TV and connect it to view the disc play on the TV. 1 Connect a composite video cable (yellow) from the VIDEO jack on this Home Theater System and the VIDEO input...
User manual
Page 18
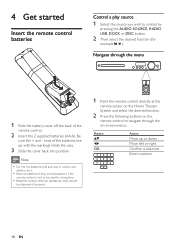
...; Batteries contain chemical substances, they are exhausted or if the remote control is not to control by pressing the AUDIO SOURCE, RADIO, USB, DOCK or DISC button. 2 Then select the desired function (for example , ). Navigate through the menu 1 Slide the battery cover off the back of properly. 1 Point the remote control...
...; Batteries contain chemical substances, they are exhausted or if the remote control is not to control by pressing the AUDIO SOURCE, RADIO, USB, DOCK or DISC button. 2 Then select the desired function (for example , ). Navigate through the menu 1 Slide the battery cover off the back of properly. 1 Point the remote control...
User manual
Page 19
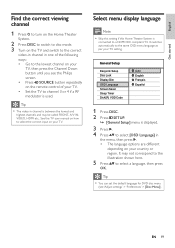
... press OK . EN 19 It may be called FRONT, A/V IN, VIDEO, HDMI etc.. Tip • You can set the default language for DVD disc menu (see the Philips screen. • Press SOURCE button repeatedly on the remote control of your TV setting. It switches automatically to the same OSD menu language as.... 5 Press to a HDMI CEC compliant TV. English Get started Find the correct viewing channel 1 Press to turn on the Home Theater System. 2 Press DISC to switch to disc mode. 3 Turn on the TV and switch to the correct video-in channel in one of the following ways: • Go to the lowest...
... press OK . EN 19 It may be called FRONT, A/V IN, VIDEO, HDMI etc.. Tip • You can set the default language for DVD disc menu (see the Philips screen. • Press SOURCE button repeatedly on the remote control of your TV setting. It switches automatically to the same OSD menu language as.... 5 Press to a HDMI CEC compliant TV. English Get started Find the correct viewing channel 1 Press to turn on the Home Theater System. 2 Press DISC to switch to disc mode. 3 Turn on the TV and switch to the correct video-in channel in one of the following ways: • Go to the lowest...

User manual
Page 20
... the TV, distorted picture may display. Note • If a blank/distorted screen is displayed, wait for 15 seconds for both this Home Theater System. 3 Press DISC. 4 Press SETUP. 5 Press to select [Video Setup] in the menu, then press . 6 Select [Progressive] > [On], then press OK . » A warning message is ... If no picture displayed, turn on the progressive scan mode on the TV. Turn off the progressive scan mode as follows: 1) Press to open the disc compartment. 2) Press . 3) Press AUDIO SYNC. 8 Press SETUP to exit the menu. 9 You can connect this Home Theater System and the TV ...
... the TV, distorted picture may display. Note • If a blank/distorted screen is displayed, wait for 15 seconds for both this Home Theater System. 3 Press DISC. 4 Press SETUP. 5 Press to select [Video Setup] in the menu, then press . 6 Select [Progressive] > [On], then press OK . » A warning message is ... If no picture displayed, turn on the progressive scan mode on the TV. Turn off the progressive scan mode as follows: 1) Press to open the disc compartment. 2) Press . 3) Press AUDIO SYNC. 8 Press SETUP to exit the menu. 9 You can connect this Home Theater System and the TV ...

User manual
Page 21
... position at the same time. • To exit the menu, press SETUP. Audio Setup Speakers Volume Speakers Delay HDMI Audio CD Upsampling Audio Sync 1 Press DISC. 2 Press SETUP. 3 Press to select [Audio Setup] in the menu, then press . • If the speaker setup option is closer to obtain the best possible...
... position at the same time. • To exit the menu, press SETUP. Audio Setup Speakers Volume Speakers Delay HDMI Audio CD Upsampling Audio Sync 1 Press DISC. 2 Press SETUP. 3 Press to select [Audio Setup] in the menu, then press . • If the speaker setup option is closer to obtain the best possible...
User manual
Page 22
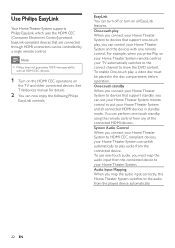
...from the played device automatically. 22 EN Audio Input Mapping When you press Play on all connected HDMI devices in the disc compartment before operation. To use your Home Theater System remote control to put your TV automatically switches to the correct channel.... System Audio Control When you can now enjoy the following Philips EasyLink controls. Use Philips EasyLink Your Home Theater System supports Philips EasyLink, which uses the HDMI CEC (Consumer Electronics Control) protocol. Note • Philips does not guarantee 100% interoperability with one -touch standby using...
...from the played device automatically. 22 EN Audio Input Mapping When you press Play on all connected HDMI devices in the disc compartment before operation. To use your Home Theater System remote control to put your TV automatically switches to the correct channel.... System Audio Control When you can now enjoy the following Philips EasyLink controls. Use Philips EasyLink Your Home Theater System supports Philips EasyLink, which uses the HDMI CEC (Consumer Electronics Control) protocol. Note • Philips does not guarantee 100% interoperability with one -touch standby using...
User manual
Page 23
...; Repeat steps 5~7 to map other connected devices. 8 Press SETUP to start , ensure that is used to connect to other HDMI device (e.g. General Setup EasyLink Setup Disc Lock Display Dim OSD Language Screen Saver Sleep Timer DivX(R) VOD Code EasyLink One Touch Play One Touch Standby System Audio Control Audio Input Mapping...
...; Repeat steps 5~7 to map other connected devices. 8 Press SETUP to start , ensure that is used to connect to other HDMI device (e.g. General Setup EasyLink Setup Disc Lock Display Dim OSD Language Screen Saver Sleep Timer DivX(R) VOD Code EasyLink One Touch Play One Touch Standby System Audio Control Audio Input Mapping...

User manual
Page 24
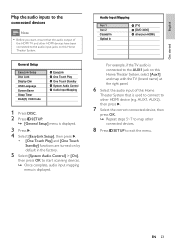
... switch to FM band. • Press USB to switch to USB mode. • Press DOCK to switch to iPod mode. • Press DISC to switch to select: DISC > USB > FM > AUX 1 > AUX 2 > COAX IN > OPTI IN > MP3 LINK > DOCK > DISC ... Select a play source On the main unit • Press SOURCE button repeatedly to...
... switch to FM band. • Press USB to switch to USB mode. • Press DOCK to switch to iPod mode. • Press DISC to switch to select: DISC > USB > FM > AUX 1 > AUX 2 > COAX IN > OPTI IN > MP3 LINK > DOCK > DISC ... Select a play source On the main unit • Press SOURCE button repeatedly to...
User manual
Page 25
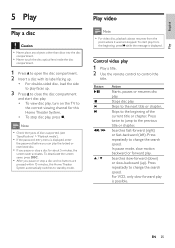
...Playback media'). • If the password entry menu is displayed, enter the password before you can play the locked or restricted disc. • If you pause or stop a disc for this Home Theater System automatically switches to standby mode. Searches slow-forward (down) or slow-backward (up . 3 ...the TV to the correct viewing channel for about 5 minutes, the screen saver activates. In pause mode, slow motion backward or forward play . Stops disc play 1 Play a title. 2 Use the remote control to control the title. Control video play . Searches fast-forward (right) or fast-backward...
...Playback media'). • If the password entry menu is displayed, enter the password before you can play the locked or restricted disc. • If you pause or stop a disc for this Home Theater System automatically switches to standby mode. Searches slow-forward (down) or slow-backward (up . 3 ...the TV to the correct viewing channel for about 5 minutes, the screen saver activates. In pause mode, slow motion backward or forward play . Stops disc play 1 Play a title. 2 Use the remote control to control the title. Control video play . Searches fast-forward (right) or fast-backward...
User manual
Page 26
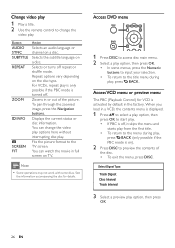
... to input your selection. • To return to the title menu during play, press BACK (only possible if the PBC mode is on). 2 Press DISC to preview the contents of the picture. Access VCD menu or preview menu The PBC (Playback Control) for details. Access DVD menu 1 Press... DISC to access disc main menu. 2 Select a play option, then press OK. • In some discs. Change video play 1 Play a title. 2 Use the remote control to change the video play options here without ...
... to input your selection. • To return to the title menu during play, press BACK (only possible if the PBC mode is on). 2 Press DISC to preview the contents of the picture. Access VCD menu or preview menu The PBC (Playback Control) for details. Access DVD menu 1 Press... DISC to access disc main menu. 2 Select a play option, then press OK. • In some discs. Change video play 1 Play a title. 2 Use the remote control to change the video play options here without ...
User manual
Page 27
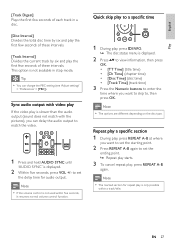
... repeat play, press REPEAT A-B again. to view information, then press • [TT Time] (title time) • [Ch Time] (chapter time) • [Disc Time] (disc time) • [Track Time] (track time) 3 Press the Numeric buttons to a speciÀc time 1 During play the Àrst few seconds of these intervals.... [Track Interval] Divides the current track by six and play , press INFO. » The disc status menu is not available in a disc. [Disc Interval] Divides the total disc time by six and play the Àrst few seconds of each track in stop mode. English Play ...
... repeat play, press REPEAT A-B again. to view information, then press • [TT Time] (title time) • [Ch Time] (chapter time) • [Disc Time] (disc time) • [Track Time] (track time) 3 Press the Numeric buttons to a speciÀc time 1 During play the Àrst few seconds of these intervals.... [Track Interval] Divides the current track by six and play , press INFO. » The disc status menu is not available in a disc. [Disc Interval] Divides the total disc time by six and play the Àrst few seconds of each track in stop mode. English Play ...
User manual
Page 28
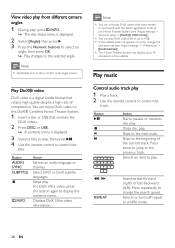
... beginning of up to 45 characters in the subtitle. Play DivX® video DivX video is a digital media format that contains the DivX videos. 2 Press DISC or USB. » A contents menu is displayed. 2 Select [Angle], then press . 3 Press the Numeric buttons to select an angle, then press OK. ...» Play changes to the previous track. Stops play. View video play from different camera angles 1 During play, press INFO. » The disc status menu is displayed. 3 Select a title to play, then press . 4 Use the remote control to 4GB. • If the subtitle does not appear ...
... beginning of up to 45 characters in the subtitle. Play DivX® video DivX video is a digital media format that contains the DivX videos. 2 Press DISC or USB. » A contents menu is displayed. 2 Select [Angle], then press . 3 Press the Numeric buttons to select an angle, then press OK. ...» Play changes to the previous track. Stops play. View video play from different camera angles 1 During play, press INFO. » The disc status menu is displayed. 3 Select a title to play, then press . 4 Use the remote control to 4GB. • If the subtitle does not appear ...
User manual
Page 29
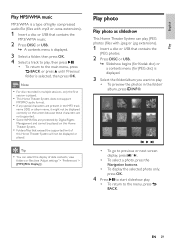
... only the Àrst session is selected, then press OK. Tip • You can play JPEG photos (Àles with .mp3 or .wma extensions). 1 Insert a disc or USB that exceed the supported limit of this Home Theater System will not be played on this Home Theater System. • Folders/Àles... that contains the MP3/WMA music. 2 Press DISC or USB. » A contents menu is displayed. 3 Select a folder, then press OK. 4 Select a track to play . • To return to the main menu, press ...
... only the Àrst session is selected, then press OK. Tip • You can play JPEG photos (Àles with .mp3 or .wma extensions). 1 Insert a disc or USB that exceed the supported limit of this Home Theater System will not be played on this Home Theater System. • Folders/Àles... that contains the MP3/WMA music. 2 Press DISC or USB. » A contents menu is displayed. 3 Select a folder, then press OK. 4 Select a track to play . • To return to the main menu, press ...


