
Leaflet
Page 2
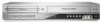
DVD/VCR Player Direct Dubbing Progressive Scan Specifications DVP3340V/17 Highlights Picture/Display • D/A converter: 14 bit / 27MHz • Picture enhancement: Progressive Scan Sound • D/A converter: 24 bit, 96 kHz • Dynamic Range (1kHz): 95 dB • Frequency response: 8 - 20 000 Hz • Signal to noise ratio: 90 • THD:
DVD/VCR Player Direct Dubbing Progressive Scan Specifications DVP3340V/17 Highlights Picture/Display • D/A converter: 14 bit / 27MHz • Picture enhancement: Progressive Scan Sound • D/A converter: 24 bit, 96 kHz • Dynamic Range (1kHz): 95 dB • Frequency response: 8 - 20 000 Hz • Signal to noise ratio: 90 • THD:
User manual
Page 5
... Rotating the picture 28 Playing a DVD VR format Disc 29 Maintenance and Service 29 Reference 30 Language Codes 30 Area Codes 30 Troubleshooting 31-32 Specifications 33 5 DVD 25 Additional Features 26 Playing an Audio CD or MP3/Windows MediaTM Audio file 27 Programmed Playback 27 Repeat Programmed Tracks 27 Erasing a Track from DVD to an Amplifier 12 Initial Settings - VCR 13 General Operation 13 CLOCK 13 PROGRAM 13 SETUP 14 Displaying Disc Information on Copyrights 7 Front Panel 8 Remote Control 9 About the Remote Control 9 Rear Panel 10...
... Rotating the picture 28 Playing a DVD VR format Disc 29 Maintenance and Service 29 Reference 30 Language Codes 30 Area Codes 30 Troubleshooting 31-32 Specifications 33 5 DVD 25 Additional Features 26 Playing an Audio CD or MP3/Windows MediaTM Audio file 27 Programmed Playback 27 Repeat Programmed Tracks 27 Erasing a Track from DVD to an Amplifier 12 Initial Settings - VCR 13 General Operation 13 CLOCK 13 PROGRAM 13 SETUP 14 Displaying Disc Information on Copyrights 7 Front Panel 8 Remote Control 9 About the Remote Control 9 Rear Panel 10...

User manual
Page 6
... unit require service, contact an authorized service location. Never stick paper or tape on the disc can cause poor picture quality and sound distortion. Symbol Used in its case. ALL DVD VCD ACD MP3 WMA All discs listed below DVD and finalized DVD±R/RW Video CDs Audio CDs MP3 files Windows MediaTM Audio files Cleaning Discs Fingerprints and dust on the disc. Do not expose the disc to direct sunlight or...
... unit require service, contact an authorized service location. Never stick paper or tape on the disc can cause poor picture quality and sound distortion. Symbol Used in its case. ALL DVD VCD ACD MP3 WMA All discs listed below DVD and finalized DVD±R/RW Video CDs Audio CDs MP3 files Windows MediaTM Audio files Cleaning Discs Fingerprints and dust on the disc. Do not expose the disc to direct sunlight or...

User manual
Page 7
... SET COMPATIBILITY WITH THIS MODEL 525p DVD+VCR, PLEASE CONTACT OUR CUSTOMER SERVICE CENTER. 7 This unit can play a DVD with one or more numbers in public, or rent copyrighted material without permission. Notes on some CD-R/RW (or DVD±R/RW) discs may result in malfunctions. • This DVD player requires discs and recordings to meet certain technical standards in order to download MP3 / Windows MediaTM Audio files and music...
... SET COMPATIBILITY WITH THIS MODEL 525p DVD+VCR, PLEASE CONTACT OUR CUSTOMER SERVICE CENTER. 7 This unit can play a DVD with one or more numbers in public, or rent copyrighted material without permission. Notes on some CD-R/RW (or DVD±R/RW) discs may result in malfunctions. • This DVD player requires discs and recordings to meet certain technical standards in order to download MP3 / Windows MediaTM Audio files and music...
User manual
Page 8
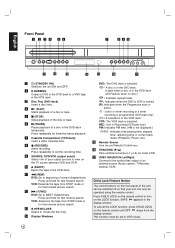
... tape. h z (RECORD) Starts recording. VCR: Rewinds the tape from STOP mode or for fast reverse picture search. VCR: Advances the tape from the display window. REC: Unit is Recording.(VCR part only) PM: Indicates PM time. (AM is selected. This function must be operated using the remote control. m / OPEN/CLOSE Opens or closes the disc tray. Press and hold for fast reverse search. b D.DUBBING Copies a DVD in the DVD deck to set in the VCR deck. e x (STOP) Stops playback of a disc or tape. Press repeatedly to a VHS tape...
... tape. h z (RECORD) Starts recording. VCR: Rewinds the tape from STOP mode or for fast reverse picture search. VCR: Advances the tape from the display window. REC: Unit is Recording.(VCR part only) PM: Indicates PM time. (AM is selected. This function must be operated using the remote control. m / OPEN/CLOSE Opens or closes the disc tray. Press and hold for fast reverse search. b D.DUBBING Copies a DVD in the DVD deck to set in the VCR deck. e x (STOP) Stops playback of a disc or tape. Press repeatedly to a VHS tape...
User manual
Page 9
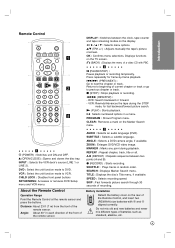
CHILD LOCK : Disables front panel buttons SETUP/MENU: Accesses or removes DVD Setup menu and VCR menu. b X (PAUSE/STEP) : Pause playback or recording temporarily. m/M (REW/FFW) : - REPEAT : Repeat chapter, track, title or all. Battery installation Detach the battery cover on the TV screen. b / B / v / V : Selects menu options. N (PLAY) : Starts playback. 0-9 Selects numbered options in each direction of the front of the remote sensor. ZOOM : Enlarges DVD/VCD video image. MARKER : Marks any point during the STOP mode, for frame-by-frame playback. ./> (PREV/NEXT...
CHILD LOCK : Disables front panel buttons SETUP/MENU: Accesses or removes DVD Setup menu and VCR menu. b X (PAUSE/STEP) : Pause playback or recording temporarily. m/M (REW/FFW) : - REPEAT : Repeat chapter, track, title or all. Battery installation Detach the battery cover on the TV screen. b / B / v / V : Selects menu options. N (PLAY) : Starts playback. 0-9 Selects numbered options in each direction of the front of the remote sensor. ZOOM : Enlarges DVD/VCD video image. MARKER : Marks any point during the STOP mode, for frame-by-frame playback. ./> (PREV/NEXT...

User manual
Page 10
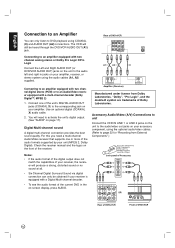
... with audio inputs. c COMPONENT/PROGRESSIVE SCAN VIDEO OUT (Y Pb Pr) (DVD EXCLUSIVE OUT) Connect to a TV with Y Pb Pr inputs. b DVD/VCR OUT (VIDEO/AUDIO (Left/Right)) Connect to a TV with video and audio inputs. English Rear Panel Caution Do not touch the inner pins of an external source (Audio system, TV/Monitor, VCR, Camcorder). d AUDIO OUT (Left/Right) (DVD EXCLUSIVE OUT) Connect to digital (coaxial) audio equipment. ab cd e f g a VCR IN LINE 1 (VIDEO/AUDIO (Left/Right)) Connect the audio/video output of...
... with audio inputs. c COMPONENT/PROGRESSIVE SCAN VIDEO OUT (Y Pb Pr) (DVD EXCLUSIVE OUT) Connect to a TV with Y Pb Pr inputs. b DVD/VCR OUT (VIDEO/AUDIO (Left/Right)) Connect to a TV with video and audio inputs. English Rear Panel Caution Do not touch the inner pins of an external source (Audio system, TV/Monitor, VCR, Camcorder). d AUDIO OUT (Left/Right) (DVD EXCLUSIVE OUT) Connect to digital (coaxial) audio equipment. ab cd e f g a VCR IN LINE 1 (VIDEO/AUDIO (Left/Right)) Connect the audio/video output of...

User manual
Page 11
... after removing the disc. • Do not connect the unit's AUDIO OUT jack to the phono in jack on the TV using an optional Y Pb Pr cable (C). Note: Rear of DVD+VCR Audio/Video connection 1. Note: If you connect both connections to solve the problem. 11 Please refer to the manuals of your TV. Notes: • The picture and sound of a nearby TV, VCR, or radio may be displayed unstable...
... after removing the disc. • Do not connect the unit's AUDIO OUT jack to the phono in jack on the TV using an optional Y Pb Pr cable (C). Note: Rear of DVD+VCR Audio/Video connection 1. Note: If you connect both connections to solve the problem. 11 Please refer to the manuals of your TV. Notes: • The picture and sound of a nearby TV, VCR, or radio may be displayed unstable...
User manual
Page 12
... VCR IN LINE 1 or LINE 2 jacks on the unit to the audio/video out jacks on your accessory component, using the optional audio/video cables. (Refer to DVD playback using the audio cables (A1, A2) supplied. For this you need to the corresponding jack on -screen display, press AUDIO. 12 You will still be obtained if your amplifier, receiver, or stereo system using COAXIAL (X) and AUDIO OUT (A2) connections. Rear of the unit's DIGITAL AUDIO...
... VCR IN LINE 1 or LINE 2 jacks on the unit to the audio/video out jacks on your accessory component, using the optional audio/video cables. (Refer to DVD playback using the audio cables (A1, A2) supplied. For this you need to the corresponding jack on -screen display, press AUDIO. 12 You will still be obtained if your amplifier, receiver, or stereo system using COAXIAL (X) and AUDIO OUT (A2) connections. Rear of the unit's DIGITAL AUDIO...

User manual
Page 13
... make various adjustments to record. INPUT: Select a LINE1 or LINE2. If it is memorized by repeating steps 1-4. REPEAT: To record up to input the program information: Input the MONTH, DAY, START and STOP times of every week select WEEKLY. Be sure to end timer recording. 13 Use the v / V buttons to switch between the program options, and the b / B buttons to 8 programs at the point where the speed changes. Your unit allows remote control adjustment...
... make various adjustments to record. INPUT: Select a LINE1 or LINE2. If it is memorized by repeating steps 1-4. REPEAT: To record up to input the program information: Input the MONTH, DAY, START and STOP times of every week select WEEKLY. Be sure to end timer recording. 13 Use the v / V buttons to switch between the program options, and the b / B buttons to 8 programs at the point where the speed changes. Your unit allows remote control adjustment...

User manual
Page 14
... is turned on a unit that does not have VHS Hi-Fi. To erase the program, press CLEAR. 4. Otherwise you must reset the clock and timer. • If the tape indicator is blinking, no tape is loaded. • When you are playing DVD at programmed Recording time, the unit automatically change a set to VCR mode and start and end times of program numbers 2 and 3 are kept in memory for selecting the audio output signals...
... is turned on a unit that does not have VHS Hi-Fi. To erase the program, press CLEAR. 4. Otherwise you must reset the clock and timer. • If the tape indicator is blinking, no tape is loaded. • When you are playing DVD at programmed Recording time, the unit automatically change a set to VCR mode and start and end times of program numbers 2 and 3 are kept in memory for selecting the audio output signals...
User manual
Page 15
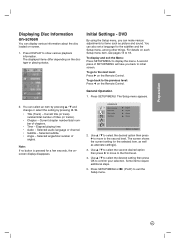
... SETUP/MENU. LANGUAGE Menu Language Disc Audio Disc Subtitle Disc Menu English Original Original Original Move Select 2. DVD By using the Setup menu, you back to 18. The Setup menu appears. 2. Current title (or track). Some items require additional steps. 5. Preparation Displaying Disc Information on-screen You can select an item by pressing v / V and change or select the setting by pressing b / B. • Title (Track) - Elapsed playing time. • Audio - Selected audio language or channel. • Subtitle - Note: If no button...
... SETUP/MENU. LANGUAGE Menu Language Disc Audio Disc Subtitle Disc Menu English Original Original Original Move Select 2. DVD By using the Setup menu, you back to 18. The Setup menu appears. 2. Current title (or track). Some items require additional steps. 5. Preparation Displaying Disc Information on-screen You can select an item by pressing v / V and change or select the setting by pressing b / B. • Title (Track) - Elapsed playing time. • Audio - Selected audio language or channel. • Subtitle - Note: If no button...

User manual
Page 16
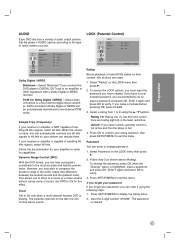
... YPbPr Progressive Scan Progressive Scan Video provides the highest quality pictures with a progressive scan signal, set to On. S-VIDEO - Select when a standard 4:3 TV is connected. To Turn ON progressive scan: Connect component video out of the this unit to Component Input. 1. Select "Progressive Scan" on -screen display. Disc Audio / Subtitle / Menu Select the language you enter the wrong language code, press CLEAR. If you prefer for connection to a TV or a monitor that do not fit. 16 Display Mode The display Mode setting works only...
... YPbPr Progressive Scan Progressive Scan Video provides the highest quality pictures with a progressive scan signal, set to On. S-VIDEO - Select when a standard 4:3 TV is connected. To Turn ON progressive scan: Connect component video out of the this unit to Component Input. 1. Select "Progressive Scan" on -screen display. Disc Audio / Subtitle / Menu Select the language you enter the wrong language code, press CLEAR. If you prefer for connection to a TV or a monitor that do not fit. 16 Display Mode The display Mode setting works only...
User manual
Page 17
... Dolby Digital / MPEG) - The password is the least restrictive. Vocal Set to exit the menu. The karaoke channels on the LOCK menu then press B. 2. Press SETUP/MENU to On only when a multi-channel karaoke DVD is not active and the disc plays in Dolby Digital or MPEG will be automatically downmixed to 8 using the following steps: 1. Set DRC to a movie at a lower volume without losing clarity of audio output...
... Dolby Digital / MPEG) - The password is the least restrictive. Vocal Set to exit the menu. The karaoke channels on the LOCK menu then press B. 2. Press SETUP/MENU to On only when a multi-channel karaoke DVD is not active and the disc plays in Dolby Digital or MPEG will be automatically downmixed to 8 using the following steps: 1. Set DRC to a movie at a lower volume without losing clarity of audio output...

User manual
Page 19
... playback. The indicator lights and the unit powers on the TV. 2. Press x (STOP) to operate the VCR and DVD. Press X (PAUSE/STEP) repeatedly to VIDEO. 3. Turn on automatically. 4. Direct VIDEO/AUDIO connection is played for the first time. • The tape speed (SP & SLP) changes. • Streaks or snow appear due to select the tape speed for more than 3 seconds. Manual Tracking To manually adjust the tracking use the v/V (TRK +/-) buttons on the Remote Control...
... playback. The indicator lights and the unit powers on the TV. 2. Press x (STOP) to operate the VCR and DVD. Press X (PAUSE/STEP) repeatedly to VIDEO. 3. Turn on automatically. 4. Direct VIDEO/AUDIO connection is played for the first time. • The tape speed (SP & SLP) changes. • Streaks or snow appear due to select the tape speed for more than 3 seconds. Manual Tracking To manually adjust the tracking use the v/V (TRK +/-) buttons on the Remote Control...

User manual
Page 20
... no recordable tape. - Use v/V (TRK +/-) on the front panel when the unit power is ON in the display window. 2. There is set to off the power. • If the power of this unit will be start the external timer recording again. • Press x (STOP) to this unit can record the input signal the external device via the timer LINE1 jack. 1. Set the timer reservation setting of recording. 2. Insert a video cassette with...
... no recordable tape. - Use v/V (TRK +/-) on the front panel when the unit power is ON in the display window. 2. There is set to off the power. • If the power of this unit will be start the external timer recording again. • Press x (STOP) to this unit can record the input signal the external device via the timer LINE1 jack. 1. Set the timer reservation setting of recording. 2. Insert a video cassette with...

User manual
Page 21
... program starts. If you set the time to select the recording time length. Turn on the TV screen, recording starts, and the (TIMER) indicator lights. If you press X (PAUSE/STEP) during instant timer recording, the instant timer recording is in advancing the recording time by using INPUT. 6. Press z (RECORD) repeatedly to 0H00M, the unit goes into the normal recording mode. 9. Set the desired recording speed (SP or SLP) using the audio/video cables. 5. Extending the Recording Time The recording time can record...
... program starts. If you set the time to select the recording time length. Turn on the TV screen, recording starts, and the (TIMER) indicator lights. If you press X (PAUSE/STEP) during instant timer recording, the instant timer recording is in advancing the recording time by using INPUT. 6. Press z (RECORD) repeatedly to 0H00M, the unit goes into the normal recording mode. 9. Set the desired recording speed (SP or SLP) using the audio/video cables. 5. Extending the Recording Time The recording time can record...
User manual
Page 29
... originally packed at the factory. 2. Insert a disc and close the tray, and playback start automatically. Refer to the list menu. 3. Notes: • Unfinalized DVD-R/RW discs cannot be diminished. Player does not support these might damage the surface of use a soft, dry cloth. Cleaning the unit To clean the player, use . This unit will play DVD-RW discs that have been finalized using the Video Recording (VR) format. 1. since they leave marks...
... originally packed at the factory. 2. Insert a disc and close the tray, and playback start automatically. Refer to the list menu. 3. Notes: • Unfinalized DVD-R/RW discs cannot be diminished. Player does not support these might damage the surface of use a soft, dry cloth. Cleaning the unit To clean the player, use . This unit will play DVD-RW discs that have been finalized using the Video Recording (VR) format. 1. since they leave marks...

User manual
Page 31
... no sound. Tape heads are set to receive unit signal output. No disc is poor. Check the connection. Cancel the Rating function or change the Rating level. The playback picture is inserted. Insert a disc or tape. (Check that the disc or tape indicator in the display window is lit.) Insert a playable disc. (Check the disc type and Regional code.) Place the disc with the audio cable is not set to the correct position. Correction Plug the power cord into...
... no sound. Tape heads are set to receive unit signal output. No disc is poor. Check the connection. Cancel the Rating function or change the Rating level. The playback picture is inserted. Insert a disc or tape. (Check that the disc or tape indicator in the display window is lit.) Insert a playable disc. (Check the disc type and Regional code.) Place the disc with the audio cable is not set to the correct position. Correction Plug the power cord into...

User manual
Page 33
... (L, R) x 2 Outputs VIDEO OUT S-VIDEO OUT COMPONENT VIDEO OUT (PROGRESSIVE SCAN) Audio output (digital audio) Audio output (analog audio) 1 V (p-p) 75 ohms, sync negative (Y) 1.0 V (p-p), 75 ohms, negative sync, Mini DIN 4-pin x 1 (C) 0.286 V (p-p) 75 ohms (Y) 1.0 V (p-p), 75 ohms, negative sync, RCA jack x 1 (Pb)/(Pr) 0.7 V (p-p), 75 ohms, RCA jack x 2 0.5 V (p-p), 75 ohms, RCA jack x 1 2.0 Vrms (1 KHz, 0 dB), 600 ohms, RCA jack (L, R) x 1 VCR Specifications Head system Timer Tape speed Tape width Maximum recording time Rewind time Frequency range Signal...
... (L, R) x 2 Outputs VIDEO OUT S-VIDEO OUT COMPONENT VIDEO OUT (PROGRESSIVE SCAN) Audio output (digital audio) Audio output (analog audio) 1 V (p-p) 75 ohms, sync negative (Y) 1.0 V (p-p), 75 ohms, negative sync, Mini DIN 4-pin x 1 (C) 0.286 V (p-p) 75 ohms (Y) 1.0 V (p-p), 75 ohms, negative sync, RCA jack x 1 (Pb)/(Pr) 0.7 V (p-p), 75 ohms, RCA jack x 2 0.5 V (p-p), 75 ohms, RCA jack x 1 2.0 Vrms (1 KHz, 0 dB), 600 ohms, RCA jack (L, R) x 1 VCR Specifications Head system Timer Tape speed Tape width Maximum recording time Rewind time Frequency range Signal...


