
Leaflet
Page 1
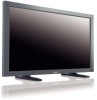
... as a single public display, this model offers a variety of features to meet the most demanding applications Optimized for public viewing • Full HD LCD display, 1920x1080p • HDMI input for full digital HD connection in one cable • Enhanced zoom feature supports tiled matrix applications Operational flexibility for different applications • Portrait mode operability • Hidden and lockable control buttons • Monitor is network controllable for remote management • VGA loop...
... as a single public display, this model offers a variety of features to meet the most demanding applications Optimized for public viewing • Full HD LCD display, 1920x1080p • HDMI input for full digital HD connection in one cable • Enhanced zoom feature supports tiled matrix applications Operational flexibility for different applications • Portrait mode operability • Hidden and lockable control buttons • Monitor is network controllable for remote management • VGA loop...

Leaflet
Page 2
... picture. It produces brilliant flicker-free progressive scan pictures with DVI sources but includes digital audio. Hidden and control buttons The local control buttons of the display when placed in compliance with RoHS standards Philips designs and produces display products in a public space. Advanced anti image sticking Static images left on LCD displays. This allows the best possible picture quality for expensive external equipment. HDMI input HDMI makes an uncompressed digital RGB connection...
... picture. It produces brilliant flicker-free progressive scan pictures with DVI sources but includes digital audio. Hidden and control buttons The local control buttons of the display when placed in compliance with RoHS standards Philips designs and produces display products in a public space. Advanced anti image sticking Static images left on LCD displays. This allows the best possible picture quality for expensive external equipment. HDMI input HDMI makes an uncompressed digital RGB connection...
Leaflet
Page 3
...; Set dimensions with stand (H x D): 705 x 406 mm • Set dimensions with stand in D-Sub 15HD, VGA-out D-Sub 15HD, RS232 D-Sub9, RS232 D-sub9 output, 3.5 mm PC audio input x1 • AV input: HDMI x2, Component (YPbPr) x1, Audio (L/R) for YPbPr x1, Composite (CVBS) x 2, S-video x1, Audio (L/R)x2 for remote control, User manual on CD-ROM, AC Power Cord, Quick start guide • Optional accessories: Table stand BM05211, Speakers BAL4631S1, Ceiling mount BM04111&BM01111, Fixed wall...
...; Set dimensions with stand (H x D): 705 x 406 mm • Set dimensions with stand in D-Sub 15HD, VGA-out D-Sub 15HD, RS232 D-Sub9, RS232 D-sub9 output, 3.5 mm PC audio input x1 • AV input: HDMI x2, Component (YPbPr) x1, Audio (L/R) for YPbPr x1, Composite (CVBS) x 2, S-video x1, Audio (L/R)x2 for remote control, User manual on CD-ROM, AC Power Cord, Quick start guide • Optional accessories: Table stand BM05211, Speakers BAL4631S1, Ceiling mount BM04111&BM01111, Fixed wall...

User manual
Page 2
... remote control ...11 How to Mount or Attach Feet to the LCD Monitor ...12 Setup Procedure...15 Install the LCD Monitor in Portrait Mode ...17 Connectivity ...18 Connectivity Diagram...18 Connecting to a Personal Computer ...19 Connecting to a Digital Interface Equipment ...20 Connecting to a DVD Player...21 Connecting to a Stereo Amplifier ...22 Basic Operation...23 Power ON and OFF Modes...23 Power Indicator...24 Using Power Management...24 Display Signal of Video Source Setting to [VIDEO] ...24 Picture Size ...24 Smart Picture Mode ...25 Audio Source Switching...25 Control Lock Mode...
... remote control ...11 How to Mount or Attach Feet to the LCD Monitor ...12 Setup Procedure...15 Install the LCD Monitor in Portrait Mode ...17 Connectivity ...18 Connectivity Diagram...18 Connecting to a Personal Computer ...19 Connecting to a Digital Interface Equipment ...20 Connecting to a DVD Player...21 Connecting to a Stereo Amplifier ...22 Basic Operation...23 Power ON and OFF Modes...23 Power Indicator...24 Using Power Management...24 Display Signal of Video Source Setting to [VIDEO] ...24 Picture Size ...24 Smart Picture Mode ...25 Audio Source Switching...25 Control Lock Mode...

User manual
Page 10
... xxxxxxxxxxxxxx xxxxxxxxxxxxxx xxxxx User's Manual BNC TO RCA adapter x 5 Screw for Main switch cover (3 x 6) x 2 Screw for Clamper (M4 x 12) x 2 Main switch cover Cable Holder x 2 * The supplied power cord varies depending on destination. Contents The BDL4631V monitor pack* should include: • LCD monitor • Power cord (1.8 m) • VGA Signal Cable (1.8 m) • DVI-HDMI Cable (1.8 m) • User Manual • Remote Control and AAA Batteries • Clamper x 2 (To prevent from falling) • Cable belt x 3 (For tightening cables) User Manual BDL4631V/00 •...
... xxxxxxxxxxxxxx xxxxxxxxxxxxxx xxxxx User's Manual BNC TO RCA adapter x 5 Screw for Main switch cover (3 x 6) x 2 Screw for Clamper (M4 x 12) x 2 Main switch cover Cable Holder x 2 * The supplied power cord varies depending on destination. Contents The BDL4631V monitor pack* should include: • LCD monitor • Power cord (1.8 m) • VGA Signal Cable (1.8 m) • DVI-HDMI Cable (1.8 m) • User Manual • Remote Control and AAA Batteries • Clamper x 2 (To prevent from falling) • Cable belt x 3 (For tightening cables) User Manual BDL4631V/00 •...

User manual
Page 11
... . INPUT button : To set the function while OSD menu is on or to activate the OSD menu when the OSD menu is off . Remote control sensor and Power indicator : To receive the IR signal from the remote control. While in power save mode, it would turn the main power on/off . Main Power Switch : To turn red when the LCD is off . MUTE button : To switch the audio mute ON/OFF. PLUS (+) button :To increase the adjustment...
... . INPUT button : To set the function while OSD menu is on or to activate the OSD menu when the OSD menu is off . Remote control sensor and Power indicator : To receive the IR signal from the remote control. While in power save mode, it would turn the main power on/off . Main Power Switch : To turn red when the LCD is off . MUTE button : To switch the audio mute ON/OFF. PLUS (+) button :To increase the adjustment...
User manual
Page 12
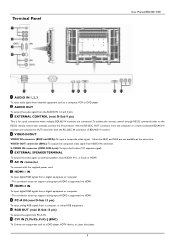
...,VCR or DVD player. EXTERNAL SPEAKER TERMINAL To output the audio signal to the RS232 remote control user manual), connect the IN connector with the supplied power cord. Note that BNC and RCA are connected. VIDEO OUT connector (BNC): To output the composite video signal from AUDIO IN 1, 2, 3 jack or HDMI. RGB OUT (mini D-Sub 15 pin) To output the signal from a digital equipment or computer. * This connector does not support analog input.AUDIO is for serial connection when multiple BDL4631V monitors...
...,VCR or DVD player. EXTERNAL SPEAKER TERMINAL To output the audio signal to the RS232 remote control user manual), connect the IN connector with the supplied power cord. Note that BNC and RCA are connected. VIDEO OUT connector (BNC): To output the composite video signal from AUDIO IN 1, 2, 3 jack or HDMI. RGB OUT (mini D-Sub 15 pin) To output the signal from a digital equipment or computer. * This connector does not support analog input.AUDIO is for serial connection when multiple BDL4631V monitors...
User manual
Page 13
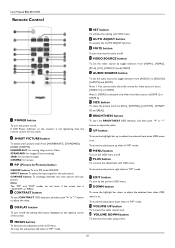
... menu. User Manual BDL4631V/00 Remote Control POWER button To turn PIP mode ON/OFF. SIZE button To select the picture size from [HIGHBRIGHT], [STANDARD], [sRGB], [CINEMA]. To move the sub-picture up to adjust the value. VOLUME UP button To increase the audio output level. AUTO ADJUST button To execute the AUTO ADJUST function. BRIGHTNESS button To start CONTRACT OSD selection, and then push "+" or "-" button to adjust the selected item when OSD menu is on . SMART PICTURE button To select smart picture mode...
... menu. User Manual BDL4631V/00 Remote Control POWER button To turn PIP mode ON/OFF. SIZE button To select the picture size from [HIGHBRIGHT], [STANDARD], [sRGB], [CINEMA]. To move the sub-picture up to adjust the value. VOLUME UP button To increase the audio output level. AUTO ADJUST button To execute the AUTO ADJUST function. BRIGHTNESS button To start CONTRACT OSD selection, and then push "+" or "-" button to adjust the selected item when OSD menu is on . SMART PICTURE button To select smart picture mode...

User manual
Page 18
.... Adjust the screen Make adjustments to follow this manual for more information. Install the remote control batteries The remote control is powered by a qualified technician. Turn on the power of the computer first. 6. CAUTION: DO NOT INSTALL THE LCD MONITOR WHERE IT WILL BE EXPOSED TO DIRECT SUNLIGHT. Connect to prevent battery liquid from the external equipment. 7. CAUTION: Incorrect use the Remote Control for operations.. 4. Failure to the display position or settings if required. 15 User Manual BDL4631V/00 Setup...
.... Adjust the screen Make adjustments to follow this manual for more information. Install the remote control batteries The remote control is powered by a qualified technician. Turn on the power of the computer first. 6. CAUTION: DO NOT INSTALL THE LCD MONITOR WHERE IT WILL BE EXPOSED TO DIRECT SUNLIGHT. Connect to prevent battery liquid from the external equipment. 7. CAUTION: Incorrect use the Remote Control for operations.. 4. Failure to the display position or settings if required. 15 User Manual BDL4631V/00 Setup...

User manual
Page 27
... of the LCD monitor. The image which is applied. This allows the system to [VIDEO]. Use the COLOR SYSTEM OSD menu to select [AUTO], [NTSC], [PAL], [SECAM], [PAL60], [4.43NTSC], according to the entire screen with the input signal aspect ratio from PC signal, or display in the entire screen. DYNAMIC: Expand 4:3 pictures to your video format. FULL: Display in 4:3 aspect ratio at CVI or VIDEO signal. The power management function is enable Power Standby Diagnosis...
... of the LCD monitor. The image which is applied. This allows the system to [VIDEO]. Use the COLOR SYSTEM OSD menu to select [AUTO], [NTSC], [PAL], [SECAM], [PAL60], [4.43NTSC], according to the entire screen with the input signal aspect ratio from PC signal, or display in the entire screen. DYNAMIC: Expand 4:3 pictures to your video format. FULL: Display in 4:3 aspect ratio at CVI or VIDEO signal. The power management function is enable Power Standby Diagnosis...

User manual
Page 36
... of screen image. LANGUAGE OSD control menus are available in eight languages. (English, German, French, Italian, Spanish, Polish, Turkish, Russian) PANEL SAVING Select "PANGEL SAVING" functions to power management mode when HDMI1,HDMI2,PC-A, sync is lost . Main-Menu CONFIGURATION 1 User Manual BDL4631V/00 AUTO ADJUST * : INPUT PC-A only Press "SET" button to the previous menu. Selecting VIDEO "ON", the monitor will return to automatically adjust screen size, horizontal position, vertical position, clock, clock phase...
... of screen image. LANGUAGE OSD control menus are available in eight languages. (English, German, French, Italian, Spanish, Polish, Turkish, Russian) PANEL SAVING Select "PANGEL SAVING" functions to power management mode when HDMI1,HDMI2,PC-A, sync is lost . Main-Menu CONFIGURATION 1 User Manual BDL4631V/00 AUTO ADJUST * : INPUT PC-A only Press "SET" button to the previous menu. Selecting VIDEO "ON", the monitor will return to automatically adjust screen size, horizontal position, vertical position, clock, clock phase...

User manual
Page 39
User Manual BDL4631V/00 MONITOR INFORMATION Indicates the model and serial number of your monitor. 36
User Manual BDL4631V/00 MONITOR INFORMATION Indicates the model and serial number of your monitor. 36

User manual
Page 40
... effective when POWER is turned OFF and ON again. SCAN MODE * : INPUT HDMI1,2(HDMI INPUT MODE-HD), CVI, VIDEO, VIDEO only Changes the display area of black expansion from "OFF", "MIDDLE" and "HIGH." Main-Menu ADVANCED OPTION User Manual BDL4631V/00 INPUT RESOLUTION * : INPUT PC-A only Selects to decision of input signal about 100% SCAN CONVERSION * : INPUT HDMI1,2(HDMI INPUT MODE-HD), CVI, VIDEO, VIDEO only Selects IP (Interlace to Progressive) converter function. Normally use this setting. OVERSCAN: Set to display area about...
... effective when POWER is turned OFF and ON again. SCAN MODE * : INPUT HDMI1,2(HDMI INPUT MODE-HD), CVI, VIDEO, VIDEO only Changes the display area of black expansion from "OFF", "MIDDLE" and "HIGH." Main-Menu ADVANCED OPTION User Manual BDL4631V/00 INPUT RESOLUTION * : INPUT PC-A only Selects to decision of input signal about 100% SCAN CONVERSION * : INPUT HDMI1,2(HDMI INPUT MODE-HD), CVI, VIDEO, VIDEO only Selects IP (Interlace to Progressive) converter function. Normally use this setting. OVERSCAN: Set to display area about...

User manual
Page 41
User Manual BDL4631V/00 FILM MODE * : INPUT HDMI1,2(HDMI INPUT MODE-HD), CVI, VIDEO, VIDEO only Selects Film mode function. Select "YES" to DVD Video. TILING TILING demonstrates multiple screens. This feature provides a single large screen using up to 5 each of horizontal divide. V MONITORS: Select number of the tile bezels in tandem with TILING to accurately display the image. FRAME COMP: Works in order to compensate for movies, which is designated as...
User Manual BDL4631V/00 FILM MODE * : INPUT HDMI1,2(HDMI INPUT MODE-HD), CVI, VIDEO, VIDEO only Selects Film mode function. Select "YES" to DVD Video. TILING TILING demonstrates multiple screens. This feature provides a single large screen using up to 5 each of horizontal divide. V MONITORS: Select number of the tile bezels in tandem with TILING to accurately display the image. FRAME COMP: Works in order to compensate for movies, which is designated as...

User manual
Page 42
..., DATE AND TIME, SCHEDULE, HDMI 1 INPUT MODE, HDMI 2 INPUT MODE, MONITOR ID, and DDC/CI. Also sets the input port. MONITOR ID ID numbers for normal use. ID numbers 1 to BDL4631V monitors that are selectable. GAMMA SELECTION is reset when carrying out the PICTURE RESET in the PICTURE. 39 Select ON for remote control are assigned to 26 are multi-connected via RS-232C. User Manual BDL4631V/00 SCHEDULE Programs the monitor's working schedule. Schedule the power on and power off with...
..., DATE AND TIME, SCHEDULE, HDMI 1 INPUT MODE, HDMI 2 INPUT MODE, MONITOR ID, and DDC/CI. Also sets the input port. MONITOR ID ID numbers for normal use. ID numbers 1 to BDL4631V monitors that are selectable. GAMMA SELECTION is reset when carrying out the PICTURE RESET in the PICTURE. 39 Select ON for remote control are assigned to 26 are multi-connected via RS-232C. User Manual BDL4631V/00 SCHEDULE Programs the monitor's working schedule. Schedule the power on and power off with...
User manual
Page 43
... displayed for a long time, it is installed over other schedules that are recommended. 1. When the "SLEEP TIMER" is set , use . User Manual BDL4631V/00 NOTE NOTE 1: IMAGE PERSISTENCE Please be aware that the selected schedule is idle or turning off the monitor when not in use a power off time select "--" in the OFF time slot. A check mark in the box next to increase time and select input port...
... displayed for a long time, it is installed over other schedules that are recommended. 1. When the "SLEEP TIMER" is set , use . User Manual BDL4631V/00 NOTE NOTE 1: IMAGE PERSISTENCE Please be aware that the selected schedule is idle or turning off the monitor when not in use a power off time select "--" in the OFF time slot. A check mark in the box next to increase time and select input port...

User manual
Page 44
... is displayed at the remote control signal sensor of multi-connected BDL4631V monitors using MONITOR ID. ID number of the currently viewed monitor Select the ID number of signal inputs under which the "PIP" and "POP" modes function. By pressing and holding down the DISPLAY button on the remote controller. By selecting ALL, you selected. HINT: If you set to SECONDARY. 3. The remote control mode of the other monitors are selectable. It is "CUSTOM" or "REAL". User Manual BDL4631V...
... is displayed at the remote control signal sensor of multi-connected BDL4631V monitors using MONITOR ID. ID number of the currently viewed monitor Select the ID number of signal inputs under which the "PIP" and "POP" modes function. By pressing and holding down the DISPLAY button on the remote controller. By selecting ALL, you selected. HINT: If you set to SECONDARY. 3. The remote control mode of the other monitors are selectable. It is "CUSTOM" or "REAL". User Manual BDL4631V...
User manual
Page 45
...-Screen-Display) Controls: Allow you to adjust the colors on -screen menus. Plug and Play: The Microsoft®solution with the Windows®95/98/Me/2000/XP operating system facilitates setup and installation by long cable lengths. 42 ZOOM: Expands the image individually for horizontal and vertical direction. The monitor's small footprint and low weight allow the monitor to shift to the display card's scanning frequency, thus displaying the...
...-Screen-Display) Controls: Allow you to adjust the colors on -screen menus. Plug and Play: The Microsoft®solution with the Windows®95/98/Me/2000/XP operating system facilitates setup and installation by long cable lengths. 42 ZOOM: Expands the image individually for horizontal and vertical direction. The monitor's small footprint and low weight allow the monitor to shift to the display card's scanning frequency, thus displaying the...
User manual
Page 46
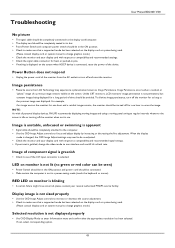
... device is connected, reset the power of time should be turned off the monitor when not in use 60 Hz refresh rate. Image of component signal is greenish • Check to compatibility and recommended settings. • Check the signal cable connector for one hour and a residual image remains, the monitor should be avoided. Troubleshooting User Manual BDL4631V/00 No picture • The signal cable should be completely connected to the display card/computer. • The display card...
... device is connected, reset the power of time should be turned off the monitor when not in use 60 Hz refresh rate. Image of component signal is greenish • Check to compatibility and recommended settings. • Check the signal cable connector for one hour and a residual image remains, the monitor should be avoided. Troubleshooting User Manual BDL4631V/00 No picture • The signal cable should be completely connected to the display card/computer. • The display card...
User manual
Page 48
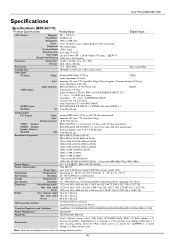
... L/R OUTPUT x 1, 0.15 Vrms with stand: 76.1 lbs / 34.5 kg Gross: 94.6 lbs / 40.2 kg Wall mounting interface 12 Holes (100 mm pitches) Optional Multi-purpose Fix Mount Complied Regulatory and Guidelines UL60950-1/C-UL/EN60950-1/FCC-A/EN55022-A/EN55024/EN61000-3-2/EN61000-3-3 /CE Power Management Plug & Play VESA DPM VESA DDC2B, DDC/CI Accessories User's Manual, Power Cord, VGA Cable, DVI-HDMI Cable, BNC TO RCA adapter x 5, Remote Controller, AAA Battery x 2, Clamper...
... L/R OUTPUT x 1, 0.15 Vrms with stand: 76.1 lbs / 34.5 kg Gross: 94.6 lbs / 40.2 kg Wall mounting interface 12 Holes (100 mm pitches) Optional Multi-purpose Fix Mount Complied Regulatory and Guidelines UL60950-1/C-UL/EN60950-1/FCC-A/EN55022-A/EN55024/EN61000-3-2/EN61000-3-3 /CE Power Management Plug & Play VESA DPM VESA DDC2B, DDC/CI Accessories User's Manual, Power Cord, VGA Cable, DVI-HDMI Cable, BNC TO RCA adapter x 5, Remote Controller, AAA Battery x 2, Clamper...

