User Guide
Page 1
Register your product and get support at www.philips.com/welcome SE655 GB Telephone Answering Machine Warning Use only rechargeable batteries. Charge the handset for 24 hours before use.
Register your product and get support at www.philips.com/welcome SE655 GB Telephone Answering Machine Warning Use only rechargeable batteries. Charge the handset for 24 hours before use.

User Guide
Page 3
... Electromagnetic Fields 4.3 End a call 26 ("EMF") 7 5 Use more of 2 Your phone 8 your phone 27 2.1 What's in the box 8 5.1 Switch the handset off/on 27 2.2 Overview of your phone 9 5.2 Keypad lock/unlock 27 2.3 Display icons and Messages 11 5.3 Text or number entry... multipacks 17 5.6.2 Access phonebook 28 3.6 Menu structure 18 5.6.3 Modify a phonebook entry 29 5.6.4 Select phonebook melody 29 4 Using your phone 25 5.6.5 Delete a phonebook entry 30 4.1 Make a call 25 5.6.6 Delete all phonebook 4.1.1 Predialling 25 entries 30 4.1.2 Direct dialling ...
... Electromagnetic Fields 4.3 End a call 26 ("EMF") 7 5 Use more of 2 Your phone 8 your phone 27 2.1 What's in the box 8 5.1 Switch the handset off/on 27 2.2 Overview of your phone 9 5.2 Keypad lock/unlock 27 2.3 Display icons and Messages 11 5.3 Text or number entry... multipacks 17 5.6.2 Access phonebook 28 3.6 Menu structure 18 5.6.3 Modify a phonebook entry 29 5.6.4 Select phonebook melody 29 4 Using your phone 25 5.6.5 Delete a phonebook entry 30 4.1 Make a call 25 5.6.6 Delete all phonebook 4.1.1 Predialling 25 entries 30 4.1.2 Direct dialling ...

User Guide
Page 4
...33 7.1.1 Delete a call list entry 33 7.1.2 Delete all call list entries 33 7.2 Using the Intercom 33 7.3 Intercom another handset 34 7.3.1 Transfer an external call to 7.3.2 another handset 34 7.4 Answer an external call 7.5 during intercom 34 7.6 Switch between an internal 7.6.1 and external call 34 7.7 Establish a... Set Time and Date Format 35 Set Alarm 36 7.13 Set Alarm Tone 36 7.14 Personal settings 37 8 Change the Handset Name 37 8.1 Handset Tones 37 8.1.1 Set the Ring Volume 37 Set the Ring Tones 37 8.1.2 Activate/Deactivate Key Beep 38 8.2 Change the ...
...33 7.1.1 Delete a call list entry 33 7.1.2 Delete all call list entries 33 7.2 Using the Intercom 33 7.3 Intercom another handset 34 7.3.1 Transfer an external call to 7.3.2 another handset 34 7.4 Answer an external call 7.5 during intercom 34 7.6 Switch between an internal 7.6.1 and external call 34 7.7 Establish a... Set Time and Date Format 35 Set Alarm 36 7.13 Set Alarm Tone 36 7.14 Personal settings 37 8 Change the Handset Name 37 8.1 Handset Tones 37 8.1.1 Set the Ring Volume 37 Set the Ring Tones 37 8.1.2 Activate/Deactivate Key Beep 38 8.2 Change the ...
User Guide
Page 5
... Drafts 56 Settings 56 SMS Reception 56 SMS Centre 57 Default Centre 57 Telephone answering machine (TAM) 57 Playing Messages 58 Playback of messages via handset 58 Functions available during playback 58 Delete all messages 58 Turn the Answering Machine On/Off 59 Play, Record, or Delete an Outgoing Message 59... Set the Answer mode 59 Answering Machine Settings 60 Ring Delay 60 Remote Access 60 Handset Screening 61 Setting the Outgoing Message Language 61 Technical data 62 Table of contents 3
... Drafts 56 Settings 56 SMS Reception 56 SMS Centre 57 Default Centre 57 Telephone answering machine (TAM) 57 Playing Messages 58 Playback of messages via handset 58 Functions available during playback 58 Delete all messages 58 Turn the Answering Machine On/Off 59 Play, Record, or Delete an Outgoing Message 59... Set the Answer mode 59 Answering Machine Settings 60 Ring Delay 60 Remote Access 60 Handset Screening 61 Setting the Outgoing Message Language 61 Technical data 62 Table of contents 3
User Guide
Page 7
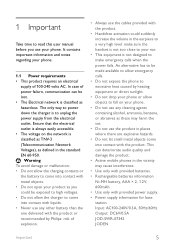
... outlet is always easily accessible. • The voltage on your ear. • This equipment is not designed to make sure the handset is not too close to your phone. • Do not use any cleaning agents containing alcohol, ammonia, benzene, or abrasives as defined in the standard EN 60-950....come into contact with the product. An alternative has to be made available to allow emergency calls. • Do not expose the phone to excessive heat caused by Philips: risk of 100-240 volts AC. 1 Important Take time to read this user manual before you could suddenly increase the volume ...
... outlet is always easily accessible. • The voltage on your ear. • This equipment is not designed to make sure the handset is not too close to your phone. • Do not use any cleaning agents containing alcohol, ammonia, benzene, or abrasives as defined in the standard EN 60-950....come into contact with the product. An alternative has to be made available to allow emergency calls. • Do not expose the phone to excessive heat caused by Philips: risk of 100-240 volts AC. 1 Important Take time to read this user manual before you could suddenly increase the volume ...
User Guide
Page 8
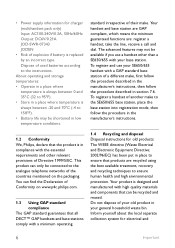
...the best available treatment, recovery and recycling techniques to ensure human health and high environmental protection. To register a handset of another make to the SE650/655 base station, place the base station into registration mode, then follow the procedure described in section 7.6. Your product...electrical and 6 Impor tant standard irrespective of the countries mentioned on www.p4c.philips.com. 1.3 Using GAP standard compliance The GAP standard guarantees that all DECT™ GAP handsets and base stations comply with your general household waste bin. The advanced features may...
...the best available treatment, recovery and recycling techniques to ensure human health and high environmental protection. To register a handset of another make to the SE650/655 base station, place the base station into registration mode, then follow the procedure described in section 7.6. Your product...electrical and 6 Impor tant standard irrespective of the countries mentioned on www.p4c.philips.com. 1.3 Using GAP standard compliance The GAP standard guarantees that all DECT™ GAP handsets and base stations comply with your general household waste bin. The advanced features may...
User Guide
Page 10
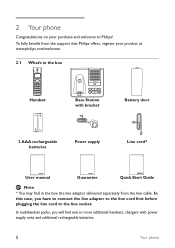
...phone Congratulations on your product at www.philips.com/welcome. 2.1 What's in the box the line adaptor delivered separately from the line cable. In multihandset packs, you have to connect the line adaptor to the line cord first before plugging the line cord to Philips! To fully benefit from the support that Philips... offers, register your purchase and welcome to the line socket. In this case, you will find one or more additional handsets, chargers with bracket Battery door 2 AAA ...
...phone Congratulations on your product at www.philips.com/welcome. 2.1 What's in the box the line adaptor delivered separately from the line cable. In multihandset packs, you have to connect the line adaptor to the line cord first before plugging the line cord to Philips! To fully benefit from the support that Philips... offers, register your purchase and welcome to the line socket. In this case, you will find one or more additional handsets, chargers with bracket Battery door 2 AAA ...

User Guide
Page 11
...h In idle mode: Long press (5 seconds) to clear all. Also used to confirm entries (for an overview of your phone A B C D E F G H A Event LED The event LED on your handset blinks when there is a new message recorded on the screen or go to the previous or next record in the Phonebook, Redial... list, or Call log. Long press to switch off the handset. During a call : Activate the recall function. Your phone 9 Editing and entry: Move to clear (delete) a character or number when making an entry. D Select key o Select the ...
...h In idle mode: Long press (5 seconds) to clear all. Also used to confirm entries (for an overview of your phone A B C D E F G H A Event LED The event LED on your handset blinks when there is a new message recorded on the screen or go to the previous or next record in the Phonebook, Redial... list, or Call log. Long press to switch off the handset. During a call : Activate the recall function. Your phone 9 Editing and entry: Move to clear (delete) a character or number when making an entry. D Select key o Select the ...

User Guide
Page 12
... key * In idle mode: Long press to enter a "*". Off hook: Long press to temporarily switch to tone (DTMF) dialling if using handsfree mode. When the handset is not too close to your direct memory access numbers. I J K L S M N O P Q P Call transfer key & Intercom key i In idle ... up a call : Toggle the loudspeaker on /off : Long press (1 second) to hold the line and page another handset. S Battery door 10 Your phone Make sure the handset is switched off . Predialling or editing: Press to lock/ unlock keypad. Editing: Short press to dial numbers and write characters...
... key * In idle mode: Long press to enter a "*". Off hook: Long press to temporarily switch to tone (DTMF) dialling if using handsfree mode. When the handset is not too close to your direct memory access numbers. I J K L S M N O P Q P Call transfer key & Intercom key i In idle ... up a call : Toggle the loudspeaker on /off : Long press (1 second) to hold the line and page another handset. S Battery door 10 Your phone Make sure the handset is switched off . Predialling or editing: Press to lock/ unlock keypad. Editing: Short press to dial numbers and write characters...
User Guide
Page 13
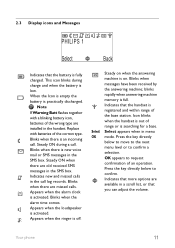
... in the SMS box. Appears when the loudspeaker is new voice mail or SMS messages in the handset. blinks rapidly when answering machine memory is registered and within range of range or is fully charged. Indicates that the...that the battery is searching for a base. Blinks when messages have been received by the answering machine; Icon blinks when the handset is out of the base station. Press the key directly below to confirm. Press the key directly below to move to ...Appears when the alarm clock is an incoming call . Select appears when in the call log records. Your phone 11
... in the SMS box. Appears when the loudspeaker is new voice mail or SMS messages in the handset. blinks rapidly when answering machine memory is registered and within range of range or is fully charged. Indicates that the...that the battery is searching for a base. Blinks when messages have been received by the answering machine; Icon blinks when the handset is out of the base station. Press the key directly below to confirm. Press the key directly below to move to ...Appears when the alarm clock is an incoming call . Select appears when in the call log records. Your phone 11

User Guide
Page 15
... during idle mode and call screening. Replay current message if pressed after 1 second of new messages only. I A Paging key a Page handset. Blinking: Shows the number of current message playback. There are 5 volume levels during message playback. H Next key f Skip to delete... press to start registration procedure. Stop message playback. 2.4 Overview of the base station A B C D E F G H I Play/Stop key p Play phone messages (the first recorded will not be played first). Long press to switch the answering machine on/off. B Speaker C Message counter Steady ON: shows the...
... during idle mode and call screening. Replay current message if pressed after 1 second of new messages only. I A Paging key a Page handset. Blinking: Shows the number of current message playback. There are 5 volume levels during message playback. H Next key f Skip to delete... press to start registration procedure. Stop message playback. 2.4 Overview of the base station A B C D E F G H I Play/Stop key p Play phone messages (the first recorded will not be played first). Long press to switch the answering machine on/off. B Speaker C Message counter Steady ON: shows the...

User Guide
Page 17
... blink quickly. Warning When the batteries are used instead of rechargeable batteries, "Warning Batt" will show on the wall. 3.3.1 Install battery Warning Always use the handset. 4 Insert screws (not included) into place. 5.20 83.00 17.00 2 Turn the bracket around. 5.20 3 Attach the bracket to the opposite side of the...
... blink quickly. Warning When the batteries are used instead of rechargeable batteries, "Warning Batt" will show on the wall. 3.3.1 Install battery Warning Always use the handset. 4 Insert screws (not included) into place. 5.20 83.00 17.00 2 Turn the bracket around. 5.20 3 Attach the bracket to the opposite side of the...

User Guide
Page 18
... the first time. 1 Slide out the battery cover. 2 Place the batteries in the correct polarity as indicated and replace the cover. 3.3.2 Charge battery Warning The handset must be charged for at least 24 hours before using it for the selected country are automatically configured.) 16 Getting started If the battery level... to configure it for a few minutes, Welcome appears in progress will blink. Move closer to the base. 3.4 Welcome mode Before you need to confirm your handset, you first use . Follow these steps to configure your phone: 1 Press o OK to display a list of the...
... the first time. 1 Slide out the battery cover. 2 Place the batteries in the correct polarity as indicated and replace the cover. 3.3.2 Charge battery Warning The handset must be charged for at least 24 hours before using it for the selected country are automatically configured.) 16 Getting started If the battery level... to configure it for a few minutes, Welcome appears in progress will blink. Move closer to the base. 3.4 Welcome mode Before you need to confirm your handset, you first use . Follow these steps to configure your phone: 1 Press o OK to display a list of the...

User Guide
Page 19
... time format (see section 5.12.2) anytime after the first configuration. 3.5 Using multipacks If you have purchased a multipack you have additional handsets, chargers, power adaptors and AAA rechargeable batteries. 1 Plug the chargers into a power socket. 2 Install the batteries supplied into the... handsets. 3 Place the handsets on the chargers to charge the batteries. In case of the date and time using the numeric keys. See section 5.12.1 - At the same time the handset switches to confirm. • A validation tone is automatically...
... time format (see section 5.12.2) anytime after the first configuration. 3.5 Using multipacks If you have purchased a multipack you have additional handsets, chargers, power adaptors and AAA rechargeable batteries. 1 Plug the chargers into a power socket. 2 Install the batteries supplied into the... handsets. 3 Place the handsets on the chargers to charge the batteries. In case of the date and time using the numeric keys. See section 5.12.1 - At the same time the handset switches to confirm. • A validation tone is automatically...

User Guide
Page 21
Name of languages Wallpaper 1 Wallpaper 2 Wallpaper 3 Wallpaper off ) One bar ... Color 4 Level 1 ... Personal Settings Personal Set Handset Name Handset Tones Language Wallpaper Color Theme Contrast Backlight Time Auto Hang-up Enter name Ring Volume Ring Tones Key Beep List of tones 15 On Off Getting started 19 Five bars Progressive Name of tones 1 ... Level 5 20 Seconds 40 Seconds 60 Seconds On Off No bar (off Color 1 ...
Name of languages Wallpaper 1 Wallpaper 2 Wallpaper 3 Wallpaper off ) One bar ... Color 4 Level 1 ... Personal Settings Personal Set Handset Name Handset Tones Language Wallpaper Color Theme Contrast Backlight Time Auto Hang-up Enter name Ring Volume Ring Tones Key Beep List of tones 15 On Off Getting started 19 Five bars Progressive Name of tones 1 ... Level 5 20 Seconds 40 Seconds 60 Seconds On Off No bar (off Color 1 ...

User Guide
Page 27
...phonebook name list. 1 Scroll n to a phonebook entry. Using your phone 4.1 Make a call log. Note If the list is empty, then "List Empty" is displayed. 2 Press t. • The call is initiated. Note • In multihandset packs, each handset has its own redial list. • You can press the numeric ...key corresponding to the first letter of 24 digits including * and # are allowed. 4 Using your phone 25 Press c Clear to delete the last digit.) Or long press to delete all handsets. • You need to subscribe to Caller Line Identification service to be able to see the caller's...
...phonebook name list. 1 Scroll n to a phonebook entry. Using your phone 4.1 Make a call log. Note If the list is empty, then "List Empty" is displayed. 2 Press t. • The call is initiated. Note • In multihandset packs, each handset has its own redial list. • You can press the numeric ...key corresponding to the first letter of 24 digits including * and # are allowed. 4 Using your phone 25 Press c Clear to delete the last digit.) Or long press to delete all handsets. • You need to subscribe to Caller Line Identification service to be able to see the caller's...

User Guide
Page 28
... your hearing. Note The call . Make sure the handset is on how to dial a stored direct access memory number. When the phone rings, press l. • The handset loudspeaker is activated by a P. 4.2 Answer a call Danger When the handset rings during an incoming call, please do not hold ...the handset too close to end the call duration (MM:SS) will be ...
... your hearing. Note The call . Make sure the handset is on how to dial a stored direct access memory number. When the phone rings, press l. • The handset loudspeaker is activated by a P. 4.2 Answer a call Danger When the handset rings during an incoming call, please do not hold ...the handset too close to end the call duration (MM:SS) will be ...

User Guide
Page 29
... options are : 5.4.1 Adjust earpiece or speaker volume During a call, press n to select from level 1 to level 5. 5.4.2 Mute/Unmute microphone When the microphone is muted, your phone 27 Use more of your correspondent cannot hear you. 1 During a call . Keys Assigned characters 6 m n o 6 ñ ö ò 7 p q r s 7 ß Π Θ Σ ...below gives you during a call , press s to turn on the microphone. 5 Use more of your phone 5.1 Switch the handset off/on To switch the handset off the microphone. 2 Press s again to turn off , press and hold h in idle mode ...
... options are : 5.4.1 Adjust earpiece or speaker volume During a call, press n to select from level 1 to level 5. 5.4.2 Mute/Unmute microphone When the microphone is muted, your phone 27 Use more of your correspondent cannot hear you. 1 During a call . Keys Assigned characters 6 m n o 6 ñ ö ò 7 p q r s 7 ß Π Θ Σ ...below gives you during a call , press s to turn on the microphone. 5 Use more of your phone 5.1 Switch the handset off/on To switch the handset off the microphone. 2 Press s again to turn off , press and hold h in idle mode ...

User Guide
Page 30
.... 3 Enter Name is highlighted; m ➝ Phonebook ➝ List) • The phonebook entries will be accessed by one handset at a time. 5.6.2 Access phonebook 1 Press d in idle mode and scroll n to browse the phonebook. (You can also access...handset is displayed. All names and numbers in idle mode. 5.4.3 Activate/Deactivate loudspeaker mode Danger Handsfree activation can suddenly increase the volume in the earpiece to the previous menu, press c Back. Tip You cannot store a new phonebook entry when the memory is highlighted; Enter the name of 24 digits for the phone...
.... 3 Enter Name is highlighted; m ➝ Phonebook ➝ List) • The phonebook entries will be accessed by one handset at a time. 5.6.2 Access phonebook 1 Press d in idle mode and scroll n to browse the phonebook. (You can also access...handset is displayed. All names and numbers in idle mode. 5.4.3 Activate/Deactivate loudspeaker mode Danger Handsfree activation can suddenly increase the volume in the earpiece to the previous menu, press c Back. Tip You cannot store a new phonebook entry when the memory is highlighted; Enter the name of 24 digits for the phone...

User Guide
Page 32
...Phonebook is highlighted; If you subscribe to these services, this allows you to confirm deletion. • A validation tone is emitted. Note Each handset has its own direct access memories. 30 Use more of your country, keys 1 and 2 are 7 direct access memories (Keys 3 to Direct...to select an entry to the phonebook list. 5.6.6 Delete all phonebook entries 1 Press m in the direct access memory location will automatically dial the stored phone number. The screen returns to delete and press o Select. 4 Delete? Press o OK to confirm deletion. • A validation tone is emitted...
...Phonebook is highlighted; If you subscribe to these services, this allows you to confirm deletion. • A validation tone is emitted. Note Each handset has its own direct access memories. 30 Use more of your country, keys 1 and 2 are 7 direct access memories (Keys 3 to Direct...to select an entry to the phonebook list. 5.6.6 Delete all phonebook entries 1 Press m in the direct access memory location will automatically dial the stored phone number. The screen returns to delete and press o Select. 4 Delete? Press o OK to confirm deletion. • A validation tone is emitted...