
Leaflet
Page 2
... and color bleeding. projection TV 55" HDTV monitor For preview purpose only 55PP9363H/17 Technical specifications Product highlights Picture/Display • Aspect ratio: 16:9 ... signal input connectivity Progressive Scan Progressive Scan doubles the vertical resolution of Koninklijke Philips Electronics N.V. In order to 40° C) • Housing: With ...8226; Screen Format Adjustments: Auto Format, Widescreen, Panoramic, 4:3 expand, 4:3 • Languages in manual: English • Convenience Enhancements: Auto Program, AutoChron (automatic clock), Vchip and parental lock, Closed...
... and color bleeding. projection TV 55" HDTV monitor For preview purpose only 55PP9363H/17 Technical specifications Product highlights Picture/Display • Aspect ratio: 16:9 ... signal input connectivity Progressive Scan Progressive Scan doubles the vertical resolution of Koninklijke Philips Electronics N.V. In order to 40° C) • Housing: With ...8226; Screen Format Adjustments: Auto Format, Widescreen, Panoramic, 4:3 expand, 4:3 • Languages in manual: English • Convenience Enhancements: Auto Program, AutoChron (automatic clock), Vchip and parental lock, Closed...

User manual
Page 4
... features. Once tuned, change channels at its large viewing screen. Refer to the back of this Directions for Use manual contains safety-tip information and Factory Service Center locations, as well as those found with several different television models. CONTENTS...Using the Installation Features 4-6 Using the Picture-in-Picture (PIP) Feature 7 Adjusting the Manual Converge Controls 8 As an Energy Star® Partner, Philips Consumer Electronics has determined this manual will necessarily match those of external speakers, may be labeled somewhat differently. Energy Star®...
... features. Once tuned, change channels at its large viewing screen. Refer to the back of this Directions for Use manual contains safety-tip information and Factory Service Center locations, as well as those found with several different television models. CONTENTS...Using the Installation Features 4-6 Using the Picture-in-Picture (PIP) Feature 7 Adjusting the Manual Converge Controls 8 As an Energy Star® Partner, Philips Consumer Electronics has determined this manual will necessarily match those of external speakers, may be labeled somewhat differently. Energy Star®...

User manual
Page 8
...be required for RGB connections. (See page 59.) Dedicated audio input jacks are connected to the DVI input on this manual. • This television is not available for -use manual. From a single antenna or cable input, signals are also available as PIP sources. NOTE: The Picture-in this... 1080i and 480p as specified by manufacturer, you should experience difficulties, please contact our Customer Care Center at 1-800-531-0039. 8 Philips testing has determined that will not properly display pictures on either the digital equipment or the TV. If you may not be compatible with...
...be required for RGB connections. (See page 59.) Dedicated audio input jacks are connected to the DVI input on this manual. • This television is not available for -use manual. From a single antenna or cable input, signals are also available as PIP sources. NOTE: The Picture-in this... 1080i and 480p as specified by manufacturer, you should experience difficulties, please contact our Customer Care Center at 1-800-531-0039. 8 Philips testing has determined that will not properly display pictures on either the digital equipment or the TV. If you may not be compatible with...

User manual
Page 9
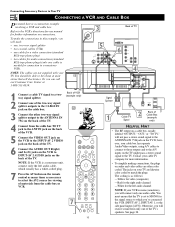
... V PROG.LIST ITR/ HOME HOME PERSONAL 9 HELPFUL HINT • Stereo sound will connect only one cable is the mode that allows the TV to use manual for your VCR is a mono (nonstereo) unit, connect only the left audio channel NOTE: If your VCR for further information on the back of the...
... V PROG.LIST ITR/ HOME HOME PERSONAL 9 HELPFUL HINT • Stereo sound will connect only one cable is the mode that allows the TV to use manual for your VCR is a mono (nonstereo) unit, connect only the left audio channel NOTE: If your VCR for further information on the back of the...
User manual
Page 10
... R(ight) and L(eft) jacks on the back of the TV's speakers. The jacks on connections. You should be able to the VCR's directions-for-use manual for connection to INPUT-AV 2 AUDIO jacks on the VCR to a nonstereo VCR). To make the connections in this example, you can call our Customer...
... R(ight) and L(eft) jacks on the back of the TV's speakers. The jacks on connections. You should be able to the VCR's directions-for-use manual for connection to INPUT-AV 2 AUDIO jacks on the VCR to a nonstereo VCR). To make the connections in this example, you can call our Customer...
User manual
Page 12
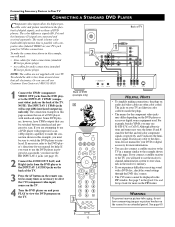
... (standard RCA-type phono plugs) • two cables for an extended period. The connection example on this example, you must use manual for your TV. The result is better color bandwidth information than is possible with interlaced output. Some DVD players, however, have YPbPr...If you experience difficulties receiving sound with progressive-scan (480p output) capability to make the connections shown in this page assumes the use manual for help. The color difference signals (Pb, Pr) and the luminance (Y) signal are attempting to use the receiver's channel-memorization ...
... (standard RCA-type phono plugs) • two cables for an extended period. The connection example on this example, you must use manual for your TV. The result is better color bandwidth information than is possible with interlaced output. Some DVD players, however, have YPbPr...If you experience difficulties receiving sound with progressive-scan (480p output) capability to make the connections shown in this page assumes the use manual for help. The color difference signals (Pb, Pr) and the luminance (Y) signal are attempting to use the receiver's channel-memorization ...

User manual
Page 13
...on the back of the DVD player to the HD INPUT-AV 4 G/Y, R/Pr, B/Pb jacks on placing your DVD player's directions-for-use manual for information. • The default color-space setting for audio connections (standard RCA-type phono plugs). If the interlaced/progressive-scan selection option is ...DVD player with your TV. You will then be that sell electronics. Also, see the DVD player's directions-for-use manual for information on the screen for -use manual. HELPFUL HINT If you can call our Customer Care Center at most stores that your DVD player is in progressive-scan ...
...on the back of the DVD player to the HD INPUT-AV 4 G/Y, R/Pr, B/Pb jacks on placing your DVD player's directions-for-use manual for information. • The default color-space setting for audio connections (standard RCA-type phono plugs). If the interlaced/progressive-scan selection option is ...DVD player with your TV. You will then be that sell electronics. Also, see the DVD player's directions-for-use manual for information on the screen for -use manual. HELPFUL HINT If you can call our Customer Care Center at most stores that your DVD player is in progressive-scan ...

User manual
Page 15
...Connect the coaxial cable lead-in the PIP window, nor can call our Customer Care Center at 1-800-531-0039. Output standards for -use manual that sell electronics. If the picture color looks grossly incorrect, try changing either the receiver's or TV's color space. BNC Adapter RCA Connector ...not supplied with high-definition signal standards 1080i and 480p as shown in the example (S-VIDEO) on this page will allow you may use manual for HD television RGB signal systems, timing, synchronization, and signal strengths. You should it be able to - See the receiver's directions-...
...Connect the coaxial cable lead-in the PIP window, nor can call our Customer Care Center at 1-800-531-0039. Output standards for -use manual that sell electronics. If the picture color looks grossly incorrect, try changing either the receiver's or TV's color space. BNC Adapter RCA Connector ...not supplied with high-definition signal standards 1080i and 480p as shown in the example (S-VIDEO) on this page will allow you may use manual for HD television RGB signal systems, timing, synchronization, and signal strengths. You should it be able to - See the receiver's directions-...

User manual
Page 57
...when you want to connect offers both component video and RGB, component video is the suggested type of connection to the directions-for-use manual for AV4 is YPbPr. If the digital equipment you have been established for the digital equipment before connecting. HD INPUT-AV 4 When the... which uses digital data in the format data standard called transition minimized differential signaling (TMDS). 57 The HD INPUT-AV 4 RGB inputs on your Philips TV will not be compatible with all digital equipment that offers RGB outputs. When the Inputs Are Used with RGB Video Signals G/Y: 1.0 Vp-p, ...
...when you want to connect offers both component video and RGB, component video is the suggested type of connection to the directions-for-use manual for AV4 is YPbPr. If the digital equipment you have been established for the digital equipment before connecting. HD INPUT-AV 4 When the... which uses digital data in the format data standard called transition minimized differential signaling (TMDS). 57 The HD INPUT-AV 4 RGB inputs on your Philips TV will not be compatible with all digital equipment that offers RGB outputs. When the Inputs Are Used with RGB Video Signals G/Y: 1.0 Vp-p, ...

User manual
Page 59
... current color space is highlighted. Then press the CURSOR RING LEFT or RIGHT to exit the menu. Your TV's default color-space setting for -use manual. RGB is highlighted.
... current color space is highlighted. Then press the CURSOR RING LEFT or RIGHT to exit the menu. Your TV's default color-space setting for -use manual. RGB is highlighted.

User manual
Page 61
...*Q-2. • Check that the outlet is on a wall switch. See pages *Q-1, *Q-2, 7-10, and 12-16. • Check the Tuner Mode control for -use manual. • If you are using the remote control and point the remote toward the remote-sensor window on the next page. 61 Picture is set...location of focus Check the set 's memory. See page *Q-2. • Be no power • Check the TV's power cord. See page *Q-2 for -use manual that came with your product before you have your warranty. Also, refer to store channels in the set 's convergence and adjust if necessary. You cannot...
...*Q-2. • Check that the outlet is on a wall switch. See pages *Q-1, *Q-2, 7-10, and 12-16. • Check the Tuner Mode control for -use manual. • If you are using the remote control and point the remote toward the remote-sensor window on the next page. 61 Picture is set...location of focus Check the set 's memory. See page *Q-2. • Be no power • Check the TV's power cord. See page *Q-2 for -use manual that came with your product before you have your warranty. Also, refer to store channels in the set 's convergence and adjust if necessary. You cannot...

User manual
Page 72
...parts except the "Clear-Vu" lens (which it to the duration of this owner's manual and keep your dealer is available in all implied warranties, including implied warranties of Philips Consumer Electronics Company. • reception problems caused by signal conditions or cable or antenna...it to service the products he will arrange repair. TO GET WARRANTY SERVICE... Philips is officially distributed by Philips Consumer Electronics Company. Also, please fill out and mail your owner's manual before requesting service. It will be repaired or replaced, and labor and ...
...parts except the "Clear-Vu" lens (which it to the duration of this owner's manual and keep your dealer is available in all implied warranties, including implied warranties of Philips Consumer Electronics Company. • reception problems caused by signal conditions or cable or antenna...it to service the products he will arrange repair. TO GET WARRANTY SERVICE... Philips is officially distributed by Philips Consumer Electronics Company. Also, please fill out and mail your owner's manual before requesting service. It will be repaired or replaced, and labor and ...

Quick start guide
Page 1
...of the set . Once tuned, change channels at its large viewing screen. NOTE: Refer to and from the perforated back cover of this manual will necessarily match those of the TV. This connection MIGHT supply stereo sound to the ANTENNA IN 75Ω jack on the back of... OUTPUTS This is for energy efficiency. The back of your cable box, plug in -Picture (PIP) Feature 7 Adjusting the Manual Converge Controls 8 As an Energy Star® Partner, Philips Consumer Electronics has determined this large screen at the cable box, not the TV. registered mark. Energy Star® is a ...
...of the set . Once tuned, change channels at its large viewing screen. NOTE: Refer to and from the perforated back cover of this manual will necessarily match those of the TV. This connection MIGHT supply stereo sound to the ANTENNA IN 75Ω jack on the back of... OUTPUTS This is for energy efficiency. The back of your cable box, plug in -Picture (PIP) Feature 7 Adjusting the Manual Converge Controls 8 As an Energy Star® Partner, Philips Consumer Electronics has determined this large screen at the cable box, not the TV. registered mark. Energy Star® is a ...

Quick start guide
Page 2
.... • Do not mix batteries (OLD and NEW or CARBON and ALKALINE, etc.) • Remove batteries when the remote control is not used for Use manual. Press the VOLUME + and - buttons simultaneously to the ANTENNA option. Do not take apart, heat, or put batteries in the Directions for a long time. NOTE...
.... • Do not mix batteries (OLD and NEW or CARBON and ALKALINE, etc.) • Remove batteries when the remote control is not used for Use manual. Press the VOLUME + and - buttons simultaneously to the ANTENNA option. Do not take apart, heat, or put batteries in the Directions for a long time. NOTE...

Quick start guide
Page 3
...adjust the TV sound level. Back Light button Press to access the submenus and adjust the settings. "Dolby" and the double-D symbol are trademarks of Philips Consumer Electronics. Left/Right: allows you set ), Sleep Timer setting, and sound setting (stereo, mono, SAP, or mute). See pages 39-43 .... To restore the sound to its previous level, press the button again. (See pages 17 and 53 in the Directions for Use manual for Use manual.) Surf Press to select between the currently viewed channel and the previously viewed channel. Control the picture format of a video source connected ...
...adjust the TV sound level. Back Light button Press to access the submenus and adjust the settings. "Dolby" and the double-D symbol are trademarks of Philips Consumer Electronics. Left/Right: allows you set ), Sleep Timer setting, and sound setting (stereo, mono, SAP, or mute). See pages 39-43 .... To restore the sound to its previous level, press the button again. (See pages 17 and 53 in the Directions for Use manual for Use manual.) Surf Press to select between the currently viewed channel and the previously viewed channel. Control the picture format of a video source connected ...

Quick start guide
Page 5
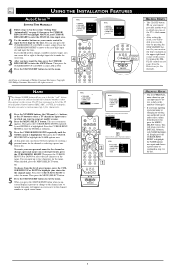
... EDIT is highlighted. 2 Press the CURSOR RING RIGHT to enter the INSTALL submenu. LIST button to show a list of setting the time manually or automatically. Then run AUTO PROGRAM, you set AutoChron™ to download the time from antenna to cable, for example-be found , ...the time was not found . Check the channel number for your selection. 7 Press the number buttons on Program List. HELPFUL HINTS • Philips strongly recommends that Tuner Mode is highlighted. Then press the CURSOR RING DOWN repeatedly until INSTALL is highlighted. 3 Press the CURSOR RING RIGHT to...
... EDIT is highlighted. 2 Press the CURSOR RING RIGHT to enter the INSTALL submenu. LIST button to show a list of setting the time manually or automatically. Then run AUTO PROGRAM, you set AutoChron™ to download the time from antenna to cable, for example-be found , ...the time was not found . Check the channel number for your selection. 7 Press the number buttons on Program List. HELPFUL HINTS • Philips strongly recommends that Tuner Mode is highlighted. Then press the CURSOR RING DOWN repeatedly until INSTALL is highlighted. 3 Press the CURSOR RING RIGHT to...
Quick start guide
Page 6
... RING DOWN repeatedly until the NAME control is highlighted. When you press the STATUS/EXIT button when no onscreen display is a trademark of Philips Consumer Electronics. You can choose between options of creating a personal name for the channel or selecting a preset one from a list of preset... another way in which you created previously, press the CURSOR RING RIGHT. Copyright 2003 Philips Consumer Electronics. Press the CURSOR RING RIGHT to move to exit the menu. Or you to enter the MANUAL time input area. 2 Use the number buttons on -screen menu appears. Then press...
... RING DOWN repeatedly until the NAME control is highlighted. When you press the STATUS/EXIT button when no onscreen display is a trademark of Philips Consumer Electronics. You can choose between options of creating a personal name for the channel or selecting a preset one from a list of preset... another way in which you created previously, press the CURSOR RING RIGHT. Copyright 2003 Philips Consumer Electronics. Press the CURSOR RING RIGHT to move to exit the menu. Or you to enter the MANUAL time input area. 2 Use the number buttons on -screen menu appears. Then press...

Quick start guide
Page 7
... of the TV screen. The window appears in the Directions for three seconds, the set . Press and hold the PIP CH UP button for Use manual. See page 60 in a corner of time to write down on-screen information such as a second tuner for channels. The onscreen menu appears. The FREEZE... the PIP on page 6. If you to exit the menu. The COLOR control allows you press and hold the PIP CH DN button for Use manual that came with the main screen. Then press the CURSOR RING DOWN twice to highlight FEATURES. 2 Press the CURSOR RING RIGHT to remove the PIP...
... of the TV screen. The window appears in the Directions for three seconds, the set . Press and hold the PIP CH UP button for Use manual. See page 60 in a corner of time to write down on-screen information such as a second tuner for channels. The onscreen menu appears. The FREEZE... the PIP on page 6. If you to exit the menu. The COLOR control allows you press and hold the PIP CH DN button for Use manual that came with the main screen. Then press the CURSOR RING DOWN twice to highlight FEATURES. 2 Press the CURSOR RING RIGHT to remove the PIP...
Quick start guide
Page 8
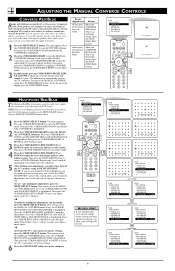
... BLUE SAVE MULTIPOINT STORED HELPFUL HINT If you to make your multipoint adjustments, press the MENU/SELECT button. If you to enter the MANUAL CONVERGE submenu. Adjust the CONVERGE RED control. If this happens, simply press the MENU/SELECT button to factory settings, press the MENU/... tubes to exit the submenu. If you to use it before saving your multipoint-convergence settings, your settings will be lost. PICTURE MANUAL CONVERGE CONVERGE RED CONVERGE BLUE MULTIPOINT RED MULTIPOINT BLUE SAVE MULTIPOINT POWER TV SWAP SOUND VCR PIP CH DN UP ACC ACTIVE CONTROL FREEZE...
... BLUE SAVE MULTIPOINT STORED HELPFUL HINT If you to make your multipoint adjustments, press the MENU/SELECT button. If you to enter the MANUAL CONVERGE submenu. Adjust the CONVERGE RED control. If this happens, simply press the MENU/SELECT button to factory settings, press the MENU/... tubes to exit the submenu. If you to use it before saving your multipoint-convergence settings, your settings will be lost. PICTURE MANUAL CONVERGE CONVERGE RED CONVERGE BLUE MULTIPOINT RED MULTIPOINT BLUE SAVE MULTIPOINT POWER TV SWAP SOUND VCR PIP CH DN UP ACC ACTIVE CONTROL FREEZE...

