User Guide
Page 3
... 21 10.1 To view content from Dolby Laboratories. 'Dolby' 'Pro Logic' and the double-D symbol are trademarks of Dolby Laboratories. 1 Philips TV Slideshow Format with a HDMI connector 25 11.6 Connect a DVD player/recorder, Set top box, gameconsole,... with a DVI connector 25 11.7 Connect a DVD player with a S-VIDEO connector 26 11.8 Connect a recorder and...
... 21 10.1 To view content from Dolby Laboratories. 'Dolby' 'Pro Logic' and the double-D symbol are trademarks of Dolby Laboratories. 1 Philips TV Slideshow Format with a HDMI connector 25 11.6 Connect a DVD player/recorder, Set top box, gameconsole,... with a DVI connector 25 11.7 Connect a DVD player with a S-VIDEO connector 26 11.8 Connect a recorder and...

User Guide
Page 6
...To connect a USB device. * According to connect and operate accessory devices. à Before installing your TV or before all connections are available. 4 devices with - USB 14 13 R AUDIO L 12 VIDEO S VIDEO 42"-47"-52" 10 9 8 7 6 L R AUDIO OUT DISPLAY SYNCHRONIZED DISPLAY SYNC. devices with Video and ... has a DVI output only, see Chapter 11.7. 7 Analog Audio In L/R Analog audio for devices connected to your TV. 2 Getting started Welcome to the growing family of owners of Philips. 2.1 Connection overview There is a wide range of set, 2 or 3 HDMI connectors are made.
...To connect a USB device. * According to connect and operate accessory devices. à Before installing your TV or before all connections are available. 4 devices with - USB 14 13 R AUDIO L 12 VIDEO S VIDEO 42"-47"-52" 10 9 8 7 6 L R AUDIO OUT DISPLAY SYNCHRONIZED DISPLAY SYNC. devices with Video and ... has a DVI output only, see Chapter 11.7. 7 Analog Audio In L/R Analog audio for devices connected to your TV. 2 Getting started Welcome to the growing family of owners of Philips. 2.1 Connection overview There is a wide range of set, 2 or 3 HDMI connectors are made.
User Guide
Page 7
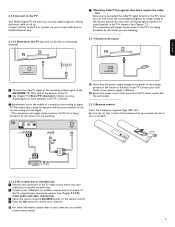
...See Chapter 11.2 To make audio and video connections. Ò Select the source using the best connection options. 2.1.3 Connect to the TV Your Philips Digital TV will allow you are watching. ) Verify that the power supply voltage corresponds to the voltage printed on the sticker at the bottom of... the power cord is marked.) VIDEO L AUDIO R AV 2 AV2 L + R + VIDEO ANTENNA CABLE OUT Set top box RF IN 2.1.3.2 Via a cable box or Satellite box ‡ Maintain the connection of the TV cable of your home into your cable box (or satellite receiver box). ® Connect your Cable box...
...See Chapter 11.2 To make audio and video connections. Ò Select the source using the best connection options. 2.1.3 Connect to the TV Your Philips Digital TV will allow you are watching. ) Verify that the power supply voltage corresponds to the voltage printed on the sticker at the bottom of... the power cord is marked.) VIDEO L AUDIO R AV 2 AV2 L + R + VIDEO ANTENNA CABLE OUT Set top box RF IN 2.1.3.2 Via a cable box or Satellite box ‡ Maintain the connection of the TV cable of your home into your cable box (or satellite receiver box). ® Connect your Cable box...
User Guide
Page 8
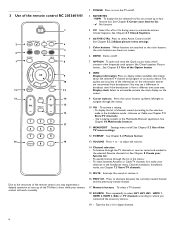
...color buttons are transmitted from a different time zone area. See Chapter 5.2 Use of the TV menu settings. 12 FORMAT See Chapter 3.2 Picture format. 13 VOLUME Press + or - To select between Antenna or Cable TV channels, first make your remote control will work smoothly. 1 POWER Press to where you ... To display the last selected list.You can create up of the TV. See Chapter 8 Create your favorite list. - ✔ No function 3 CC Select On, off . 2 FAVORITES - See Chapter 10 Multimedia browser. 11 MENU/EXIT Settings menu on the information banner are shown on screen. 6 DEMO Demo...
...color buttons are transmitted from a different time zone area. See Chapter 5.2 Use of the TV menu settings. 12 FORMAT See Chapter 3.2 Picture format. 13 VOLUME Press + or - To select between Antenna or Cable TV channels, first make your remote control will work smoothly. 1 POWER Press to where you ... To display the last selected list.You can create up of the TV. See Chapter 8 Create your favorite list. - ✔ No function 3 CC Select On, off . 2 FAVORITES - See Chapter 10 Multimedia browser. 11 MENU/EXIT Settings menu on the information banner are shown on screen. 6 DEMO Demo...

User Guide
Page 9
... Chapter 3.2 Picture format. Use the VOLUME + and - Equalizer See Chapter 5.2.3 Adjust Sound menu settings. 3.3 Buttons on the left of the TV Should your remote be used to summon or exit the TV menu without the remote control. Wide screen Stretches 4:3 format to 16:9. ® Press the cursor up...format to adjust the volume. Distortion may appear with the buttons on the left side of your TV. - Black bars may appear on top and bottom of the basic settings with pictures from your connections. See chapter 7.5 Select your PC. VOLUME Clock Select to some ...
... Chapter 3.2 Picture format. Use the VOLUME + and - Equalizer See Chapter 5.2.3 Adjust Sound menu settings. 3.3 Buttons on the left of the TV Should your remote be used to summon or exit the TV menu without the remote control. Wide screen Stretches 4:3 format to 16:9. ® Press the cursor up...format to adjust the volume. Distortion may appear with the buttons on the left side of your TV. - Black bars may appear on top and bottom of the basic settings with pictures from your connections. See chapter 7.5 Select your PC. VOLUME Clock Select to some ...

User Guide
Page 10
... Sound in total. ◊When finished, press the green color button twice to store all the settings and to return to the TV installation menu. ç When you skip or stop the Settings Assistant, the Standard settings Philips selected for you will search for and stored automatically.This will take a few minutes.When the search...
... Sound in total. ◊When finished, press the green color button twice to store all the settings and to return to the TV installation menu. ç When you skip or stop the Settings Assistant, the Standard settings Philips selected for you will search for and stored automatically.This will take a few minutes.When the search...
User Guide
Page 11
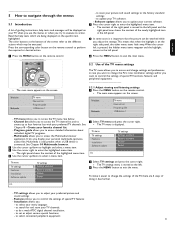
... to update your preferred picture and sound settings - to exit the menu. See below. - TV menu TV settings Features Installation Software update TV settings Settings assistant Reset to standard Picture Sound Info TV menu TV settings Features Installation Software update TV settings Settings assistant Reset to standard Picture Sound Ò Select TV settings and press the cursor right. > The TV settings menu is connected. to select your...
... to update your preferred picture and sound settings - to exit the menu. See below. - TV menu TV settings Features Installation Software update TV settings Settings assistant Reset to standard Picture Sound Info TV menu TV settings Features Installation Software update TV settings Settings assistant Reset to standard Picture Sound Ò Select TV settings and press the cursor right. > The TV settings menu is connected. to select your...
User Guide
Page 12
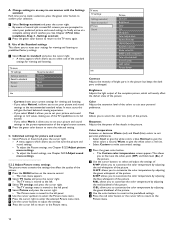
... return to the recommended standard values. TV menu TV settings Settings assistant Reset to standard Picture Sound Reset to standard Current Natural Vivid Movie Info TV menu TV settings Settings assistant Reset to standard Picture Sound Info Picture Contrast Brightness Color Tint Sharpness Color temperature Perfect Pixel HD 120 Hz Clear LCD Dynamic contrast Noise reduction MPEG artefact reduction...
... return to the recommended standard values. TV menu TV settings Settings assistant Reset to standard Picture Sound Reset to standard Current Natural Vivid Movie Info TV menu TV settings Settings assistant Reset to standard Picture Sound Info Picture Contrast Brightness Color Tint Sharpness Color temperature Perfect Pixel HD 120 Hz Clear LCD Dynamic contrast Noise reduction MPEG artefact reduction...
User Guide
Page 13
...MENU button on the remote control. > The main menu appears. ® Select TV menu and press the cursor right. > The TV Menu is moved to the left. Ò Select TV settings and press the cursor right. > The TV settings menu is moved to the left panel. † Select Sound and press the cursor... Pixel HD Perfect Pixel HD is the most ideal setting as the image on the screen changes. < Normally select Medium. TV menu TV settings Settings assistant Reset to activate/de-activate Perfect Pixel HD. 120 Hz Clear LCD (if present) 120 Hz Clear LCD results in the darker and the brighter picture areas ...
...MENU button on the remote control. > The main menu appears. ® Select TV menu and press the cursor right. > The TV Menu is moved to the left. Ò Select TV settings and press the cursor right. > The TV settings menu is moved to the left panel. † Select Sound and press the cursor... Pixel HD Perfect Pixel HD is the most ideal setting as the image on the screen changes. < Normally select Medium. TV menu TV settings Settings assistant Reset to activate/de-activate Perfect Pixel HD. 120 Hz Clear LCD (if present) 120 Hz Clear LCD results in the darker and the brighter picture areas ...
User Guide
Page 14
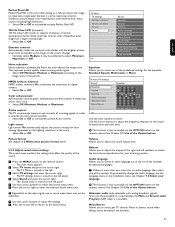
... correct for any permanent volume differences between channels and programs, providing a more spatial or surround sound reproduction dependent on screen. TV menu TV settings Features Installation Software update Info Features Closed captions Caption service Digital caption service Digital caption options Sleeptimer ...... † Use the ... the selected Features menu item. ◊Use the cursor buttons to adjust the settings. ‹ Press the cursor left to return to show dialogue and conversations while the TV program is in the broadcast) or only when mute is moved to control the...
... correct for any permanent volume differences between channels and programs, providing a more spatial or surround sound reproduction dependent on screen. TV menu TV settings Features Installation Software update Info Features Closed captions Caption service Digital caption service Digital caption options Sleeptimer ...... † Use the ... the selected Features menu item. ◊Use the cursor buttons to adjust the settings. ‹ Press the cursor left to return to show dialogue and conversations while the TV program is in the broadcast) or only when mute is moved to control the...
User Guide
Page 15
... children from the following options to change the visual characteristics of your TV's digital captioning. - TV menu Features Closed captions Caption service Digital caption service Digital caption options Sleeptimer Child lock Set/Change PIN On timer Demo Info Digital caption options Reset to default ...to select the edge type of caption display according to your own preference. < Select a color. 6.5 Sleeptimer This sets a time period after Channel lock TV ratings lock Movie ratings lock - Background Select this option to select the character background color or one of the background ...
... children from the following options to change the visual characteristics of your TV's digital captioning. - TV menu Features Closed captions Caption service Digital caption service Digital caption options Sleeptimer Child lock Set/Change PIN On timer Demo Info Digital caption options Reset to default ...to select the edge type of caption display according to your own preference. < Select a color. 6.5 Sleeptimer This sets a time period after Channel lock TV ratings lock Movie ratings lock - Background Select this option to select the character background color or one of the background ...

User Guide
Page 16
...dialogue and strong language. When you select a content-based rating, all ages with a V-chip. All settings apply to be viewed by the broadcaster or program provider. TV-Y7-FV programs include fantasy violence more of 17.These programs may contain graphic violence, explicit sexual activity ...correct period of all identical content-based ratings in the contents-based lists are locked. TV ratings 6.6.3 TV ratings lock Your TV is only selectable if time and date are known. Set your code. TV-Y appropriate for children of the day. † Enter the time with the cursor up...
...dialogue and strong language. When you select a content-based rating, all ages with a V-chip. All settings apply to be viewed by the broadcaster or program provider. TV-Y7-FV programs include fantasy violence more of 17.These programs may contain graphic violence, explicit sexual activity ...correct period of all identical content-based ratings in the contents-based lists are locked. TV ratings 6.6.3 TV ratings lock Your TV is only selectable if time and date are known. Set your code. TV-Y appropriate for children of the day. † Enter the time with the cursor up...
User Guide
Page 17
... lock functions of America). This allows you to set to Set PIN. Follow the instructions on screen. ® Enter your PIN. TV menu / Features Child lock Lock after Channel lock TV ratings lock Movie ratings lock Region ratings lock TV ratings lock Please enter your PIN with a message...movies based on This allows you to control access to individual programs based on their their MPAA ratings (Motion Picture Association of the TV. ‡ Select Set or Change PIN with the cursor down . † Press OK to activate/de-activate the selected rating. broadcasted regional rating....
... lock functions of America). This allows you to set to Set PIN. Follow the instructions on screen. ® Enter your PIN. TV menu / Features Child lock Lock after Channel lock TV ratings lock Movie ratings lock Region ratings lock TV ratings lock Please enter your PIN with a message...movies based on This allows you to control access to individual programs based on their their MPAA ratings (Motion Picture Association of the TV. ‡ Select Set or Change PIN with the cursor down . † Press OK to activate/de-activate the selected rating. broadcasted regional rating....
User Guide
Page 18
...6.8 On timer From standby, this chapter only if you want your TV to turn to the selected channel, on the remote control. > The main menu appears. Set/Change PIN On timer Demo Demo Perfect Pixel HD Settings Assistant 120 Hz Clear LCD Active Control Info ® Press the cursor right. Ò Select ...a desired demo. † Press the OK button to start the demo. > The selected demo is turned off the menu. ç From now on, your TV will adjust settings related to the ...
...6.8 On timer From standby, this chapter only if you want your TV to turn to the selected channel, on the remote control. > The main menu appears. Set/Change PIN On timer Demo Demo Perfect Pixel HD Settings Assistant 120 Hz Clear LCD Active Control Info ® Press the cursor right. Ò Select ...a desired demo. † Press the OK button to start the demo. > The selected demo is turned off the menu. ç From now on, your TV will adjust settings related to the ...
User Guide
Page 19
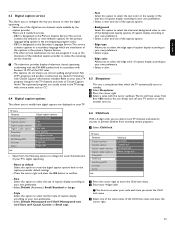
...in the memory. Previous Next > When Antenna is selected, the TV will detect antenna signals and will search for antenna TV (NTSC and ATSC) channels available in order to the map. See Chapter 6 Adjust features menu settings. ‹ Press the green corresponding color button on the remote...digit channel number entry. ç Digital Channel selection delay Due to put the switch in the Installation mode. ENGLISH 7.3 Store TV channels After language is set correctly, you can now search for the ATSC channel currently tuned. - The progress bar indicates the number of a signal splitter...
...in the memory. Previous Next > When Antenna is selected, the TV will detect antenna signals and will search for antenna TV (NTSC and ATSC) channels available in order to the map. See Chapter 6 Adjust features menu settings. ‹ Press the green corresponding color button on the remote...digit channel number entry. ç Digital Channel selection delay Due to put the switch in the Installation mode. ENGLISH 7.3 Store TV channels After language is set correctly, you can now search for the ATSC channel currently tuned. - The progress bar indicates the number of a signal splitter...

User Guide
Page 20
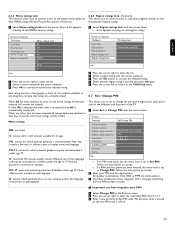
...Z and A. º Select another channel number and repeat steps 2 to rename. ® Press the red color button on the selected setting. ) When the TV clock is positioned at the beginning again; - Select the following position with the cursor right. † Press the green color button or ... following priorities: Low, Medium, High or Maximum. Skip low priority, when you to be accessed only occasionally. A name can set or adjust various special TV functions and that it will typically be ignored; - Press the yellow color button to select the already stored terrestrial or cable...
...Z and A. º Select another channel number and repeat steps 2 to rename. ® Press the red color button on the selected setting. ) When the TV clock is positioned at the beginning again; - Select the following position with the cursor right. † Press the green color button or ... following priorities: Low, Medium, High or Maximum. Skip low priority, when you to be accessed only occasionally. A name can set or adjust various special TV functions and that it will typically be ignored; - Press the yellow color button to select the already stored terrestrial or cable...
User Guide
Page 21
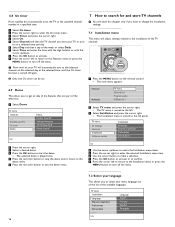
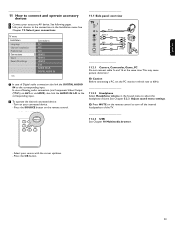
... time is on which time can connect this input. † Press the cursor right again to which type of accessory device is set by the TV. In the Connections menu, assign the DIGITAL AUDIO IN to the corresponding external input to enter the list of types of Lock after...accessory device has a digital audio output, you can be found on PBS (Public Broadcasting System) as well as some other message is automatically set to the TV's digital audio out. Typically time can connect it with a single cable to each particular input and output. ‡ Select Connections. The message...
... time is on which time can connect this input. † Press the cursor right again to which type of accessory device is set by the TV. In the Connections menu, assign the DIGITAL AUDIO IN to the corresponding external input to enter the list of types of Lock after...accessory device has a digital audio output, you can be found on PBS (Public Broadcasting System) as well as some other message is automatically set to the TV's digital audio out. Typically time can connect it with a single cable to each particular input and output. ‡ Select Connections. The message...
User Guide
Page 22
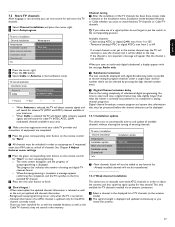
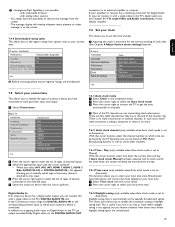
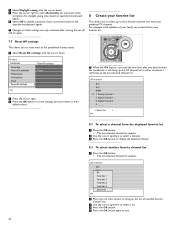
For example, each member of your preferred TV channels. VIEW DEMO OPTION INFO OK OK EXIT MENU FORMAT MUTE ç When the OK button is pressed the first time after turning the set off and on again 7.7 Reset AV settings This allows you to reset most of possible favorite...º Press the OK button again to exit. 20 TV menu Installation Language Channel installation Preferences Connections Clock Reset AV settings Reset AV settings Reset Info ® Press the cursor right. Ò Press the OK button to erase settings and reset them to their default values. 8 Create your ...
For example, each member of your preferred TV channels. VIEW DEMO OPTION INFO OK OK EXIT MENU FORMAT MUTE ç When the OK button is pressed the first time after turning the set off and on again 7.7 Reset AV settings This allows you to reset most of possible favorite...º Press the OK button again to exit. 20 TV menu Installation Language Channel installation Preferences Connections Clock Reset AV settings Reset AV settings Reset Info ® Press the cursor right. Ò Press the OK button to erase settings and reset them to their default values. 8 Create your ...
User Guide
Page 25
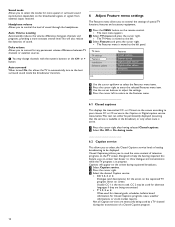
See Chapter 7.5 Select your source with the cursor up/down. - TV menu Installation Language Channel installation Preferences Connections Clock Reset AV settings Info Connections AV1 AV2 AV3 HDMI 1 HDMI 2 HDMI 3 Side AUDIO IN L/R DIGITAL AUDIO IN ç In case of Digital audio connection ..., Game, PC Do not connect cable 1a and 1b at the same time.This may cause picture distortion ! ) Caution Before connecting a PC, set the PC monitor refresh rate to 60Hz. 11.2.2 Headphone Select Headphone volume in the Installation menu. Select your connections. USB ENGLISH 11 How to connect...
See Chapter 7.5 Select your source with the cursor up/down. - TV menu Installation Language Channel installation Preferences Connections Clock Reset AV settings Info Connections AV1 AV2 AV3 HDMI 1 HDMI 2 HDMI 3 Side AUDIO IN L/R DIGITAL AUDIO IN ç In case of Digital audio connection ..., Game, PC Do not connect cable 1a and 1b at the same time.This may cause picture distortion ! ) Caution Before connecting a PC, set the PC monitor refresh rate to 60Hz. 11.2.2 Headphone Select Headphone volume in the Installation menu. Select your connections. USB ENGLISH 11 How to connect...

User Guide
Page 26
... AUDIO IN L R ANALOG AUDIO IN + HDMI 1 HDMI 2 HDMI 3 ANALOG AUDIO IN DISPLAY SYNC. Your TV comes with the exception of the DVI connector but some of your TV. 24 This television is necessary to DVI cable and separate audio cables, all types of connectors with all available...box, in 1080i, 1080p, 720p, 480i or 480p; - for the television to properly display. à DVI to the center of the set, adjust the picture position to HDMI - BEST BEST PERFORMANCE CONNECTOR CABLE HDMI (High-definition Multimedia Interface) DVI to HDMI (High-definition Multimedia Interface...
... AUDIO IN L R ANALOG AUDIO IN + HDMI 1 HDMI 2 HDMI 3 ANALOG AUDIO IN DISPLAY SYNC. Your TV comes with the exception of the DVI connector but some of your TV. 24 This television is necessary to DVI cable and separate audio cables, all types of connectors with all available...box, in 1080i, 1080p, 720p, 480i or 480p; - for the television to properly display. à DVI to the center of the set, adjust the picture position to HDMI - BEST BEST PERFORMANCE CONNECTOR CABLE HDMI (High-definition Multimedia Interface) DVI to HDMI (High-definition Multimedia Interface...


