User manual
Page 3
... TV on/off or to standby Switch channels Adjust volume Watch channels from a set-top box Watch connected devices Watch a DVD 6 Use more of your TV Use the quick access menu Change picture and sound settings Use Auto Mode Create and use lists of favorite channels Set the clock Use child control and rating locks View closed captions (subtitles) View photos and play music on a USB device Use your TV in HD mode Use your TV as a PC monitor Use Philips EasyLink Use the demo mode 7 Install channels Select your menu language Set your location to home Automatically install channels Optimize the signal...
... TV on/off or to standby Switch channels Adjust volume Watch channels from a set-top box Watch connected devices Watch a DVD 6 Use more of your TV Use the quick access menu Change picture and sound settings Use Auto Mode Create and use lists of favorite channels Set the clock Use child control and rating locks View closed captions (subtitles) View photos and play music on a USB device Use your TV in HD mode Use your TV as a PC monitor Use Philips EasyLink Use the demo mode 7 Install channels Select your menu language Set your location to home Automatically install channels Optimize the signal...
User manual
Page 5
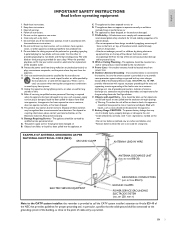
... registers, stoves, or other . Use only with a cart, stand, tripod, bracket, or table specified by the manufacturer. 12. or B. or C. Outdoor Antenna Grounding - Battery Usage CAUTION - alignment as power-supply cord or plug is used for long periods of the obsolete outlet. 10. Install in performance; Tilt/Stability - If an outside antenna is connected to the receiver, be located away from the apparatus...
... registers, stoves, or other . Use only with a cart, stand, tripod, bracket, or table specified by the manufacturer. 12. or B. or C. Outdoor Antenna Grounding - Battery Usage CAUTION - alignment as power-supply cord or plug is used for long periods of the obsolete outlet. 10. Install in performance; Tilt/Stability - If an outside antenna is connected to the receiver, be located away from the apparatus...
User manual
Page 6
... this manual, any changes or modifications made with shielded cables with metallic RFI/EMI connector hoods to radio communications. All rights reserved. or their respective owners. The material in other registered and unregistered trademarks are user serviceable. freetype.org). Pixel characteristics This LCD product has a high number of color pixels. Warranty No components are the property of the product. Cables Connections...
... this manual, any changes or modifications made with shielded cables with metallic RFI/EMI connector hoods to radio communications. All rights reserved. or their respective owners. The material in other registered and unregistered trademarks are user serviceable. freetype.org). Pixel characteristics This LCD product has a high number of color pixels. Warranty No components are the property of the product. Cables Connections...

User manual
Page 9
... 13). f OPTION Activates the quick access menu (see 'Change picture format' on page 14). e Color buttons Selects tasks or options. k MUTE Mutes or unmutes audio. c FAV Displays a list of the information depends on the broadcaster.You might see 'Use Auto Mode' on page 15). q BACK Returns to standby. t SLEEP Sets a delay after which the TV switches to a previous screen. u ACTIVE CONTROL The TV continuously measures and corrects incoming signals to provide the best picture quality.
... 13). f OPTION Activates the quick access menu (see 'Change picture format' on page 14). e Color buttons Selects tasks or options. k MUTE Mutes or unmutes audio. c FAV Displays a list of the information depends on the broadcaster.You might see 'Use Auto Mode' on page 15). q BACK Returns to standby. t SLEEP Sets a delay after which the TV switches to a previous screen. u ACTIVE CONTROL The TV continuously measures and corrects incoming signals to provide the best picture quality.
User manual
Page 10
... the power cord or plug to digital TV.This means that a given broadcaster can have channels available either in analog or in your area can loosen connections. • The ideal viewing distance for free through an antenna connection. Prevent theft by looping a Kensington lock between the slot and a permanent object, such as a heavy table. ends of the TV. Note • Remove the batteries if not using the remote control...
... the power cord or plug to digital TV.This means that a given broadcaster can have channels available either in analog or in your area can loosen connections. • The ideal viewing distance for free through an antenna connection. Prevent theft by looping a Kensington lock between the slot and a permanent object, such as a heavy table. ends of the TV. Note • Remove the batteries if not using the remote control...
User manual
Page 11
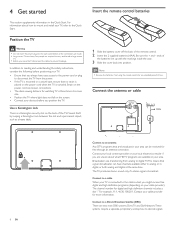
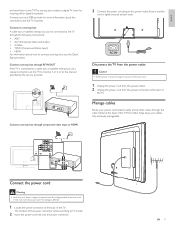
... receiving off-air digital broadcasts. English and send them to TV model. 2 Insert the power cord fully into the power connector. Manage cables Route your power cord, antenna cable and all other cables through component video input or HDMI 3 Connect the power cord plug to the power outlet. TV ANTENNA HDMI 1 R R R SERV. Ensure that your power voltage corresponds with the voltage printed at the back of the power connector varies according to the TV.The set -top box through the cable...
... receiving off-air digital broadcasts. English and send them to TV model. 2 Insert the power cord fully into the power connector. Manage cables Route your power cord, antenna cable and all other cables through component video input or HDMI 3 Connect the power cord plug to the power outlet. TV ANTENNA HDMI 1 R R R SERV. Ensure that your power voltage corresponds with the voltage printed at the back of the power connector varies according to the TV.The set -top box through the cable...
User manual
Page 12
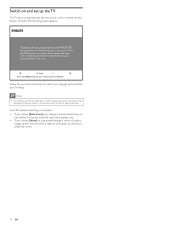
... local Cable / Satellite signal provider for your purchase of this stage of picture display options. Press the left or right cursor buttons to install channels. Please proceed with the following screen appears: Thank you turn off the TV. Finish the setup by selecting your location: • If you choose [Retail store] your TV to a cable box or satellite set up the TV The TV turns on automatically after the power cord...
... local Cable / Satellite signal provider for your purchase of this stage of picture display options. Press the left or right cursor buttons to install channels. Please proceed with the following screen appears: Thank you turn off the TV. Finish the setup by selecting your location: • If you choose [Retail store] your TV to a cable box or satellite set up the TV The TV turns on automatically after the power cord...
User manual
Page 15
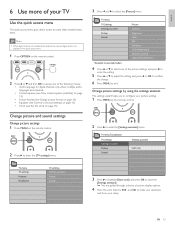
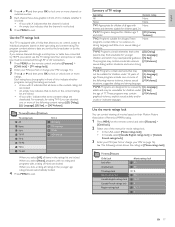
... 'View closed captions (subtitles)' on page 19). • Picture format (see 'Change picture format' on page 14). • Equalizer (see 'Summary of sound settings' on page 15). • Clock (see 'Set the clock' on page 15). Change picture settings by using the settings assistant The settings wizard helps you to select the [Picture] menu. English 6 Use more of your TV Use the quick access menu The quick access menu gives direct access to some often-needed menu items. Note • When digital channels are installed...
... 'View closed captions (subtitles)' on page 19). • Picture format (see 'Change picture format' on page 14). • Equalizer (see 'Summary of sound settings' on page 15). • Clock (see 'Set the clock' on page 15). Change picture settings by using the settings assistant The settings wizard helps you to select the [Picture] menu. English 6 Use more of your TV Use the quick access menu The quick access menu gives direct access to some often-needed menu items. Note • When digital channels are installed...

User manual
Page 17
...;c time. TV menu I Installation Clock Auto clock mode Auto clock channel Time zone Daylight saving Auto clock mode Manual Automatic 3 (Optional) Select the channel from the list of favorite channels. 6 Press the green button to exit. When [Speakers EasyLink] is selected, the TV speakers are displayed. 2 Press or to highlight a list, and press OK to select the list. Use Auto Mode 1 Press AUTO MODE to set the time automatically and choose which channel to read the time from. 1 Press MENU on the remote control and...
...;c time. TV menu I Installation Clock Auto clock mode Auto clock channel Time zone Daylight saving Auto clock mode Manual Automatic 3 (Optional) Select the channel from the list of favorite channels. 6 Press the green button to exit. When [Speakers EasyLink] is selected, the TV speakers are displayed. 2 Press or to highlight a list, and press OK to select the list. Use Auto Mode 1 Press AUTO MODE to set the time automatically and choose which channel to read the time from. 1 Press MENU on the remote control and...
User manual
Page 19
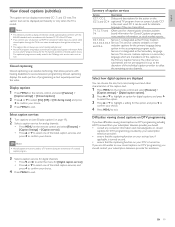
.../or crude or indecent language. TV-MA: Programs are designed to be viewed by HDMI, you can control viewing of movies based on their Motion Picture Association of America (MPAA) rating. 1 Press MENU on the remote control and select [Features] > [Child lock]. 2 Select one of the menus for younger [(L) Language] children and which may need parental guidance. [(S) Sex] The program may contain moderate violence, [(V) Violence...
.../or crude or indecent language. TV-MA: Programs are designed to be viewed by HDMI, you can control viewing of movies based on their Motion Picture Association of America (MPAA) rating. 1 Press MENU on the remote control and select [Features] > [Child lock]. 2 Select one of the menus for younger [(L) Language] children and which may need parental guidance. [(S) Sex] The program may contain moderate violence, [(V) Violence...
User manual
Page 21
... the TV is muted. Closed captioning Closed captioning is an assistive technology that the captioning function on your set -top box via HDMI or component video input, you should : • consult any consumer information and manuals/guides on closed captions for DTV programming provided by a TV channel during mute], and press to confirm your area TV program listings for the TV channels and times of the caption text. 1 Press MENU on the remote control and select [Features] > [Caption settings] > [Digital caption...
... the TV is muted. Closed captioning Closed captioning is an assistive technology that the captioning function on your set -top box via HDMI or component video input, you should : • consult any consumer information and manuals/guides on closed captions for DTV programming provided by a TV channel during mute], and press to confirm your area TV program listings for the TV channels and times of the caption text. 1 Press MENU on the remote control and select [Features] > [Caption settings] > [Digital caption...
User manual
Page 23
... time] [Rotate] [Zoom] [Start show]/[Stop show] Description Displays the picture name, date, size and next picture in high definition (HD) mode. Duration: 00:02:53 Year: 5 Press or to select a song. • Press the color keys on the remote control to repeat, shuffle, or change the video format on a USB device 1 Connect your devices' on page 28). 2 Press MENU on the remote control...
... time] [Rotate] [Zoom] [Start show]/[Stop show] Description Displays the picture name, date, size and next picture in high definition (HD) mode. Duration: 00:02:53 Year: 5 Press or to select a song. • Press the color keys on the remote control to repeat, shuffle, or change the video format on a USB device 1 Connect your devices' on page 28). 2 Press MENU on the remote control...
User manual
Page 24
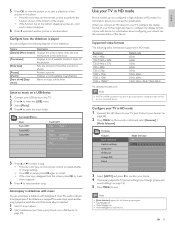
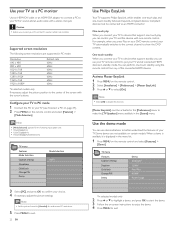
Supported screen resolutions The following input signals only: • 720x480p@60 Hz • 1280x720p@60 Hz • 1920x1080p@24/25/30/50/60 Hz TV menu Features Mode Selection Caption settings Sleeptimer Child Lock Change PIN Demo Mode Selection PC HDTV Use Philips EasyLink Your TV supports Philips EasyLink, which enables one-touch play and one remote control. Activate Master EasyLink 1 Press MENU on -screen instructions to enjoy the demo. 4 Press MENU to exit. For sound, add an audio cable with one...
Supported screen resolutions The following input signals only: • 720x480p@60 Hz • 1280x720p@60 Hz • 1920x1080p@24/25/30/50/60 Hz TV menu Features Mode Selection Caption settings Sleeptimer Child Lock Change PIN Demo Mode Selection PC HDTV Use Philips EasyLink Your TV supports Philips EasyLink, which enables one-touch play and one remote control. Activate Master EasyLink 1 Press MENU on -screen instructions to enjoy the demo. 4 Press MENU to exit. For sound, add an audio cable with one...
User manual
Page 26
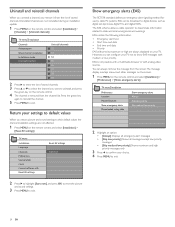
... the channel you return picture and sound settings to their default values the channel installation settings are not affected. 1 Press MENU on the remote control. 4 The channel is not possible with a multimedia browser or with medium or low priority. TV menu Installation Preferences Location Master EasyLink Show emergency alerts Downloaded rating table Show emergency alerts Always Skip low priority Skip medium/low priority 2 Highlight an option: • [Always]: Displays...
... the channel you return picture and sound settings to their default values the channel installation settings are not affected. 1 Press MENU on the remote control. 4 The channel is not possible with a multimedia browser or with medium or low priority. TV menu Installation Preferences Location Master EasyLink Show emergency alerts Downloaded rating table Show emergency alerts Always Skip low priority Skip medium/low priority 2 Highlight an option: • [Always]: Displays...
User manual
Page 27
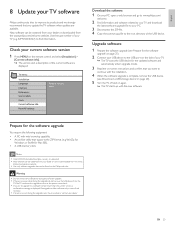
... 8 Update your dealer or downloaded from the www.philips.com/welcome website. Use the type number of your current software version 1 Press MENU on the remote control and select [Installation] > [Current software info]. » The version and a description of the USB device. Check your TV (e.g. 42PFL5603D/27) to your dealer or can be downloaded from the www. TV menu Installation Language Channels Preferences Source labels Clock Current software info Reset AV settings Release...
... 8 Update your dealer or downloaded from the www.philips.com/welcome website. Use the type number of your current software version 1 Press MENU on the remote control and select [Installation] > [Current software info]. » The version and a description of the USB device. Check your TV (e.g. 42PFL5603D/27) to your dealer or can be downloaded from the www. TV menu Installation Language Channels Preferences Source labels Clock Current software info Reset AV settings Release...
User manual
Page 29
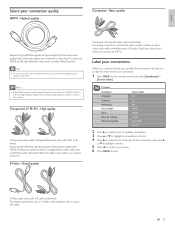
...finition video and to exit. S-Video cable and audio L/R cable (red/white) For analog connections. TV menu Installation Language Channels Preferences Source labels Clock Reset AV settings Software upgrade Source labels AV1 AV2 AV3 HDMI1 HDMI2 HDMI3 Side HDMI Side AV 2 Press to enter the list of available connections. 3 Press or to highlight a connection in DVD or Blu-ray Discs. High quality Component video cable (red/green/blue) and audio L/R cable (red/ white) Supports high-definition signals but gives lower picture quality than HDMI. S-Video -
...finition video and to exit. S-Video cable and audio L/R cable (red/white) For analog connections. TV menu Installation Language Channels Preferences Source labels Clock Reset AV settings Software upgrade Source labels AV1 AV2 AV3 HDMI1 HDMI2 HDMI3 Side HDMI Side AV 2 Press to enter the list of available connections. 3 Press or to highlight a connection in DVD or Blu-ray Discs. High quality Component video cable (red/green/blue) and audio L/R cable (red/ white) Supports high-definition signals but gives lower picture quality than HDMI. S-Video -
User manual
Page 31
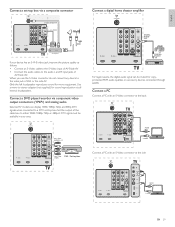
... signals when connected to the audio L and R input jacks of AV3/side AV. English Connect a set -top box. U L L L Pr Pr SPDIF OUT Pb Pb Y Y VIDEO L S-VIDEO R AV 1 HDMI 2 AV 2 AV 3 DVI AUDIO IN HDMI 3 R AUDIO L VIDEO S-VIDEO HDMI 4 USB AUDIO OUT S VIDEO EN 29 Connect a DVD player/recorder via component video output connectors (YPbPr) and analog audio Selected TV models can be available in your device has an S-VHS video jack, improve the picture quality as follows: • Connect an S-Video cable to the S-Video input...
... signals when connected to the audio L and R input jacks of AV3/side AV. English Connect a set -top box. U L L L Pr Pr SPDIF OUT Pb Pb Y Y VIDEO L S-VIDEO R AV 1 HDMI 2 AV 2 AV 3 DVI AUDIO IN HDMI 3 R AUDIO L VIDEO S-VIDEO HDMI 4 USB AUDIO OUT S VIDEO EN 29 Connect a DVD player/recorder via component video output connectors (YPbPr) and analog audio Selected TV models can be available in your device has an S-VHS video jack, improve the picture quality as follows: • Connect an S-Video cable to the S-Video input...
User manual
Page 33
... respond to the color code. Ensure the indicator light on page 28). The picture Broadcast video format. mostly red and green, or the picture misses red when Ensure all the connections are using the TV remote control. connected to HDMI connections. Incomplete channel installation If the TV receives channels via an connected HDMI cable. press MUTE on the TV. For HDMI connections, some accessory devices, the picture format must be set in Connect your devices (see 'Connect your devices' on the TV blinks when you are...
... respond to the color code. Ensure the indicator light on page 28). The picture Broadcast video format. mostly red and green, or the picture misses red when Ensure all the connections are using the TV remote control. connected to HDMI connections. Incomplete channel installation If the TV receives channels via an connected HDMI cable. press MUTE on the TV. For HDMI connections, some accessory devices, the picture format must be set in Connect your devices (see 'Connect your devices' on the TV blinks when you are...

User manual
Page 36
... repair of antenna/signal source systems outside of the product. • Product repair and/or part replacement because of improper installation or maintenance, connections to improper voltage supply, power line surge, lightning damage, retained images or screen markings resulting from the date of the replacement or repair for ninety (90) days or for the remaining portion of the original product's warranty, whichever provides longer coverage...
... repair of antenna/signal source systems outside of the product. • Product repair and/or part replacement because of improper installation or maintenance, connections to improper voltage supply, power line surge, lightning damage, retained images or screen markings resulting from the date of the replacement or repair for ninety (90) days or for the remaining portion of the original product's warranty, whichever provides longer coverage...
Leaflet
Page 3
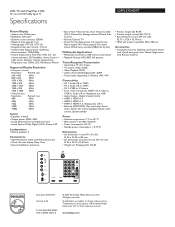
... inch • VESA wall mount compatible: 400 x 400 mm Accessories • Included accessories: Tabletop swivel stand, Power cord, Quick start guide, User Manual, Registration card, Remote Control • R AUDIO L VIDEO S-VIDEO HDMI 4 USB TV ANTENNA Issue date 2010-03-31 Version: 4.4.6 12 NC: 8670 000 47559 UPC: 6 09585 16273 0 © 2010 Koninklijke Philips Electronics N.V. or their respective owners. www.philips.com All Rights reserved. Digital: Coaxial (cinch) • HDMI 1: HDMI v1.3 • HDMI 2: HDMI v1.3 • HDMI 3: HDMI v1.3, Analog audio L/R in • EasyLink (HDMI...
... inch • VESA wall mount compatible: 400 x 400 mm Accessories • Included accessories: Tabletop swivel stand, Power cord, Quick start guide, User Manual, Registration card, Remote Control • R AUDIO L VIDEO S-VIDEO HDMI 4 USB TV ANTENNA Issue date 2010-03-31 Version: 4.4.6 12 NC: 8670 000 47559 UPC: 6 09585 16273 0 © 2010 Koninklijke Philips Electronics N.V. or their respective owners. www.philips.com All Rights reserved. Digital: Coaxial (cinch) • HDMI 1: HDMI v1.3 • HDMI 2: HDMI v1.3 • HDMI 3: HDMI v1.3, Analog audio L/R in • EasyLink (HDMI...


