
Leaflet
Page 2
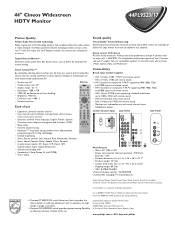
... channel input. • Headphone output Center Channel Input Jack Panel Side Panel Miscellaneous • Mains: AC 110V ± 10% • Power consumption: Normal operation: 270 Watts Stand by: This Philips patented reflective technology enables a large screen size TV with low weight and small footprint without the hassle of two 2" tweeters and two 5" woofers. Full user controllable equalizer via the OSD menu with V-chip technology. • Closed Captioning • Smart Picture control...
... channel input. • Headphone output Center Channel Input Jack Panel Side Panel Miscellaneous • Mains: AC 110V ± 10% • Power consumption: Normal operation: 270 Watts Stand by: This Philips patented reflective technology enables a large screen size TV with low weight and small footprint without the hassle of two 2" tweeters and two 5" woofers. Full user controllable equalizer via the OSD menu with V-chip technology. • Closed Captioning • Smart Picture control...

User manual
Page 1
... Control™-analyzes and adjusts incoming signal • Two-tuner, Double-window PIP (Picture-in-Picture) • Dolby® Virtual Surround, 40-watt RMS • 3D Y/C Comb Filter • HD Component and DVI Input • Center Channel Audio Input • Side AV Convenience Jacks • Matching stand and swivel available Refer to the Quick Use and Setup Guide (supplied with your TV) for information on basic connections, remote control button descriptions, on-screen menu...
... Control™-analyzes and adjusts incoming signal • Two-tuner, Double-window PIP (Picture-in-Picture) • Dolby® Virtual Surround, 40-watt RMS • 3D Y/C Comb Filter • HD Component and DVI Input • Center Channel Audio Input • Side AV Convenience Jacks • Matching stand and swivel available Refer to the Quick Use and Setup Guide (supplied with your TV) for information on basic connections, remote control button descriptions, on-screen menu...
User manual
Page 3
...top of time. 14. If an outside antenna is connected to the receiver, be connected to the grounding system of cable entry as close to rain; Note to the CATV system installer: This ...POWER SERVICE GROUNDING ELECTRODE SYSTEM (NEC ART 250, PART H) The appliance should be serviced by the manufacturer. 19. An outdoor antenna should be located away from the top of the polarized or groundingtype plug. IMPORTANT SAFETY INSTRUCTIONS Read before operating equipment 1. Clean only with the manufacturers instructions. 8. Do not defeat the safety purpose of the set...
...top of time. 14. If an outside antenna is connected to the receiver, be connected to the grounding system of cable entry as close to rain; Note to the CATV system installer: This ...POWER SERVICE GROUNDING ELECTRODE SYSTEM (NEC ART 250, PART H) The appliance should be serviced by the manufacturer. 19. An outdoor antenna should be located away from the top of the polarized or groundingtype plug. IMPORTANT SAFETY INSTRUCTIONS Read before operating equipment 1. Clean only with the manufacturers instructions. 8. Do not defeat the safety purpose of the set...
User manual
Page 4
... DVD Player 13 Connecting a Progressive-scan DVD Player 14 Connecting an HD Satellite Receiver to YPbPr 15 Connecting an HD Satellite Receiver to DVI 16 Connecting Surround Sound Equipment 17 Connecting to the Side Inputs:Video Game System . . . . . .18 Labeling the Audio/Video Input Sources 19 USING THE REMOTE CONTROL Programming the Remote Control 20-21 Setup Codes for Accessory Devices 22-23 Using the TV Remote's VCR-specific Buttons . . . . .24 Using Active Control™ Plus 25 Using the Zoom Control 26 USING THE ON-SCREEN MENUS PICTURE Adjusting/Setting the Picture Controls...
... DVD Player 13 Connecting a Progressive-scan DVD Player 14 Connecting an HD Satellite Receiver to YPbPr 15 Connecting an HD Satellite Receiver to DVI 16 Connecting Surround Sound Equipment 17 Connecting to the Side Inputs:Video Game System . . . . . .18 Labeling the Audio/Video Input Sources 19 USING THE REMOTE CONTROL Programming the Remote Control 20-21 Setup Codes for Accessory Devices 22-23 Using the TV Remote's VCR-specific Buttons . . . . .24 Using Active Control™ Plus 25 Using the Zoom Control 26 USING THE ON-SCREEN MENUS PICTURE Adjusting/Setting the Picture Controls...

User manual
Page 5
... Side video inputs 50 times per second and adjusts key picture settings. Active Control, AutoPicture, AutoSound, AutoSurf, Cineos, Digital Crystal Clear, Digital Natural Motion, and Pixel Plus are reduced, providing a more consistent, comfortable sound. The comb filter supports the picture demands of this feature uses an ambient light sensor to adjust the picture settings according to viewing conditions in a PIP screen-if you set up your new TV. • Directions for Use manual-contains...
... Side video inputs 50 times per second and adjusts key picture settings. Active Control, AutoPicture, AutoSound, AutoSurf, Cineos, Digital Crystal Clear, Digital Natural Motion, and Pixel Plus are reduced, providing a more consistent, comfortable sound. The comb filter supports the picture demands of this feature uses an ambient light sensor to adjust the picture settings according to viewing conditions in a PIP screen-if you set up your new TV. • Directions for Use manual-contains...

User manual
Page 7
... jacks receive only the picture signal. phono plugs V Provide better picture performance than the Video (composite) jacks because the color part of the picture is already equipped with RCA-type phono plugs Provide sound for audio, connect it to make connections. Be sure to the TV. Your TV also has monitor output ("MON OUT") audio ("L" and "R") jacks and a sub- Connect A/V cables Video (called "CVBS" or "composite") Input Jack Cable used : DVI-D This jack works only...
... jacks receive only the picture signal. phono plugs V Provide better picture performance than the Video (composite) jacks because the color part of the picture is already equipped with RCA-type phono plugs Provide sound for audio, connect it to make connections. Be sure to the TV. Your TV also has monitor output ("MON OUT") audio ("L" and "R") jacks and a sub- Connect A/V cables Video (called "CVBS" or "composite") Input Jack Cable used : DVI-D This jack works only...

User manual
Page 8
... of 1 SERVICE 12C DVI G S-VIDEO 9 signal connected, the set will automatically show the one of better quality than CVBS. changing the TV volume does not affect them. CENTER CHANNEL AMP INPUT 4 SUB OUT Output Jack Provides a signal to the AV4 audio inputs. Inputs available: 75Ω RF coaxial. Separates the signal into three parts, two color and one brightness. 9 10 tions must be made to an external powered subwoofer. 5 AV3 Input Jacks Signals accepted...
... of 1 SERVICE 12C DVI G S-VIDEO 9 signal connected, the set will automatically show the one of better quality than CVBS. changing the TV volume does not affect them. CENTER CHANNEL AMP INPUT 4 SUB OUT Output Jack Provides a signal to the AV4 audio inputs. Inputs available: 75Ω RF coaxial. Separates the signal into three parts, two color and one brightness. 9 10 tions must be made to an external powered subwoofer. 5 AV3 Input Jacks Signals accepted...
User manual
Page 9
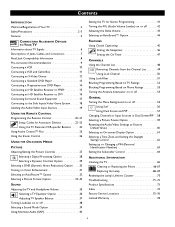
... the TV for best viewing. • Do not place the TV in This Manual The accessory device jack panels shown are presented only as guides. Pre-connection Recommendations Positioning the TV Before connecting accessory devices-VCR, DVD player, or HD satellite receiver, for example-please keep the ... to rain or moisture. • To prevent any cables. • Ensure that connections can circulate freely around other components. Optional Swivel Optional Stand POWER HIGH DEFINITION SELECT GUIDE INFO POWER STANDBY-ON DVD619 DVD/CD PLAYER OPEN/CLOSE STOP PLAY PAUSE PREV NEXT 9
... the TV for best viewing. • Do not place the TV in This Manual The accessory device jack panels shown are presented only as guides. Pre-connection Recommendations Positioning the TV Before connecting accessory devices-VCR, DVD player, or HD satellite receiver, for example-please keep the ... to rain or moisture. • To prevent any cables. • Ensure that connections can circulate freely around other components. Optional Swivel Optional Stand POWER HIGH DEFINITION SELECT GUIDE INFO POWER STANDBY-ON DVD619 DVD/CD PLAYER OPEN/CLOSE STOP PLAY PAUSE PREV NEXT 9

User manual
Page 10
... access the Source list. 5 Press the Cursor Up or Down button to select the AV2 input source. 6 Press the OK button to the channel you can watch the unscrambled programs by pressing the CH + or - Back of VCR (example only) 1 NOTE: Since you've connected the cable TV signal directly to simplify connections: Yellow: Video (Composite Video) Red: Right Audio White: Left Audio. 45 6 5 ACITVE SOUND CONTROL PICTURE 1 2 ZOOM 10 HELPFUL HINT Color Coding Used...
... access the Source list. 5 Press the Cursor Up or Down button to select the AV2 input source. 6 Press the OK button to the channel you can watch the unscrambled programs by pressing the CH + or - Back of VCR (example only) 1 NOTE: Since you've connected the cable TV signal directly to simplify connections: Yellow: Video (Composite Video) Red: Right Audio White: Left Audio. 45 6 5 ACITVE SOUND CONTROL PICTURE 1 2 ZOOM 10 HELPFUL HINT Color Coding Used...

User manual
Page 11
... the TV. 6 Press the Source Select button on the remote control to access the Source list. 7 Press the Cursor Up or Down button to select the AV2 input source. 8 Press the OK button to the AV2 input source for the viewing of Cable Box (example only) 8 7 ACITVE SOUND CONTROL PICTURE 1 2 ZOOM 11 NOTE: Since you must press the digit (number) buttons to tune directly to simplify connections: Yellow: Video (Composite Video) Red: Right Audio White: Left Audio.
... the TV. 6 Press the Source Select button on the remote control to access the Source list. 7 Press the Cursor Up or Down button to select the AV2 input source. 8 Press the OK button to the AV2 input source for the viewing of Cable Box (example only) 8 7 ACITVE SOUND CONTROL PICTURE 1 2 ZOOM 11 NOTE: Since you must press the digit (number) buttons to tune directly to simplify connections: Yellow: Video (Composite Video) Red: Right Audio White: Left Audio.

User manual
Page 13
... set is standard or progressive scan, you experience difficulties receiving sound with a DVD disc, check the sound settings through the DVD disc's menu. Although abbreviations and terms may differ depending on the DVD player or accessory digital source equipment used. or CrCbY. also red for right audio, and white for left audio. • The names for the component video jacks may vary, the letters B and R stand for the blue and red color component signal...
... set is standard or progressive scan, you experience difficulties receiving sound with a DVD disc, check the sound settings through the DVD disc's menu. Although abbreviations and terms may differ depending on the DVD player or accessory digital source equipment used. or CrCbY. also red for right audio, and white for left audio. • The names for the component video jacks may vary, the letters B and R stand for the blue and red color component signal...
User manual
Page 14
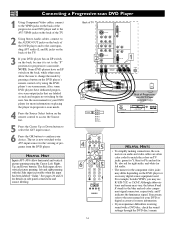
... allow horizontal and vertical picture panning using the DVD player's on-screen menu. See the user manual for your DVD player for details on side panel connections and source labeling. left audio. • The names for the component video jacks may vary, the letters B and R stand for more information on placing the player in progressive-scan mode. 4 Press the Source Select button on the remote control to access the Source list. 5 Press the Cursor...
... allow horizontal and vertical picture panning using the DVD player's on-screen menu. See the user manual for your DVD player for details on side panel connections and source labeling. left audio. • The names for the component video jacks may vary, the letters B and R stand for more information on placing the player in progressive-scan mode. 4 Press the Source Select button on the remote control to access the Source list. 5 Press the Cursor...

User manual
Page 15
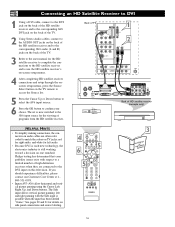
... video cables are often color coded to match the colors on TV jacks: green for Y, blue for Pb, and red for Pr; also red for right audio, and white for left and right panning with the Side input is now switched to the user manual for your choice. Although abbreviations and terms may vary, the letters B and R stand for details on side panel connections and source labeling. 45 6 5 ACITVE SOUND CONTROL PICTURE...
... video cables are often color coded to match the colors on TV jacks: green for Y, blue for Pb, and red for Pr; also red for right audio, and white for left and right panning with the Side input is now switched to the user manual for your choice. Although abbreviations and terms may vary, the letters B and R stand for details on side panel connections and source labeling. 45 6 5 ACITVE SOUND CONTROL PICTURE...
User manual
Page 16
... panel connections and source labeling. 4 5 6 5 ACITVE SOUND CONTROL PICTURE 1 2 ZOOM 3 UHseDRr eSMfocaaertneivulleiatrle 16 left audio. • Because DVI is such new technology, the electronics industry is now switched to the AV6 input source for left and right panning with respect to a limited number of high-definition receivers when they are often color coded to match the colors on TV jacks: red for right audio, and white for the viewing of programs...
... panel connections and source labeling. 4 5 6 5 ACITVE SOUND CONTROL PICTURE 1 2 ZOOM 3 UHseDRr eSMfocaaertneivulleiatrle 16 left audio. • Because DVI is such new technology, the electronics industry is now switched to the AV6 input source for left and right panning with respect to a limited number of high-definition receivers when they are often color coded to match the colors on TV jacks: red for right audio, and white for the viewing of programs...

User manual
Page 28
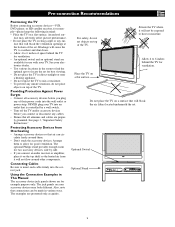
...6 Press the Menu button to select "Picture." 3 Press the Cursor Down button repeatedly until the "Digital processing" control is not available for use with the AV3, AV4, AV5, or AV6 input sources. TV Settings Demo Install Picture Sound Features Channels 5 2 4 3 1 5 6 ACITVE SOUND CONTROL PICTURE 1 2 ZOOM Picture Sound Features Channels TV Contrast Brightness Color Sharpness Picture TV Contrast 40 Brightness Color Sharpness Picture TV Color Temperature Digital processing Dynamic contrast DNR Progressive Scan Movie Plus Digital Natural Motion Picture TV Digital processing...
...6 Press the Menu button to select "Picture." 3 Press the Cursor Down button repeatedly until the "Digital processing" control is not available for use with the AV3, AV4, AV5, or AV6 input sources. TV Settings Demo Install Picture Sound Features Channels 5 2 4 3 1 5 6 ACITVE SOUND CONTROL PICTURE 1 2 ZOOM Picture Sound Features Channels TV Contrast Brightness Color Sharpness Picture TV Contrast 40 Brightness Color Sharpness Picture TV Color Temperature Digital processing Dynamic contrast DNR Progressive Scan Movie Plus Digital Natural Motion Picture TV Digital processing...

User manual
Page 45
... the TV channels and times of television programs on -screen menu. On-Closed captioning information (if available) will appear on screen during mute control," using the CC button on the remote control or the "Features" on the TV screen. Captions will display on the remote control to enter the caption service submenu. Using Closed Captioning Closed Captioning (CC) allows you to select "Settings." Press the Cursor Down button repeatedly to read the voice content of shows with service marks such as boxes...
... the TV channels and times of television programs on -screen menu. On-Closed captioning information (if available) will appear on screen during mute control," using the CC button on the remote control or the "Features" on the TV screen. Captions will display on the remote control to enter the caption service submenu. Using Closed Captioning Closed Captioning (CC) allows you to select "Settings." Press the Cursor Down button repeatedly to read the voice content of shows with service marks such as boxes...

User manual
Page 71
... Timer may have a picture but no sound. • If you see scrolling images. • Make sure you with your warranty. This information is blinking on the front of times and try to switch it is receiving power. • The remote control could have a problem. The TV is designed not to operate with the lamp door open , the TV will reappear each time the TV is turned on until the lamp...
... Timer may have a picture but no sound. • If you see scrolling images. • Make sure you with your warranty. This information is blinking on the front of times and try to switch it is receiving power. • The remote control could have a problem. The TV is designed not to operate with the lamp door open , the TV will reappear each time the TV is turned on until the lamp...

User manual
Page 72
... be receiving signals that came with accessory devices. *Q refers to the Quick Use and Setup Guide that are using an antenna, be sure it is not broken or shorted, and make sure the antenna cable is connected properly and securely. • If you to TV. The picture shakes or is not clear. • If you are using an antenna, make sure it is set to replace...
... be receiving signals that came with accessory devices. *Q refers to the Quick Use and Setup Guide that are using an antenna, be sure it is not broken or shorted, and make sure the antenna cable is connected properly and securely. • If you to TV. The picture shakes or is not clear. • If you are using an antenna, make sure it is set to replace...

User manual
Page 73
... screen with adjustments at 120Hz, 500Hz, 1.5KHz, 5KHz, and 10KHz), Balance, AVL (on/off), and Headphone (volume, balance) • Center channel input • Subwoofer out Operation • Easy, menu-driven installation and operation; direct-access menus and cursor control • Selection of three menu languages: English, French, and Spanish • On-screen status display on programs and functions (on silicon (LCOS) • Flicker free; perfect convergence • Resolution...
... screen with adjustments at 120Hz, 500Hz, 1.5KHz, 5KHz, and 10KHz), Balance, AVL (on/off), and Headphone (volume, balance) • Center channel input • Subwoofer out Operation • Easy, menu-driven installation and operation; direct-access menus and cursor control • Selection of three menu languages: English, French, and Spanish • On-screen status display on programs and functions (on silicon (LCOS) • Flicker free; perfect convergence • Resolution...

User manual
Page 74
... Screen/PIP Format Changing Channels or Input Sources, 60 Selecting, 59 DVI Input Jack, 7-8, 18 Dynamic Contrast Options, 31 Dynamic Noise Reduction Options, 32 F Factory Service Locations, 77-78 Features, List of, 5 Filters, Cleaning or Replacing, 68-69 H Headphone Volume, Adjusting, 37 I Incredible Surround™ (See Sound Mode Options) J Jacks/Cables/Connectors, Descriptions, 7 L Lamp Replacing, 71-72 Resetting the Lifetime Counter, 73 Lamp Lifetime Counter, 72 Lamp Rating Control, 72 Language, Setting for the On-screen Menu, *Q8 Lock...
... Screen/PIP Format Changing Channels or Input Sources, 60 Selecting, 59 DVI Input Jack, 7-8, 18 Dynamic Contrast Options, 31 Dynamic Noise Reduction Options, 32 F Factory Service Locations, 77-78 Features, List of, 5 Filters, Cleaning or Replacing, 68-69 H Headphone Volume, Adjusting, 37 I Incredible Surround™ (See Sound Mode Options) J Jacks/Cables/Connectors, Descriptions, 7 L Lamp Replacing, 71-72 Resetting the Lifetime Counter, 73 Lamp Lifetime Counter, 72 Lamp Rating Control, 72 Language, Setting for the On-screen Menu, *Q8 Lock...


