User manual
Page 3
... Slot 3 2 Getting started 4 2.1 Connection overview 4 3 Use of the Remote Control RC 4451 6 3.1 Use of the OPTION button 7 3.2 Picture format 7 3.3 Buttons on the left of the TV 7 3.4 Turn the TV on the TV screen . . . 2 1.4 Mounting 2 1.5 Electric, Magnetic and Electromagnetic Fields... connected peripherals with a HDMI connector 33 4 - with background music 31 2 - Philips TV Slideshow Format with a HDMI connector 26 11.6 Connect a DVD player/recorder, Set top box, gameconsole,... Philips TV - ENGLISH Content 1 Safety warnings 2 1.2 Care of the screen 2 1.3 Warning ...
... Slot 3 2 Getting started 4 2.1 Connection overview 4 3 Use of the Remote Control RC 4451 6 3.1 Use of the OPTION button 7 3.2 Picture format 7 3.3 Buttons on the left of the TV 7 3.4 Turn the TV on the TV screen . . . 2 1.4 Mounting 2 1.5 Electric, Magnetic and Electromagnetic Fields... connected peripherals with a HDMI connector 33 4 - with background music 31 2 - Philips TV Slideshow Format with a HDMI connector 26 11.6 Connect a DVD player/recorder, Set top box, gameconsole,... Philips TV - ENGLISH Content 1 Safety warnings 2 1.2 Care of the screen 2 1.3 Warning ...
User manual
Page 7
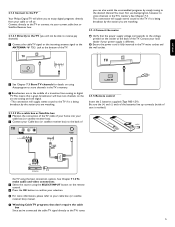
... box) to the back of VIDEO L AUDIO R AV 2 AV2 L + R + VIDEO ANTENNA MAINS 2.1.5 Remote control Insert the 2 batteries supplied (Type R03-1,5V). 2.1.3 Connect to the TV Your Philips Digital TV will not be able to receive pay channels) ‡ Connect the cable TV signal or the incoming antenna signal to the ANTENNA x 75Ω jack at...
... box) to the back of VIDEO L AUDIO R AV 2 AV2 L + R + VIDEO ANTENNA MAINS 2.1.5 Remote control Insert the 2 batteries supplied (Type R03-1,5V). 2.1.3 Connect to the TV Your Philips Digital TV will not be able to receive pay channels) ‡ Connect the cable TV signal or the incoming antenna signal to the ANTENNA x 75Ω jack at...
User manual
Page 8
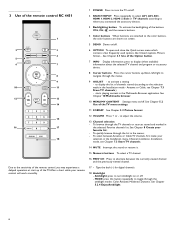
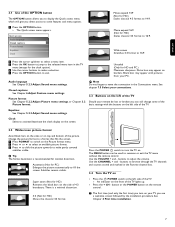
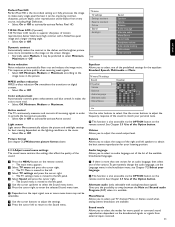
...in the Installation mode - Ambilight: press to activate a setting - To quickly browse through the TV channels or sources stored and marked in the Multimedia Browser application. 3 Use of the remote control RC 4451 POWER 1 SELECT 2 INPUT 5 DEMO OPTION 6 3 4 INFO 7 OK...CH 0 - 17 Ambilight MODE 18 Due to adjust the volume. 13 Channel selection - to the sensitivity of the remote control, you connected the accessory devices. 3 Backlighting button To activate the backlighting of the TV menu settings. 11 FORMAT See Chapter 3.2 Picture format. 12 VOLUME Press + or -
...in the Installation mode - Ambilight: press to activate a setting - To quickly browse through the TV channels or sources stored and marked in the Multimedia Browser application. 3 Use of the remote control RC 4451 POWER 1 SELECT 2 INPUT 5 DEMO OPTION 6 3 4 INFO 7 OK...CH 0 - 17 Ambilight MODE 18 Due to adjust the volume. 13 Channel selection - to the sensitivity of the remote control, you connected the accessory devices. 3 Backlighting button To activate the backlighting of the TV menu settings. 11 FORMAT See Chapter 3.2 Picture format. 12 VOLUME Press + or -
User manual
Page 9
... Sound menu settings. - Use the CHANNEL + and - button or the POWER button on the remote control. ç The first time (and only the first time) you turn the TV on the left side of the TV. VOLUME + Clock Select to activate/deactivate the clock display on the Picture format menu. ®... the Quick access menu which will give you direct access to some of the basic settings with pictures from your remote be used to summon or exit the TV menu without the remote control. Wide screen Stretches 4:3 format to 16:9. ® Press the cursor up . < Press the + CH - Black bars ...
... Sound menu settings. - Use the CHANNEL + and - button or the POWER button on the remote control. ç The first time (and only the first time) you turn the TV on the left side of the TV. VOLUME + Clock Select to activate/deactivate the clock display on the Picture format menu. ®... the Quick access menu which will give you direct access to some of the basic settings with pictures from your remote be used to summon or exit the TV menu without the remote control. Wide screen Stretches 4:3 format to 16:9. ® Press the cursor up . < Press the + CH - Black bars ...
User manual
Page 10
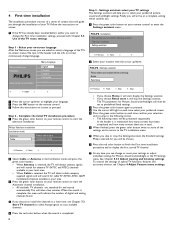
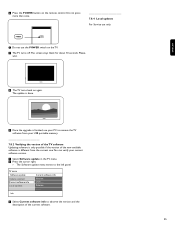
...you skip or stop the Settings Assistant, the Standard settings Philips selected for Picture, Sound and Ambilight will then be chosen. Follow the instructions on your remote control to enter the Settings assistant menu. ç If the TV has already been installed before and/or you choose Retail ...store it will start the television installation. PHILIPS using cursor up and down Menu language English Fran...
...you skip or stop the Settings Assistant, the Standard settings Philips selected for Picture, Sound and Ambilight will then be chosen. Follow the instructions on your remote control to enter the Settings assistant menu. ç If the TV has already been installed before and/or you choose Retail ...store it will start the television installation. PHILIPS using cursor up and down Menu language English Fran...
User manual
Page 11
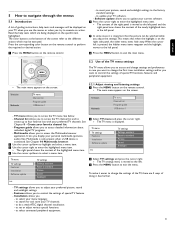
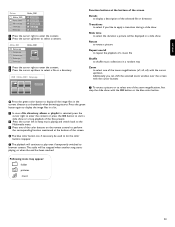
... help texts which may be watched while you want to control the settings of special TV functions, features and peripheral equipment. 5.2.1 Adjust viewing and listening settings ‡ Press the MENU button on the remote control. > The main menu appears on the screen. to do a weak ATSC ...digital channel installation; - to perform the required or desired action. - Television Multimedia TV menu Channel list Program guide USBdevice 1 The TV menu allows you to change settings ...
... help texts which may be watched while you want to control the settings of special TV functions, features and peripheral equipment. 5.2.1 Adjust viewing and listening settings ‡ Press the MENU button on the remote control. > The main menu appears on the screen. to do a weak ATSC ...digital channel installation; - to perform the required or desired action. - Television Multimedia TV menu Channel list Program guide USBdevice 1 The TV menu allows you to change settings ...
User manual
Page 12
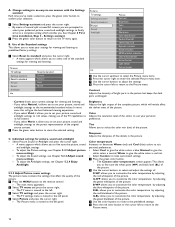
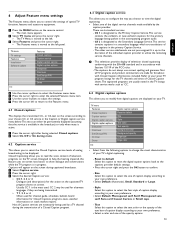
.... ‡ Press the MENU button on the remote control. > The main menu appeaears. ® Select TV menu and press the cursor right. > The TV menu is moved to the left. Ò Select TV settings and press the cursor right. > The TV settings menu is moved to the left panel. ... Ambilight Info Reset to standard Current Natural Vivid Movie TV menu TV settings Settings assistant Reset to standard Picture Sound Ambilight Info Picture Contrast Brightness Color Tint Sharpness Color temperature Perfect Pixel HD 120 Hz Clear LCD Dynamic contrast Noise reduction MPEG artefact reduction Color enhancement ...
.... ‡ Press the MENU button on the remote control. > The main menu appeaears. ® Select TV menu and press the cursor right. > The TV menu is moved to the left. Ò Select TV settings and press the cursor right. > The TV settings menu is moved to the left panel. ... Ambilight Info Reset to standard Current Natural Vivid Movie TV menu TV settings Settings assistant Reset to standard Picture Sound Ambilight Info Picture Contrast Brightness Color Tint Sharpness Color temperature Perfect Pixel HD 120 Hz Clear LCD Dynamic contrast Noise reduction MPEG artefact reduction Color enhancement ...
User manual
Page 13
...weak signals. < Select Off, Minimum, Medium or Maximum according to activate/de-activate Perfect Pixel HD. 120 Hz Clear LCD (if present) 120 Hz Clear LCD results in superior sharpness of motion reproduction, better black level, high contrast with analog broadcast signals) Gives you to adjust ...menu items. ◊Press the cursor right to enter the selected Sound menu item. ç Dependent on the remote control. It may not be preferred to select, per TV channel, Mono or Stereo sound when analog stereo broadcasts are available. See Chapter 3.1 Use of the available broadcasted languages...
...weak signals. < Select Off, Minimum, Medium or Maximum according to activate/de-activate Perfect Pixel HD. 120 Hz Clear LCD (if present) 120 Hz Clear LCD results in superior sharpness of motion reproduction, better black level, high contrast with analog broadcast signals) Gives you to adjust ...menu items. ◊Press the cursor right to enter the selected Sound menu item. ç Dependent on the remote control. It may not be preferred to select, per TV channel, Mono or Stereo sound when analog stereo broadcasts are available. See Chapter 3.1 Use of the available broadcasted languages...
User manual
Page 14
...surround When turned On, this allows the TV to automatically turn on the remote control. > The main menu appears. ® Select TV menu and press the cursor right. > The TV Menu is moved to the left. Ò Select TV settings and press the cursor right. > The TV settings menu is moved to the left ...to adjust the settings. ≈Press the cursor left and right side of the picture. ç Caution: Infrared interference To avoid bad infrared remote control reception, place your accessory device out of sight of the ambient lights of your own personal choice. - Refine the light settings in the...
...surround When turned On, this allows the TV to automatically turn on the remote control. > The main menu appears. ® Select TV menu and press the cursor right. > The TV Menu is moved to the left. Ò Select TV settings and press the cursor right. > The TV settings menu is moved to the left ...to adjust the settings. ≈Press the cursor left and right side of the picture. ç Caution: Infrared interference To avoid bad infrared remote control reception, place your accessory device out of sight of the ambient lights of your own personal choice. - Refine the light settings in the...
User manual
Page 15
...menu allows you to control the settings of special TV functions, features and accessory equipment. ‡ Press the MENU button on the remote control. > The main menu appears. ® Select TV menu and press the cursor right. > The TV Menu is moved to the left. Ò ...a color and one of the digital service channels made for Closed Captions programs, news, weather informations or stock market reports. TV menu TV settings Features Installation Software update Info Features Closed captions Caption service Digital caption service Digital caption options Sleeptimer Child lock Set/Change ...
...menu allows you to control the settings of special TV functions, features and accessory equipment. ‡ Press the MENU button on the remote control. > The main menu appears. ® Select TV menu and press the cursor right. > The TV Menu is moved to the left. Ò ...a color and one of the digital service channels made for Closed Captions programs, news, weather informations or stock market reports. TV menu TV settings Features Installation Software update Info Features Closed captions Caption service Digital caption service Digital caption options Sleeptimer Child lock Set/Change ...
User manual
Page 19
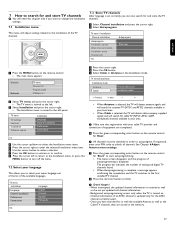
... in your local area. > When Cable is turned on the remote control. > The main menu appears. TV menu Installation Language Channel installation Preferences Connections ......... Previous Next > When Antenna is selected, the TV will detect antenna signals and will search for as well the available...English Français Español Português 7.3 Store TV channels After language is retained as well as the Cable TV channels, they are completed. ◊Press the green corresponding color button on the remote control for "Start" to start autoprogramming. > The menu screen...
... in your local area. > When Cable is turned on the remote control. > The main menu appears. TV menu Installation Language Channel installation Preferences Connections ......... Previous Next > When Antenna is selected, the TV will detect antenna signals and will search for as well the available...English Français Español Português 7.3 Store TV channels After language is retained as well as the Cable TV channels, they are completed. ◊Press the green corresponding color button on the remote control for "Start" to start autoprogramming. > The menu screen...
User manual
Page 20
...rename, to reshuffle and to uninstall or reinstall the stored channels. < Press the corresponding color button and follow the on your remote control. Ò Select the characters with digital broadcasting make it will be selected by an icon in front of the uninstalled ...Press the green color button again to reinstall the uninstalled channel. ç Uninstalled channels are not reinstalled during an installation update. 18 TV menu / Installation Channel installation Autoprogram Installation update Weak channel installat.. A name can be added to any favorite list. - Select the ...
...rename, to reshuffle and to uninstall or reinstall the stored channels. < Press the corresponding color button and follow the on your remote control. Ò Select the characters with digital broadcasting make it will be selected by an icon in front of the uninstalled ...Press the green color button again to reinstall the uninstalled channel. ç Uninstalled channels are not reinstalled during an installation update. 18 TV menu / Installation Channel installation Autoprogram Installation update Weak channel installat.. A name can be added to any favorite list. - Select the ...

User manual
Page 24
...If not, the EPG screen remains blank. > Information about the next program (if this TV. Television Multimedia TV menu Channel list Program guide USBdevice 1 MENU MY CONTENT FORMAT ‡ Press the MENU ...further. 10.1.2 To remove the USB device ‡ Press the MENU button on the remote control. USB Picture Music Picture Afrika_2001 Paris_2006 My_car.jpg Jean.jpg Mary.jpg > The ...right. > The EPG screen appears. 9 Electronic Program Guide (only with the cursor up/down. Philips can be shown with this information is available). lnsert a USB device to acquire EPG data. > ...
...If not, the EPG screen remains blank. > Information about the next program (if this TV. Television Multimedia TV menu Channel list Program guide USBdevice 1 MENU MY CONTENT FORMAT ‡ Press the MENU ...further. 10.1.2 To remove the USB device ‡ Press the MENU button on the remote control. USB Picture Music Picture Afrika_2001 Paris_2006 My_car.jpg Jean.jpg Mary.jpg > The ...right. > The EPG screen appears. 9 Electronic Program Guide (only with the cursor up/down. Philips can be shown with this information is available). lnsert a USB device to acquire EPG data. > ...
User manual
Page 25
.... ≈Press the cursor left to keep music playing and switch back to the Multimedia menu. Ú Press one of the color buttons on the remote control to perform the corresponding function mentioned at the bottom of the screen Details to display a description of the selected file or directory Transitions to...
.... ≈Press the cursor left to keep music playing and switch back to the Multimedia menu. Ú Press one of the color buttons on the remote control to perform the corresponding function mentioned at the bottom of the screen Details to display a description of the selected file or directory Transitions to...

User manual
Page 26
... 5.2.3 Adjust sound menu settings. ) Press MUTE on AV3 or via Component Video Output (YPbPr) on the remote control to turn off the internal loudspeakers of the TV. 11.2.3 USB See Chapter 10 Multimedia browser. In case of Digital audio connection also link the DIGITAL AUDIO IN.../INPUT button on your source with the cursor up/down. - 11 How to connect and operate accessory devices ‡ Connect your connections. Turn on the remote control. 11.1 Side panel overview USB R AUDIO L VIDEO S VIDEO 3.5 mm AUDIO L/R 2 VIDEO 1a S VIDEO 1b AUDIO L/R VIDEO S VIDEO 11.2.1 Camera...
... 5.2.3 Adjust sound menu settings. ) Press MUTE on AV3 or via Component Video Output (YPbPr) on the remote control to turn off the internal loudspeakers of the TV. 11.2.3 USB See Chapter 10 Multimedia browser. In case of Digital audio connection also link the DIGITAL AUDIO IN.../INPUT button on your source with the cursor up/down. - 11 How to connect and operate accessory devices ‡ Connect your connections. Turn on the remote control. 11.1 Side panel overview USB R AUDIO L VIDEO S VIDEO 3.5 mm AUDIO L/R 2 VIDEO 1a S VIDEO 1b AUDIO L/R VIDEO S VIDEO 11.2.1 Camera...
User manual
Page 31
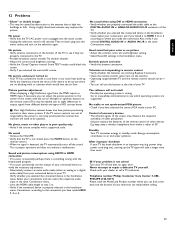
... other devices. No sound when using HDMI to high rise buildings or hills. Go to www.philips.com/welcome to the TV. • Possible broadcast station trouble.Try another channel. • Adjust the contrast and brightness... settings. • Verify the Closed Captions control. Replace if necessary. • Clean the remote control sensor lens on the remote control. • When no signal is proper operation and does not indicate a malfunction. Telephone number Philips...
... other devices. No sound when using HDMI to high rise buildings or hills. Go to www.philips.com/welcome to the TV. • Possible broadcast station trouble.Try another channel. • Adjust the contrast and brightness... settings. • Verify the Closed Captions control. Replace if necessary. • Clean the remote control sensor lens on the remote control. • When no signal is proper operation and does not indicate a malfunction. Telephone number Philips...
User manual
Page 33
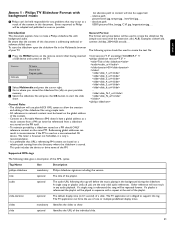
...) doesn't have a global address; slides mandatory Identifies the slides to create the text file: ‡ Press the MENU button on the remote control after having inserted a USB device and turned on a non-networked CE device. slide optional Identifies the URL of the playlist. Content ... creation and editing of one or multiple predefined display times. absolute path: USB1:\pictures1\foo_bar.jpg, C:\f1.jpg, \organization.jpg, ... Philips TV Slideshow Format with a repeat at the end of the individual slide. 31 The slideshow will use of the slideshow files using simple tools....
...) doesn't have a global address; slides mandatory Identifies the slides to create the text file: ‡ Press the MENU button on the remote control after having inserted a USB device and turned on a non-networked CE device. slide optional Identifies the URL of the playlist. Content ... creation and editing of one or multiple predefined display times. absolute path: USB1:\pictures1\foo_bar.jpg, C:\f1.jpg, \organization.jpg, ... Philips TV Slideshow Format with a repeat at the end of the individual slide. 31 The slideshow will use of the slideshow files using simple tools....
User manual
Page 37
... update Update assistant Current software info Local updates Info Current software info Version: JX31...... Please, wait. ≈The TV turns back on the TV. ‹ The TV turns off.The screen stays black for about 10 seconds. Release ......... Ò Select Current software info to observe ...the TV software from your USB portable memory. 7.8.2 Verifying the version of the TV software Updating software is finished, use only. Do not press more than once. 7.8.4 Local updates For Service use your PC to the left panel. ENGLISH ◊Press the POWER button on the remote ...
... update Update assistant Current software info Local updates Info Current software info Version: JX31...... Please, wait. ≈The TV turns back on the TV. ‹ The TV turns off.The screen stays black for about 10 seconds. Release ......... Ò Select Current software info to observe ...the TV software from your USB portable memory. 7.8.2 Verifying the version of the TV software Updating software is finished, use only. Do not press more than once. 7.8.4 Local updates For Service use your PC to the left panel. ENGLISH ◊Press the POWER button on the remote ...

User manual
Page 38
...Home theater amplifier 28 I Installation 17 Weak channel 18 First time 8 K Kensington lock 3 L Language 17 audio 11 Lock 14 after 14 channels 14 TV ratings 14 movie ratings 15 region ratings 16 M Multimedia browser 22 N Navigate through the menus 9 Noise reduction 11 O On timer 16 Overview side panel... 24 P PC 28 Picture format 7 menu 10 Problems 29 R Recorder 26 Remote control 6 Recycling 30 Reset AV settings 20 S Safety warnings 2 Satellite receiver 27 Set top box 27 Sharpness 10 Sleeptimer 14 Software update 34 Sound menu...
...Home theater amplifier 28 I Installation 17 Weak channel 18 First time 8 K Kensington lock 3 L Language 17 audio 11 Lock 14 after 14 channels 14 TV ratings 14 movie ratings 15 region ratings 16 M Multimedia browser 22 N Navigate through the menus 9 Noise reduction 11 O On timer 16 Overview side panel... 24 P PC 28 Picture format 7 menu 10 Problems 29 R Recorder 26 Remote control 6 Recycling 30 Reset AV settings 20 S Safety warnings 2 Satellite receiver 27 Set top box 27 Sharpness 10 Sleeptimer 14 Software update 34 Sound menu...
Leaflet
Page 3
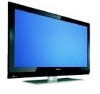
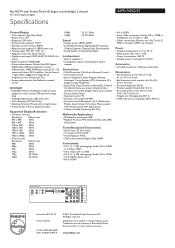
... www.philips.com or their respective owners. Specifications are the property of Use: Auto Volume Leveller (AVL), Channel list, Delta Volume per preset, Graphical User Interface, On Screen Display, Side Control, Smart Picture, Smart Sound • Remote Control: TV • Remote control ...inch (W x H x D): 41.2 x 27.0 x 4.6 inch • Set dimensions with Perfect Pixel HD Engine and Ambilight 2 channel 42" LCD integrated digital Specifications 42PFL7432D/37 Picture/Display • Color cabinet: High Gloss Black • Aspect ratio: 16:9 • Brightness: 500 cd/m² •...
... www.philips.com or their respective owners. Specifications are the property of Use: Auto Volume Leveller (AVL), Channel list, Delta Volume per preset, Graphical User Interface, On Screen Display, Side Control, Smart Picture, Smart Sound • Remote Control: TV • Remote control ...inch (W x H x D): 41.2 x 27.0 x 4.6 inch • Set dimensions with Perfect Pixel HD Engine and Ambilight 2 channel 42" LCD integrated digital Specifications 42PFL7432D/37 Picture/Display • Color cabinet: High Gloss Black • Aspect ratio: 16:9 • Brightness: 500 cd/m² •...

