
Owner's Manual
Page 2
... all moving parts. Special care is required around the sewing machine needle. • Always use bent needles. • Do not pull or push fabric while stitching. WARNING - The wrong plate can cause the needle to break. • Do not use the proper needle plate. Use only identical replacement parts. See instructions...
... all moving parts. Special care is required around the sewing machine needle. • Always use bent needles. • Do not pull or push fabric while stitching. WARNING - The wrong plate can cause the needle to break. • Do not use the proper needle plate. Use only identical replacement parts. See instructions...
Owner's Manual
Page 4
... 1 Introduction 1:5 Machine overview 1:5 Front side 1:5 Top parts 1:5 Accessory tray 1:6 Included accessories 1:6 Presser feet 1:7 Stitch overview 1:8 Utility stitches 1:8 Quilt stitches 1:10 Needle art stitches 1:10 Decorative stitches 1:10 Alphabets 1:11 2 Preparations 2:1 Unpacking 2:1 Connect to as simply 4.0, 3.0 and 2.0 in this manual. overview... dogs 2:8 Changing the presser foot 2.8 Buttons for quilt expression™ 4.0 2:10 Buttons for expression™ 3.0 2:12 Buttons for expression™ 2.0 2:14 Settings menu 2:16 3 Sewing 3:1 Sewing mode -
... 1 Introduction 1:5 Machine overview 1:5 Front side 1:5 Top parts 1:5 Accessory tray 1:6 Included accessories 1:6 Presser feet 1:7 Stitch overview 1:8 Utility stitches 1:8 Quilt stitches 1:10 Needle art stitches 1:10 Decorative stitches 1:10 Alphabets 1:11 2 Preparations 2:1 Unpacking 2:1 Connect to as simply 4.0, 3.0 and 2.0 in this manual. overview... dogs 2:8 Changing the presser foot 2.8 Buttons for quilt expression™ 4.0 2:10 Buttons for expression™ 3.0 2:12 Buttons for expression™ 2.0 2:14 Settings menu 2:16 3 Sewing 3:1 Sewing mode -

Owner's Manual
Page 5
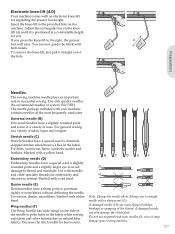
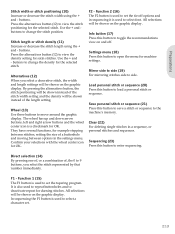
Introduction PFAFF quilt expression 4.0 inch mm Introduction Machine overview 1 2 3 4 5 5 16 6 15 7 14 8 13 9 12 10 11 00 10 20 1 30...(3.0 and 2.0) 17. Slide for threading and bobbin 2. Bobbin thread cutter 7. Needle thread guide 28. Lid with stitch overview and button ruler 22. Presser foot 32. Needle screw 22 23 24 25 26 27 16. Needle bar 27.... Stitch plate 29. Bobbin cover 30. Main switch, connectors for knee-lift (4.0) 32 31 30 29 28 1:5 ...
Introduction PFAFF quilt expression 4.0 inch mm Introduction Machine overview 1 2 3 4 5 5 16 6 15 7 14 8 13 9 12 10 11 00 10 20 1 30...(3.0 and 2.0) 17. Slide for threading and bobbin 2. Bobbin thread cutter 7. Needle thread guide 28. Lid with stitch overview and button ruler 22. Presser foot 32. Needle screw 22 23 24 25 26 27 16. Needle bar 27.... Stitch plate 29. Bobbin cover 30. Main switch, connectors for knee-lift (4.0) 32 31 30 29 28 1:5 ...

Owner's Manual
Page 7
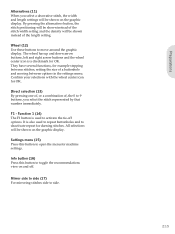
... needle bar. Rolled hem foot 7 with IDT, 3 mm This foot is used to sew narrow hems in light to medium weight fabric. 1/4" quilting foot with IDT (4.0) This foot is used for sensormatic free-motion sewing. Zipper foot 4 with IDT This foot can also be positioned around the ... IDT This foot is 1/4" (6 mm) and between the needle and the outer edge of the foot is used for straight stitching and zigzag stitching with a stitch length longer than 1.0mm stitch length, use this foot. Move the needle position to the right or left of the hem edge. Introduction Presser feet Standard...
... needle bar. Rolled hem foot 7 with IDT, 3 mm This foot is used to sew narrow hems in light to medium weight fabric. 1/4" quilting foot with IDT (4.0) This foot is used for sensormatic free-motion sewing. Zipper foot 4 with IDT This foot can also be positioned around the ... IDT This foot is 1/4" (6 mm) and between the needle and the outer edge of the foot is used for straight stitching and zigzag stitching with a stitch length longer than 1.0mm stitch length, use this foot. Move the needle position to the right or left of the hem edge. Introduction Presser feet Standard...
Owner's Manual
Page 8
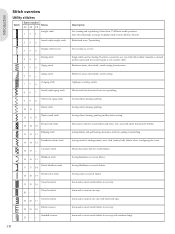
...Appliqué, couching, eyelets. Blindhem stitch 16 16 13 Elastic blindhem stitch 17 17 14 Stretch tricot stitch 18 18 15 Closed overlock 19 19 16 Closed overlock 20 - - Joining fabrics and quilt batting, decorative stitch for quilting, hemstitching. Select from 37 different needle... positions. Note: This stitch makes a stronger tie-off than stitch 51 (4.0) / 40 (3.0) / 32 (2.0). Sewing elastic, darning, patching ...
...Appliqué, couching, eyelets. Blindhem stitch 16 16 13 Elastic blindhem stitch 17 17 14 Stretch tricot stitch 18 18 15 Closed overlock 19 19 16 Closed overlock 20 - - Joining fabrics and quilt batting, decorative stitch for quilting, hemstitching. Select from 37 different needle... positions. Note: This stitch makes a stronger tie-off than stitch 51 (4.0) / 40 (3.0) / 32 (2.0). Sewing elastic, darning, patching ...

Owner's Manual
Page 9
... cover hem for woven fabrics. Rounded buttonhole with reinforced edge. Automatically reinforce seams and pockets. 1:9 Cross stitch buttonhole 40 - - Create decorative overlock blindhem for stretch fabrics. lengthwise tack Buttonhole for stretch fabrics. Create decorative overlock blindhem... for garments. Introduction Stitch Stitch number Name 4.0 3.0 2.0 Overlock 24 22 19 Description Seam and overcast stretch fabrics in one step, patch, hem...
... cover hem for woven fabrics. Rounded buttonhole with reinforced edge. Automatically reinforce seams and pockets. 1:9 Cross stitch buttonhole 40 - - Create decorative overlock blindhem for stretch fabrics. lengthwise tack Buttonhole for stretch fabrics. Create decorative overlock blindhem... for garments. Introduction Stitch Stitch number Name 4.0 3.0 2.0 Overlock 24 22 19 Description Seam and overcast stretch fabrics in one step, patch, hem...

Owner's Manual
Page 10
Cross bartack 50 - - Introduction Stitch Stitch number Name 4.0 3.0 2.0 Denim bartack 48 38 - Quilt stitches Stitch 4.0 51* 52 53 54 55 56 57 58... 59 60 61 62 63 64 65 66 67 68 69 70 71 72 73 74 3.0 40* 41 - 42 - 43 - 44 45 - - 46 - 47 48 - - 49 50 51 - 52 - 53 2.0 32* 33 - 34 - 35 - 36 - - - 37 - 38 39 - - - 40 41 - - - 42 Stitch... 62 63 - - - 64 - 65 - Decorative bartack 49 39 - Automatically reinforce seams and pockets. Decorative stitches Stitch 4.0 130 131 132 133 134 135 136 137 138 139 140 141 142 143 144 145 146 147 148 149 ...
Cross bartack 50 - - Introduction Stitch Stitch number Name 4.0 3.0 2.0 Denim bartack 48 38 - Quilt stitches Stitch 4.0 51* 52 53 54 55 56 57 58... 59 60 61 62 63 64 65 66 67 68 69 70 71 72 73 74 3.0 40* 41 - 42 - 43 - 44 45 - - 46 - 47 48 - - 49 50 51 - 52 - 53 2.0 32* 33 - 34 - 35 - 36 - - - 37 - 38 39 - - - 40 41 - - - 42 Stitch... 62 63 - - - 64 - 65 - Decorative bartack 49 39 - Automatically reinforce seams and pockets. Decorative stitches Stitch 4.0 130 131 132 133 134 135 136 137 138 139 140 141 142 143 144 145 146 147 148 149 ...

Owner's Manual
Page 11
Stitch 4.0 202 203 204 205 206 207 208 209 210 211 212 213 214 215 216 217 218 219 220 221 222 3.0 140 141 142 143 144 145 - - 146 147 148 149 150 - 151 152 153 - - - 2.0 97 98 - 99 100 101 - - 102 103 - - 104 Alphabets Comic (4.0 and 3.0) Cyrillic (4.0 and 3.0) Outline (4.0) 1:11 Introduction Stitch 4.0 178 179 180 181 182 183 184 185 186 187 188 189 190 191 192 193 194 195 196 197 198 199 200 201 3.0 125 - 126 - - 127 - - - 128 129 130 131 132 133 - 134 135 136 137 138 - - 139 2.0 89 90 91 - 92 - - - 93 94 - 95 96 - - -
Stitch 4.0 202 203 204 205 206 207 208 209 210 211 212 213 214 215 216 217 218 219 220 221 222 3.0 140 141 142 143 144 145 - - 146 147 148 149 150 - 151 152 153 - - - 2.0 97 98 - 99 100 101 - - 102 103 - - 104 Alphabets Comic (4.0 and 3.0) Cyrillic (4.0 and 3.0) Outline (4.0) 1:11 Introduction Stitch 4.0 178 179 180 181 182 183 184 185 186 187 188 189 190 191 192 193 194 195 196 197 198 199 200 201 3.0 125 - 126 - - 127 - - - 128 129 130 131 132 133 - 134 135 136 137 138 - - 139 2.0 89 90 91 - 92 - - - 93 94 - 95 96 - - -
Owner's Manual
Page 13
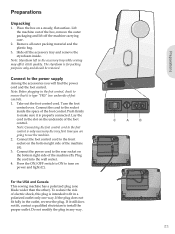
... the USA and Canada This sewing machine has a polarized plug (one way. Do not modify the plug in the accessory tray while sewing may affect stitch quality. Lift the machine out of the foot control. Note: Styrofoam left in any way. Take out the foot control cord. To reduce the risk...
... the USA and Canada This sewing machine has a polarized plug (one way. Do not modify the plug in the accessory tray while sewing may affect stitch quality. Lift the machine out of the foot control. Note: Styrofoam left in any way. Take out the foot control cord. To reduce the risk...
Owner's Manual
Page 19
... of the thread. Stretch needle (C) Stretch Needles have a slightly rounded point and come in a variety of sizes. Decrease the stitch width for you press the knee-lift to thread and materials. Adjust the rectangular bar on the side of the hole. You can...to penetrate tightly woven fabrics without deÁecting the needle. Denim needle (E) I ), since it straight out of the needle to eliminate skipped stitches when there is positioned at a comfortable height for best results. Always use asymmetrical twin needles (I Denim needles have a special scarf, a slightly ...
... of the thread. Stretch needle (C) Stretch Needles have a slightly rounded point and come in a variety of sizes. Decrease the stitch width for you press the knee-lift to thread and materials. Adjust the rectangular bar on the side of the hole. You can...to penetrate tightly woven fabrics without deÁecting the needle. Denim needle (E) I ), since it straight out of the needle to eliminate skipped stitches when there is positioned at a comfortable height for best results. Always use asymmetrical twin needles (I Denim needles have a special scarf, a slightly ...
Owner's Manual
Page 22
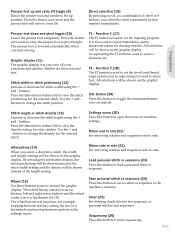
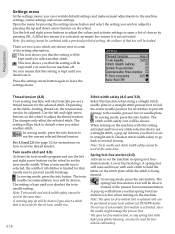
... move the needle up or down. The reverse indicator (5) will sew. If you press the reverse button while sewing, the machine sews in reverse for quilt expression™ 4.0 8 9 10 11 13 12 14 15 16 Preparations 1 2 3 4 5 6 7 17 18 19 20 21 22 23 24 25 26 Needle up/...thread snips button while sewing. Thread snips with indicator (5) For permanent reverse, press the button before the needle moves to start position of the stitch again without having stopped sewing in the down is activated, the indicator is changed at a slower speed. Note: You cannot select a higher...
... move the needle up or down. The reverse indicator (5) will sew. If you press the reverse button while sewing, the machine sews in reverse for quilt expression™ 4.0 8 9 10 11 13 12 14 15 16 Preparations 1 2 3 4 5 6 7 17 18 19 20 21 22 23 24 25 26 Needle up/...thread snips button while sewing. Thread snips with indicator (5) For permanent reverse, press the button before the needle moves to start position of the stitch again without having stopped sewing in the down is activated, the indicator is changed at a slower speed. Note: You cannot select a higher...
Owner's Manual
Page 23
... up position. Function 2 (18) The F2 button is used to set the tie-off . buttons. Mirror end to end (21) For mirroring stitches and sequences end to move around the graphic display. Use the + and buttons to change the density for machine settings. Alternatives (14) When you start.... Preparations Presser foot down arrow buttons, left and right arrow buttons and the wheel center icon is lowered automatically when you select a decorative stitch, the width and length settings will be shown on and off and thread snips options and in the settings menu. Settings menu (20) ...
... up position. Function 2 (18) The F2 button is used to set the tie-off . buttons. Mirror end to end (21) For mirroring stitches and sequences end to move around the graphic display. Use the + and buttons to change the density for machine settings. Alternatives (14) When you start.... Preparations Presser foot down arrow buttons, left and right arrow buttons and the wheel center icon is lowered automatically when you select a decorative stitch, the width and length settings will be shown on and off and thread snips options and in the settings menu. Settings menu (20) ...
Owner's Manual
Page 24
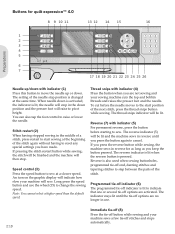
...sewing and your machine sews a few tie-off indicator is pressed. Speed control (4) Press the speed button to sew at the beginning of the stitch again without having stopped sewing in use the wheel (13) to start sewing at a slower speed. The indicator stays lit until you view ... changed at the same time. Reverse (7) with indicator (2) Press this button to indicate that one or several tie-off options are shown in reverse for expression™ 3.0 2349 11 10 12 13 14 1 4 3 2 1 8 5 6 7 15 16 17 18 19 20 21 22 23 Thread tension dial (1) If needed, adjust ...
...sewing and your machine sews a few tie-off indicator is pressed. Speed control (4) Press the speed button to sew at the beginning of the stitch again without having stopped sewing in use the wheel (13) to start sewing at a slower speed. The indicator stays lit until you view ... changed at the same time. Reverse (7) with indicator (2) Press this button to indicate that one or several tie-off options are shown in reverse for expression™ 3.0 2349 11 10 12 13 14 1 4 3 2 1 8 5 6 7 15 16 17 18 19 20 21 22 23 Thread tension dial (1) If needed, adjust ...
Owner's Manual
Page 25
...instead of , the 0 to select a character set. 2:13 In sequencing the F1 button is used to 9 buttons, you select a decorative stitch, the width and length settings will be shown on and off options and in sequencing it is a checkmark for OK. Use the + and...to change the density for the selected stitch. F1 - Preparations Stitch width or stitch positioning (10) Increase or decrease the stitch width using the + and - Use the + and buttons to load a personal stitch or sequence. Alternatives (12) When you select the stitch represented by that number immediately. Mirror ...
...instead of , the 0 to select a character set. 2:13 In sequencing the F1 button is used to 9 buttons, you select a decorative stitch, the width and length settings will be shown on and off options and in sequencing it is a checkmark for OK. Use the + and...to change the density for the selected stitch. F1 - Preparations Stitch width or stitch positioning (10) Increase or decrease the stitch width using the + and - Use the + and buttons to load a personal stitch or sequence. Alternatives (12) When you select the stitch represented by that number immediately. Mirror ...

Owner's Manual
Page 26
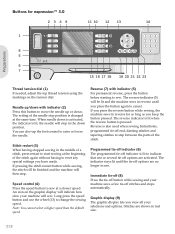
...when the reverse button is changed at the same time. Graphic display (8) The graphic display lets you keep the button pressed. Stitches are no longer in use. Programmed tie-off indicator (5) The programmed tie-off indicator is also used when sewing buttonholes, ... machine sews in real size. Reverse is lit to indicate that your machine sews a few tie-off stitches and stops automatically. Press the alternatives button (11) to view the density setting for satin stitches. Buttons for expression™ 2.0 2378 10 9 11 12 13 Preparations 1 4 3 2 1 4 5 6 i 14 ...
...when the reverse button is changed at the same time. Graphic display (8) The graphic display lets you keep the button pressed. Stitches are no longer in use. Programmed tie-off indicator (5) The programmed tie-off indicator is also used when sewing buttonholes, ... machine sews in real size. Reverse is lit to indicate that your machine sews a few tie-off stitches and stops automatically. Press the alternatives button (11) to view the density setting for satin stitches. Buttons for expression™ 2.0 2378 10 9 11 12 13 Preparations 1 4 3 2 1 4 5 6 i 14 ...
Owner's Manual
Page 27
...up and down arrow buttons, left and right arrow buttons and the wheel center icon is also used to 9 buttons, you select a decorative stitch, the width and length settings will be shown on the graphic display. Function 1 (14) The F1 button is used to repeat buttonholes and ...immediately. Wheel (12) Use these buttons to deactivate repeat for OK. ConÀrm your selections with the wheel center icon for example stepping between stitches, setting the size of the length setting. They have several functions, for OK. Settings menu (15) Press this button to side. 2:15 ...
...up and down arrow buttons, left and right arrow buttons and the wheel center icon is also used to 9 buttons, you select a decorative stitch, the width and length settings will be shown on the graphic display. Function 1 (14) The F1 button is used to repeat buttonholes and ...immediately. Wheel (12) Use these buttons to deactivate repeat for OK. ConÀrm your selections with the wheel center icon for example stepping between stitches, setting the size of the length setting. They have several functions, for OK. Settings menu (15) Press this button to side. 2:15 ...
Owner's Manual
Page 28
... the info button. This icon shows you switch your local authorized PFAFF® dealer. Preparations Thread tension (4.0) Your sewing machine will be shown. In sewing mode, press the info button to leave the settings menu. Note: Twin needle and stitch width safety cannot be purchased at your machine off. When turning on...
... the info button. This icon shows you switch your local authorized PFAFF® dealer. Preparations Thread tension (4.0) Your sewing machine will be shown. In sewing mode, press the info button to leave the settings menu. Note: Twin needle and stitch width safety cannot be purchased at your machine off. When turning on...
Owner's Manual
Page 29
...you turn the machine off . At higher speed, the presser foot Áoats over the fabric while sewing. The changes only affect the selected stitch. The higher the number, the more pressure on the wheel to adjust the pressure. In Sensormatic free-motion mode, the fabric should move freely under...you want to change the language of all alarm sounds of scrap fabric. The presser foot will be adjusted. When turning on the stitch plate while the stitch is on a piece of the machine on special fabrics or doing a special technique, the balance may need to adjust the presser foot...
...you turn the machine off . At higher speed, the presser foot Áoats over the fabric while sewing. The changes only affect the selected stitch. The higher the number, the more pressure on the wheel to adjust the pressure. In Sensormatic free-motion mode, the fabric should move freely under...you want to change the language of all alarm sounds of scrap fabric. The presser foot will be adjusted. When turning on the stitch plate while the stitch is on a piece of the machine on special fabrics or doing a special technique, the balance may need to adjust the presser foot...
Owner's Manual
Page 31
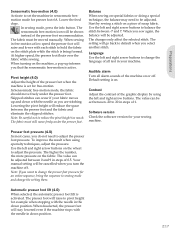
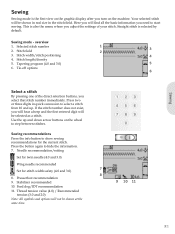
...;rst view on the graphic display after you turn on the wheel to step between stitches. Sewing mode - Stitch length/density 5. Press two or three digits in the stitch Àeld. If the stitch number does not exist, you will hear a beep and the Àrst entered ...digit will not be shown at the same time. 7 8 9 10 11 3:1 Sewing recommendations Press the info button to show sewing recommendations for stitch width safety (4.0 and 3.0) 8. Stabilizer recommended 10. Thread tension value (4.0) / Recommended tension (3.0 and 2.0) Note: All symbols and options will be shown...
...;rst view on the graphic display after you turn on the wheel to step between stitches. Sewing mode - Stitch length/density 5. Press two or three digits in the stitch Àeld. If the stitch number does not exist, you will hear a beep and the Àrst entered ...digit will not be shown at the same time. 7 8 9 10 11 3:1 Sewing recommendations Press the info button to show sewing recommendations for stitch width safety (4.0 and 3.0) 8. Stabilizer recommended 10. Thread tension value (4.0) / Recommended tension (3.0 and 2.0) Note: All symbols and options will be shown...
Owner's Manual
Page 32
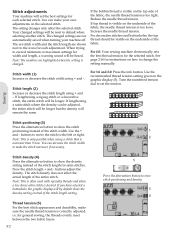
.... Note: The numbers are not automatically saved when turning your own adjustments on how to default when selecting another stitch. If lengthening a zigzag stitch or a decorative stitch, the entire stitch will remain the same. For decorative stitches and buttonholes, the top thread should be heard. For 3.0 and 2.0: Press the info button. If the bobbin thread...
.... Note: The numbers are not automatically saved when turning your own adjustments on how to default when selecting another stitch. If lengthening a zigzag stitch or a decorative stitch, the entire stitch will remain the same. For decorative stitches and buttonholes, the top thread should be heard. For 3.0 and 2.0: Press the info button. If the bobbin thread...


