
Owner's Manual
Page 4
... (4.0 2:7 Needles 2:7 Changing the needle 2:8 Lowering feed dogs 2:8 Changing the presser foot 2.8 Buttons for quilt expression™ 4.0 2:10 Buttons for expression™ 3.0 2:12 Buttons for expression™ 2.0 2:14 Settings menu 2:16 3 Sewing 3:1 Sewing mode - Table of contents 1 Introduction 1:5... program (4.0 and 3.0 3:4 Speed control 3:4 Personal stitches (4.0 and 3.0 3:5 Sewing techniques 3:6 Handlook quilting 3:6 Darning 3:6 Free-motion position (3.0 and 2.0 3:7 Buttonholes 3:7 Common sewing pop-ups 3:9 4 Sequencing (4.0 and 3.0) 4:1 Sequencing -
... (4.0 2:7 Needles 2:7 Changing the needle 2:8 Lowering feed dogs 2:8 Changing the presser foot 2.8 Buttons for quilt expression™ 4.0 2:10 Buttons for expression™ 3.0 2:12 Buttons for expression™ 2.0 2:14 Settings menu 2:16 3 Sewing 3:1 Sewing mode - Table of contents 1 Introduction 1:5... program (4.0 and 3.0 3:4 Speed control 3:4 Personal stitches (4.0 and 3.0 3:5 Sewing techniques 3:6 Handlook quilting 3:6 Darning 3:6 Free-motion position (3.0 and 2.0 3:7 Buttonholes 3:7 Common sewing pop-ups 3:9 4 Sequencing (4.0 and 3.0) 4:1 Sequencing -

Owner's Manual
Page 5
Threading slots winding 3. Sensormatic buttonhole foot socket 24. Light bulbs 25. Bobbin thread guides 6. Needle bar 27. Stitch plate 29. Free arm 31. Presser foot 32. IDT 14. Presser foot ... and foot control 20. Connection for threading and bobbin 2. Pre-tension disk for knee-lift (4.0) 32 31 30 29 28 1:5 Thread tension disk 12. Introduction PFAFF quilt expression 4.0 inch mm Introduction Machine overview 1 2 3 4 5 5 16 6 15 7 14 8 13 9 12 10 11 00 10 20 1 30 40 2 50 17 18 19 20 21 Front side...
Threading slots winding 3. Sensormatic buttonhole foot socket 24. Light bulbs 25. Bobbin thread guides 6. Needle bar 27. Stitch plate 29. Free arm 31. Presser foot 32. IDT 14. Presser foot ... and foot control 20. Connection for threading and bobbin 2. Pre-tension disk for knee-lift (4.0) 32 31 30 29 28 1:5 Thread tension disk 12. Introduction PFAFF quilt expression 4.0 inch mm Introduction Machine overview 1 2 3 4 5 5 16 6 15 7 14 8 13 9 12 10 11 00 10 20 1 30 40 2 50 17 18 19 20 21 Front side...

Owner's Manual
Page 7
...less than 1.0 mm. Rolled hem foot 7 with IDT, 3 mm This foot is used to sew narrow hems in light to medium weight fabric. 1/4" quilting foot with IDT (4.0) This foot is perfect for piecing and patchwork, especially when used in a suitable length to position the garment edge. Zipper foot 4... into the hole at the back of the toe 1/8" (3 mm). Sensormatic free-motion foot 6A (4.0) This foot is used for sewing manual buttonholes. Introduction Presser feet Standard presser foot 0A with IDT (attached on the machine upon delivery) This foot is used mainly for straight stitching and ...
...less than 1.0 mm. Rolled hem foot 7 with IDT, 3 mm This foot is used to sew narrow hems in light to medium weight fabric. 1/4" quilting foot with IDT (4.0) This foot is perfect for piecing and patchwork, especially when used in a suitable length to position the garment edge. Zipper foot 4... into the hole at the back of the toe 1/8" (3 mm). Sensormatic free-motion foot 6A (4.0) This foot is used for sewing manual buttonholes. Introduction Presser feet Standard presser foot 0A with IDT (attached on the machine upon delivery) This foot is used mainly for straight stitching and ...

Owner's Manual
Page 9
... buttonhole or decorative buttonhole. 36 29 - Linen buttonhole 32 25 22 Buttonhole for garments. lengthwise tack Buttonhole for blouses, shirts and linen. Rounded buttonhole 38 31 26 Buttonhole for stretch fabrics. Buttonhole for light garments or jackets. Decorative eyelet buttonhole Decorative buttonhole ...serger cover hem for pillowcases. Create decorative overlock blindhem for blouses, shirts and jackets. Standard buttonhole 33 26 23 Basic buttonhole for woven fabrics. Programmable darning stitch Darning holes or damaged fabric. 45 35 29 Programmable ...
... buttonhole or decorative buttonhole. 36 29 - Linen buttonhole 32 25 22 Buttonhole for garments. lengthwise tack Buttonhole for blouses, shirts and linen. Rounded buttonhole 38 31 26 Buttonhole for stretch fabrics. Buttonhole for light garments or jackets. Decorative eyelet buttonhole Decorative buttonhole ...serger cover hem for pillowcases. Create decorative overlock blindhem for blouses, shirts and jackets. Standard buttonhole 33 26 23 Basic buttonhole for woven fabrics. Programmable darning stitch Darning holes or damaged fabric. 45 35 29 Programmable ...
Owner's Manual
Page 22
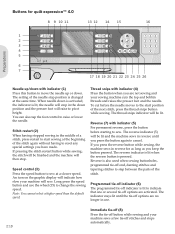
..., press the button before the needle moves to the start sewing at the beginning of the stitch again without having stopped sewing in reverse for quilt expression™ 4.0 8 9 10 11 13 12 14 15 16 Preparations 1 2 3 4 5 6 7 17 18 19 20 21 22 23 24 25 26 Needle up/down with...of the needle stop position is changed at a slower speed. The indicator stays lit until the tie-off indicator is also used when sewing buttonholes, programmed tie-off options are activated. Programmed tie-off indicator (6) The programmed tie-off options are not sewing and your machine will be ...
..., press the button before the needle moves to the start sewing at the beginning of the stitch again without having stopped sewing in reverse for quilt expression™ 4.0 8 9 10 11 13 12 14 15 16 Preparations 1 2 3 4 5 6 7 17 18 19 20 21 22 23 24 25 26 Needle up/down with...of the needle stop position is changed at a slower speed. The indicator stays lit until the tie-off indicator is also used when sewing buttonholes, programmed tie-off options are activated. Programmed tie-off indicator (6) The programmed tie-off options are not sewing and your machine will be ...
Owner's Manual
Page 23
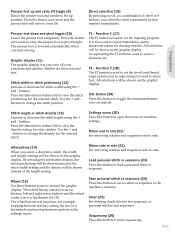
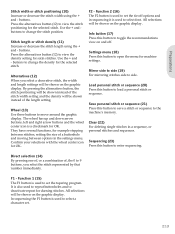
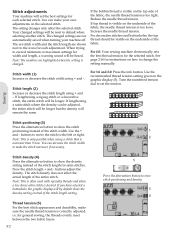
...'s memory. Direct selection (16) By pressing one of, or a combination of, the 0 to extra lift. The presser foot is used to repeat buttonholes and to enter sequencing. 2:11 Graphic display (11) The graphic display lets you start sewing. Stitches are shown in the settings menu. Function 1 (17...the alternatives button, the stitch positioning will be shown instead of the stitch width setting and the density will be shown instead of a buttonhole and moving between options in real size. Mirror side to side (22) For mirroring stitches and sequences side to view the density setting ...
...'s memory. Direct selection (16) By pressing one of, or a combination of, the 0 to extra lift. The presser foot is used to repeat buttonholes and to enter sequencing. 2:11 Graphic display (11) The graphic display lets you start sewing. Stitches are shown in the settings menu. Function 1 (17...the alternatives button, the stitch positioning will be shown instead of the stitch width setting and the density will be shown instead of a buttonhole and moving between options in real size. Mirror side to side (22) For mirroring stitches and sequences side to view the density setting ...
Owner's Manual
Page 24
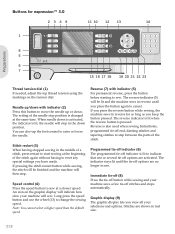
...is lit, the needle will indicate how slow your selections and options. Needle up/down is activated, the indicator is also used when sewing buttonholes, programmed tie-off end, darning stitches and tapering stitches to indicate that one or several tie-off stitches and stops automatically. The setting of ...the stitch. Immediate tie-off (8) Press the tie-off button while sewing and your machine sews a few tie-off options are shown in reverse for expression™ 3.0 2349 11 10 12 13 14 1 4 3 2 1 8 5 6 7 15 16 17 18 19 20 21 22 23 Thread tension dial (1) If needed, adjust...
...is lit, the needle will indicate how slow your selections and options. Needle up/down is activated, the indicator is also used when sewing buttonholes, programmed tie-off end, darning stitches and tapering stitches to indicate that one or several tie-off stitches and stops automatically. The setting of ...the stitch. Immediate tie-off (8) Press the tie-off button while sewing and your machine sews a few tie-off options are shown in reverse for expression™ 3.0 2349 11 10 12 13 14 1 4 3 2 1 8 5 6 7 15 16 17 18 19 20 21 22 23 Thread tension dial (1) If needed, adjust...
Owner's Manual
Page 25
... the graphic display. Settings menu (18) Press this button to open the menu for OK. Function 1 (15) The F1 button is also used to repeat buttonholes and to select font. It is used to deactivate repeat for example stepping between stitches, setting the size of... a buttonhole and moving between options in a sequence, or personal stitches and sequences. The wheel has up and down arrow buttons, left and right arrow buttons and ...
... the graphic display. Settings menu (18) Press this button to open the menu for OK. Function 1 (15) The F1 button is also used to repeat buttonholes and to select font. It is used to deactivate repeat for example stepping between stitches, setting the size of... a buttonhole and moving between options in a sequence, or personal stitches and sequences. The wheel has up and down arrow buttons, left and right arrow buttons and ...

Owner's Manual
Page 26
...time. Immediate tie-off (7) Press the tie-off button while sewing and your machine sews a few tie-off indicator is also used when sewing buttonholes, programmed tie-off options are shown in use. Stitch width or stitch positioning (9) Increase or decrease the stitch width using the + and -... sews in the down is activated, the indicator is set to resume full speed. Press the alternatives button (11) to view the stitch positioning for expression™ 2.0 2378 10 9 11 12 13 Preparations 1 4 3 2 1 4 5 6 i 14 15 16 17 Thread tension dial (1) If needed, adjust the top thread ...
...time. Immediate tie-off (7) Press the tie-off button while sewing and your machine sews a few tie-off indicator is also used when sewing buttonholes, programmed tie-off options are shown in use. Stitch width or stitch positioning (9) Increase or decrease the stitch width using the + and -... sews in the down is activated, the indicator is set to resume full speed. Press the alternatives button (11) to view the stitch positioning for expression™ 2.0 2378 10 9 11 12 13 Preparations 1 4 3 2 1 4 5 6 i 14 15 16 17 Thread tension dial (1) If needed, adjust the top thread ...
Owner's Manual
Page 27
...graphic display. The wheel has up and down arrow buttons, left and right arrow buttons and the wheel center icon is used to repeat buttonholes and to 9 buttons, you select a decorative stitch, the width and length settings will be shown on the graphic display. Direct selection (...13) By pressing one of, or a combination of a buttonhole and moving between stitches, setting the size of , the 0 to deactivate repeat for machine settings. Function 1 (14) The F1 button is a checkmark for...
...graphic display. The wheel has up and down arrow buttons, left and right arrow buttons and the wheel center icon is used to repeat buttonholes and to 9 buttons, you select a decorative stitch, the width and length settings will be shown on the graphic display. Direct selection (...13) By pressing one of, or a combination of a buttonhole and moving between stitches, setting the size of , the 0 to deactivate repeat for machine settings. Function 1 (14) The F1 button is a checkmark for...
Owner's Manual
Page 32
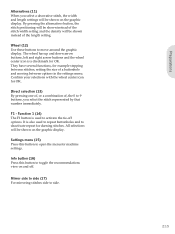
... setting manually. The stitch density does not affect the actual length of the stitch length setting. If you have selected a buttonhole, the graphic display will be reset to exceed minimum or maximum settings for each adjustment. Thread tension (5) For the best stitch... thread tension for instructions on the graphic display (5). Reduce the needle thread tension. Increase the needle thread tension. For decorative stitches and buttonholes, the top thread should be longer. Use the + 1 and - for satin stitches. Sewing Stitch positioning (3) Press the alternatives button...
... setting manually. The stitch density does not affect the actual length of the stitch length setting. If you have selected a buttonhole, the graphic display will be reset to exceed minimum or maximum settings for each adjustment. Thread tension (5) For the best stitch... thread tension for instructions on the graphic display (5). Reduce the needle thread tension. Increase the needle thread tension. For decorative stitches and buttonholes, the top thread should be longer. Use the + 1 and - for satin stitches. Sewing Stitch positioning (3) Press the alternatives button...

Owner's Manual
Page 35
... when you are in load or save button. Select yes or no with the arrow buttons on the wheel. Note: Some special stitches, such as buttonholes, cannot be sewn out. Load personal stitch 1. ConÀrm by using the arrow buttons. Select the stitch you want to verify the deletion. Con...
... when you are in load or save button. Select yes or no with the arrow buttons on the wheel. Note: Some special stitches, such as buttonholes, cannot be sewn out. Load personal stitch 1. ConÀrm by using the arrow buttons. Select the stitch you want to verify the deletion. Con...
Owner's Manual
Page 37
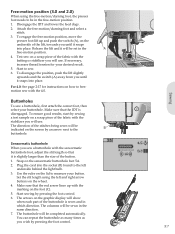
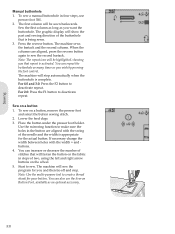
... 2. To ensure good results, start by an arrow next to freemotion sew with the marking on the foot (C). 5. You can repeat the buttonhole as many times as you wish by pressing the foot control. 6. C 3:7 Release the lift and it snaps into place. To disengage the ...button. 1. Attach the free-motion/darning foot and select a stitch. 3. For 4.0: See page 2:17 for your desired result. 5. Sewing Buttonholes To sew a buttonhole, Àrst attach the correct foot, then select your button. Snap on the wheel. 4. The columns will be sewn in the free-motion...
... 2. To ensure good results, start by an arrow next to freemotion sew with the marking on the foot (C). 5. You can repeat the buttonhole as many times as you wish by pressing the foot control. 6. C 3:7 Release the lift and it snaps into place. To disengage the ...button. 1. Attach the free-motion/darning foot and select a stitch. 3. For 4.0: See page 2:17 for your desired result. 5. Sewing Buttonholes To sew a buttonhole, Àrst attach the correct foot, then select your button. Snap on the wheel. 4. The columns will be sewn in the free-motion...
Owner's Manual
Page 38
... foot 5M. 2. You can increase or decrease the number of stitches that will show the part and sewing direction of the buttonhole that repeat is activated. To sew a manual buttonhole in four steps, use the Sew-on the wheel. 5. Sew the Àrst column as long as you want the...to deactivate repeat. When the columns are aligned with the width + and buttons. 4. You can repeat the buttonhole as many times as you wish by pressing the foot control. Sewing Manual buttonhole 1. The graphic display will fasten the button on the fabric in the button are aligned, press the reverse ...
... foot 5M. 2. You can increase or decrease the number of stitches that will show the part and sewing direction of the buttonhole that repeat is activated. To sew a manual buttonhole in four steps, use the Sew-on the wheel. 5. Sew the Àrst column as long as you want the...to deactivate repeat. When the columns are aligned with the width + and buttons. 4. You can repeat the buttonhole as many times as you wish by pressing the foot control. Sewing Manual buttonhole 1. The graphic display will fasten the button on the fabric in the button are aligned, press the reverse ...
Owner's Manual
Page 41
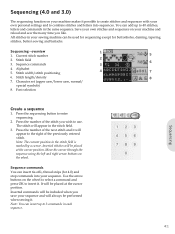
... stitch you wish to use. Stitch Àeld 3. Use the arrow buttons on the wheel. Sequencing - Note: You can insert tie-offs, thread snips (for buttonholes, darning, tapering stitches, button sewing and bartacks. Move the cursor through the sequence using the left and right arrow buttons on the wheel to select...
... stitch you wish to use. Stitch Àeld 3. Use the arrow buttons on the wheel. Sequencing - Note: You can insert tie-offs, thread snips (for buttonholes, darning, tapering stitches, button sewing and bartacks. Move the cursor through the sequence using the left and right arrow buttons on the wheel to select...
Owner's Manual
Page 49
...winding 2:5 Winding from horizontal position 2:5 Winding through the needle 2:5 Button, sew on 3:9 Buttonholes 3:7 Manual buttonhole 3:8 Sensormatic buttonhole 3:8 Buttons expression™ 2.0 2:14-2:15 expression™ 3.0 2:12-2:13 quilt expression™ 4.0 2:10-2:11 C Changing the light bulbs 5:1 Changing the needle 2:8 Changing ... tray 1:6 Front side 1:5 Included accessories 1:6 Presser feet 1:7 Top parts 1:5 Maintenance 5:1 Manual buttonhole 3:8 Mirroring 2:11, 2:13, 2:15, 3:3 N Needle, changing 2:8 Needle art stitches 1:10 Needles 2:7 Needle threader 2:4 Needle up/down 2:...
...winding 2:5 Winding from horizontal position 2:5 Winding through the needle 2:5 Button, sew on 3:9 Buttonholes 3:7 Manual buttonhole 3:8 Sensormatic buttonhole 3:8 Buttons expression™ 2.0 2:14-2:15 expression™ 3.0 2:12-2:13 quilt expression™ 4.0 2:10-2:11 C Changing the light bulbs 5:1 Changing the needle 2:8 Changing ... tray 1:6 Front side 1:5 Included accessories 1:6 Presser feet 1:7 Top parts 1:5 Maintenance 5:1 Manual buttonhole 3:8 Mirroring 2:11, 2:13, 2:15, 3:3 N Needle, changing 2:8 Needle art stitches 1:10 Needles 2:7 Needle threader 2:4 Needle up/down 2:...

Owner's Manual
Page 50
... raise 2:11, 2:17 Program a sequence 4:1 Programmed tie-off indicator...... 2:10, 2:12, 2:14, 3:3 Q Quilt stitches 1:10 Quilting 3:6 R Raise the presser foot 2:11 Replacing the stitch plate 5:2 Reverse button 2:10, 2:12, 2:14 Reverse ...2:11, 2:13, 2:15, 3:1 Sensormatic buttonhole 3:8 Sensormatic buttonhole foot 1:7, 3:7 Sensormatic free-motion 2:17 Sequence commands 4:1 Sequencing 4:1 Settings menu 2:16-2:17 Sewing mode 3:1 Sewing recommendations 3:1 Sewing techniques 3:6 Quilting 3:6 Darning 3:6 Free-motion position 3:7 Buttonhole 3:7 Sew on a button 3:9 Software version ...
... raise 2:11, 2:17 Program a sequence 4:1 Programmed tie-off indicator...... 2:10, 2:12, 2:14, 3:3 Q Quilt stitches 1:10 Quilting 3:6 R Raise the presser foot 2:11 Replacing the stitch plate 5:2 Reverse button 2:10, 2:12, 2:14 Reverse ...2:11, 2:13, 2:15, 3:1 Sensormatic buttonhole 3:8 Sensormatic buttonhole foot 1:7, 3:7 Sensormatic free-motion 2:17 Sequence commands 4:1 Sequencing 4:1 Settings menu 2:16-2:17 Sewing mode 3:1 Sewing recommendations 3:1 Sewing techniques 3:6 Quilting 3:6 Darning 3:6 Free-motion position 3:7 Buttonhole 3:7 Sew on a button 3:9 Software version ...


