
Owner's Manual
Page 5
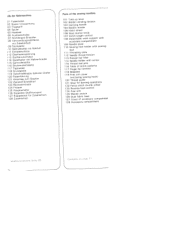
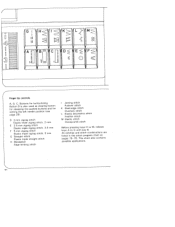
... Bobbin winding tension 103 Carrying handle 104 Bobbin winder 105 Hand wheel 106 Stop motion knob 107 Stitch length control 108 Detachable work support with accessory compartment 109 110 Needle plate Sewing foot holder with sewing foot 111 Threading slots 112 Needle thread tension 11 3 Presser bar lifter 114 Needle holder with screw 11 5 Thread reel pins 116 Table of stitch patterns 11 7 Finger-tip controls 118 Bedplate 11 9 Free arm cover enclosing sewing hook> 1 20 Thread guide 121 Stop for darning operations 1 22 Fancy-stitch thumb wheel 1 23 Reverse-feed control 124 Free arm...
... Bobbin winding tension 103 Carrying handle 104 Bobbin winder 105 Hand wheel 106 Stop motion knob 107 Stitch length control 108 Detachable work support with accessory compartment 109 110 Needle plate Sewing foot holder with sewing foot 111 Threading slots 112 Needle thread tension 11 3 Presser bar lifter 114 Needle holder with screw 11 5 Thread reel pins 116 Table of stitch patterns 11 7 Finger-tip controls 118 Bedplate 11 9 Free arm cover enclosing sewing hook> 1 20 Thread guide 121 Stop for darning operations 1 22 Fancy-stitch thumb wheel 1 23 Reverse-feed control 124 Free arm...

Owner's Manual
Page 7
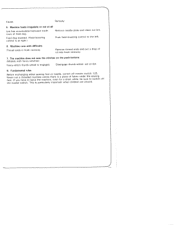
... the needle area, such as threading needle, changing needle, threading bobbin, or changing presser foot, etc. Do not pull or push fabric while stitching. Do not reach for a sewing machine that has fallen into cord reel. Never operate this manual. Do not unplug by the manufacturer only. ANGER To reduce the risk of lint, dust, and loose cloth. Special care is being administered. Always use only. Never drop or insert any...
... the needle area, such as threading needle, changing needle, threading bobbin, or changing presser foot, etc. Do not pull or push fabric while stitching. Do not reach for a sewing machine that has fallen into cord reel. Never operate this manual. Do not unplug by the manufacturer only. ANGER To reduce the risk of lint, dust, and loose cloth. Special care is being administered. Always use only. Never drop or insert any...
Owner's Manual
Page 8
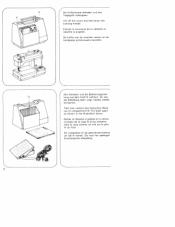
Lift off the cover and fold down the carrying handle. De koffer van de machine nemen en de handgreep achterwaarts kantelen. ) 4 Den Anlasser und die Bedienungsanlei tung aus dem Fach N nehmen. Put back again as shown in the illustration above. ... rabattre ía poignee. So wie die Abbildung oben zeigt, beides wieder einräumen. Take foot control and Instruction Book out of compartment N. Retirer Ia rheostat a pédale et Ia notice d'emploi de Ia case N et les remettre dans Ia case comme on voit sur Ia pho to du haut. Zie voor het opbergen bovenstaande afbeelding...
Lift off the cover and fold down the carrying handle. De koffer van de machine nemen en de handgreep achterwaarts kantelen. ) 4 Den Anlasser und die Bedienungsanlei tung aus dem Fach N nehmen. Put back again as shown in the illustration above. ... rabattre ía poignee. So wie die Abbildung oben zeigt, beides wieder einräumen. Take foot control and Instruction Book out of compartment N. Retirer Ia rheostat a pédale et Ia notice d'emploi de Ia case N et les remettre dans Ia case comme on voit sur Ia pho to du haut. Zie voor het opbergen bovenstaande afbeelding...
Owner's Manual
Page 17
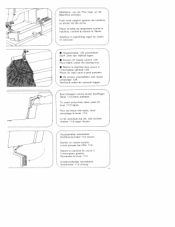
... Pfeil zelgt, an die Maschine schieben, Push work support against the machine, as shown by the arrow. Placer du tissu sous le pied presseur. • De stroom uitschakelen met hoofd schakeiaar 125. Hauptschalter einschalten, Stoffdrückerhebel 11 3 senken. Lower presser bar lifter 11 3. Place fabric under the sewing foot. • Mettre Ia machine hors circuit a I • Hauptschalter 125 ausschalten...
... Pfeil zelgt, an die Maschine schieben, Push work support against the machine, as shown by the arrow. Placer du tissu sous le pied presseur. • De stroom uitschakelen met hoofd schakeiaar 125. Hauptschalter einschalten, Stoffdrückerhebel 11 3 senken. Lower presser bar lifter 11 3. Place fabric under the sewing foot. • Mettre Ia machine hors circuit a I • Hauptschalter 125 ausschalten...
Owner's Manual
Page 21
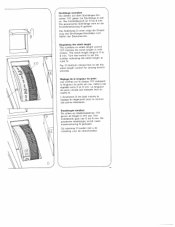
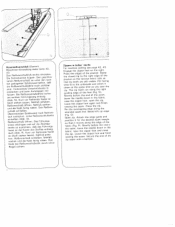
Regulating the stitch length The numbers on stitch length control 107 indicate the stitch length in mm aan. Het instelbereik gaat van 0 tot 6 mm. Die Abbildung 0 unten zeigt die ...set the stitch length control for sewing stretch stitches. Op tekening 0 londer) ziet u de instelling voor de stretchsteken. Der Einsteltbereich st 0 bis 6 mm. Turn the control to set the number indicating the stitch length at mark N. La longueur de point choisie est indiquee face au repére N. Die gewunschte Stichlänge wird an die Einstellmarkierung N gedreht. L'illustration 0 len bas...
Regulating the stitch length The numbers on stitch length control 107 indicate the stitch length in mm aan. Het instelbereik gaat van 0 tot 6 mm. Die Abbildung 0 unten zeigt die ...set the stitch length control for sewing stretch stitches. Op tekening 0 londer) ziet u de instelling voor de stretchsteken. Der Einsteltbereich st 0 bis 6 mm. Turn the control to set the number indicating the stitch length at mark N. La longueur de point choisie est indiquee face au repére N. Die gewunschte Stichlänge wird an die Einstellmarkierung N gedreht. L'illustration 0 len bas...
Owner's Manual
Page 26
...F 5-mm zigzag stitch Elastic triple zigzag stitch, 5 mm G Straight stitch Elastic triple straight stitch H Blindstitch Edge binding stitch I Joining stitch Pullover stitch K Shell-edge stitch Overlock stitch L Elastic decorative stitch Feather stitch M Elastic stitch Honeycomb stitch Before pressing keys H to M, release keys A to G with key B. Buttons for buttonholing Button B is also used as clearing button for releasing the pushed buttons and for setting the left needle position (see page 25). This chart also contains possible applications. All stitches and stitch combinations are listed in...
...F 5-mm zigzag stitch Elastic triple zigzag stitch, 5 mm G Straight stitch Elastic triple straight stitch H Blindstitch Edge binding stitch I Joining stitch Pullover stitch K Shell-edge stitch Overlock stitch L Elastic decorative stitch Feather stitch M Elastic stitch Honeycomb stitch Before pressing keys H to M, release keys A to G with key B. Buttons for buttonholing Button B is also used as clearing button for releasing the pushed buttons and for setting the left needle position (see page 25). This chart also contains possible applications. All stitches and stitch combinations are listed in...
Owner's Manual
Page 30
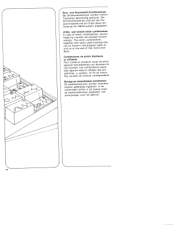
...et utilitaires Pour combiner plusieurs types de point appuyer simultanément sur plusieurs dE ces touches. In de stekentabel achter in the program table as well as at the end of stitch combinations, several finger-tip controls are pressed simulta neously. ... An weisung mit Nähhinweisen angegeben. Utility- and stretch-stitch combinations In case of this Instruction Book. I Nutz- und Stretchstich-Kombinationen Bei Stichkombinationen werden mehrer Tipptasten gleichzeitig gedruckt. The stitch combinations, together with some useful sewing tips, can be found in dit boekje staan de ...
...et utilitaires Pour combiner plusieurs types de point appuyer simultanément sur plusieurs dE ces touches. In de stekentabel achter in the program table as well as at the end of stitch combinations, several finger-tip controls are pressed simulta neously. ... An weisung mit Nähhinweisen angegeben. Utility- and stretch-stitch combinations In case of this Instruction Book. I Nutz- und Stretchstich-Kombinationen Bei Stichkombinationen werden mehrer Tipptasten gleichzeitig gedruckt. The stitch combinations, together with some useful sewing tips, can be found in dit boekje staan de ...
Owner's Manual
Page 39
...in the lid indicates the following: P Needle systems Q The sewing operations for which to use the respective foot R Threading path for standard accessories Open lid 127 of the respective sewing feet and bobbins. o = Normal sewing foot 2 = Clear-view sewing foot 3 = Blind-stitch foot 4= Zipper foot 5= Button-hole sewing foot Needles 0= Bobbins The table in do klep ziet u hot volgende...Les operations de couture correspondant aux divers pieds B = Traiet d'enfilago pour le bobinage )pbergvak voor de accessores )e klep 1 27 your bet opbergvak 1 28 penen. Accessory box for bobbin winding ...
...in the lid indicates the following: P Needle systems Q The sewing operations for which to use the respective foot R Threading path for standard accessories Open lid 127 of the respective sewing feet and bobbins. o = Normal sewing foot 2 = Clear-view sewing foot 3 = Blind-stitch foot 4= Zipper foot 5= Button-hole sewing foot Needles 0= Bobbins The table in do klep ziet u hot volgende...Les operations de couture correspondant aux divers pieds B = Traiet d'enfilago pour le bobinage )pbergvak voor de accessores )e klep 1 27 your bet opbergvak 1 28 penen. Accessory box for bobbin winding ...
Owner's Manual
Page 40
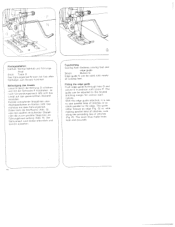
... making parallel lines of stitches, runs along the preceding line of stitches or to stitch parallel to sew parallel lines of stitches Fig RI. j With the edge gumde attached, it n positon eth screj P. 4 Abstepparbeiten \iontuR. Ocr 'iahluerlaut ;aid nmmer ordntl,ch mci korrekt aussehen Topstitching sewing foot: Ordinary sewing foot and edge guide Stitch: Button G Edge guide N can he used with nearly all sewing feet, Fitting the edge guide...
... making parallel lines of stitches, runs along the preceding line of stitches or to stitch parallel to sew parallel lines of stitches Fig RI. j With the edge gumde attached, it n positon eth screj P. 4 Abstepparbeiten \iontuR. Ocr 'iahluerlaut ;aid nmmer ordntl,ch mci korrekt aussehen Topstitching sewing foot: Ordinary sewing foot and edge guide Stitch: Button G Edge guide N can he used with nearly all sewing feet, Fitting the edge guide...
Owner's Manual
Page 44
... the mains cad are coloured according to the terminal which is coloured blue must be connected to the terminal which is used, a 3-ampere fuse has to be connected to the following code: Blue: Neutral Brown: Live As the colours of the wires in the mains lead of this appliance may not correspond... with the colour coding of the terminals in your plug, proceed as follows: the wire which is marked with the letter L or coloured Please note: When a 1 3-ampere plug is ...
... the mains cad are coloured according to the terminal which is coloured blue must be connected to the terminal which is used, a 3-ampere fuse has to be connected to the following code: Blue: Neutral Brown: Live As the colours of the wires in the mains lead of this appliance may not correspond... with the colour coding of the terminals in your plug, proceed as follows: the wire which is marked with the letter L or coloured Please note: When a 1 3-ampere plug is ...
Owner's Manual
Page 52
.... Open zip, Attach the edge guide and position it for the desired seam margin so that its teeth are still visible. Engage the zipper foot on the reverse fabric side so that it down at the same time as you sew the zip The zip teeth run along the right guiding edge of the seam, leave the needle down in the fabric, raise the zipper foot and...
.... Open zip, Attach the edge guide and position it for the desired seam margin so that its teeth are still visible. Engage the zipper foot on the reverse fabric side so that it down at the same time as you sew the zip The zip teeth run along the right guiding edge of the seam, leave the needle down in the fabric, raise the zipper foot and...

Owner's Manual
Page 62
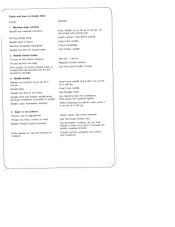
..., workwear, heavy linen, blue jeans and light canvas. silk C Hemstitching point Attractive hemstitching on dressed materials, organdy heavily and glass cambric. Fabric weight: light 6N0eed7le0 size: 75 r Fabric weight medium - Coarse knitted jersey fabrics, fabrics, Qulana Lastex, doubleand Simplex. Narrow twist point Leather, suede, calf and goatskin leathers Narrow wedge point with buttonhole 30/3 synthetic thread. terials, Seams or No.
..., workwear, heavy linen, blue jeans and light canvas. silk C Hemstitching point Attractive hemstitching on dressed materials, organdy heavily and glass cambric. Fabric weight: light 6N0eed7le0 size: 75 r Fabric weight medium - Coarse knitted jersey fabrics, fabrics, Qulana Lastex, doubleand Simplex. Narrow twist point Leather, suede, calf and goatskin leathers Narrow wedge point with buttonhole 30/3 synthetic thread. terials, Seams or No.
Owner's Manual
Page 63
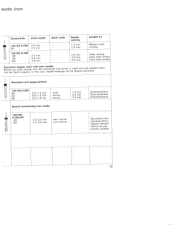
... Decorative hem stitching effect. Stitch length fl 130/705 H-ZWI 2.5 mm 80 2.5 mm 130/705 H-ZWI 80 2.5 mm ç' 90 2.5 mm [30mm Stitch width - - - -- Heavily dressed fabrics are par ticulary suitable. 55 leedle chart System & No. Needle spacing 1.6 mm 2.0 mm 2.5 mm 3.0 mm 4Mmm Suitable for Medium-wide cording Wide cording Extra wide cording Exftawecorng DBineetofcoortrehaetyivofeaubdrsietcasripgtrnossepwesreilnywg.n, Intwutrihtnhistthwweianyh,annnedeeweddlheleeselbraenadkacgheecckantobemalakregesluyreprtehveennteeedd.les stitch Decorative and zigzag patterns...
... Decorative hem stitching effect. Stitch length fl 130/705 H-ZWI 2.5 mm 80 2.5 mm 130/705 H-ZWI 80 2.5 mm ç' 90 2.5 mm [30mm Stitch width - - - -- Heavily dressed fabrics are par ticulary suitable. 55 leedle chart System & No. Needle spacing 1.6 mm 2.0 mm 2.5 mm 3.0 mm 4Mmm Suitable for Medium-wide cording Wide cording Extra wide cording Exftawecorng DBineetofcoortrehaetyivofeaubdrsietcasripgtrnossepwesreilnywg.n, Intwutrihtnhistthwweianyh,annnedeeweddlheleeselbraenadkacgheecckantobemalakregesluyreprtehveennteeedd.les stitch Decorative and zigzag patterns...
Owner's Manual
Page 70
... , its flat shank side facing rear. Needle bent or blunt. Push needle up as far as it will go . 4. Use thicker needle. 2. Poor-quality or knotty thread used . Insert new needle. Bobbin thread wound unevenly. Insert system 130/705 H needle. Let machine feed the workpiece. Only guide the material lightly. Seam is pushed or pulled. Use only good quality thread. 3. Needle bent and strikes needle plate because workpiece is not uniform Tension out of adjustment. Kinks...
... , its flat shank side facing rear. Needle bent or blunt. Push needle up as far as it will go . 4. Use thicker needle. 2. Poor-quality or knotty thread used . Insert new needle. Bobbin thread wound unevenly. Insert system 130/705 H needle. Let machine feed the workpiece. Only guide the material lightly. Seam is pushed or pulled. Use only good quality thread. 3. Needle bent and strikes needle plate because workpiece is not uniform Tension out of adjustment. Kinks...
Owner's Manual
Page 71
Disengage thumb-wheel: set at right.( Remove needle plate and clean Out lint. Push feed-lowering control to the left. 6. Machine runs with fancy stitches( Fancy-stitch thumb-wheel is at dot. 8. Cause: Remedy: 5. Machine feeds irregularly or not at all Lint has accumulated between tooth rows of oil into hook raceway. 7. Feed dog lowered. (Feed-lowering control is engaged. Remove thread ends and put a drop of feed dog. Fundamental rules BNtfhoeeeofvto.emrreIafrseuytxneocruhaashtwnhagirvtieecnahgdt.oeedTilthehmiaesvraeicsshtephiwnaeerintmiugcnaucllfeaohrsoilsnyteto,...
Disengage thumb-wheel: set at right.( Remove needle plate and clean Out lint. Push feed-lowering control to the left. 6. Machine runs with fancy stitches( Fancy-stitch thumb-wheel is at dot. 8. Cause: Remedy: 5. Machine feeds irregularly or not at all Lint has accumulated between tooth rows of oil into hook raceway. 7. Feed dog lowered. (Feed-lowering control is engaged. Remove thread ends and put a drop of feed dog. Fundamental rules BNtfhoeeeofvto.emrreIafrseuytxneocruhaashtwnhagirvtieecnahgdt.oeedTilthehmiaesvraeicsshtephiwnaeerintmiugcnaucllfeaohrsoilsnyteto,...
Owner's Manual
Page 78
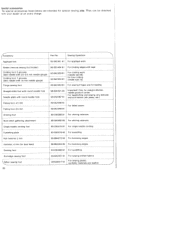
... special accessories listed below are intended for straight stitches, needle position center. Sewing Operation Appliqué foot 93-042941-91 For appliqué work Binder (remove sewing foot holder) 98-053484-91 For binding edges with tape Cording foot, 5 grooves (twin needle with 2.0-25 mm needle gauge) j 9342 950 91 Cording foot, 7 grooves (twin needle with 1.6 mm needle gauge) 9304295391 Fringe sewing foot 93-042943-91 For cording work (needle size 80, for fine cording needle size 70) For sewing fringes and for basting Straight-stitch foot with round needle hole Needle plate...
... special accessories listed below are intended for straight stitches, needle position center. Sewing Operation Appliqué foot 93-042941-91 For appliqué work Binder (remove sewing foot holder) 98-053484-91 For binding edges with tape Cording foot, 5 grooves (twin needle with 2.0-25 mm needle gauge) j 9342 950 91 Cording foot, 7 grooves (twin needle with 1.6 mm needle gauge) 9304295391 Fringe sewing foot 93-042943-91 For cording work (needle size 80, for fine cording needle size 70) For sewing fringes and for basting Straight-stitch foot with round needle hole Needle plate...
Owner's Manual
Page 79
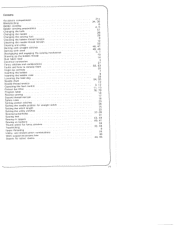
... the sewing mechanism Drawing up the bobbin thread Dual fabric feed Electrical connection Fancy stitches and combinations Faults and how to remedy them Finger-tip controls Inserting the bobbin Inserting the bobbin case Lowering the feed dog Needle chart Needle thread tension Operating the foot control Presser bar lifter Program table Reverse sewing Second thread reel pin Safety rules Setting stretch stitches Setting the needle position for straight stitch Setting the stitch length Setting the utility stitches Sewing buttonholes Sewing feet Sewing in zippers Sewing on buttons Thumb wheel...
... the sewing mechanism Drawing up the bobbin thread Dual fabric feed Electrical connection Fancy stitches and combinations Faults and how to remedy them Finger-tip controls Inserting the bobbin Inserting the bobbin case Lowering the feed dog Needle chart Needle thread tension Operating the foot control Presser bar lifter Program table Reverse sewing Second thread reel pin Safety rules Setting stretch stitches Setting the needle position for straight stitch Setting the stitch length Setting the utility stitches Sewing buttonholes Sewing feet Sewing in zippers Sewing on buttons Thumb wheel...

Owner's Manual
Page 86
... the the lower half, the buttons marked stretch", turn the stitch to be regulated. C) 05 06 Ii -III - -III - FC,) Nr. Seams exposed to sew this seam pattern. Sewing on elastic threads or covering seams on elastic fabrics. Stitch program chart Listed in programs I1LUi A 02 III II I I cD cI cI GH I 03 /- \ /- Stitch 01 Buttonholes 02 Straight stitch 03 Z.gzag sti.ch , Elastic triple 04 straight stitch Elastic triple 05 zigzag stich 06 Elastic stitch 07 Honeycomb stitch 08...
... the the lower half, the buttons marked stretch", turn the stitch to be regulated. C) 05 06 Ii -III - -III - FC,) Nr. Seams exposed to sew this seam pattern. Sewing on elastic threads or covering seams on elastic fabrics. Stitch program chart Listed in programs I1LUi A 02 III II I I cD cI cI GH I 03 /- \ /- Stitch 01 Buttonholes 02 Straight stitch 03 Z.gzag sti.ch , Elastic triple 04 straight stitch Elastic triple 05 zigzag stich 06 Elastic stitch 07 Honeycomb stitch 08...
Owner's Manual
Page 87
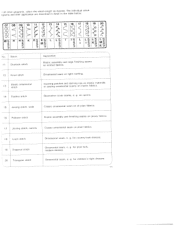
Stitch - 11 Overlock stitch Application .--- Elastic ornamental 13 stitch Inserting patches and darning rips on elastic materials or sewing ornamentai seams on aprons. 15 Joining stitch. Ornamental seam, e. C) I -+ C) C) - 0 I I :- 18 19 20 NJ •.-..ii Xi /' NJ li ' X Al "I A' '-I -J Lr--J1 r- -.(J 17 r M - g. on e 1 astic fabrics. 14 Feather stitch Decorative cover seams, e. for countrylook dresses. - - ---- --------.. 19 Diagonal stitch Ornamental seam, a. m -' ' 16 -I , X ISKM. Elastic assembly and edge finishing seams on knitted ...
Stitch - 11 Overlock stitch Application .--- Elastic ornamental 13 stitch Inserting patches and darning rips on elastic materials or sewing ornamentai seams on aprons. 15 Joining stitch. Ornamental seam, e. C) I -+ C) C) - 0 I I :- 18 19 20 NJ •.-..ii Xi /' NJ li ' X Al "I A' '-I -J Lr--J1 r- -.(J 17 r M - g. on e 1 astic fabrics. 14 Feather stitch Decorative cover seams, e. for countrylook dresses. - - ---- --------.. 19 Diagonal stitch Ornamental seam, a. m -' ' 16 -I , X ISKM. Elastic assembly and edge finishing seams on knitted ...


