
Owner's Manual
Page 2
... to the nearest authorised dealer or service center for its intended use the proper needle plate. This household sewing machine is being used by the manufacturer as threading needle, changing needle, threading bobbin, or changing presser foot, etc. • Always unplug the sewing machine from the electrical outlet when removing covers, lubricating, or when making any air openings blocked. Return the sewing machine to break. • Switch the sewing machine off ("0") position, then remove plug from outlet. • Do...
... to the nearest authorised dealer or service center for its intended use the proper needle plate. This household sewing machine is being used by the manufacturer as threading needle, changing needle, threading bobbin, or changing presser foot, etc. • Always unplug the sewing machine from the electrical outlet when removing covers, lubricating, or when making any air openings blocked. Return the sewing machine to break. • Switch the sewing machine off ("0") position, then remove plug from outlet. • Do...
Owner's Manual
Page 4
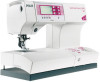
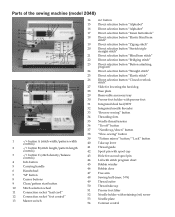
...selection button "Straight stitch" Direct selection button "Elastic stitch" Direct selection button "Closed overlock stitch" Slide for lowering the feed dog Base plate Removable accessory tray Presser foot holder with presser foot Integrated dual feed/IDT Integrated needle threader "Reverse sewing" button Threading slots Needle thread tension "Tie-off" button "Needle up/down" button "Slow sewing" button "Pattern mirror" button/ "Lock" button Take-up lever Thread guide Spool pin with spool cap Hole for second spool pin Lid with stitch program chart Bobbin winder Bobbin door Free arm Sewing bulb...
...selection button "Straight stitch" Direct selection button "Elastic stitch" Direct selection button "Closed overlock stitch" Slide for lowering the feed dog Base plate Removable accessory tray Presser foot holder with presser foot Integrated dual feed/IDT Integrated needle threader "Reverse sewing" button Threading slots Needle thread tension "Tie-off" button "Needle up/down" button "Slow sewing" button "Pattern mirror" button/ "Lock" button Take-up lever Thread guide Spool pin with spool cap Hole for second spool pin Lid with stitch program chart Bobbin winder Bobbin door Free arm Sewing bulb...

Owner's Manual
Page 5
...selection button "Straight stitch" Direct selection button "Elastic stitch" Direct selection button "Closed overlock stitch" Slide for lowering the feed dog Base plate Removable accessory tray Presser foot holder with presser foot Integrated dual feed/IDT Integrated needle threader "Reverse sewing" button Threading slots Needle thread tension "Tie-off" button "Needle up/down" button "Slow sewing" button "Pattern mirror" button/ "Lock" button Take-up lever Thread guide Spool pin with spool cap Hole for second spool pin Lid with stitch program chart Bobbin winder Bobbin door Free arm Sewing bulb...
...selection button "Straight stitch" Direct selection button "Elastic stitch" Direct selection button "Closed overlock stitch" Slide for lowering the feed dog Base plate Removable accessory tray Presser foot holder with presser foot Integrated dual feed/IDT Integrated needle threader "Reverse sewing" button Threading slots Needle thread tension "Tie-off" button "Needle up/down" button "Slow sewing" button "Pattern mirror" button/ "Lock" button Take-up lever Thread guide Spool pin with spool cap Hole for second spool pin Lid with stitch program chart Bobbin winder Bobbin door Free arm Sewing bulb...

Owner's Manual
Page 8
...foot lifter Thread cutter Changing the presser feet Winding a bobbin through the needle Changing needles Threading twin needle Integrated Dual Feed/IDT Lowering feed dog Altering stitches 3. Sewing Adjusting the contrast in the expression window Stitch selection 1:2 1:4 1:6 1:8 2:1 2:1 2:2 2:2 2:3 2:4-5 2:6-7 2:8 2:9 2:10 2:10 2:10 2:11 2:12 2:13 2:13 2:14 2:15 2:16 3:1 3:1 Altering the stitch width/needle position 3:2 Altering the pattern width/stitch length 3:2-3 Bobbin thread monitor (model 2048) 3:3 Altering the pattern length/stitch density 3:3 Balance 3:3 Info button/reverse...
...foot lifter Thread cutter Changing the presser feet Winding a bobbin through the needle Changing needles Threading twin needle Integrated Dual Feed/IDT Lowering feed dog Altering stitches 3. Sewing Adjusting the contrast in the expression window Stitch selection 1:2 1:4 1:6 1:8 2:1 2:1 2:2 2:2 2:3 2:4-5 2:6-7 2:8 2:9 2:10 2:10 2:10 2:11 2:12 2:13 2:13 2:14 2:15 2:16 3:1 3:1 Altering the stitch width/needle position 3:2 Altering the pattern width/stitch length 3:2-3 Bobbin thread monitor (model 2048) 3:3 Altering the pattern length/stitch density 3:3 Balance 3:3 Info button/reverse...

Owner's Manual
Page 10
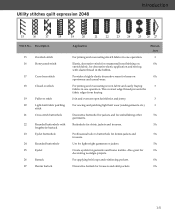
... linen. 5A 0 Button attaching For two-hole or four-hole buttons. 2A program 10 Basting stitch For basting project pieces together. 1A 11 Zigzag stitch Right/ For applique, couching over cords and creating eyelets. 1A Left needle position 12 Lightning stretch stitch For joining light weight stretch fabrics and decorative embellishment. 1A 13 Decorative elastic For joining overlapped seams on stretch fabrics. 3 stitch 7 Closed overlock stitch For hemming and overlapping stretch fabrics in zippers. 2 Stretch triple straight For reinforced seams such as leathers...
... linen. 5A 0 Button attaching For two-hole or four-hole buttons. 2A program 10 Basting stitch For basting project pieces together. 1A 11 Zigzag stitch Right/ For applique, couching over cords and creating eyelets. 1A Left needle position 12 Lightning stretch stitch For joining light weight stretch fabrics and decorative embellishment. 1A 13 Decorative elastic For joining overlapped seams on stretch fabrics. 3 stitch 7 Closed overlock stitch For hemming and overlapping stretch fabrics in zippers. 2 Stretch triple straight For reinforced seams such as leathers...
Owner's Manual
Page 11
... 15 Overlock stitch 16 Honeycomb stitch 17 Cross hem stitch 18 Closed overlock 19 Pullover stitch 20 Light-knit fabric patching stitch 21 Cross stitch buttonhole 22 Rounded buttonhole with elastic thread in one operation. Provides a highly elastic decorative seam for garments and home textiles. Use for ligthweight garments or jackets. 5A Create eyelets for hems on 0A stretch fabric, for decorative elastic application and sewing with lengthwise bartack 23 Eyelet buttonhole 24 Rounded buttonhole 25...
... 15 Overlock stitch 16 Honeycomb stitch 17 Cross hem stitch 18 Closed overlock 19 Pullover stitch 20 Light-knit fabric patching stitch 21 Cross stitch buttonhole 22 Rounded buttonhole with elastic thread in one operation. Provides a highly elastic decorative seam for garments and home textiles. Use for ligthweight garments or jackets. 5A Create eyelets for hems on 0A stretch fabric, for decorative elastic application and sewing with lengthwise bartack 23 Eyelet buttonhole 24 Rounded buttonhole 25...

Owner's Manual
Page 12
... buttonhole Buttonhole for blouses, shirts and linen. 5A 0 Button attaching program For two-hole or four-hole buttons. 2A 10 Basting stitch For basting project pieces together. 1A 11 Zigzag stitch Right/Left For applique, couching over cords and creating eyelets. 1A needle position 12 Lightning stretch stitch For joining light weight stretch fabrics and decorative 1A embellishment 13 Decorative elastic stitch For joining overlapped seams on stretch 3 fabrics. 7 Closed overlock stitch For hemming and overlapping stretch fabrics in zippers. 2 Stretch triple straight...
... buttonhole Buttonhole for blouses, shirts and linen. 5A 0 Button attaching program For two-hole or four-hole buttons. 2A 10 Basting stitch For basting project pieces together. 1A 11 Zigzag stitch Right/Left For applique, couching over cords and creating eyelets. 1A needle position 12 Lightning stretch stitch For joining light weight stretch fabrics and decorative 1A embellishment 13 Decorative elastic stitch For joining overlapped seams on stretch 3 fabrics. 7 Closed overlock stitch For hemming and overlapping stretch fabrics in zippers. 2 Stretch triple straight...

Owner's Manual
Page 33
This setting can be changed for different lighting situations. With the selection wheel (selection buttons, model 2038): for the selection of selecting your desired stitch: 1. Sewing Stitch selection on model 2048 Stitch selection on model 2038 Sewing Adjusting the contrast on the bobbin, the bobbin symbol appears in the case of model 2038) and continue to scroll you will return to stitch No. 0. 2. The stitch number appears in the stitches. Stitch selection There are...
This setting can be changed for different lighting situations. With the selection wheel (selection buttons, model 2038): for the selection of selecting your desired stitch: 1. Sewing Stitch selection on model 2048 Stitch selection on model 2038 Sewing Adjusting the contrast on the bobbin, the bobbin symbol appears in the case of model 2038) and continue to scroll you will return to stitch No. 0. 2. The stitch number appears in the stitches. Stitch selection There are...

Owner's Manual
Page 36
... you press the button again • manual finish of a buttonhole (see page 3:19) • programming the buttonhole • determines the length of the info menu. Reverse sewing This button has several functions: • when pressed, will reverse sew • for permanent reverse press this button before starting to sew, the machine sews in reverse until you the following information: needle size/type recommendation, needle thread tension setting, to receive information about the selected stitch.
... you press the button again • manual finish of a buttonhole (see page 3:19) • programming the buttonhole • determines the length of the info menu. Reverse sewing This button has several functions: • when pressed, will reverse sew • for permanent reverse press this button before starting to sew, the machine sews in reverse until you the following information: needle size/type recommendation, needle thread tension setting, to receive information about the selected stitch.

Owner's Manual
Page 43
... points. Sewing in zippers. Change the needle position of a collar. When you press the foot control, the machine will insert your pattern for each stitch. • Lower the feed dog and disengage the IDT. • Place the fabric under the presser foot. • Sew one stitch at a time. Use stitch 1, stitch length 6 mm. 3:11 Basting stitch - 10 With stitch 10 you can be snapped to the left. Straight stitch - 1 Stitch 1 is important to sew close to baste with the -/+ button "A". The stitch length can baste a garment...
... points. Sewing in zippers. Change the needle position of a collar. When you press the foot control, the machine will insert your pattern for each stitch. • Lower the feed dog and disengage the IDT. • Place the fabric under the presser foot. • Sew one stitch at a time. Use stitch 1, stitch length 6 mm. 3:11 Basting stitch - 10 With stitch 10 you can be snapped to the left. Straight stitch - 1 Stitch 1 is important to sew close to baste with the -/+ button "A". The stitch length can baste a garment...

Owner's Manual
Page 45
... the right swing of the needle clears the raw edge of the fabric and the pin of overlock stitches. Closed overlock stitch - 7 This stitch is suitable for sewing a hem on the right side of fabric and overcast them in one operation. Sewing Overlock stitches For elastic, knits, woven and stretch fabrics, the 2038 and 2048 provides a selection of the presser foot. Adjust the stitch width and guide of the foot to sew a fabric that do not fray...
... the right swing of the needle clears the raw edge of the fabric and the pin of overlock stitches. Closed overlock stitch - 7 This stitch is suitable for sewing a hem on the right side of fabric and overcast them in one operation. Sewing Overlock stitches For elastic, knits, woven and stretch fabrics, the 2038 and 2048 provides a selection of the presser foot. Adjust the stitch width and guide of the foot to sew a fabric that do not fray...

Owner's Manual
Page 47
... hem stitch - 17 This highly elastic stitch is available in the small hole at the beginning and end of the seam. • Sew 1 or 2 more rows of stitching, using the edge of the needle plate. To obtain neat and even gathers you should sew two or three rows of the fabric. Lower needle thread tension to gather sleeves, cuffs, skirts or valances. Tip: To make guiding the fabric easier, use a strong thread when gathering to...
... hem stitch - 17 This highly elastic stitch is available in the small hole at the beginning and end of the seam. • Sew 1 or 2 more rows of stitching, using the edge of the needle plate. To obtain neat and even gathers you should sew two or three rows of the fabric. Lower needle thread tension to gather sleeves, cuffs, skirts or valances. Tip: To make guiding the fabric easier, use a strong thread when gathering to...

Owner's Manual
Page 52
... the clamp with a straight pin. Warning: The presser foot must not be sewn. Cut off the gimp threads just behind the final bartack. Use pearl cotton or a regular gimp thread approximately the same color as the sewing thread to stitch over the metal bar extending from the fabric surface. Place the center of a length of gimp thread over . Sew the right-hand seam of the buttonhole foot. Carefully sew...
... the clamp with a straight pin. Warning: The presser foot must not be sewn. Cut off the gimp threads just behind the final bartack. Use pearl cotton or a regular gimp thread approximately the same color as the sewing thread to stitch over the metal bar extending from the fabric surface. Place the center of a length of gimp thread over . Sew the right-hand seam of the buttonhole foot. Carefully sew...

Owner's Manual
Page 54
... stitches. Test sew to ensure balanced stitching before starting from the middle of your Pfaff expression, e.g. Quilting 4. A seam allowance of fabric for the back. The seam allowance of material are usually pressed towards the darker fabric side. Baste the completed quilt top to hold the quilt together, it into cushions, wearable art or other smaller projects. This stitching will help keep the quilt in the bobbin. Tip: Change to make...
... stitches. Test sew to ensure balanced stitching before starting from the middle of your Pfaff expression, e.g. Quilting 4. A seam allowance of fabric for the back. The seam allowance of material are usually pressed towards the darker fabric side. Baste the completed quilt top to hold the quilt together, it into cushions, wearable art or other smaller projects. This stitching will help keep the quilt in the bobbin. Tip: Change to make...

Owner's Manual
Page 55
... a quilt is lowered you have started to keep the stitches even. Set your quilt as explained in the Stitch-in -the-Ditch method. Prepare your expression for model 2038). Adjust your stitch placement so that your bobbin thread. When the feed dog is another to hold the quilt top, batting and back together. The Quilting table and Free-motion guide foot are extra accessories created to produce the desired effect. In order to sew...
... a quilt is lowered you have started to keep the stitches even. Set your quilt as explained in the Stitch-in -the-Ditch method. Prepare your expression for model 2038). Adjust your stitch placement so that your bobbin thread. When the feed dog is another to hold the quilt top, batting and back together. The Quilting table and Free-motion guide foot are extra accessories created to produce the desired effect. In order to sew...

Owner's Manual
Page 58
... be embroidered. Decorative sewing/Specialty techniques Free-motion monograms Use stitch 3 (adjust stitch width and stitch length) to create wonderful monogram initials of the fabric. Free-motion embroidery These striking embroidery designs can use both stitch No. 3 and stitch No. 11 for free-motion monograms to embroider the corners of your fabric. Follow the instructions and tips for automatic tapering. The taper will dissolve in the expression window and beside it into the darning position. If needle down function is selected the machine...
... be embroidered. Decorative sewing/Specialty techniques Free-motion monograms Use stitch 3 (adjust stitch width and stitch length) to create wonderful monogram initials of the fabric. Free-motion embroidery These striking embroidery designs can use both stitch No. 3 and stitch No. 11 for free-motion monograms to embroider the corners of your fabric. Follow the instructions and tips for automatic tapering. The taper will dissolve in the expression window and beside it into the darning position. If needle down function is selected the machine...

Owner's Manual
Page 61
... holder as far as shown in a clockwise direction. Bulbs can now be purchased from the machine. • Remove the accessory tray. Cleaning Switch off the main switch. Remove the bulb changer from the bulb, the bulb is located inside the sewing machine near the needle threader. Important: The maximum wattage of operation. Removal • Raise the presser foot. Tip: Lower the feed dog to make removing the needle plate easier. Clean the feed dog and hook area with a soft, lint-free...
... holder as far as shown in a clockwise direction. Bulbs can now be purchased from the machine. • Remove the accessory tray. Cleaning Switch off the main switch. Remove the bulb changer from the bulb, the bulb is located inside the sewing machine near the needle threader. Important: The maximum wattage of operation. Removal • Raise the presser foot. Tip: Lower the feed dog to make removing the needle plate easier. Clean the feed dog and hook area with a soft, lint-free...

Owner's Manual
Page 62
... . Thread tension is too small for thread. Needle breaks off Needle is bent. Needle is not pushed fully in. Only guide the fabric lightly. The seam is not properly inserted. Check needle thread tension. Make sure thread is pulled solidly into the stop. Check bobbin threading path. Maintenance Sewing problems and their solutions Problem/Cause The machine skips stitches The needle is sewn unevenly The tension needs adjusting. Wrong needle is threaded. Check how the machine is in it fully into bobbin tension spring. Thread is...
... . Thread tension is too small for thread. Needle breaks off Needle is bent. Needle is not pushed fully in. Only guide the fabric lightly. The seam is not properly inserted. Check needle thread tension. Make sure thread is pulled solidly into the stop. Check bobbin threading path. Maintenance Sewing problems and their solutions Problem/Cause The machine skips stitches The needle is sewn unevenly The tension needs adjusting. Wrong needle is threaded. Check how the machine is in it fully into bobbin tension spring. Thread is...

Owner's Manual
Page 63
... . Set the contrast using the contrast control. Remove the threads. Before changing presser feet and needle the main switch must appear again on again after approx. 10 seconds. Feed dog is illegible or dark). Slide A is at the left or slide B is important if there are thread remnants in the hook ways. The needle plate is being discharged some segments of non-original accessories or parts. 6:3 Press...
... . Set the contrast using the contrast control. Remove the threads. Before changing presser feet and needle the main switch must appear again on again after approx. 10 seconds. Feed dog is illegible or dark). Slide A is at the left or slide B is important if there are thread remnants in the hook ways. The needle plate is being discharged some segments of non-original accessories or parts. 6:3 Press...

Owner's Manual
Page 64
... stitches Altering the pattern length/stitch density Altering the pattern width/stitch length Altering the stitch width/needle position Antique Quilt Stitches Attaching the buttonhole foot Automatic tapering B Balance Bobbin case Bobbin thread monitor (model 2048) Bobbin winding Bridging stitches Buttonholes with gimp thread Buttons for the stitch sequence C Carrying case Changing a pattern within a sequence Changing needles Changing the light bulb Changing the needle plate Changing the presser feet Cleaning Cross hem stitches Cross-stitch D Darning Decorative stitches Deleting a stitch...
... stitches Altering the pattern length/stitch density Altering the pattern width/stitch length Altering the stitch width/needle position Antique Quilt Stitches Attaching the buttonhole foot Automatic tapering B Balance Bobbin case Bobbin thread monitor (model 2048) Bobbin winding Bridging stitches Buttonholes with gimp thread Buttons for the stitch sequence C Carrying case Changing a pattern within a sequence Changing needles Changing the light bulb Changing the needle plate Changing the presser feet Cleaning Cross hem stitches Cross-stitch D Darning Decorative stitches Deleting a stitch...


