
Owner's Manual
Page 4
...) 2:9 Electronic knee-lift 2:9 Needles 2:10 Changing the needle 2:11 Lowering feed dogs 2:11 Changing the presser foot 2:11 USB ports 2:12 Connect machine to computer 2:12 4D™ Embroidery Software 2:13 Installing your machine 2:14 Buttons and icons 2:15 3 PFAFF® HD screen 3:1 Task bar 3:2 Use the task bar 3:3 Common icons 3:3 Selection menu...
...) 2:9 Electronic knee-lift 2:9 Needles 2:10 Changing the needle 2:11 Lowering feed dogs 2:11 Changing the presser foot 2:11 USB ports 2:12 Connect machine to computer 2:12 4D™ Embroidery Software 2:13 Installing your machine 2:14 Buttons and icons 2:15 3 PFAFF® HD screen 3:1 Task bar 3:2 Use the task bar 3:3 Common icons 3:3 Selection menu...

Owner's Manual
Page 10
... (360x200) 72 74 Included accessories not in picture • Foot control • Power cord 73 • USB cord (P/N:412 62 59-04) • Needles • 4D™ Embroidery Machine Communication CD • creative vision™ Embroidery collection 1:10 Seam ripper 64. Brush 65. Spool cap, small 68. creative™ Master Hoop (240x150) 74. Introduction Parts of...
... (360x200) 72 74 Included accessories not in picture • Foot control • Power cord 73 • USB cord (P/N:412 62 59-04) • Needles • 4D™ Embroidery Machine Communication CD • creative vision™ Embroidery collection 1:10 Seam ripper 64. Brush 65. Spool cap, small 68. creative™ Master Hoop (240x150) 74. Introduction Parts of...

Owner's Manual
Page 11
...sew close to both sides of the zipper teeth. Rolled hem foot with IDT, 3mm This foot is used for blindhem stitches. The groove on the foot to position the garment edge. Embroidery/Sensormatic free-motion foot This foot is used to sew narrow hems in a suitable length to zipper... teeth. Maxi-stitch foot This foot is used for side-motion stitches. Fancy stitch foot with IDT This foot is used for decorative ...
...sew close to both sides of the zipper teeth. Rolled hem foot with IDT, 3mm This foot is used for blindhem stitches. The groove on the foot to position the garment edge. Embroidery/Sensormatic free-motion foot This foot is used to sew narrow hems in a suitable length to zipper... teeth. Maxi-stitch foot This foot is used for side-motion stitches. Fancy stitch foot with IDT This foot is used for decorative ...

Owner's Manual
Page 29
... (Integrated dual feed) For sewing any fabric precisely PFAFF® creative vision™ sewing and embroidery machine provides the ideal solution: the integrated dual feed, IDT system. The material is positioned at the same time. Raise the presser foot. Pull the IDT down until it engages. Insert the...2:9 Preparations To remove the knee-lift, just pull it away from the top and bottom at a comfortable height for regulating the presser foot height. You can now guide the fabric with two fingers at side must face upwards. As on the machine. Engaging the IDT...
... (Integrated dual feed) For sewing any fabric precisely PFAFF® creative vision™ sewing and embroidery machine provides the ideal solution: the integrated dual feed, IDT system. The material is positioned at the same time. Raise the presser foot. Pull the IDT down until it engages. Insert the...2:9 Preparations To remove the knee-lift, just pull it away from the top and bottom at a comfortable height for regulating the presser foot height. You can now guide the fabric with two fingers at side must face upwards. As on the machine. Engaging the IDT...
Owner's Manual
Page 35
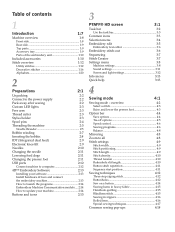
... press it easier to stop the machine without using the foot control. Thread snips (G) Press to sew. If pressing this button to start sewing. Thread snips performed by the machine can be programmed, see chapter 4. In embroidery mode the threads are cut automatically at the color change.... Immediate tie-off (H) Press immediate tie-off while sewing and your machine sews a few tie-off the thread, cuts the needle and bobbin threads and raises the presser foot and the needle. Tie-off...
... press it easier to stop the machine without using the foot control. Thread snips (G) Press to sew. If pressing this button to start sewing. Thread snips performed by the machine can be programmed, see chapter 4. In embroidery mode the threads are cut automatically at the color change.... Immediate tie-off (H) Press immediate tie-off while sewing and your machine sews a few tie-off the thread, cuts the needle and bobbin threads and raises the presser foot and the needle. Tie-off...

Owner's Manual
Page 36
... to raise or lower the needle. Needle up/down (J) Press this button to move the needle up or down position and the presser foot will stop in the middle of a stitch, press restart to the beginning of the needle stop . When needle down is activated, the icon is changed ... special settings you have made. You can also use stitch restart to go back to start sewing at the same time. The setting of an embroidery. If pressing the stitch restart button while sewing, the stitch will be finished and the machine will then stop position is lit, the needle...
... to raise or lower the needle. Needle up/down (J) Press this button to move the needle up or down position and the presser foot will stop in the middle of a stitch, press restart to the beginning of the needle stop . When needle down is activated, the icon is changed ... special settings you have made. You can also use stitch restart to go back to start sewing at the same time. The setting of an embroidery. If pressing the stitch restart button while sewing, the stitch will be finished and the machine will then stop position is lit, the needle...

Owner's Manual
Page 45
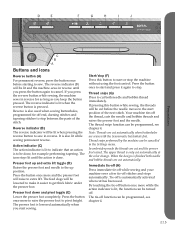
... you start embroidering again, so that needs to reset the timer. Automatic presser foot lift When selected, the automatic presser foot lift is selected, the machine will be done a pop-up to Embroidery stitch-out. AutoSave current state When AutoSave current state is activated. Timer Displays ...easily remove the thread end when cut the thread after switching the machine off. The defragmentation can take up message appears. ABC 3:9 Pfaff HD screen Note: If AutoSave current state is selected it can take longer to go to do a defragmentation. Defragment machine memory ...
... you start embroidering again, so that needs to reset the timer. Automatic presser foot lift When selected, the automatic presser foot lift is selected, the machine will be done a pop-up to Embroidery stitch-out. AutoSave current state When AutoSave current state is activated. Timer Displays ...easily remove the thread end when cut the thread after switching the machine off. The defragmentation can take up message appears. ABC 3:9 Pfaff HD screen Note: If AutoSave current state is selected it can take longer to go to do a defragmentation. Defragment machine memory ...
Owner's Manual
Page 46
... number the more pressure on the underside of the presser foot in embroidery stitch-out mode. Some embroideries may require an adjustment. The fabric must still move freely under the presser foot. A spring foot will form loops on the fabric. Specialty techniques may build up . Pfaff HD screen Sensormatic free-motion Activate to set the machine...
... number the more pressure on the underside of the presser foot in embroidery stitch-out mode. Some embroideries may require an adjustment. The fabric must still move freely under the presser foot. A spring foot will form loops on the fabric. Specialty techniques may build up . Pfaff HD screen Sensormatic free-motion Activate to set the machine...

Owner's Manual
Page 70
...left corner (1). Sequencing - Mirroring side to personal files 16. Note: If sewing mode is active and your programmed stitch is in embroidery mode. Delete 6. Directional stitches 18. Stitch field 5. To open, just touch the sequencing symbol on the task bar again. overview...You can also be inserted in a sequence. Width/position toggle 13. Stitch length 14. To close the active function by pressing the foot control, or by pressing the start/stop c) cut 17. Zoom to all stitches are creating and adjusting a sequence of sequence 2. Stitches...
...left corner (1). Sequencing - Mirroring side to personal files 16. Note: If sewing mode is active and your programmed stitch is in embroidery mode. Delete 6. Directional stitches 18. Stitch field 5. To open, just touch the sequencing symbol on the task bar again. overview...You can also be inserted in a sequence. Width/position toggle 13. Stitch length 14. To close the active function by pressing the foot control, or by pressing the start/stop c) cut 17. Zoom to all stitches are creating and adjusting a sequence of sequence 2. Stitches...

Owner's Manual
Page 72
This is inserted and it and an icon will be added into the sequence. Note: If creating a sequence in embroidery mode, tie-offs at the end of the sequence if you program them. 15a 15b 15 16a 16b 16c 16 Sequencing 5:4 Insert the thread snips ... the cursor to tie-off . Use the tie-off command (16a) if you want a secure tie-off and cut the threads and raise the presser foot. This confirms that the command is useful for example at the beginning and end will be added automatically, allowing you to stop. Sequence...
This is inserted and it and an icon will be added into the sequence. Note: If creating a sequence in embroidery mode, tie-offs at the end of the sequence if you program them. 15a 15b 15 16a 16b 16c 16 Sequencing 5:4 Insert the thread snips ... the cursor to tie-off . Use the tie-off command (16a) if you want a secure tie-off and cut the threads and raise the presser foot. This confirms that the command is useful for example at the beginning and end will be added automatically, allowing you to stop. Sequence...

Owner's Manual
Page 76
...Stitch Creator. pan 15. Save options a) Save to personal menu b) Save to side 8. To close the active function by pressing the foot control, or by pressing the start/stop button. Either create a stitch of that stitch. Stitch selection area 2. move and combine stitches directly...function - Some stitches cannot be stored in your personal menu or in personal files. If you . 6:2 You can also insert a built-in embroidery mode. Scroll bar (Scroll through stitch categories) 3. Multi-select 12. The width of these stitches, a pop-up to end 9. Triple stitch 10....
...Stitch Creator. pan 15. Save options a) Save to personal menu b) Save to side 8. To close the active function by pressing the foot control, or by pressing the start/stop button. Either create a stitch of that stitch. Stitch selection area 2. move and combine stitches directly...function - Some stitches cannot be stored in your personal menu or in personal files. If you . 6:2 You can also insert a built-in embroidery mode. Scroll bar (Scroll through stitch categories) 3. Multi-select 12. The width of these stitches, a pop-up to end 9. Triple stitch 10....
Owner's Manual
Page 83
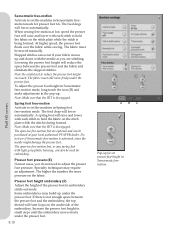
...3. The suggested thread colors for each time you to calibrate the machine with the embroidery hoop attached as this can damage the needle, presser foot, hoop and/or the embroidery unit. Slide the accessory tray off , turn it plugs firmly into anything...from around the machine before calibrating so that the machine and embroidery unit are shown. Preparations creative vision™ Embroidery collection Page through the creative vision™ Embroidery collection for positioning. The cover will set your embroidery functions each color number are even. If the machine is...
...3. The suggested thread colors for each time you to calibrate the machine with the embroidery hoop attached as this can damage the needle, presser foot, hoop and/or the embroidery unit. Slide the accessory tray off , turn it plugs firmly into anything...from around the machine before calibrating so that the machine and embroidery unit are shown. Preparations creative vision™ Embroidery collection Page through the creative vision™ Embroidery collection for positioning. The cover will set your embroidery functions each color number are even. If the machine is...

Owner's Manual
Page 85
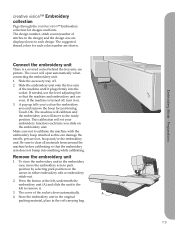
... in the color list (C). B A C B 7:5 Open selection menu (A) to embroidery stitch-out by touching the embroidery toggle icon (B) on the hoop. 3. The design is disengaged. 2. Embroidery Mode - Preparations 4. Touch it once to load to embroidery edit. The machine automatically switches to embroidery edit. After attaching the embroidery unit and embroidery foot, insert a bobbin with the first color in...
... in the color list (C). B A C B 7:5 Open selection menu (A) to embroidery stitch-out by touching the embroidery toggle icon (B) on the hoop. 3. The design is disengaged. 2. Embroidery Mode - Preparations 4. Touch it once to load to embroidery edit. The machine automatically switches to embroidery edit. After attaching the embroidery unit and embroidery foot, insert a bobbin with the first color in...
Owner's Manual
Page 86
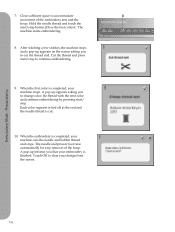
... is tied off at the end and the needle thread is finished. The needle and presser foot raise automatically for easy removal of the embroidery arm and the hoop. Embroidery Mode - Re-thread with the next color and continue embroidering by pressing start /stop to continue embroidering.... 9. When the embroidery is completed, your embroidery is cut the thread end. Clear sufficient space to cut . 10. A pop-up appears asking you to accommodate D movement...
... is tied off at the end and the needle thread is finished. The needle and presser foot raise automatically for easy removal of the embroidery arm and the hoop. Embroidery Mode - Re-thread with the next color and continue embroidering by pressing start /stop to continue embroidering.... 9. When the embroidery is completed, your embroidery is cut the thread end. Clear sufficient space to cut . 10. A pop-up appears asking you to accommodate D movement...

Owner's Manual
Page 121
...get easier access to remove the hoop, otherwise the hoop or the embroidery unit may be reminded to the machine does not match the size displayed on the embroidery presser foot 6A. Press the start/stop button or the foot control. Re-thread the needle thread, close the pop-up . ...Start embroidering again by pressing the start embroidering again. 9:11 Embroidery mode - Note: It is attached, a popup asks...
...get easier access to remove the hoop, otherwise the hoop or the embroidery unit may be reminded to the machine does not match the size displayed on the embroidery presser foot 6A. Press the start/stop button or the foot control. Re-thread the needle thread, close the pop-up . ...Start embroidering again by pressing the start embroidering again. 9:11 Embroidery mode - Note: It is attached, a popup asks...

Owner's Manual
Page 132
...the back (C). The dust and lint will be blown into your machine with the knob fitting into the bobbin case area. Wipe the PFAFF® HD screen with a soft dry cloth. Clean with the accessories. Press the stitch plate down until it up and extra lift. ...design/project. Clean the feed dogs with the brush found with the brush. Remove the bobbin case (B) by pressing presser foot up . Note: When using the optional accessory PFAFF® Embroidery Cutwork Needles, it is needed. C Replacing the stitch plate With feed dogs lowered, place the stitch plate with a ...
...the back (C). The dust and lint will be blown into your machine with the knob fitting into the bobbin case area. Wipe the PFAFF® HD screen with a soft dry cloth. Clean with the accessories. Press the stitch plate down until it up and extra lift. ...design/project. Clean the feed dogs with the brush found with the brush. Remove the bobbin case (B) by pressing presser foot up . Note: When using the optional accessory PFAFF® Embroidery Cutwork Needles, it is needed. C Replacing the stitch plate With feed dogs lowered, place the stitch plate with a ...
Owner's Manual
Page 133
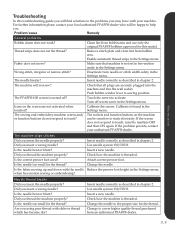
...purchased from bobbin area. For further information please contact your authorized PFAFF® dealer. If the problem persists, contact your local authorized PFAFF® dealer who will be sensitive to static electricity. Attach correct presser foot. Needle thread breaks Did you insert a wrong needle? Change ...machine. Maintenance Troubleshooting In this model. Thread snips does not cut the thread? Check that machine is threaded. The sewing and embroidery machine screen and/ or function buttons do not respond to touch, turn the machine OFF and then ON again. Did you ...
...purchased from bobbin area. For further information please contact your authorized PFAFF® dealer. If the problem persists, contact your local authorized PFAFF® dealer who will be sensitive to static electricity. Attach correct presser foot. Needle thread breaks Did you insert a wrong needle? Change ...machine. Maintenance Troubleshooting In this model. Thread snips does not cut the thread? Check that machine is threaded. The sewing and embroidery machine screen and/ or function buttons do not respond to touch, turn the machine OFF and then ON again. Did you ...
Owner's Manual
Page 134
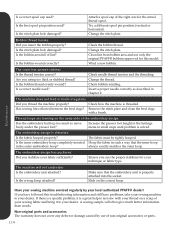
... sewing lint collected between the feed dogs? Increase the presser foot height in the Settings menu in the outer embroidery hoop? Hoop the fabric in chapter 2. The machine will often give much to your local authorized PFAFF® dealer! Non-original parts and accessories The warranty does...your technique or fabric type. Slide on the underside of the embroidery design Has the embroidery built up too much better information than words. Maintenance Have your sewing machine serviced regularly by use only the original PFAFF® bobbins approved for the actual thread spool. Is the...
... sewing lint collected between the feed dogs? Increase the presser foot height in the Settings menu in the outer embroidery hoop? Hoop the fabric in chapter 2. The machine will often give much to your local authorized PFAFF® dealer! Non-original parts and accessories The warranty does...your technique or fabric type. Slide on the underside of the embroidery design Has the embroidery built up too much better information than words. Maintenance Have your sewing machine serviced regularly by use only the original PFAFF® bobbins approved for the actual thread spool. Is the...
Owner's Manual
Page 135
... 2:4 Available disk space low 10:7 Available memory 10:3 B Background color 8:9, 9:6 Background fabric 8:9, 9:6 Balance 4:8 Basting 9:5 Beading foot 3:8 Blindhem stitch 4:15 Bobbin empty 4:18, 9:11 Bobbin position 9:7 Bobbin thread breaks 11:4 Bobbin winding 2:7 Browse Files & Folders ... or folder 10:6 Could not delete file or folder 10:7 Create a new folder 10:6 Create a sequence 5:3 creative vision™ Embroidery collection 7:3 Crosshair 9:3 Current position 9:7 Current stitch 9:4 Custom LED lights 2:3 Cut jump stitches 3:9 Cut position 9:7 Cut thread...
... 2:4 Available disk space low 10:7 Available memory 10:3 B Background color 8:9, 9:6 Background fabric 8:9, 9:6 Balance 4:8 Basting 9:5 Beading foot 3:8 Blindhem stitch 4:15 Bobbin empty 4:18, 9:11 Bobbin position 9:7 Bobbin thread breaks 11:4 Bobbin winding 2:7 Browse Files & Folders ... or folder 10:6 Could not delete file or folder 10:7 Create a new folder 10:6 Create a sequence 5:3 creative vision™ Embroidery collection 7:3 Crosshair 9:3 Current position 9:7 Current stitch 9:4 Custom LED lights 2:3 Cut jump stitches 3:9 Cut position 9:7 Cut thread...
Owner's Manual
Page 137
...:3 Personal info 3:13 Personal menu 3:4 PFAFF® HD screen 3:2 Position of the marked stitch point 6:5 Precise positioning 9:8 Presser feet 1:11 Presser foot down and pivot toggle 2:15 Presser foot height embroidery 3:10 Presser foot pressure 3:10 Presser foot up and extra lift toggle 2:15 ...Q Quick help 3:13 R Raise and lower the presser foot 4:3 Rear side 1:9 Register immediately for ...
...:3 Personal info 3:13 Personal menu 3:4 PFAFF® HD screen 3:2 Position of the marked stitch point 6:5 Precise positioning 9:8 Presser feet 1:11 Presser foot down and pivot toggle 2:15 Presser foot height embroidery 3:10 Presser foot pressure 3:10 Presser foot up and extra lift toggle 2:15 ...Q Quick help 3:13 R Raise and lower the presser foot 4:3 Rear side 1:9 Register immediately for ...


