
Owner's Manual
Page 2
... any damage caused. To stubborn dirt, use a dry, clean and soft cloth which the user can repair. This is disturbed, - t- When leaving the machine, during work or when changing mechanical parts or accessories, always disconnect the machine from the mains by a Pfaff mechanic. 5. Please Note! 9. Dproodnuoct...,amgnidhteci-i.reqse;unIcatiottlsitihstsyusouanubllmidjgeachbcttehe, dine static electricity, heat-producing objects, corrosive chemicals or liquids. with alcohol or paraffin. 8. Do not use only original PFAFF parts.
... any damage caused. To stubborn dirt, use a dry, clean and soft cloth which the user can repair. This is disturbed, - t- When leaving the machine, during work or when changing mechanical parts or accessories, always disconnect the machine from the mains by a Pfaff mechanic. 5. Please Note! 9. Dproodnuoct...,amgnidhteci-i.reqse;unIcatiottlsitihstsyusouanubllmidjgeachbcttehe, dine static electricity, heat-producing objects, corrosive chemicals or liquids. with alcohol or paraffin. 8. Do not use only original PFAFF parts.
Owner's Manual
Page 5
....iiottnshtpgaouecsrrshilezoymdef, detibhfnydeittesoharalesr !IIIjIiI ]I DANGER 'l i1 1. 2. 3. 4. into a tub or sink. When you use an electric C.) Ci'- I I 111116178190112.3.45..6...7.....DTDNDAKDDSonAoomHeoleoweowvldeonanewneiplkniaondotdrosacyiotoltfcynthesotitpuosog,nupluutspnpguchneuesuasenegherpnenelrraeloalpysawutscnbtuolteehgutaeogetrhwegwntoietowpbhnunitnfpayunserghyornedrsgaorperwhonefurpuasrmoewbeillseooflnerllearfimiausdgacnntbr.cnenlogdrshestmriaeniuec,oilnoentlnrrastrgndvwfeehoocmaielrhlhlcecicdoseoniiieo(falnlvntpfsteerodgioepsdlsn(aiur".s.cngafota0tcoeryigf"dThotUfrp...
....iiottnshtpgaouecsrrshilezoymdef, detibhfnydeittesoharalesr !IIIjIiI ]I DANGER 'l i1 1. 2. 3. 4. into a tub or sink. When you use an electric C.) Ci'- I I 111116178190112.3.45..6...7.....DTDNDAKDDSonAoomHeoleoweowvldeonanewneiplkniaondotdrosacyiotoltfcynthesotitpuosog,nupluutspnpguchneuesuasenegherpnenelrraeloalpysawutscnbtuolteehgutaeogetrhwegwntoietowpbhnunitnfpayunserghyornedrsgaorperwhonefurpuasrmoewbeillseooflnerllearfimiausdgacnntbr.cnenlogdrshestmriaeniuec,oilnoentlnrrastrgndvwfeehoocmaielrhlhlcecicdoseoniiieo(falnlvntpfsteerodgioepsdlsn(aiur".s.cngafota0tcoeryigf"dThotUfrp...
Owner's Manual
Page 6
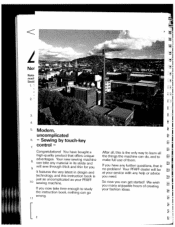
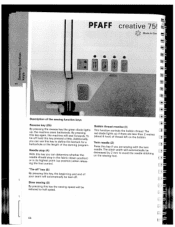
... any material in desgin and technology, and this is the only way to learn all , this instruction book is no problem! Your PFAFF dealer will sew through thick and thin for you. Your new sewing machine can take time enough to ra K make full... use of creating your PFAFF sewing machine. Sewing by touch-key 7. control - Ii p. Congratulations! Modern, uncomplicated 6. - ii El -I 2 a 9 Nol K Note maci Secti I 1. 1 II I I El 1I K After all the...
... any material in desgin and technology, and this is the only way to learn all , this instruction book is no problem! Your PFAFF dealer will sew through thick and thin for you. Your new sewing machine can take time enough to ra K make full... use of creating your PFAFF sewing machine. Sewing by touch-key 7. control - Ii p. Congratulations! Modern, uncomplicated 6. - ii El -I 2 a 9 Nol K Note maci Secti I 1. 1 II I I El 1I K After all the...
Owner's Manual
Page 7
... follows: may The wire which is coloured brown must be used , but disposed of this appliance as approved by ASTA according or with the letter N - For The The ...the letter L - f -R Blue: Neutral J! or coloured black. II1 - or coloured red. Cut-off mains plugs are available from electrical suppliers or the PFAFF agencies. - must be used without fuse cover. Please also observe the general safety notes on the fold out page. 0 I Lfl) tfl C L 11 N Safety rules 'I !! Only...
... follows: may The wire which is coloured brown must be used , but disposed of this appliance as approved by ASTA according or with the letter N - For The The ...the letter L - f -R Blue: Neutral J! or coloured black. II1 - or coloured red. Cut-off mains plugs are available from electrical suppliers or the PFAFF agencies. - must be used without fuse cover. Please also observe the general safety notes on the fold out page. 0 I Lfl) tfl C L 11 N Safety rules 'I !! Only...
Owner's Manual
Page 9
... programs/Summary Engaging the Dual Feed Entering the pattern number Eyelet embroidery Eyelet embroidery, pattern examples Fading in the Creative Designer j Inserting zippers Inserting zippers concealed on both sides "K"key Keyhole buttonholes Keyhole buttonholes with gimp thread Knit... 65 121 174 1 74 1 20 163 163 1 63 1 63 5 Language selection Letter combinations (letter sequence) Letter selection using the "Creative Designer Linen buttonhole Linen embroidery Linen embroidery example - Info as operating aid - Gathering foot Gathering with elastic threads Gathering with corners ...
... programs/Summary Engaging the Dual Feed Entering the pattern number Eyelet embroidery Eyelet embroidery, pattern examples Fading in the Creative Designer j Inserting zippers Inserting zippers concealed on both sides "K"key Keyhole buttonholes Keyhole buttonholes with gimp thread Knit... 65 121 174 1 74 1 20 163 163 1 63 1 63 5 Language selection Letter combinations (letter sequence) Letter selection using the "Creative Designer Linen buttonhole Linen embroidery Linen embroidery example - Info as operating aid - Gathering foot Gathering with elastic threads Gathering with corners ...
Owner's Manual
Page 12
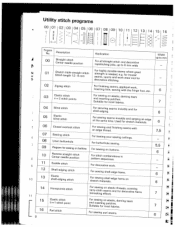
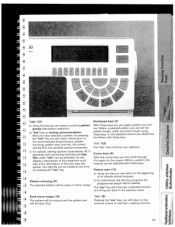
... decorative topstitching jobs, up to 6 mm wide N rr 01 Stretch triple straight stitch Stitch length 1.5 -6 mm For highly durable seams where great strength is needed, e.g. Used for sewing on buttons Reverse straight stitch Center needle position Saddle stitch For basting your sewing cuttings. Width uptomm - - 02 Zigzag stitch For finishing seams...
... decorative topstitching jobs, up to 6 mm wide N rr 01 Stretch triple straight stitch Stitch length 1.5 -6 mm For highly durable seams where great strength is needed, e.g. Used for sewing on buttons Reverse straight stitch Center needle position Saddle stitch For basting your sewing cuttings. Width uptomm - - 02 Zigzag stitch For finishing seams...
Owner's Manual
Page 22
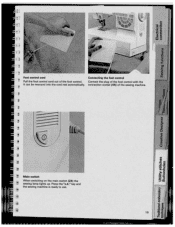
I I 19 I 1* 1$ is ready to use. Connect the plug of the foot control with the It can be rewound into the cord reel automatically, connection socket (44) of the foot control. Press the 'ok key and the sewing machine is Main switch When switching on the main switch (24) the sewing lamp lights up. Foot control cord Connecting the foot control Pull the foot control cord out of the sewing machine.
I I 19 I 1* 1$ is ready to use. Connect the plug of the foot control with the It can be rewound into the cord reel automatically, connection socket (44) of the foot control. Press the 'ok key and the sewing machine is Main switch When switching on the main switch (24) the sewing lamp lights up. Foot control cord Connecting the foot control Pull the foot control cord out of the sewing machine.
Owner's Manual
Page 29
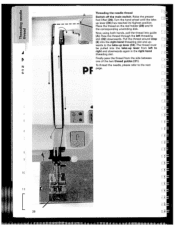
... the takeup lever (34) has reached its highest position. Pull the thread around stop (E) into guide (A). a) a) a) • 0 D '-4' A I' N IT S r- Raise the presser foot lifter (26). Now, using both hands, pull the thread into the right-hand threading slot and up wards to the take -up lever (34). The thread must be pulled...
... the takeup lever (34) has reached its highest position. Pull the thread around stop (E) into guide (A). a) a) a) • 0 D '-4' A I' N IT S r- Raise the presser foot lifter (26). Now, using both hands, pull the thread into the right-hand threading slot and up wards to the take -up lever (34). The thread must be pulled...
Owner's Manual
Page 34
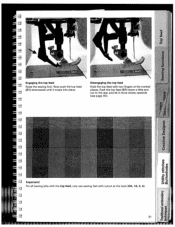
Important! Now push the top feed (51) downwards until it move slowly upwards I - Push the top feed (51) down a little and out to the rear, and let it snaps into place. a): 11 Engaging the top feed Raise the sewing foot. For all sewing jobs with the top feed, only use sewing feet with two fingers at the back (OA, 1A, 3,4). 2J #1 H H 31 II Disengaging the top feed Hold the top feed with cutout at the marked places. Cl) ,I (see page 30). 0 0 0a) . -n .
Important! Now push the top feed (51) downwards until it move slowly upwards I - Push the top feed (51) down a little and out to the rear, and let it snaps into place. a): 11 Engaging the top feed Raise the sewing foot. For all sewing jobs with the top feed, only use sewing feet with two fingers at the back (OA, 1A, 3,4). 2J #1 H H 31 II Disengaging the top feed Hold the top feed with cutout at the marked places. Cl) ,I (see page 30). 0 0 0a) . -n .
Owner's Manual
Page 41
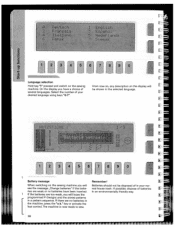
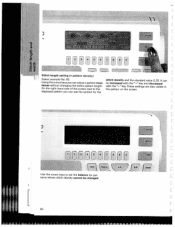
.... On the display you will loose the programmed P-Designs and the stored patterns in a pattern sequence. Select the number of batteries in your desired language using keys "O-7' From now on, any description on the sewing machine. key or activate the foot control.The machine is now ready to sew. Batteries should...
.... On the display you will loose the programmed P-Designs and the stored patterns in a pattern sequence. Select the number of batteries in your desired language using keys "O-7' From now on, any description on the sewing machine. key or activate the foot control.The machine is now ready to sew. Batteries should...
Owner's Manual
Page 42
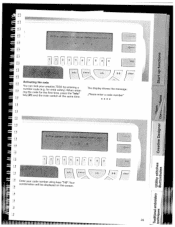
Your on the screen. [ o.k. a) C Ua)) I II 39 4 rz r HH[ [ -Th esc Activating the code kYinneuogyumt(hcb2ae1en)rcacloonodcddeketfyho(oeeru.gtrmh.ceafrioenfrairtscsiwhtvietiltidcm7hs5ea,5aft0eptrtyheb)sey.sWestanhhmteeeren"initneigmfnoate"e. U) .C C =4-I I aU)) '4,.' P1 0- 0 z 'F cJ ;Ij4ii 31 'I Enter your code number using combination will be displayed keys "1-0". r o.k.) /> The display shows the message: ,,Please enter a code number" **** 3!
Your on the screen. [ o.k. a) C Ua)) I II 39 4 rz r HH[ [ -Th esc Activating the code kYinneuogyumt(hcb2ae1en)rcacloonodcddeketfyho(oeeru.gtrmh.ceafrioenfrairtscsiwhtvietiltidcm7hs5ea,5aft0eptrtyheb)sey.sWestanhhmteeeren"initneigmfnoate"e. U) .C C =4-I I aU)) '4,.' P1 0- 0 z 'F cJ ;Ij4ii 31 'I Enter your code number using combination will be displayed keys "1-0". r o.k.) /> The display shows the message: ,,Please enter a code number" **** 3!
Owner's Manual
Page 46
I -- I •• I: ) 'V I: I-
I -- I •• I: ) 'V I: I-
Owner's Manual
Page 47
...diode lights up , the machine sews backwards. metres Twin needle (2) Press this key again, the machine will be reduced to half speed. 1 44 L PFAFF creative 75! 1 Mnda In G Description of the sewing function keys Reverse key (25) By pressing the reverse key the green diode lights up if there are... sewing speed will sew forwards. To tie-off hold this key to avoid the needle stitching on less the than 2 bobbin. Additionally, you can use this key pressed a little. The stitch width will automatically be decreased by 2 mm to define the bartack for a buttonhole or the length of...
...diode lights up , the machine sews backwards. metres Twin needle (2) Press this key again, the machine will be reduced to half speed. 1 44 L PFAFF creative 75! 1 Mnda In G Description of the sewing function keys Reverse key (25) By pressing the reverse key the green diode lights up if there are... sewing speed will sew forwards. To tie-off hold this key to avoid the needle stitching on less the than 2 bobbin. Additionally, you can use this key pressed a little. The stitch width will automatically be decreased by 2 mm to define the bartack for a buttonhole or the length of...
Owner's Manual
Page 48
... be closed at any time by pattern groups (see pattern selection). After you can set the pattern length, width and stitch length using these keys. Pattern start and end, the correct sewing foot and possible special accessories. The "esc" key will interrupt a selected ... Pattern mirroring (17) The selected pattern will be activated. Within a selected pattern you can be deleted. I I I j I I j II I I J "info" (21) a) Using this key you have selected a pattern, by num ber. "esc" (9) Pressing the "esc" key, you back to the beginning of the next step will return...
... be closed at any time by pattern groups (see pattern selection). After you can set the pattern length, width and stitch length using these keys. Pattern start and end, the correct sewing foot and possible special accessories. The "esc" key will interrupt a selected ... Pattern mirroring (17) The selected pattern will be activated. Within a selected pattern you can be deleted. I I I j I I j II I I J "info" (21) a) Using this key you have selected a pattern, by num ber. "esc" (9) Pressing the "esc" key, you back to the beginning of the next step will return...
Owner's Manual
Page 49
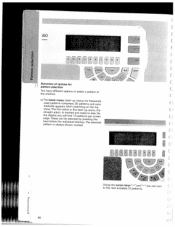
you can turn Fse U I [ 46 Using to select a pattern of options for pattern selection You have different the creative: options to the the cursor keys "-b" and "-" next available 10 patterns. The selected - pattern is always shown marked. 5O krmany L Summary of a) Tmuhsaeetdicbapalsalyitctearmpnpseenacurosm(wsptharirestne-usspw3m0itcephnaiunt)...
you can turn Fse U I [ 46 Using to select a pattern of options for pattern selection You have different the creative: options to the the cursor keys "-b" and "-" next available 10 patterns. The selected - pattern is always shown marked. 5O krmany L Summary of a) Tmuhsaeetdicbapalsalyitctearmpnpseenacurosm(wsptharirestne-usspw3m0itcephnaiunt)...
Owner's Manual
Page 50
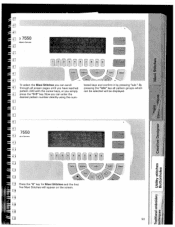
.... marked and ready to sew. Ea) - •0 47 . The left pattern on the dis play: Enter the desired pattern number using keys "1-0' Press cursor key"-*' You are now in pattern group 120-129. By pressing the "0-9" key this message appears on the display ...is Press the"0-9" key. 0 [E L't fl HEH1E Li C 0 I zj * a, U, - -I b) Alternatively, you can activate a pattern by motifs -I 7550 Modo In Cldrmnny ZLHHr [ c) Selection of pattern groups (Groups of ten stitch patterns) By pressing the key underneath any other pattern, Enter the desired pattern...
.... marked and ready to sew. Ea) - •0 47 . The left pattern on the dis play: Enter the desired pattern number using keys "1-0' Press cursor key"-*' You are now in pattern group 120-129. By pressing the "0-9" key this message appears on the display ...is Press the"0-9" key. 0 [E L't fl HEH1E Li C 0 I zj * a, U, - -I b) Alternatively, you can activate a pattern by motifs -I 7550 Modo In Cldrmnny ZLHHr [ c) Selection of pattern groups (Groups of ten stitch patterns) By pressing the key underneath any other pattern, Enter the desired pattern...
Owner's Manual
Page 53
Using the cursor keys you can see the symbol for pat terns whose stitch density cannot be increased with the "-b" key and decreased with the "-" key. ...\ o.k. It can adjust a pattern more dense without changing the entire pattern length. _ _ V J fly I 1 r 1 I 1i[1H 1n I .,..., I Stitch length setting (= pattern density) Select example No. 65. Use the cursor keys to the displayed pattern you can be changed: E 50 These settings are also visible in the pattern on the screen.
Using the cursor keys you can see the symbol for pat terns whose stitch density cannot be increased with the "-b" key and decreased with the "-" key. ...\ o.k. It can adjust a pattern more dense without changing the entire pattern length. _ _ V J fly I 1 r 1 I 1i[1H 1n I .,..., I Stitch length setting (= pattern density) Select example No. 65. Use the cursor keys to the displayed pattern you can be changed: E 50 These settings are also visible in the pattern on the screen.
Owner's Manual
Page 56
y' I: To select the Maxi Stitches you can scroll through all pattern groups which can enter the desired pattern number directly using the num bered keys and confirm it by pressing "o.k.' I, info Press the "0" key for Maxi Stitches and the first five Maxi Stitches will be displayed. - ... all screen pages until you have reached pattern 200 with the cursor keys, or you can be selected will appear on the screen. 53 GI I: - 7550 de in Germany i1' .EiETh 0 J)I I - I 7550 Made in Germany I:. Now you simply press the "0-9" key. mi - MI - yy I: -I -
y' I: To select the Maxi Stitches you can scroll through all pattern groups which can enter the desired pattern number directly using the num bered keys and confirm it by pressing "o.k.' I, info Press the "0" key for Maxi Stitches and the first five Maxi Stitches will be displayed. - ... all screen pages until you have reached pattern 200 with the cursor keys, or you can be selected will appear on the screen. 53 GI I: - 7550 de in Germany i1' .EiETh 0 J)I I - I 7550 Made in Germany I:. Now you simply press the "0-9" key. mi - MI - yy I: -I -

Owner's Manual
Page 57
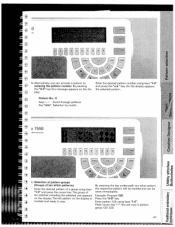
and ready to the next available patterns. If you can scroll balance settings (see "balance" section). By pressing one of length and width settings are made in the same L the two keys below the pattern it will be sewn. The to be displayed consecutively with its length, width and E a 54 V p iany L 0 [1! [ 1 Using the cursor keys "-" and "÷-" you press this key again, the pattern will be marked way as for 9 mm patterns.
and ready to the next available patterns. If you can scroll balance settings (see "balance" section). By pressing one of length and width settings are made in the same L the two keys below the pattern it will be sewn. The to be displayed consecutively with its length, width and E a 54 V p iany L 0 [1! [ 1 Using the cursor keys "-" and "÷-" you press this key again, the pattern will be marked way as for 9 mm patterns.
Owner's Manual
Page 58
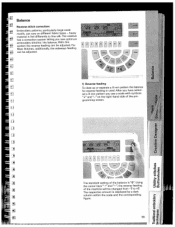
... from -7 to fine silk. I i i 1) Reverse feeding To close up or separate a 9 mm pattern the balance for reverse feeding is "O' Using the cursor keys "-f" and "-' the reverse feeding s4 I of the machine will be adjusted. [. Balance Reverse stitch correction: Embroidery patterns, particularly large-...scale motifs, can vary on the right-hand side of the pro gramming screen. The respective amount is fed differently to ÷7. The creative has a correction system letting you see a scale with symbols "+" and "-" on different fabric types - heavy material is displayed by a ...
... from -7 to fine silk. I i i 1) Reverse feeding To close up or separate a 9 mm pattern the balance for reverse feeding is "O' Using the cursor keys "-f" and "-' the reverse feeding s4 I of the machine will be adjusted. [. Balance Reverse stitch correction: Embroidery patterns, particularly large-...scale motifs, can vary on the right-hand side of the pro gramming screen. The respective amount is fed differently to ÷7. The creative has a correction system letting you see a scale with symbols "+" and "-" on different fabric types - heavy material is displayed by a ...


