
Owner's Manual
Page 2
... drive belt must be adjusted by pulling out the mains plug. 3. Housing: To clean the housing, use only original PFAFF parts. Fpoleraesaesifeorldutnhdiesrpstaagnedionpgenofwthhiesninresatrduicntgioint. The machine for domestic sewing machines according to the indications on the Treatment Always protect the machine against damage by its function is visible damage, - If this appliance is used on Cleaning the...
... drive belt must be adjusted by pulling out the mains plug. 3. Housing: To clean the housing, use only original PFAFF parts. Fpoleraesaesifeorldutnhdiesrpstaagnedionpgenofwthhiesninresatrduicntgioint. The machine for domestic sewing machines according to the indications on the Treatment Always protect the machine against damage by its function is visible damage, - If this appliance is used on Cleaning the...
Owner's Manual
Page 6
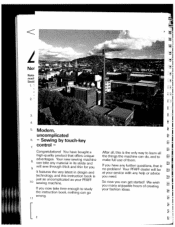
...a 9 Nol K Note maci Secti I 1. 1 II I I El 1I K After all, this instruction book is the only way to learn all the things the machine can do, and to ra K make full use of creating your PFAFF sewing machine. We wish you have bought a high-quality product that is no problem! If you need. Your... PFAFF dealer will be at your service with any material in desgin and technology, and this is 10 just as uncomplicated ...
...a 9 Nol K Note maci Secti I 1. 1 II I I El 1I K After all, this instruction book is the only way to learn all the things the machine can do, and to ra K make full use of creating your PFAFF sewing machine. We wish you have bought a high-quality product that is no problem! If you need. Your... PFAFF dealer will be at your service with any material in desgin and technology, and this is 10 just as uncomplicated ...
Owner's Manual
Page 9
...Language selection Letter combinations (letter sequence) Letter selection using the "Creative Designer Linen buttonhole Linen embroidery Linen embroidery example - Light-knit mending stitch Machine binds Machine does not feed or feeds irregularly Machine does not sew the entered program Machine skips stitches 48 to 0 33 ' 33 30 I C ... Engaging the Dual Feed Entering the pattern number Eyelet embroidery Eyelet embroidery, pattern examples Fading in the Creative Designer j Inserting zippers Inserting zippers concealed on both sides "K"key Keyhole buttonholes Keyhole buttonholes with gimp ...
...Language selection Letter combinations (letter sequence) Letter selection using the "Creative Designer Linen buttonhole Linen embroidery Linen embroidery example - Light-knit mending stitch Machine binds Machine does not feed or feeds irregularly Machine does not sew the entered program Machine skips stitches 48 to 0 33 ' 33 30 I C ... Engaging the Dual Feed Entering the pattern number Eyelet embroidery Eyelet embroidery, pattern examples Fading in the Creative Designer j Inserting zippers Inserting zippers concealed on both sides "K"key Keyhole buttonholes Keyhole buttonholes with gimp ...
Owner's Manual
Page 10
...stitch stitch length points and width Sewing a P-Design Sewing faults and their removal Sewing feet and special accessories! groups of ten I Pattern start I Placing the bobbin Placing the needle plate 3 P-Memory selection Preparing the machine Presser foot lifter for pattern selection... E Overlock stitch 1 55 161 157-158 27 1 63 44 45 45 24 11 8 46 E Parts of the Creative...
...stitch stitch length points and width Sewing a P-Design Sewing faults and their removal Sewing feet and special accessories! groups of ten I Pattern start I Placing the bobbin Placing the needle plate 3 P-Memory selection Preparing the machine Presser foot lifter for pattern selection... E Overlock stitch 1 55 161 157-158 27 1 63 44 45 45 24 11 8 46 E Parts of the Creative...
Owner's Manual
Page 22
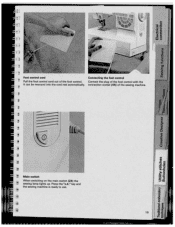
I I 19 Connect the plug of the foot control with the It can be rewound into the cord reel automatically, connection socket (44) of the foot control. Foot control cord Connecting the foot control Pull the foot control cord out of the sewing machine. I 1* 1$ is ready to use. Press the 'ok key and the sewing machine is Main switch When switching on the main switch (24) the sewing lamp lights up.
I I 19 Connect the plug of the foot control with the It can be rewound into the cord reel automatically, connection socket (44) of the foot control. Foot control cord Connecting the foot control Pull the foot control cord out of the sewing machine. I 1* 1$ is ready to use. Press the 'ok key and the sewing machine is Main switch When switching on the main switch (24) the sewing lamp lights up.
Owner's Manual
Page 41
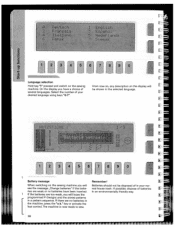
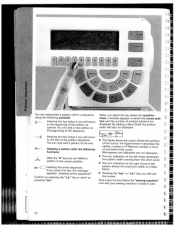
..."o.k." If there are too weak, you will be disposed of your desired language using keys "O-7' From now on, any description on the sewing machine. z EiLiLii Language selection Hold key "1" pressed and switch on the display will loose the programmed P-Designs and the stored patterns in your ...nor mal house trash. Select the number of in a pattern sequence. key or activate the foot control.The machine is now ready to sew. Batteries should not be shown in an environmentally friendly way. 38 If the batteries are no batteries have a choice of batteries...
..."o.k." If there are too weak, you will be disposed of your desired language using keys "O-7' From now on, any description on the sewing machine. z EiLiLii Language selection Hold key "1" pressed and switch on the display will loose the programmed P-Designs and the stored patterns in your ...nor mal house trash. Select the number of in a pattern sequence. key or activate the foot control.The machine is now ready to sew. Batteries should not be shown in an environmentally friendly way. 38 If the batteries are no batteries have a choice of batteries...
Owner's Manual
Page 44
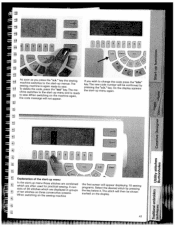
... not appear. 0 L ThH11 1T L:4 I 0I cj, 4-'- 1- Tcohidneelestweitthcheecsotdoe,thperesstsartth-uep"emsce"nukeayn. to sew. 4 WL -4 )[. The sewing machine is again ready to sew. LI a, 2 -Q E a, - The pressing new code number the "o.k." o\Jk. : / j As soon machine as you wish to the the "o.k." When switching on the machine again, " the code message will the be confirmed by display appears the...
... not appear. 0 L ThH11 1T L:4 I 0I cj, 4-'- 1- Tcohidneelestweitthcheecsotdoe,thperesstsartth-uep"emsce"nukeayn. to sew. 4 WL -4 )[. The sewing machine is again ready to sew. LI a, 2 -Q E a, - The pressing new code number the "o.k." o\Jk. : / j As soon machine as you wish to the the "o.k." When switching on the machine again, " the code message will the be confirmed by display appears the...
Owner's Manual
Page 47
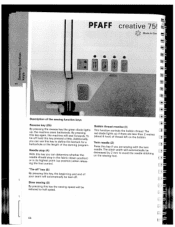
PFAFF creative 75! 1 Mnda In G Description of your seam will automatically be tied-off. 1 Slow sewing (3) By pressing this key the sewing speed will be decreased by 2 mm to avoid the needle stitching on less the than 2 bobbin. "Tie-off hold this key if you are (.... 1 44 L Needle stop (4) With this key, the beginning and end of the sewing function keys Reverse key (25) By pressing the reverse key the green diode lights up, the machine sews backwards. The stitch width will sew forwards. The red diode lights up position) when releas ing the foot control. Additionally, ...
PFAFF creative 75! 1 Mnda In G Description of your seam will automatically be tied-off. 1 Slow sewing (3) By pressing this key the sewing speed will be decreased by 2 mm to avoid the needle stitching on less the than 2 bobbin. "Tie-off hold this key if you are (.... 1 44 L Needle stop (4) With this key, the beginning and end of the sewing function keys Reverse key (25) By pressing the reverse key the green diode lights up, the machine sews backwards. The stitch width will sew forwards. The red diode lights up position) when releas ing the foot control. Additionally, ...
Owner's Manual
Page 67
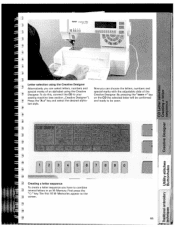
By pressing the "mem +" key sewing machine (see section ,,Creative Designer"). The first 16 M-Memories appear on the CD the selected letter will be confirmed H' Press the "A-z" key and select the desired alpha and ready ... a letter sequence To create a letter sequence you can choose the letters, numbers and special marks of an alphabet using the Creative special marks with the adjustable slide of the H' Designer. I Il I I I I PFAFF creatiSO i3iTi 5J! To do this, connect the CD to combine several letters in an M-Memory. on the screen. (I) C.) 1-' a) 2 Ea...
By pressing the "mem +" key sewing machine (see section ,,Creative Designer"). The first 16 M-Memories appear on the CD the selected letter will be confirmed H' Press the "A-z" key and select the desired alpha and ready ... a letter sequence To create a letter sequence you can choose the letters, numbers and special marks of an alphabet using the Creative special marks with the adjustable slide of the H' Designer. I Il I I I I PFAFF creatiSO i3iTi 5J! To do this, connect the CD to combine several letters in an M-Memory. on the screen. (I) C.) 1-' a) 2 Ea...
Owner's Manual
Page 74
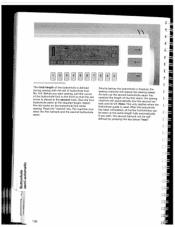
...•l t 4 Om 2221 • The figure above the cursor shows the position of the pattern se quence. the figure below the "sewing machine" IC L [ [ icon and your sewing machine is ready to the end of and behind the cursor. Now press the key below it describes the i IL 1 m Deleting a pattern..."esc" or "o.k." Confirm by pressing "esc" pattern number or P-Memory number in which the cursor posi Pressing the key below it you will move to sew. [ [ [ 72 i V You can add a new pattern to the beginning of the cursor; By adding a Maxi Stitch the pattern width will ...
...•l t 4 Om 2221 • The figure above the cursor shows the position of the pattern se quence. the figure below the "sewing machine" IC L [ [ icon and your sewing machine is ready to the end of and behind the cursor. Now press the key below it describes the i IL 1 m Deleting a pattern..."esc" or "o.k." Confirm by pressing "esc" pattern number or P-Memory number in which the cursor posi Pressing the key below it you will move to sew. [ [ [ 72 i V You can add a new pattern to the beginning of the cursor; By adding a Maxi Stitch the pattern width will ...
Owner's Manual
Page 88
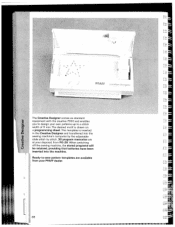
... been inserted into the sewing machine's computer by the adjustable slide stitch by stitch. 30 program memories are available from P0-29. I II 1/ i•1 I U F PFAF F The Creative Designer comes as standard equipment with the creative 7550 and enables you to design your own patterns up to -sew pattern templates are at your disposal, from your PFAFF dealer.
... been inserted into the sewing machine's computer by the adjustable slide stitch by stitch. 30 program memories are available from P0-29. I II 1/ i•1 I U F PFAF F The Creative Designer comes as standard equipment with the creative 7550 and enables you to design your own patterns up to -sew pattern templates are at your disposal, from your PFAFF dealer.
Owner's Manual
Page 95
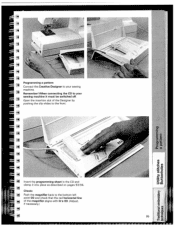
Open the insertion slot of the Designer by pushing the clip slides to the bottom left point 00 and check that the red horizontal line of the magnifier aligns with lire 00. (Adjust, if necessary.) C aco 0 oa()I - When connecting the CD to your sewing machine it into place as described on pages 93/94. Check: Push the magnifier back to the front. I ) t;.c LI 2 Ea) -Cl) C) 0O 95 CC3 i-if Insert the programming sheet in the CD and clamp it must be switched off. Programming a pattern Connect the Creative Designer to your sewing machine. Remember!
Open the insertion slot of the Designer by pushing the clip slides to the bottom left point 00 and check that the red horizontal line of the magnifier aligns with lire 00. (Adjust, if necessary.) C aco 0 oa()I - When connecting the CD to your sewing machine it into place as described on pages 93/94. Check: Push the magnifier back to the front. I ) t;.c LI 2 Ea) -Cl) C) 0O 95 CC3 i-if Insert the programming sheet in the CD and clamp it must be switched off. Programming a pattern Connect the Creative Designer to your sewing machine. Remember!
Owner's Manual
Page 96
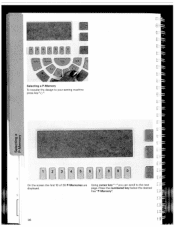
Using cursor key"*" you can scroll to your sewing machine press key"p)" E a) a)' 00.. 1 On the screen the first 10 of 30 P-Memories are displayed. Press the numbered key below the desired free "P-Memory" I II 96 r [ r 1 ' C- Selecting a P-Memory To transfer the design to the next page.
Using cursor key"*" you can scroll to your sewing machine press key"p)" E a) a)' 00.. 1 On the screen the first 10 of 30 P-Memories are displayed. Press the numbered key below the desired free "P-Memory" I II 96 r [ r 1 ' C- Selecting a P-Memory To transfer the design to the next page.
Owner's Manual
Page 135
... to define the second bartack yourself, press key "6" below "man' The message "Finish manually" appears on the foot control again, the sewing machine will then be deleted by taking your buttonhole now. C The creative will automatically sew the entire buttonhole at the preset length and tie-off . key afterwards, a new screen will reduce the...
... to define the second bartack yourself, press key "6" below "man' The message "Finish manually" appears on the foot control again, the sewing machine will then be deleted by taking your buttonhole now. C The creative will automatically sew the entire buttonhole at the preset length and tie-off . key afterwards, a new screen will reduce the...
Owner's Manual
Page 137
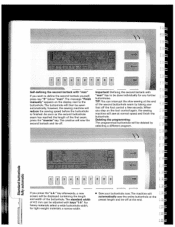
...pressing the key below"man' 4 C., I w The total length of the buttonhole is defined during sewing with the aid of the first seam, the sewing machine will reduce the sewing speed. The machine now sews the first bartack and the second buttonhole seam. Shortly before the buttonhole is placed at the second mark...all further buttonholes can be sewn at the required length. If you start sewing, pull the runner of the buttonhole foot to the front so that the red arrow is finished, the sewing machine will automatically sew the second bartack and tie-off, Note: This only applies when the ...
...pressing the key below"man' 4 C., I w The total length of the buttonhole is defined during sewing with the aid of the first seam, the sewing machine will reduce the sewing speed. The machine now sews the first bartack and the second buttonhole seam. Shortly before the buttonhole is placed at the second mark...all further buttonholes can be sewn at the required length. If you start sewing, pull the runner of the buttonhole foot to the front so that the red arrow is finished, the sewing machine will automatically sew the second bartack and tie-off, Note: This only applies when the ...
Owner's Manual
Page 159
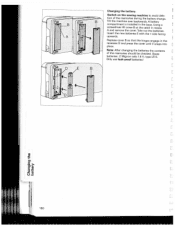
... Only use leak-proof batteries! A battery compartment is installed in recess A and remove the cover. type LR 6. Tilt the machine over backwards. Take out the batteries. Changing the battery: Switch on the sewing machine to avoid dele tion of the memories should be checked, Spare batteries: 2 Mignon cells 1.5V; Using a screwdriver lift cover...
... Only use leak-proof batteries! A battery compartment is installed in recess A and remove the cover. type LR 6. Tilt the machine over backwards. Take out the batteries. Changing the battery: Switch on the sewing machine to avoid dele tion of the memories should be checked, Spare batteries: 2 Mignon cells 1.5V; Using a screwdriver lift cover...
Owner's Manual
Page 160
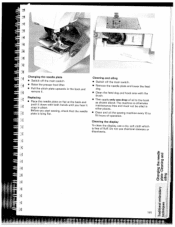
... the presser foot lifter. • Pull the stitch plate upwards in the back and remove it snap in other places. • Clean and oil the sewing machine every 10 to the hook as shown above. Cleaning the display To clean the display, use chemical cleaners or dissolvents. a) 142 0) a) 1 cC (-I 0)a) 0). Before you hear...
... the presser foot lifter. • Pull the stitch plate upwards in the back and remove it snap in other places. • Clean and oil the sewing machine every 10 to the hook as shown above. Cleaning the display To clean the display, use chemical cleaners or dissolvents. a) 142 0) a) 1 cC (-I 0)a) 0). Before you hear...
Owner's Manual
Page 161
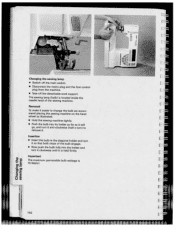
... Now push the bulb fully into the holder and turn it remove it is located inside the needle head of the sewing machin Removal Twmoheemnedal kpaelsaicitlilenuagssttireharetetdose. a Disconnect the mains plug plug from the machiflO. and turn it clockwise until it . and the.... lmpOñat I-a The maximum permissible bulb wattage is 15 WattSl o(n 162 a 4 \[ Ghafl9'9 the sewing lamP • Switch off the detaChab work supP0 The sewin9 lamp (bulb) is held firmly. wainnggemathcheinbeulobnwteherehcaonmd • Hold the sewing machine tightly. • Push the bulb go.
... Now push the bulb fully into the holder and turn it remove it is located inside the needle head of the sewing machin Removal Twmoheemnedal kpaelsaicitlilenuagssttireharetetdose. a Disconnect the mains plug plug from the machiflO. and turn it clockwise until it . and the.... lmpOñat I-a The maximum permissible bulb wattage is 15 WattSl o(n 162 a 4 \[ Ghafl9'9 the sewing lamP • Switch off the detaChab work supP0 The sewin9 lamp (bulb) is held firmly. wainnggemathcheinbeulobnwteherehcaonmd • Hold the sewing machine tightly. • Push the bulb go.
Owner's Manual
Page 178
... backing in cold water, and your piece TIP: of individually made embroidery is dissolve the No. 00 (stitch length at about 2 mm • Transfer your sewing machine. r • Then place two plies of AVALON stabilizer under the area to do not cut out the fabric from the dery is easy to make... the embroidery more stable, sew work easier! L Using the "needle down" function makes this part of the • To make with your pattern onto the face side of the ...
... backing in cold water, and your piece TIP: of individually made embroidery is dissolve the No. 00 (stitch length at about 2 mm • Transfer your sewing machine. r • Then place two plies of AVALON stabilizer under the area to do not cut out the fabric from the dery is easy to make... the embroidery more stable, sew work easier! L Using the "needle down" function makes this part of the • To make with your pattern onto the face side of the ...
Owner's Manual
Page 179
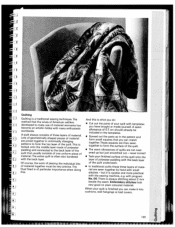
j of material. but just smoothed out - a 181 Quilting Quilting is quicker and more practical with the sewing machine, e.g. This is always stitching about 2 mm beside the seam. These squares are then sewn together to form the surface of the quilt. • The seam ...form the top layer of the quilt. stitches - with templates you have bought or made of polyester padding and connected to make it is a traditional sewing technique. There is tacked onto the middle layer made yourself. Ii When your quilt is what you do: method that you can match together. A seam...
j of material. but just smoothed out - a 181 Quilting Quilting is quicker and more practical with the sewing machine, e.g. This is always stitching about 2 mm beside the seam. These squares are then sewn together to form the surface of the quilt. • The seam ...form the top layer of the quilt. stitches - with templates you have bought or made of polyester padding and connected to make it is a traditional sewing technique. There is tacked onto the middle layer made yourself. Ii When your quilt is what you do: method that you can match together. A seam...


