

Owner's Manual
Page 3
... fuse Changing the light bulb Changing the needle Changing the sewing foot Checking the bobbin thread tension Checking the needle thread tension Cleaning and oiling Creative computer keyboard Detachable work support and accessories Drawing up the bobbin thread Dropping the feed dog Dual feed Foot control Important notes Inserting the bobbin Inserting the bobbin case Machine connection Memorizing and cancelling of program combinations Needle position for straight stitch Operating keys of electronic system Pattern mirroring Pattern start setting Placing spool of thread on pin Presser bar lifter...
... fuse Changing the light bulb Changing the needle Changing the sewing foot Checking the bobbin thread tension Checking the needle thread tension Cleaning and oiling Creative computer keyboard Detachable work support and accessories Drawing up the bobbin thread Dropping the feed dog Dual feed Foot control Important notes Inserting the bobbin Inserting the bobbin case Machine connection Memorizing and cancelling of program combinations Needle position for straight stitch Operating keys of electronic system Pattern mirroring Pattern start setting Placing spool of thread on pin Presser bar lifter...
Owner's Manual
Page 5
... & pattern length key 106 Stitch length & pattern length key 107 Stitch width key 108 Master switch 109 Detachable work support with accessory box and compartment 110 Needle plate 111 Sewing foot holder with sewing foot 112 Needle holder with set screw 113 Bobbin thread monitor light 114 "needle down" key 115 "sew slow" key 116 "reverse" key 117 "tie-off I buttonhole" key 118 Presser bar with thread cutter 119 Presser bar lifter 120 Program display 121 Programming keys (2) 122 Program chart (see sewing book) 124 Bobbin winder 125...
... & pattern length key 106 Stitch length & pattern length key 107 Stitch width key 108 Master switch 109 Detachable work support with accessory box and compartment 110 Needle plate 111 Sewing foot holder with sewing foot 112 Needle holder with set screw 113 Bobbin thread monitor light 114 "needle down" key 115 "sew slow" key 116 "reverse" key 117 "tie-off I buttonhole" key 118 Presser bar with thread cutter 119 Presser bar lifter 120 Program display 121 Programming keys (2) 122 Program chart (see sewing book) 124 Bobbin winder 125...
Owner's Manual
Page 6
... Pfaff Creative 1371 Limited Edition Instruction Book, errors were overlooked. Sew. Then the light will be sewn 1/8" away from the coil of the zipper or bulk of the pattern. This makes topstitching very easy. Page 1 O2.SEWING ZPPERS If you touch key 117 during sew ing, it will be used to the right of the zipper or welt, use program 01: a) if the zipper foot is lit. When sewing a buttonhole...
... Pfaff Creative 1371 Limited Edition Instruction Book, errors were overlooked. Sew. Then the light will be sewn 1/8" away from the coil of the zipper or bulk of the pattern. This makes topstitching very easy. Page 1 O2.SEWING ZPPERS If you touch key 117 during sew ing, it will be used to the right of the zipper or welt, use program 01: a) if the zipper foot is lit. When sewing a buttonhole...
Owner's Manual
Page 7
... . Page 2O,S1iTCH WIDTH SETTING 3. Page 32JMPORTANT The Pfaff Creative 1371 Limited Edition does not require batteries because it will also go off, When sewing a buttonhole (program 13), key 117 is to sew a straight stitch with pattern mirroring key lit b) if the zipper foot is used , but in your Instruction Book: Page 1 &JIEIOFF BUTTONHOLE If you sew a pattern and touch key 117 during sewing a seam, the light will go on and...
... . Page 2O,S1iTCH WIDTH SETTING 3. Page 32JMPORTANT The Pfaff Creative 1371 Limited Edition does not require batteries because it will also go off, When sewing a buttonhole (program 13), key 117 is to sew a straight stitch with pattern mirroring key lit b) if the zipper foot is used , but in your Instruction Book: Page 1 &JIEIOFF BUTTONHOLE If you sew a pattern and touch key 117 during sewing a seam, the light will go on and...

Owner's Manual
Page 24
... sewing, the light goes on and a seam is tied off right away, while a pattern is tied off at top speed. Reverse sewing: Push key 116 before you push "needle down in the fabric when the macnine stops. Eectronc bobbin thread monitor: Bobbin thread monitor light 113 starts to flash when the bobbin thread is on, key 117 serves to determine and memorize the seam length. When you start sewing. The indicator light...
... sewing, the light goes on and a seam is tied off right away, while a pattern is tied off at top speed. Reverse sewing: Push key 116 before you push "needle down in the fabric when the macnine stops. Eectronc bobbin thread monitor: Bobbin thread monitor light 113 starts to flash when the bobbin thread is on, key 117 serves to determine and memorize the seam length. When you start sewing. The indicator light...

Owner's Manual
Page 40
... go . Insert new needle. Thread machine properly and check both tensions. Machine skips stitches Needle not inserted correctly. Needle bent or blunt. Let machine feed the work is not uniform Tension out of adjustment. When inserting the bobbin case, push it in hand, but pass it will go . Use first-class thread only. During bobbin winding, do not hold thread in as far as it through the bobbin tension stud. Machine threaded improperly. Poor-quality or knotty thread used . 2. Bobbin thread wound...
... go . Insert new needle. Thread machine properly and check both tensions. Machine skips stitches Needle not inserted correctly. Needle bent or blunt. Let machine feed the work is not uniform Tension out of adjustment. When inserting the bobbin case, push it in hand, but pass it will go . Use first-class thread only. During bobbin winding, do not hold thread in as far as it through the bobbin tension stud. Machine threaded improperly. Poor-quality or knotty thread used . 2. Bobbin thread wound...

Owner's Manual
Page 41
Flick drop-feed control to the right behind the hook and on again. Failure of machine programming function If you have collected in the free arm cover over the indicator lamp, in the hook raceway, in the bobbin case, behind the hook. By means of this procedure the contents of oil into hook raceway. 7. Insert new fuse. Never run Fuse ist faulty. Machine does not sew the program entered...
Flick drop-feed control to the right behind the hook and on again. Failure of machine programming function If you have collected in the free arm cover over the indicator lamp, in the hook raceway, in the bobbin case, behind the hook. By means of this procedure the contents of oil into hook raceway. 7. Insert new fuse. Never run Fuse ist faulty. Machine does not sew the program entered...
Owner's Manual
Page 43
... hems with the twin needle 92 Selecting the MEM-memory 64 Serging seams 87-89 Serging with zigzag stitch and overlock foot 87 Sewing dots 69 Sewing fancy seams with the twin needle 46 Sewing in zippers 102 Sewing letters 68 Sewing monograms 47 Sewing neck openings 89 Sewing numbers 68 Sewing on buttons 101 Sewing with straight, utility and stretch stitches 73 Shell edging 60 Shirring with elastic thread 84 Shirring with straight stitch 83 Single buttonhole 100 Single pattern 65 Smocking with elastic thread...
... hems with the twin needle 92 Selecting the MEM-memory 64 Serging seams 87-89 Serging with zigzag stitch and overlock foot 87 Sewing dots 69 Sewing fancy seams with the twin needle 46 Sewing in zippers 102 Sewing letters 68 Sewing monograms 47 Sewing neck openings 89 Sewing numbers 68 Sewing on buttons 101 Sewing with straight, utility and stretch stitches 73 Shell edging 60 Shirring with elastic thread 84 Shirring with straight stitch 83 Single buttonhole 100 Single pattern 65 Smocking with elastic thread...

Owner's Manual
Page 52
... and prevents the needle from striking th needle plate. When tracing the scallops make sure their siz corresponds to the pattern length of differen colours. Try the pattern out on page 58. Sewing fancy seams with little imagination. Press the "twin needle" key; Place one thread to the right an other to th• stitch pattern sewn first, offsetting it again a sewing-foot width (Fig. 1). Border...
... and prevents the needle from striking th needle plate. When tracing the scallops make sure their siz corresponds to the pattern length of differen colours. Try the pattern out on page 58. Sewing fancy seams with little imagination. Press the "twin needle" key; Place one thread to the right an other to th• stitch pattern sewn first, offsetting it again a sewing-foot width (Fig. 1). Border...

Owner's Manual
Page 61
... embroidery with the eyeletting pate (special accessory) r prog zzI pattern mirror Feed dog: dropped Presser bar lifter: in darning position beforehand). The fabric must be tigL against the pin all round. Draw the bobbin thread u and hold it for the first few straight stitches at the same time. Stitc around the cut with a few stitches (placing pressEi bar lifter in darning position (page 96) Sewing thread: embroidering and darning thread Fftting the eyeletting plate: insert the plate wit the double...
... embroidery with the eyeletting pate (special accessory) r prog zzI pattern mirror Feed dog: dropped Presser bar lifter: in darning position beforehand). The fabric must be tigL against the pin all round. Draw the bobbin thread u and hold it for the first few straight stitches at the same time. Stitc around the cut with a few stitches (placing pressEi bar lifter in darning position (page 96) Sewing thread: embroidering and darning thread Fftting the eyeletting plate: insert the plate wit the double...
Owner's Manual
Page 86
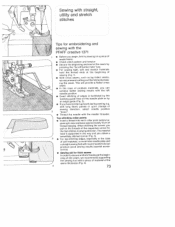
Sewing with straight, utility and stretch stitches Tips for embroidering and sewing with the PFAFF creative 1371 o Before you begin, first try sewing on the needle plate or by pressing the "tie-off/button-hole" key. • For sewing light, soft and stretch materials hold the thread ends at the begin ning of the seam, we recommend cutting out the fold and press ing the seam. The material feed is facilitated by...
Sewing with straight, utility and stretch stitches Tips for embroidering and sewing with the PFAFF creative 1371 o Before you begin, first try sewing on the needle plate or by pressing the "tie-off/button-hole" key. • For sewing light, soft and stretch materials hold the thread ends at the begin ning of the seam, we recommend cutting out the fold and press ing the seam. The material feed is facilitated by...

Owner's Manual
Page 87
... effective moti embroideries set the needle thread tension lighter i.e. lower than the buttonhole range. 74 Be careful when pressing velvet! try out on piece of waste fabric and do not baste such materiai as plastic, foil or oilcloth (penetration holes!). Us long stitch lengths (4 to 6 mm) and the dual feei Pure silk: set needle thread tension a little lowe Needle must be in grain direction with ligh needle thread tension and elastic seams. Machine-embroidery silk...
... effective moti embroideries set the needle thread tension lighter i.e. lower than the buttonhole range. 74 Be careful when pressing velvet! try out on piece of waste fabric and do not baste such materiai as plastic, foil or oilcloth (penetration holes!). Us long stitch lengths (4 to 6 mm) and the dual feei Pure silk: set needle thread tension a little lowe Needle must be in grain direction with ligh needle thread tension and elastic seams. Machine-embroidery silk...

Owner's Manual
Page 89
... find the joining threads and cut th ) through carefully, to avoid damage to the matei Basting prog : cci -- 00 - -3+ 0 ____i Feed dog: lowered Sewing thread: normal sewing thread For trying on top material ply. we recommend securii the parts previously with basting stitches. Remove the bastinç thread after sewing. 76 __ Making tailor's tacks Fringe foot. special accessory ZZ4LTZtiZLi 10 ;-.- -3+ * * Fringe foot Stitch-width: 2 mm Needle: 80 Sewing thread: Machine embroidery thread Basting is thus largel...
... find the joining threads and cut th ) through carefully, to avoid damage to the matei Basting prog : cci -- 00 - -3+ 0 ____i Feed dog: lowered Sewing thread: normal sewing thread For trying on top material ply. we recommend securii the parts previously with basting stitches. Remove the bastinç thread after sewing. 76 __ Making tailor's tacks Fringe foot. special accessory ZZ4LTZtiZLi 10 ;-.- -3+ * * Fringe foot Stitch-width: 2 mm Needle: 80 Sewing thread: Machine embroidery thread Basting is thus largel...

Owner's Manual
Page 95
...-stitch foot (special accessory). • Before you fit the straight-stitch foot, set relatively high. Buttonhole thread as bobbin thread 2 prog rv t- -- -a'' -- -- - 6-7 Buttonhole thread can also be wound on the bobbir and used in thc machine wrong side up. thread should be set the needle at its central position. 3 80 In this sewinç job the needle thread tension must be used as bobbin thread. Top-stitch seams Buttonhole thread as needle thread [prog 00 5-6 0 Needle: 100/120 Needle thread: buttonhole thread Bobbin thread: sewing thread Stitch length...
...-stitch foot (special accessory). • Before you fit the straight-stitch foot, set relatively high. Buttonhole thread as bobbin thread 2 prog rv t- -- -a'' -- -- - 6-7 Buttonhole thread can also be wound on the bobbir and used in thc machine wrong side up. thread should be set the needle at its central position. 3 80 In this sewinç job the needle thread tension must be used as bobbin thread. Top-stitch seams Buttonhole thread as needle thread [prog 00 5-6 0 Needle: 100/120 Needle thread: buttonhole thread Bobbin thread: sewing thread Stitch length...

Owner's Manual
Page 96
... seams L ± 9Z Stitch length: Needle: Thread: 6.0 mm 80 sewing thread • This stitch can be used . Trim away the excess material on facings. j_J '2 11 II - For this, normal sewing thread is used without any difficulty for top-stitching operations. Place one thread to the right, and the other to the left of the fabric with needle threads ILtt:- Twin-needle top-stitch seams - "dt.cdle twin needle needle gauge, as desired The twin needle can...
... seams L ± 9Z Stitch length: Needle: Thread: 6.0 mm 80 sewing thread • This stitch can be used . Trim away the excess material on facings. j_J '2 11 II - For this, normal sewing thread is used without any difficulty for top-stitching operations. Place one thread to the right, and the other to the left of the fabric with needle threads ILtt:- Twin-needle top-stitch seams - "dt.cdle twin needle needle gauge, as desired The twin needle can...

Owner's Manual
Page 102
... or easily fraying materials, use the overlock foot. 11 I Serging with the required zigzag stitch. The material enters at the red marking on the right sewing foot side. For change of the sewing foot (overlock foot No. 3) Turn screw "A" fully to be selected for zigzag stitch see page 77. 3 87 I -- 3-5 3 - Allow the edge of - ." Stitch-width: as required Sewing thread: Embroidery darning thread or sewing thread The stored zigzag-stitch is suitable for serging of...
... or easily fraying materials, use the overlock foot. 11 I Serging with the required zigzag stitch. The material enters at the red marking on the right sewing foot side. For change of the sewing foot (overlock foot No. 3) Turn screw "A" fully to be selected for zigzag stitch see page 77. 3 87 I -- 3-5 3 - Allow the edge of - ." Stitch-width: as required Sewing thread: Embroidery darning thread or sewing thread The stored zigzag-stitch is suitable for serging of...

Owner's Manual
Page 108
... J--Tj - 3(5m h-*---1 * Roll hemmer (special accessory) Use the roll hemmer foot for hemming nylon, tricot and chiffon. Lower the foot and secure the hem in hem edge (Fig. 3). Hold the fabric tight as it during sewing. Set the stitch width just wide enough that the needle stitches close to the drawn-in position with the hemmer * Hemmer foot (special accessory) Hemming secures the fabric edge against fraying and produces...
... J--Tj - 3(5m h-*---1 * Roll hemmer (special accessory) Use the roll hemmer foot for hemming nylon, tricot and chiffon. Lower the foot and secure the hem in hem edge (Fig. 3). Hold the fabric tight as it during sewing. Set the stitch width just wide enough that the needle stitches close to the drawn-in position with the hemmer * Hemmer foot (special accessory) Hemming secures the fabric edge against fraying and produces...

Owner's Manual
Page 111
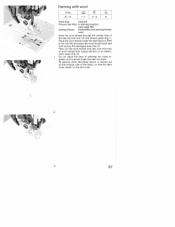
.... 2 J ,1 - __ ___ Darning with straight stitch prog 00 - 2-3 6 Feed dog: lowered Presser bar lifter: in darning position Sewing-cotton: embroidering and darning thread Darning position (Fig. 1): Lower presser bar hfter 'A", at the same time push ing it back slighty until it enters notch "B" at th' bottom of its slot Attach the darning foot (Fig. 2): Raise the needle, Push lever "E" towards the back and hold it : stop. Insert the pin of the foot in hok "C" and insert the foot so that...
.... 2 J ,1 - __ ___ Darning with straight stitch prog 00 - 2-3 6 Feed dog: lowered Presser bar lifter: in darning position Sewing-cotton: embroidering and darning thread Darning position (Fig. 1): Lower presser bar hfter 'A", at the same time push ing it back slighty until it enters notch "B" at th' bottom of its slot Attach the darning foot (Fig. 2): Raise the needle, Push lever "E" towards the back and hold it : stop. Insert the pin of the foot in hok "C" and insert the foot so that...
Owner's Manual
Page 112
... would make the darn too hard. All darning work described above is carried out on the face side. 2 3 97 stitch seam (Fig. 3). Darning with zigzag stitches or an elastic- Then cut the wool thread and sew over the rows of wool thread with wool prog_E 24T Feed dog: lowered Presser bar lifter: in darning position (see page 96) Sewing thread: Embroidery and darning thread, wool Draw the wool thread through the needle hole of the darning foot and into the thread guide...
... would make the darn too hard. All darning work described above is carried out on the face side. 2 3 97 stitch seam (Fig. 3). Darning with zigzag stitches or an elastic- Then cut the wool thread and sew over the rows of wool thread with wool prog_E 24T Feed dog: lowered Presser bar lifter: in darning position (see page 96) Sewing thread: Embroidery and darning thread, wool Draw the wool thread through the needle hole of the darning foot and into the thread guide...

Owner's Manual
Page 114
... affect feeding of the buttonhole foot fully to the right one (Fig. 2). • Sew last bartack. • The change in this , a piece of this way will be placed underneath during programming, it will be sewn at the end (Fig. 1 c). and adjust the second buttonhole seam to sew the bartack. ab C - Lingerie buttonholes prog (1 i:i .__Lz.L______ - Sewing thread: Embroidery and darning thread Generally buttonholes are sewn onto double...
... affect feeding of the buttonhole foot fully to the right one (Fig. 2). • Sew last bartack. • The change in this , a piece of this way will be placed underneath during programming, it will be sewn at the end (Fig. 1 c). and adjust the second buttonhole seam to sew the bartack. ab C - Lingerie buttonholes prog (1 i:i .__Lz.L______ - Sewing thread: Embroidery and darning thread Generally buttonholes are sewn onto double...


