
Owner's Manual
Page 4
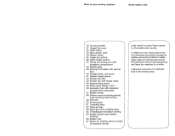
...entering phone number of customer service a) Be careful to use only a 15-watt light bulb in the sewing lamp. c) Be sure to avoid finger injuries by the needle when sewing. Parts of your sewing machine Some safety rules I 30 Carrying handle 31 Hinged top cover 32 Hand wheel 33 Stop motion knob ...Presser bar lifter 43 Presser bar with thread cutter 44 Reverse-feed control 45 Stitch chart (Model 1027) 46 Accessory box with accessory compartment underneath 47 Bobbin winder 48 Free arm cover (enclosing sewing hook and drop-feed control) 49 Free arm 50 Thread guide 51 Threading slots 52 Take-...
...entering phone number of customer service a) Be careful to use only a 15-watt light bulb in the sewing lamp. c) Be sure to avoid finger injuries by the needle when sewing. Parts of your sewing machine Some safety rules I 30 Carrying handle 31 Hinged top cover 32 Hand wheel 33 Stop motion knob ...Presser bar lifter 43 Presser bar with thread cutter 44 Reverse-feed control 45 Stitch chart (Model 1027) 46 Accessory box with accessory compartment underneath 47 Bobbin winder 48 Free arm cover (enclosing sewing hook and drop-feed control) 49 Free arm 50 Thread guide 51 Threading slots 52 Take-...
Owner's Manual
Page 7
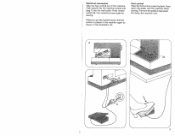
Push plug B into the machine socket and plug C into the wall outlet. Foot control Place the foot control under the table. Your machine is depressed, the faster the machine runs. 3 Press down the pedal, and the machine starts sewing. The more the pedal is now readyfor sewing. When you put the machine away, the foot control is placed in the machine again as shown in the illustration (A). Electrical connection Take the foot control out of the machine. Press master switch 34.
Push plug B into the machine socket and plug C into the wall outlet. Foot control Place the foot control under the table. Your machine is depressed, the faster the machine runs. 3 Press down the pedal, and the machine starts sewing. The more the pedal is now readyfor sewing. When you put the machine away, the foot control is placed in the machine again as shown in the illustration (A). Electrical connection Take the foot control out of the machine. Press master switch 34.

Owner's Manual
Page 13
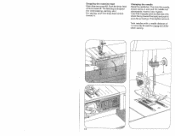
Raise the sewing foot. C The sewing foot is lowered for inserting extra-thick materials. Pull the work , turn the hand wheel toward the back. Presser bar lifter Lever 42 has three positions: A = The sewing foot is raised. (Before you remove the work out of the presser bar. Draw the threads into the cutter slot and pulithem downwards to raise the needle and take-up lever 52.) B = The sewing foot is an oblique slot located at the back of the machine toward you to cut them. 9 Thread cutter The thread cutter is raised further for sewing.
Raise the sewing foot. C The sewing foot is lowered for inserting extra-thick materials. Pull the work , turn the hand wheel toward the back. Presser bar lifter Lever 42 has three positions: A = The sewing foot is raised. (Before you remove the work out of the presser bar. Draw the threads into the cutter slot and pulithem downwards to raise the needle and take-up lever 52.) B = The sewing foot is an oblique slot located at the back of the machine toward you to cut them. 9 Thread cutter The thread cutter is raised further for sewing.

Owner's Manual
Page 15
Stitch length range: Model 1025: 0-4 Model 1027: 0-6 Ill. As long as you keep this button depressed, the machine sews back wards. 11 Reverse sewing Push button 44. B shows how to set the stitch length control for sewing stretch stitches (red stitch symbols on push buttons). Regulating the stitch length Turn the control so that the number indi cating the stitch length chosen is opposite mark A.
Stitch length range: Model 1025: 0-4 Model 1027: 0-6 Ill. As long as you keep this button depressed, the machine sews back wards. 11 Reverse sewing Push button 44. B shows how to set the stitch length control for sewing stretch stitches (red stitch symbols on push buttons). Regulating the stitch length Turn the control so that the number indi cating the stitch length chosen is opposite mark A.
Owner's Manual
Page 20
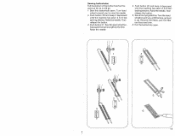
Then hold the needle, loosen screw A and pull the needle out downwards. Push the drop-feed control toward A. Changing the needle Raise the needle bar. Then tighten screw A. The feed dog is dropped (for zigzag and utility stitch sewing. 16 Dropping the machine feed Open free arm cover 48. Twin needles with the flat side of 1.4mm may be used for embroidering, darning, etc.) For sewing, push the drop-feed control toward B. Insert a new System 1 30/705 H needle (with a needle distance of its shank facing toward the back) and push it up as far as it will go.
Then hold the needle, loosen screw A and pull the needle out downwards. Push the drop-feed control toward A. Changing the needle Raise the needle bar. Then tighten screw A. The feed dog is dropped (for zigzag and utility stitch sewing. 16 Dropping the machine feed Open free arm cover 48. Twin needles with the flat side of 1.4mm may be used for embroidering, darning, etc.) For sewing, push the drop-feed control toward B. Insert a new System 1 30/705 H needle (with a needle distance of its shank facing toward the back) and push it up as far as it will go.
Owner's Manual
Page 23
...seam the same length as it depressed until the machine has sewn 4 to 6 bartacking stitches. Raise the needle. Turn hand wheel torward you until the take-up lever is up. Then release the button. 3 Push button 21 . Then release the button. 5 Sew a few tying stitches. Turn the hand wheel ...toward you to raise the needle. 2 Push button 20 and keep it depressed until the machine has sewn 4 to 6 bartacking stitches. Sewing buttonholes Pull the bottom of the buttonhole foot for ward as far as the first. Raise the needle. 4 Push button 20 ...
...seam the same length as it depressed until the machine has sewn 4 to 6 bartacking stitches. Raise the needle. Turn hand wheel torward you until the take-up lever is up. Then release the button. 3 Push button 21 . Then release the button. 5 Sew a few tying stitches. Turn the hand wheel ...toward you to raise the needle. 2 Push button 20 and keep it depressed until the machine has sewn 4 to 6 bartacking stitches. Sewing buttonholes Pull the bottom of the buttonhole foot for ward as far as the first. Raise the needle. 4 Push button 20 ...
Owner's Manual
Page 25
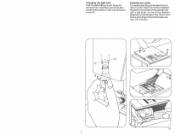
Insert the new bulb so that its pins slide in the vicinity of oil into the hook race way now and then. 21 Cleaning and oiling Tilt needle plate 38 up at the back (A) and take it out (B). Do not oil the machine because it is put a drop of the sewing hook with a sàft brush. Push it up and turn it toward B. All you have to do is maintenance-free. Clean the machine feed and the parts in slots C. Changing the light bulb Push the light bulb up, turn it toward A and pull it out.
Insert the new bulb so that its pins slide in the vicinity of oil into the hook race way now and then. 21 Cleaning and oiling Tilt needle plate 38 up at the back (A) and take it out (B). Do not oil the machine because it is put a drop of the sewing hook with a sàft brush. Push it up and turn it toward B. All you have to do is maintenance-free. Clean the machine feed and the parts in slots C. Changing the light bulb Push the light bulb up, turn it toward A and pull it out.


