
Pfaff Tipmatic 1027 Support Question
Pfaff Tipmatic 1027 Support Question
Find answers below for this question about Pfaff Tipmatic 1027.Need a Pfaff Tipmatic 1027 manual? We have 1 online manual for this item!
Question posted by yaacovi on August 23rd, 2013
How Do I Oil My Sewing Machine ????
The person who posted this question about this Pfaff product did not include a detailed explanation. Please use the "Request More Information" button to the right if more details would help you to answer this question.
Current Answers
Answer #1: Posted by TommyKervz on August 23rd, 2013 11:32 PM
TommyKervz

Member since:
January 10th, 2013 Points: 17,776,813

Member since:
January 10th, 2013 Points: 17,776,813
Greetings - The following is a quote from page 25 of the machine's Manual.
"Do not oil the machine because it is maintenance-free. All you have to do is put a drop of oil into the hook race way now and then"
http://www.helpowl.com/manuals/Pfaff/Tipmatic1027/184679
"Do not oil the machine because it is maintenance-free. All you have to do is put a drop of oil into the hook race way now and then"
http://www.helpowl.com/manuals/Pfaff/Tipmatic1027/184679
Related Pfaff Tipmatic 1027 Manual Pages
Owner's Manual - Page 2
... bobbin Inserting the bobbin Inserting the bobbin case Drawing up the bobbin thread Presser bar lifter Thread cutter Thread tensions Regulating the stitch length Reverse sewing Finger-tip controls 1027 Finger-tip controls 1025 Selecting utility stitches Selecting stretch stitches Utility- K
J Fold out this page
4 Contents Removing the carrying case cover...
Owner's Manual - Page 4
...oil the machine or have to interrupt sewing and leave the machine for entering phone number of customer service
a) Be careful to use only a 15-watt light bulb in the sewing lamp. c) Be sure to avoid finger injuries by the needle when sewing. Parts of your sewing machine...(Model 1027) 46 Accessory box with accessory compartment underneath 47 Bobbin winder 48 Free arm cover (enclosing sewing hook ...
Owner's Manual - Page 5
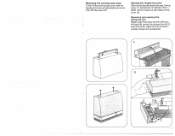
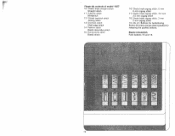
On Model 1027 a stitch chart is found on the inside of this cover (A). Opening the hinged top cover Also fold the handle toward the left (C) and lift it ...
Owner's Manual - Page 6
I;- C
a
0
0
Accessory box and accessory compartment sTliofiltrtyitucpooutmht ep(Aaf)rr.tomTnhet enortfe(aBics)caeunsnsdaoedrrdynietbiaootnxha.4l 6acacneds
Ill. C
2
. C shows how the second spool holder
snap-on sewing feet, the and the seam ripper fit
into the box.
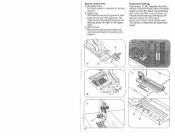
Owner's Manual - Page 7
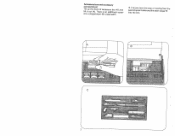
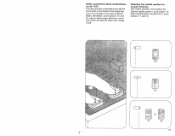
... and plug C into the wall outlet. Your machine is depressed, the faster the machine runs.
3
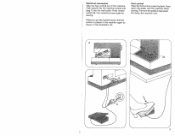
The more the pedal is now readyfor sewing. Electrical connection Take the foot control out of the machine.
When you put the machine away, the foot control is placed in the machine again as shown in the illustration (A). Foot control
Place...
Owner's Manual - Page 8
...thread on it into the right thread guide, the other to the left .
4 Upper threading Raise the sewing foot.
B Large spools of thread:
Push unreeling discs D and Eon the spool holder in the drawing....
One of the threads is used for bobbin winding and twinneedle sewing.
Then draw it back into slot B, into thread guide 50 and into the left of thread,...
Owner's Manual - Page 9
V
Disengaging the sewing mechanism Before you .
Hold the hand wheel steady and turn the stop motion knob toward you start winding the bobbin, disen gage the sewing mechanism. After bobbin winding, tighten the knob again by turning it away from front to back.
Threading the needle Thread the needle from you.
5
Owner's Manual - Page 10
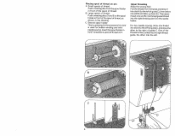
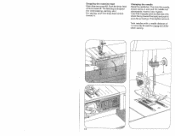
...to start the bobbin winder. Leave the top cover open during bobbin winding. Re-engage the sewing mechanism.
6 Insert the spool holder and place a spool of thread on spindle 47 so that... spool, lead it around bobbin tension stud 55, wind it out. Disengage the sewing mechanism. Then re-engage the sewing mechanism. Place a bobbin on the bobbin. Push the full bobbin toward the right...
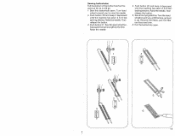
Owner's Manual - Page 12
... lever is up. Drawing up the bobbin thread
Hold the needle thread a little taut. Turn hand wheel 32 toward the left and back under the sewing foot.
8
Inserting the bobbin case Pull out latch K and push the bobbin case onto stud B, making sure slot A is up.
Owner's Manual - Page 13

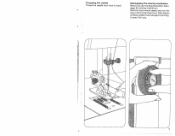
... located at the back of the machine toward you to cut them.
9 C The sewing foot is lowered for inserting extra-thick materials. Draw the threads into the cutter slot and pulithem downwards to raise the needle and take-up lever 52.) B = The sewing foot is raised further for sewing. Pull the work , turn the...
Owner's Manual - Page 15

... the number indi cating the stitch length chosen is opposite mark A. B shows how to set the stitch length control for sewing stretch stitches (red stitch symbols on push buttons).
Reverse sewing
Push button 44. As long as you keep this button depressed, the machine sews back wards.
11
Stitch length range: Model 1025: 0-4 Model...
Owner's Manual - Page 16
Finger-tip controls of model 1027 10 Elastic triple straight stitch
Straight stitch 11 Pullover stitch
Blindstitch 1 2 Closed overlock stitch
Joining stitch 1 3 Overlock stitch
Shell-edge stitch 14 Feather stitch
Elastic ...
Owner's Manual - Page 19
... 1027
The various stitch combinations are shown in the chart on the inside of the hinged top cover. Selecting the needle position for straight stitching
Left needle position: push button 20 Central needle position: push button 1 0 Right needle position (model 1 027): push buttons 11 and 1 2. For example, if you want to sew...
Owner's Manual - Page 20
...Twin needles with the flat side of 1.4mm may be used for embroidering, darning, etc.) For sewing, push the drop-feed control toward B. Then hold the needle, loosen screw A and pull ...tighten screw A. Push the drop-feed control toward A. The feed dog is dropped (for zigzag and utility stitch sewing.
16 Insert a new System 1 30/705 H needle (with a needle distance of its shank facing toward...
Owner's Manual - Page 21

... hold it in slot C. Hole E and screw Dare used for attaching an edge guide. When attaching a sewing foot make sure stud B enters slot C.
Lower presser bar lifter 42 and at the same time reposition the sewing foot so that stud B fits in place with your left hand. Screw F serves to secure the...
Owner's Manual - Page 22
... insert its rear pin into groove F, then push its front pin into groove G. C Darning foot Remove the sewing foot holder and secure the darning foot in front lug D. Insert the filler cord as follows (C): Place it over...of the foot, pull it taut and clamp it in position with screw H. As you sew, arrow E moves along the right or left zipper chain. The zipper foot can be adjusted sideways for stitching...
Owner's Manual - Page 23
... button 20 and keep it depressed
until the machine has sewn 4 to 6 bartacking stitches. Sew the second button
hole seam the same length as it will go. 1 Sew first buttonhole seam. Turn hand
wheel torward you until the machine has sewn 4 to 6 bartacking stitches. Raise the needle. Sewing buttonholes Pull the bottom of the buttonhole...
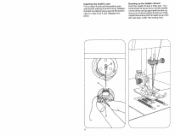
Owner's Manual - Page 25
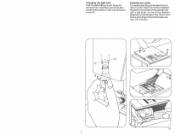
... the new bulb so that its pins slide in the vicinity of oil into the hook race way now and then.
21 All you have to do is maintenance-free. Do not oil the machine because it is put a drop of the sewing hook with a sàft brush. Changing the light bulb
Push the...
Owner's Manual - Page 26
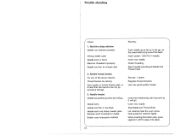
... and Thread Chart.
When inserting the bobbin case, press against it until it will go. Machine threaded improperly. Needle thread breaks For any of the above . Needle bent. Let machine feed the work is pushed or pulled. Machine skips stitches Needle not inserted correctly. Needle bent or blunt. Needle breaks Needle not pushed...
Owner's Manual - Page 27
...needle plate and clean out lint. Use first-class thread only. Thread machine properly and check both tensions.
5.
Remove thread ends and put a drop of material. Check upper and lower tensions. Machine feeds irregularly or not at left.)
Flick reverse-feed control to the...Tension out of feed dog.
Bobbin thread wound unevenly. Kinks appear on top and bottom of oil into hook raceway.
23
Similar Questions


Stitch Selection - Zigzag Etc.
good day, please tell me how the stitch selection works on the tipmatic 1027 sewing machine
good day, please tell me how the stitch selection works on the tipmatic 1027 sewing machine
(Posted by myrnamjs 2 years ago)

Tipmatic 1027 Has Power, The Light Is On , But It Won't Run.
Plugged in. Light on. no movement when foot pedal depressed. fly wheel turns. needle rises and falls
Plugged in. Light on. no movement when foot pedal depressed. fly wheel turns. needle rises and falls
(Posted by joannekulesza 8 years ago)

Pfaff Tipmatic 1027 -emitting Smoke
My Pfaff 1027, while not being used, started to emitt smoke from various openings. I unplugged and l...
My Pfaff 1027, while not being used, started to emitt smoke from various openings. I unplugged and l...
(Posted by Clingwood 9 years ago)
