

Owner's Manual
Page 2
... ("0") when making any other user servicing adjustments mentioned in Àrm person. • Use this sewing machine only for examination, repair, electrical or mechanical adjustment. • Never operate the sewing machine with same type rated 5 Watt. WARNING - To reduce the risk of lint, dust, and loose cloth. • Keep Àngers away from outlet. • Do not unplug by the manufacturer as threading needle, changing needle, threading bobbin, or changing presser foot, etc...
... ("0") when making any other user servicing adjustments mentioned in Àrm person. • Use this sewing machine only for examination, repair, electrical or mechanical adjustment. • Never operate the sewing machine with same type rated 5 Watt. WARNING - To reduce the risk of lint, dust, and loose cloth. • Keep Àngers away from outlet. • Do not unplug by the manufacturer as threading needle, changing needle, threading bobbin, or changing presser foot, etc...
Owner's Manual
Page 3
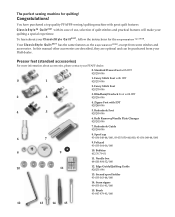
... stitches and accessories. Fancy Stitch Foot with great quilt features. Second spool holder 93-033 063-44/000 14. Buttonhole Guide 820294-096 6 7 8. Your C l a s s i c S t y l e Q u i l t 2 0 2 7 has the same features as the expression2028, except from your PFAFF dealer. 0. Bulb Remover/Needle Plate Changer 820292-096 7. You have purchased a top quality PFAFF® sewing/quilting machine with IDT 820253-096 2. To learn about accessories, please contact your Pfaff dealer. Zipper Foot with IDT 820250-096 0 1 1. Buttonhole Foot...
... stitches and accessories. Fancy Stitch Foot with great quilt features. Second spool holder 93-033 063-44/000 14. Buttonhole Guide 820294-096 6 7 8. Your C l a s s i c S t y l e Q u i l t 2 0 2 7 has the same features as the expression2028, except from your PFAFF dealer. 0. Bulb Remover/Needle Plate Changer 820292-096 7. You have purchased a top quality PFAFF® sewing/quilting machine with IDT 820253-096 2. To learn about accessories, please contact your Pfaff dealer. Zipper Foot with IDT 820250-096 0 1 1. Buttonhole Foot...
Owner's Manual
Page 4
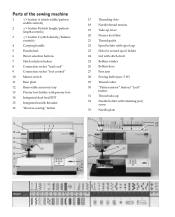
... plate 12 Removable accessory tray 13 Presser foot holder with presser foot 14 Integrated dual feed/IDT 15 Integrated needle threader 16 "Reverse sewing" button 17 Threading slots 18 Needle thread tension 19 Take-up lever 20 Presser foot lifter 21 Thread guide 22 Spool holder with spool cap 23 Hole for second spool holder 24 Lid with stitch chart 25 Bobbin winder 26 Bobbin door 27 Free arm 28 Sewing bulb (max. 5 W) 29 Thread cutter 30 "Pattern mirror" button/"Lock" button 31 Thread take-up 32 Needle holder with retaining (set) screw 33 Needle plate...
... plate 12 Removable accessory tray 13 Presser foot holder with presser foot 14 Integrated dual feed/IDT 15 Integrated needle threader 16 "Reverse sewing" button 17 Threading slots 18 Needle thread tension 19 Take-up lever 20 Presser foot lifter 21 Thread guide 22 Spool holder with spool cap 23 Hole for second spool holder 24 Lid with stitch chart 25 Bobbin winder 26 Bobbin door 27 Free arm 28 Sewing bulb (max. 5 W) 29 Thread cutter 30 "Pattern mirror" button/"Lock" button 31 Thread take-up 32 Needle holder with retaining (set) screw 33 Needle plate...
Owner's Manual
Page 6
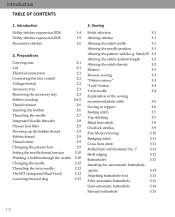
...thread 2:9 Thread cutter 2:9 Changing the presser foot 2:9 Setting the needle thread tension 2:10 Winding a bobbin through the needle 2:10 Changing the needle 2:12 Threading the twin needle: 2:12 The IDT (Integrated Dual Feed) 2:13 Lowering the feed dog 2:13 3. Stitch 25 3:2 Altering the stitch/pattern length 3:2 Altering the stitch density 3:2 Balance 3:3 Reverse sewing 3:3 "Pattern mirror" 3:3 "Lock" button 3:4 Twin needle 3:4 Explanation of the sewing recommendations table 3:6 Sewing in zippers 3:6 Basting stitch 3:7 Top stitching 3:7 Blind hem...
...thread 2:9 Thread cutter 2:9 Changing the presser foot 2:9 Setting the needle thread tension 2:10 Winding a bobbin through the needle 2:10 Changing the needle 2:12 Threading the twin needle: 2:12 The IDT (Integrated Dual Feed) 2:13 Lowering the feed dog 2:13 3. Stitch 25 3:2 Altering the stitch/pattern length 3:2 Altering the stitch density 3:2 Balance 3:3 Reverse sewing 3:3 "Pattern mirror" 3:3 "Lock" button 3:4 Twin needle 3:4 Explanation of the sewing recommendations table 3:6 Sewing in zippers 3:6 Basting stitch 3:7 Top stitching 3:7 Blind hem...

Owner's Manual
Page 8
..., shirts and linen. 5 0 Button attaching program For two-hole or four-hole buttons. 2 10 Basting stitch For basting project pieces together. 1 11 Zigzag stitch Right/Left For applique, couching over cords and creating eyelets. 3 needle position 12 Lightning stretch stitch For joining light weight stretch fabrics and decorative 1 embellishment 13 Decorative elastic stitch For joining overlapped seams on stretch 3 fabrics. 7 Closed overlock stitch For hemming and overlapping stretch fabrics in zippers. 2 Stretch triple straight For reinforced seams such as leathers...
..., shirts and linen. 5 0 Button attaching program For two-hole or four-hole buttons. 2 10 Basting stitch For basting project pieces together. 1 11 Zigzag stitch Right/Left For applique, couching over cords and creating eyelets. 3 needle position 12 Lightning stretch stitch For joining light weight stretch fabrics and decorative 1 embellishment 13 Decorative elastic stitch For joining overlapped seams on stretch 3 fabrics. 7 Closed overlock stitch For hemming and overlapping stretch fabrics in zippers. 2 Stretch triple straight For reinforced seams such as leathers...
Owner's Manual
Page 14
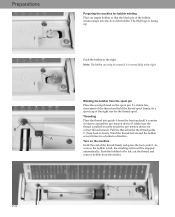
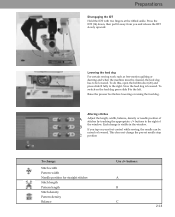
... stopped automatically. Preparations Preparing the machine for bobbin winding Place an empty bobbin so that the black pin of the bobbin winder snaps into guide A from the front and pull it is moved fully to the right Winding the bobbin from the spool pin Place the sewing thread on the machine Hold the end of the thread Àrmly and press the foot control. C 2:4 As soon as the bobbin is...
... stopped automatically. Preparations Preparing the machine for bobbin winding Place an empty bobbin so that the black pin of the bobbin winder snaps into guide A from the front and pull it is moved fully to the right Winding the bobbin from the spool pin Place the sewing thread on the machine Hold the end of the thread Àrmly and press the foot control. C 2:4 As soon as the bobbin is...
Owner's Manual
Page 16
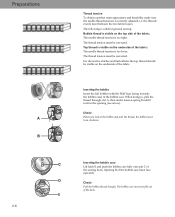
... towards the bobbin case) in the opening (see arrow). Top thread is visible on the underside of the fabric: The needle thread tension is too loose. For decorative stitches and buttonholes the top thread should be visible on the top side of the fabric: The needle thread tension is too tight. The bobbin case must turn clockwise Inserting the bobbin case Lift latch E and push the bobbin case fully onto pin C of the hook. Check...
... towards the bobbin case) in the opening (see arrow). Top thread is visible on the underside of the fabric: The needle thread tension is too loose. For decorative stitches and buttonholes the top thread should be visible on the top side of the fabric: The needle thread tension is too tight. The bobbin case must turn clockwise Inserting the bobbin case Lift latch E and push the bobbin case fully onto pin C of the hook. Check...

Owner's Manual
Page 18
... the needle threader slowly moves upwards. Press the threader down with the presser foot lifter (20). 2:8 Place the thread over hook E and under the thread hook F and hold the end of the thread so a thread loop forms behind the needle. Release the end of the thread taut. Threader hook F swivels through the needle eye. Preparations E F Integrated Needle threader In order to make threading the needle easier and quicker, use the Pfaff Integrated Needle threader. Lower the presser foot.
... the needle threader slowly moves upwards. Press the threader down with the presser foot lifter (20). 2:8 Place the thread over hook E and under the thread hook F and hold the end of the thread so a thread loop forms behind the needle. Release the end of the thread taut. Threader hook F swivels through the needle eye. Preparations E F Integrated Needle threader In order to make threading the needle easier and quicker, use the Pfaff Integrated Needle threader. Lower the presser foot.

Owner's Manual
Page 20
... the machine is fully threaded. The normal setting for sewing is lowered, the pins of the needle thread tension (18) using the markings on the tension dial. Pull the needle thread underneath the presser foot and upward through the needle It is possible to the top position. Setting the needle thread tension Set the required amount of the foot engage in the presser foot holder. Winding a bobbin through the right-hand threader slot (17). For decorative sewing, darning and buttonhole sewing 3. Preparations 2:10 Attaching the presser foot...
... the machine is fully threaded. The normal setting for sewing is lowered, the pins of the needle thread tension (18) using the markings on the tension dial. Pull the needle thread underneath the presser foot and upward through the needle It is possible to the top position. Setting the needle thread tension Set the required amount of the foot engage in the presser foot holder. Winding a bobbin through the right-hand threader slot (17). For decorative sewing, darning and buttonhole sewing 3. Preparations 2:10 Attaching the presser foot...

Owner's Manual
Page 21
... rear. Lower the presser foot and insert the needle, pushing it up as far as it will go. Push the bobbin to its highest position. Loosen the needle screw (32) and pull the needle out downwards. Wind the beginning of the thread Àrmly and press the foot control. Changing the needle Switch off the main switch To remove: Lower the presser foot and set the needle to the right. C Guide the thread to...
... rear. Lower the presser foot and insert the needle, pushing it up as far as it will go. Push the bobbin to its highest position. Loosen the needle screw (32) and pull the needle out downwards. Wind the beginning of the thread Àrmly and press the foot control. Changing the needle Switch off the main switch To remove: Lower the presser foot and set the needle to the right. C Guide the thread to...
Owner's Manual
Page 23
... sewing, the needle can be cleaned, the feed dog has to the left. Preparations Disengaging the IDT Hold the IDT with two Àngers at the ribbed ankle. Lowering the feed dog For certain sewing work such as free-motion quilting or darning and when the machine must be C raised or lowered. Now the feed dog is visible in the window. Each change : Stitch width Pattern width Needle position for straight stitches Stitch length Pattern length Stitch density Pattern density Balance Use -/+ buttons...
... sewing, the needle can be cleaned, the feed dog has to the left. Preparations Disengaging the IDT Hold the IDT with two Àngers at the ribbed ankle. Lowering the feed dog For certain sewing work such as free-motion quilting or darning and when the machine must be C raised or lowered. Now the feed dog is visible in the window. Each change : Stitch width Pattern width Needle position for straight stitches Stitch length Pattern length Stitch density Pattern density Balance Use -/+ buttons...
Owner's Manual
Page 26
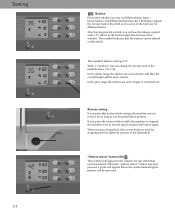
... different fabric types - The balance adjusts the reverse feed of the stitch so it in reverse for any stitch that the balance can change the reverse feed of the buttonhole. In the plus range the stitches are sewn shorter, and thus the overall length will be mirrored. Reverse sewing If you keep the button pressed. When sewing a buttonhole, the reverse button is fed differently than Àne silk. The standard balance setting...
... different fabric types - The balance adjusts the reverse feed of the stitch so it in reverse for any stitch that the balance can change the reverse feed of the buttonhole. In the plus range the stitches are sewn shorter, and thus the overall length will be mirrored. Reverse sewing If you keep the button pressed. When sewing a buttonhole, the reverse button is fed differently than Àne silk. The standard balance setting...

Owner's Manual
Page 29
... directions included with your zipper. Then set the needle position so that can be increased up to the right. Stitch Stitch Stitch number Stitch width in mm Stitch length in center needle position. The zipper foot can be adjusted with the Integrated Dual Feed (IDT) engaged or disengaged, needle thread tension setting and recommended presser foot,. If the foot is attached on how you will Ànd the settings we recommend for different sewing purposes. Change the needle position of the straight stitch...
... directions included with your zipper. Then set the needle position so that can be increased up to the right. Stitch Stitch Stitch number Stitch width in mm Stitch length in center needle position. The zipper foot can be adjusted with the Integrated Dual Feed (IDT) engaged or disengaged, needle thread tension setting and recommended presser foot,. If the foot is attached on how you will Ànd the settings we recommend for different sewing purposes. Change the needle position of the straight stitch...

Owner's Manual
Page 30
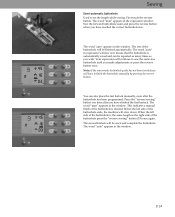
... needle positions allowing you to guide the presser foot along the fabric edge for each stitch. • Lower the feed dog and disengage the IDT. • Place the fabric under the presser foot. • Sew one stitch, then move the fabric the required amount to the rear. • Continue to baste with set screw F. The guide marks are easier to sew one stitch at a time until you Ànish basting. In this case the bottom feed need...
... needle positions allowing you to guide the presser foot along the fabric edge for each stitch. • Lower the feed dog and disengage the IDT. • Place the fabric under the presser foot. • Sew one stitch, then move the fabric the required amount to the rear. • Continue to baste with set screw F. The guide marks are easier to sew one stitch at a time until you Ànish basting. In this case the bottom feed need...
Owner's Manual
Page 37
... the correct buttonhole size. This indicates a manual Ànish of the buttonhole is automatically saved and can also place the last bartack manually, even after you have stitched the Àrst bartack. The second bartack will continue to set the length while sewing. Sew the forward buttonhole seam and press the reverse button when you have to Ànish the buttonhole manually by pressing the reverse button. Your expression...
... the correct buttonhole size. This indicates a manual Ànish of the buttonhole is automatically saved and can also place the last bartack manually, even after you have stitched the Àrst bartack. The second bartack will continue to set the length while sewing. Sew the forward buttonhole seam and press the reverse button when you have to Ànish the buttonhole manually by pressing the reverse button. Your expression...

Owner's Manual
Page 39
... more durable and will not stretch. After the machine sews the Àrst few stitches of the curved end pull the gimp thread down from the clamp with gimp thread Place the center of a length of gimp thread over the metal bar extending from the fabric surface. Place the center of a length of the buttonhole foot. Keyhole buttonhole with a straight pin. Carefully sew the curve. Cut off the...
... more durable and will not stretch. After the machine sews the Àrst few stitches of the curved end pull the gimp thread down from the clamp with gimp thread Place the center of a length of gimp thread over the metal bar extending from the fabric surface. Place the center of a length of the buttonhole foot. Keyhole buttonhole with a straight pin. Carefully sew the curve. Cut off the...
Owner's Manual
Page 46
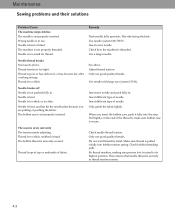
.... Thread tension is threaded. Only use . Insert new needle and push fully in it fully into bobbin tension spring. Insert different type of the thread to its highest position. The seam is not properly inserted. Check needle thread tension. Maintenance Sewing problems and their solutions Problem/Cause The machine skips stitches The needle is sewn unevenly The tension needs adjusting. Needle is bent Needle is raised to make sure bobbin case is bent or blunt. Insert a new needle. Needle is bent, and has hit the needle plate because you insert the bobbin case...
.... Thread tension is threaded. Only use . Insert new needle and push fully in it fully into bobbin tension spring. Insert different type of the thread to its highest position. The seam is not properly inserted. Check needle thread tension. Maintenance Sewing problems and their solutions Problem/Cause The machine skips stitches The needle is sewn unevenly The tension needs adjusting. Needle is bent Needle is raised to make sure bobbin case is bent or blunt. Insert a new needle. Needle is bent, and has hit the needle plate because you insert the bobbin case...
Owner's Manual
Page 47
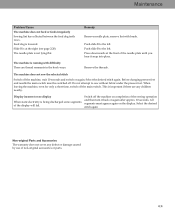
... Non-original Parts and Accessories The warranty does not cover any children nearby. Maintenance Problem/Cause The machine does not feed or feeds irregularly Sewing lint has collected between the feed dog teeth rows. The machine does not sew the selected stitch Switch off the main switch. Do not attempt to the left . Push slide B to sew without fabric under the presser foot. Remove the threads. Before changing presser feet and needle the main...
... Non-original Parts and Accessories The warranty does not cover any children nearby. Maintenance Problem/Cause The machine does not feed or feeds irregularly Sewing lint has collected between the feed dog teeth rows. The machine does not sew the selected stitch Switch off the main switch. Do not attempt to the left . Push slide B to sew without fabric under the presser foot. Remove the threads. Before changing presser feet and needle the main...

Owner's Manual
Page 48
... table 3:6 Altering the stitch/pattern length 3:2 Attaching buttonhole foot 3:13 F B Balance Basting stitch Free motion embroidery 3:19 Free Motion Sewing 3:10 3:3 Fully automatic buttonhole 3:13 3:7 Blind hem stitch Bobbin thread Bobbin winding Bridging stitch Buttonhole tips: 3:8 G 2:9 General notes on decorative sewing 3:18 2:4-5 3:11 H 3:17 Hemstitching 3:20 Buttonhole with gimp thread 3:16 I Buttonholes 3:13 Inserting the bobbin 2:6 Inserting the sensormatic buttonhole C Carrying case guide: 3:13 2:1 Integrated Needle threader 2:8 Changing the light bulb...
... table 3:6 Altering the stitch/pattern length 3:2 Attaching buttonhole foot 3:13 F B Balance Basting stitch Free motion embroidery 3:19 Free Motion Sewing 3:10 3:3 Fully automatic buttonhole 3:13 3:7 Blind hem stitch Bobbin thread Bobbin winding Bridging stitch Buttonhole tips: 3:8 G 2:9 General notes on decorative sewing 3:18 2:4-5 3:11 H 3:17 Hemstitching 3:20 Buttonhole with gimp thread 3:16 I Buttonholes 3:13 Inserting the bobbin 2:6 Inserting the sensormatic buttonhole C Carrying case guide: 3:13 2:1 Integrated Needle threader 2:8 Changing the light bulb...
Owner's Manual
Page 49
P Pattern mirror Presser foot lifter Q Quilt stitch R Removing the accessory tray Reverse sewing Rolled hem with hemmer No. 7 S Semi-automatic buttonhole Setting the needle thread tension Sewing in zippers Sewing on buttons Sewing problems and their solutions Shell edging Stitch selection Maintenance V 3:3 Voltage Switch 2:2 2:8 W Winding a bobbin through the needle 2:10 3:19 2:3 3:3 3:12 3:14 2:10 3:6 3:17 4:3 3:12 3:1 T Tapering 3:19 The IDT (Integrated Dual Feed) 2:13 Thread cutter 2:9 Thread tension 2:6 Threading the needle 2:7 Threading the twin needle: 2:12 Top ...
P Pattern mirror Presser foot lifter Q Quilt stitch R Removing the accessory tray Reverse sewing Rolled hem with hemmer No. 7 S Semi-automatic buttonhole Setting the needle thread tension Sewing in zippers Sewing on buttons Sewing problems and their solutions Shell edging Stitch selection Maintenance V 3:3 Voltage Switch 2:2 2:8 W Winding a bobbin through the needle 2:10 3:19 2:3 3:3 3:12 3:14 2:10 3:6 3:17 4:3 3:12 3:1 T Tapering 3:19 The IDT (Integrated Dual Feed) 2:13 Thread cutter 2:9 Thread tension 2:6 Threading the needle 2:7 Threading the twin needle: 2:12 Top ...


