
Owner's Manual
Page 2
..., and loose cloth. 5. Use only the attachments recommended by or near children. 2. Always use the proper needle plate, as threading the needle, changing the needle, threading the bobbin, changing the presser foot or changing the light. 10.Always unplug sewing machine from the electrical outlet when removing covers, lubricating, or when making any adjustments in the instruction manual. 11.Never drop or insert any other user servicing adjustments mentioned in the needle area, such as a wrong needle plate can cause the needle to persons...
..., and loose cloth. 5. Use only the attachments recommended by or near children. 2. Always use the proper needle plate, as threading the needle, changing the needle, threading the bobbin, changing the presser foot or changing the light. 10.Always unplug sewing machine from the electrical outlet when removing covers, lubricating, or when making any adjustments in the instruction manual. 11.Never drop or insert any other user servicing adjustments mentioned in the needle area, such as a wrong needle plate can cause the needle to persons...

Owner's Manual
Page 3
Replacing or removing the needle or any assemblies, the presser feet, needle or other hot objects. 2. Maintaining the machine. For a longer service life 1. For repair or adjustment In the event a malfunction occurs or adjustment is required, first follow the troubleshooting guide in the back of this operation manual to turn OFF the power switch and unplug the cord when: Operation is completed. If the problem persists, please consult your eye on...
Replacing or removing the needle or any assemblies, the presser feet, needle or other hot objects. 2. Maintaining the machine. For a longer service life 1. For repair or adjustment In the event a malfunction occurs or adjustment is required, first follow the troubleshooting guide in the back of this operation manual to turn OFF the power switch and unplug the cord when: Operation is completed. If the problem persists, please consult your eye on...
Owner's Manual
Page 4
... INSTRUCTIONS ...1-2 CONTENTS...3-5 ACCESSORIES ...6 PRINCIPAL PARTS OF THE MACHINE 7 FOOT CONTROL ...8 OPERATION BUTTONS...9-11 START/STOP button...9 Thread Snips ...9 Reverse button ...10 Auto-lock button ...10 Needle position button ...11 FUNCTION BUTTONS ...12-15 Stitch width adjustment button ...12 Stitch length adjustment button 13 Tension adjustment buttons ...13 FUNC selection button ...14 Key lock button...14 Bobbin winding button ...14 Elongation button ...15 Mirror image button ...15 Twin needle button ...15 SELECTION BUTTONS ...16-17 Direct stitch selection and number buttons...
... INSTRUCTIONS ...1-2 CONTENTS...3-5 ACCESSORIES ...6 PRINCIPAL PARTS OF THE MACHINE 7 FOOT CONTROL ...8 OPERATION BUTTONS...9-11 START/STOP button...9 Thread Snips ...9 Reverse button ...10 Auto-lock button ...10 Needle position button ...11 FUNCTION BUTTONS ...12-15 Stitch width adjustment button ...12 Stitch length adjustment button 13 Tension adjustment buttons ...13 FUNC selection button ...14 Key lock button...14 Bobbin winding button ...14 Elongation button ...15 Mirror image button ...15 Twin needle button ...15 SELECTION BUTTONS ...16-17 Direct stitch selection and number buttons...
Owner's Manual
Page 5
... NEEDLE/ FABRIC/ THREAD 41 THREAD TENSION...42 LENGTH & WIDTH ADJUSTMENT ...43 Stitch width adjustment ...43 Stitch length adjustment ...43 STITCH BALANCE ADJUSTMENT ...44 PRESSER FOOT PRESSURE ADJUSTMENT 45 USEFUL FUNCTIONS ...46-48 Reverse ...46 Free arm sewing...46 To raise or lower the feed dogs 47 Attaching the Knee Lift ...47 Knee Lift to raise / lower presser foot 47 USEFUL SEWING TIPS...48 Sewing corners...48 STITCHES SELECTING STITCHES ...49 BASIC STITCHING ...50-51 Straight stitches and needle position 50 Zigzag stitches ...50 Stretch stitch...51 BLIND HEM / LINGERIE STITCHING...
... NEEDLE/ FABRIC/ THREAD 41 THREAD TENSION...42 LENGTH & WIDTH ADJUSTMENT ...43 Stitch width adjustment ...43 Stitch length adjustment ...43 STITCH BALANCE ADJUSTMENT ...44 PRESSER FOOT PRESSURE ADJUSTMENT 45 USEFUL FUNCTIONS ...46-48 Reverse ...46 Free arm sewing...46 To raise or lower the feed dogs 47 Attaching the Knee Lift ...47 Knee Lift to raise / lower presser foot 47 USEFUL SEWING TIPS...48 Sewing corners...48 STITCHES SELECTING STITCHES ...49 BASIC STITCHING ...50-51 Straight stitches and needle position 50 Zigzag stitches ...50 Stretch stitch...51 BLIND HEM / LINGERIE STITCHING...
Owner's Manual
Page 8
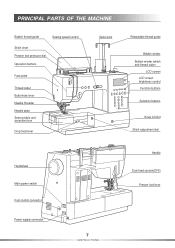
PRINCIPAL PARTS OF THE MACHINE Bobbin thread guide Sewing speed control Stitch chart Presser foot pressure dial Operation buttons Face plate Thread cutter Buttonhole lever Needle threader Needle plate Sewing table and accessory box Drop feed lever Spool pins Retractable thread guide Bobbin winder Bobbin winder switch and thread cutter LCD screen LCD screen brightness control Function buttons Selection buttons Knee Lift slot Stitch adjustment dial Handwheel Main power switch Foot control connector Power supply connector 7 INSTRUCTIONS Handle Dual feed system(DFS) Presser foot lever
PRINCIPAL PARTS OF THE MACHINE Bobbin thread guide Sewing speed control Stitch chart Presser foot pressure dial Operation buttons Face plate Thread cutter Buttonhole lever Needle threader Needle plate Sewing table and accessory box Drop feed lever Spool pins Retractable thread guide Bobbin winder Bobbin winder switch and thread cutter LCD screen LCD screen brightness control Function buttons Selection buttons Knee Lift slot Stitch adjustment dial Handwheel Main power switch Foot control connector Power supply connector 7 INSTRUCTIONS Handle Dual feed system(DFS) Presser foot lever

Owner's Manual
Page 13
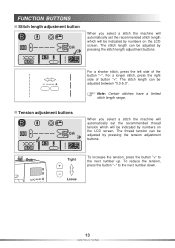
...4-D stitch 50 are selected, the needle position is regulated by pressing the stitch width adjustment buttons. The stitch width can be changed from left and pressing the "+" button (right), will move the needle to extreme right position "9.0". FUNCTION BUTTONS Stitch width adjustment buttons Stitch length adjustment buttons Tension adjustment buttons Twin needle button Mirror image button Elongation button Bobbin winding button Key lock button FUNC selection button Stitch width adjustment buttons When you select a stitch, the machine will automatically set center needle position...
...4-D stitch 50 are selected, the needle position is regulated by pressing the stitch width adjustment buttons. The stitch width can be changed from left and pressing the "+" button (right), will move the needle to extreme right position "9.0". FUNCTION BUTTONS Stitch width adjustment buttons Stitch length adjustment buttons Tension adjustment buttons Twin needle button Mirror image button Elongation button Bobbin winding button Key lock button FUNC selection button Stitch width adjustment buttons When you select a stitch, the machine will automatically set center needle position...
Owner's Manual
Page 14
... next number down. The stitch length can be indicated by pressing the stitch length adjustment buttons. Note: Certain stitches have a limited stitch length range. Loose 13 INSTRUCTIONS When you select a stitch the machine will automatically set the recommended thread tension which will be adjusted by pressing the tension adjustment buttons. To reduce the tension, press the button "" to the next number up. The thread tension can be adjusted by numbers on the LCD screen. The stitch length can be adjusted between...
... next number down. The stitch length can be indicated by pressing the stitch length adjustment buttons. Note: Certain stitches have a limited stitch length range. Loose 13 INSTRUCTIONS When you select a stitch the machine will automatically set the recommended thread tension which will be adjusted by pressing the tension adjustment buttons. To reduce the tension, press the button "" to the next number up. The thread tension can be adjusted by numbers on the LCD screen. The stitch length can be adjusted between...

Owner's Manual
Page 15
... will be set at direct mode A when you turn on while the bobbin is locked the Function and Selection buttons cannot be operated. Then press the 2 digit stitch number from accidentally being changed. Lock buttons to the group of stitches. Press the " " button to wind the bobbin. Put the empty bobbin on the bobbin winder shaft. Press " ", then 4, and then stitch number by using the numbered buttons. Bobbin can wind in any operation mode. 14 INSTRUCTIONS Press...
... will be set at direct mode A when you turn on while the bobbin is locked the Function and Selection buttons cannot be operated. Then press the 2 digit stitch number from accidentally being changed. Lock buttons to the group of stitches. Press the " " button to wind the bobbin. Put the empty bobbin on the bobbin winder shaft. Press " ", then 4, and then stitch number by using the numbered buttons. Bobbin can wind in any operation mode. 14 INSTRUCTIONS Press...
Owner's Manual
Page 34
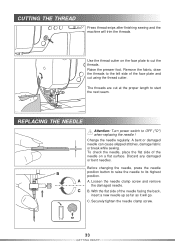
... needle on the face plate to start the next seam. CUTTING THE THREAD Press thread snips after finishing sewing and the machine will go. REPLACING THE NEEDLE Attention: Turn power switch to its highest position. Loosen the needle clamp screw and remove the damaged needle. Before changing the needle, press the needle position button to raise the needle to OFF ("O") when replacing the needle ! The threads are cut at the proper length to cut using the thread cutter. Raise the presser foot...
... needle on the face plate to start the next seam. CUTTING THE THREAD Press thread snips after finishing sewing and the machine will go. REPLACING THE NEEDLE Attention: Turn power switch to its highest position. Loosen the needle clamp screw and remove the damaged needle. Before changing the needle, press the needle position button to raise the needle to OFF ("O") when replacing the needle ! The threads are cut at the proper length to cut using the thread cutter. Raise the presser foot...
Owner's Manual
Page 50
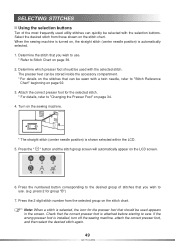
... page 39. 2. When the sewing machine is turned on the sewing machine. * The straight stitch (center needle position) is automatically selected. 1. If the wrong presser foot is attached before starting to sew. press 2 for the presser foot that should be used with the selected stitch. SELECTING STITCHES Using the selection buttons Ten of stitches that you wish to use . (e.g. Check that the correct presser foot is installed, turn off the sewing machine, attach the correct presser foot, and then select the...
... page 39. 2. When the sewing machine is turned on the sewing machine. * The straight stitch (center needle position) is automatically selected. 1. If the wrong presser foot is attached before starting to sew. press 2 for the presser foot that should be used with the selected stitch. SELECTING STITCHES Using the selection buttons Ten of stitches that you wish to use . (e.g. Check that the correct presser foot is installed, turn off the sewing machine, attach the correct presser foot, and then select the...

Owner's Manual
Page 51
... a longer stitch length, press the "+" stitch length adjustment button. The cutout on any stitches. Adjusting the stitch length The density of the Fancy stitch foot (2A) is designed to stitches 1-4 from "0.0-9.0". BASIC STITCHING Straight stitches and needle position Zigzag stitches Changing the needle position This setting can be reduced on the underside of zigzag stitches increases as a satin stitch. Generally speaking, the thicker the fabric, thread and needle, the longer the stitch should be applied only to accommodate dense stitch formation. 50 STITCHES The width...
... a longer stitch length, press the "+" stitch length adjustment button. The cutout on any stitches. Adjusting the stitch length The density of the Fancy stitch foot (2A) is designed to stitches 1-4 from "0.0-9.0". BASIC STITCHING Straight stitches and needle position Zigzag stitches Changing the needle position This setting can be reduced on the underside of zigzag stitches increases as a satin stitch. Generally speaking, the thicker the fabric, thread and needle, the longer the stitch should be applied only to accommodate dense stitch formation. 50 STITCHES The width...

Owner's Manual
Page 53
... of the stitch or move the guide to the left . 5 52 STITCHES Attach the blindhem foot. If the stitches are too visible on the presser foot accordingly. 3. Fold the fabric as you (counter clockwise) by turning the knob (a) so that the guide just rests against the folded edge of the fabric, increase the width or move the guide to sew blind hems. Always make a sewing test first...
... of the stitch or move the guide to the left . 5 52 STITCHES Attach the blindhem foot. If the stitches are too visible on the presser foot accordingly. 3. Fold the fabric as you (counter clockwise) by turning the knob (a) so that the guide just rests against the folded edge of the fabric, increase the width or move the guide to sew blind hems. Always make a sewing test first...
Owner's Manual
Page 57
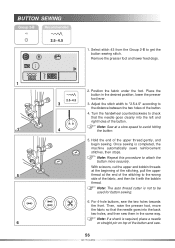
... machine automatically sews reinforcement stitches, then stops. Note: The auto thread cutter is not to attach the button more securely. Place the button in the same way. Adjust the stitch width to "2.5-4.5" according to get the button sewing stitch. Once sewing is required, place a needle 6 or straight pin on top of the stitching, pull the upper 5 thread at a slow speed to avoid hitting 4 the button. 5. Remove the presser foot and lower feed dogs. 1 2.5~4.5 3 2. With scissors, cut the upper and bobbin threads at...
... machine automatically sews reinforcement stitches, then stops. Note: The auto thread cutter is not to attach the button more securely. Place the button in the same way. Adjust the stitch width to "2.5-4.5" according to get the button sewing stitch. Once sewing is required, place a needle 6 or straight pin on top of the stitching, pull the upper 5 thread at a slow speed to avoid hitting 4 the button. 5. Remove the presser foot and lower feed dogs. 1 2.5~4.5 3 2. With scissors, cut the upper and bobbin threads at...

Owner's Manual
Page 61
... any buttonhole stitches on stretch fabric, hook gimp thread under the buttonhole foot. 1. Using a seam ripper, cut the middle part of the buttonhole. Use a pin as a stopper at the top of the gimp thread remaining at the bartack to prevent the stitching from buttonhole foot. Attach the buttonhole foot and hook the gimp thread onto the back spur of the PUSH gimp thread. Set the stitch width to match the diameter of the presser foot. BUTTONHOLE STITCHING Note: If the buttonhole lever...
... any buttonhole stitches on stretch fabric, hook gimp thread under the buttonhole foot. 1. Using a seam ripper, cut the middle part of the buttonhole. Use a pin as a stopper at the top of the gimp thread remaining at the bartack to prevent the stitching from buttonhole foot. Attach the buttonhole foot and hook the gimp thread onto the back spur of the PUSH gimp thread. Set the stitch width to match the diameter of the presser foot. BUTTONHOLE STITCHING Note: If the buttonhole lever...
Owner's Manual
Page 65
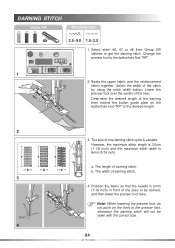
Baste the upper fabric and the reinforcement fabric together. a. Select the width of darning stitch. 4. The width of the stitch by using the stitch width button. Lower the presser foot over the center of darning stitch. However, the maximum stitch length is 3.5cm (1-1/8 inch) and the maximum stitch width is variable. Note: When lowering the presser foot, do not push on the buttonhole foot "RP" to be sewn with the correct size. 64 STITCHES Change the presser foot to...
Baste the upper fabric and the reinforcement fabric together. a. Select the width of darning stitch. 4. The width of the stitch by using the stitch width button. Lower the presser foot over the center of darning stitch. However, the maximum stitch length is 3.5cm (1-1/8 inch) and the maximum stitch width is variable. Note: When lowering the presser foot, do not push on the buttonhole foot "RP" to be sewn with the correct size. 64 STITCHES Change the presser foot to...
Owner's Manual
Page 68
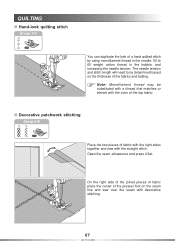
... quilted stitch by using monofilament thread in the needle, 50 to be substituted with a thread that matches or blends with the color of fabric with the right sides together and sew with decorative stitching. 67 STITCHES QUILTING Hand-look quilting stitch You can duplicate the look of the fabrics and batting. The needle tension and stitch length will need to 60 weight cotton thread in the bobbin, and increasing the needle tension. Open the seam...
... quilted stitch by using monofilament thread in the needle, 50 to be substituted with a thread that matches or blends with the color of fabric with the right sides together and sew with decorative stitching. 67 STITCHES QUILTING Hand-look quilting stitch You can duplicate the look of the fabrics and batting. The needle tension and stitch length will need to 60 weight cotton thread in the bobbin, and increasing the needle tension. Open the seam...
Owner's Manual
Page 72
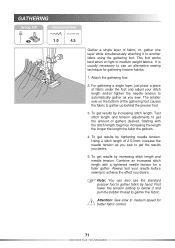
... automatically gather as you sew to another fabric using the gathering foot. Note: You can also use an alternative sewing technique for gathering heavier fabrics. 1. First lower the tension setting to below 2 and pull the bobbin thread to achieve the effect you desire. Attention: Sew slow to gather up behind the presser foot. 3. Starting with a tightened needle tension for better fabric control. 71 DECORATIVE TECHNIQUES Combine an increased stitch length with the stitch length, begin by increasing stitch length and needle tension. This foot works...
... automatically gather as you sew to another fabric using the gathering foot. Note: You can also use an alternative sewing technique for gathering heavier fabrics. 1. First lower the tension setting to below 2 and pull the bobbin thread to achieve the effect you desire. Attention: Sew slow to gather up behind the presser foot. 3. Starting with a tightened needle tension for better fabric control. 71 DECORATIVE TECHNIQUES Combine an increased stitch length with the stitch length, begin by increasing stitch length and needle tension. This foot works...
Owner's Manual
Page 77
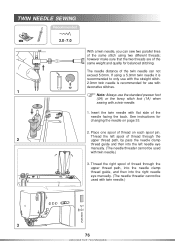
... spool of thread through the 2 upper thread path, by pass the needle clamp thread guide and then into the right needle eye manually. (The needle threader cannot be used with twin needle.) 3. however make sure that the two threads are of thread on page 33. 2. Insert the twin needle with a twin needle. 1. If using two different threads; Thread the left needle eye manually. (The needle threader cannot be used with twin needle.) 3 76 DECORATIVE TECHNIQUES See instructions for use with decorative stitches. 1 Note: Always use the standard presser foot...
... spool of thread through the 2 upper thread path, by pass the needle clamp thread guide and then into the right needle eye manually. (The needle threader cannot be used with twin needle.) 3. however make sure that the two threads are of thread on page 33. 2. Insert the twin needle with a twin needle. 1. If using two different threads; Thread the left needle eye manually. (The needle threader cannot be used with twin needle.) 3 76 DECORATIVE TECHNIQUES See instructions for use with decorative stitches. 1 Note: Always use the standard presser foot...

Owner's Manual
Page 91
... used . 3.Choose a needle to sew. page 27 page 42 page 41 page 33 page 27 page 33 1.The bobbin case is not correctly threaded. 2.Rethread the bobbin case. Problem Upper thread breaks Lower thread breaks Skipped stitches Needle breaks Loose stitches Seams gather or pucker Cause Correction Reference 1.The machine is not threaded correctly. 1.Rethread the machine. 2.The thread tension is too tight. 2.Reduce the thread tension to a lower number. 3.The thread is too thick for the needle. 3.Select a larger needle. 4.The needle is not inserted...
... used . 3.Choose a needle to sew. page 27 page 42 page 41 page 33 page 27 page 33 1.The bobbin case is not correctly threaded. 2.Rethread the bobbin case. Problem Upper thread breaks Lower thread breaks Skipped stitches Needle breaks Loose stitches Seams gather or pucker Cause Correction Reference 1.The machine is not threaded correctly. 1.Rethread the machine. 2.The thread tension is too tight. 2.Reduce the thread tension to a lower number. 3.The thread is too thick for the needle. 3.Select a larger needle. 4.The needle is not inserted...
Owner's Manual
Page 92
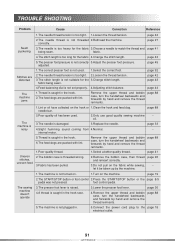
... sewing machine doesn't operate 2.The START/STOP button or foot control 2.Press the START/STOP button or the page 8/9 pedal was not pressed. page 41 2.Remove the bobbin case, then thread page 26 and reinsert correctly. 3.Do not pull on the hook or 1.Clean the hook and feed dog. page 45 1.The correct presser foot is threaded wrong. 3.Fabric has been pulled. 1.Select a better quality thread. internal motor. 5.Thread is not correctly 5.Adjust the presser foot pressure. page 43 5.The presser foot pressure...
... sewing machine doesn't operate 2.The START/STOP button or foot control 2.Press the START/STOP button or the page 8/9 pedal was not pressed. page 41 2.Remove the bobbin case, then thread page 26 and reinsert correctly. 3.Do not pull on the hook or 1.Clean the hook and feed dog. page 45 1.The correct presser foot is threaded wrong. 3.Fabric has been pulled. 1.Select a better quality thread. internal motor. 5.Thread is not correctly 5.Adjust the presser foot pressure. page 43 5.The presser foot pressure...


