
Pfaff C1100 Pro Support Question
Pfaff C1100 Pro Support Question
Find answers below for this question about Pfaff C1100 Pro.Need a Pfaff C1100 Pro manual? We have 1 online manual for this item!
Question posted by kasperflindt on March 28th, 2013
My Pfaff C1100 Is Clicking Continuously And Is Not Operational
Hello
My sowing machine Pfaff C1100 was sowing away even after I removed my foot from the pedal. I had to shut off the machine to stop it from sowing. Now, when I turn it back on, it is "clicking" whilst moving the needle up and down - not operational.
How do I terminate this situation?
Many thanks in advance
Kasper
Current Answers
Related Pfaff C1100 Pro Manual Pages
Owner's Manual - Page 2
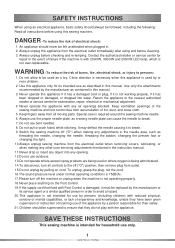
... the light. 10.Always unplug sewing machine from outlet. 15.Do not unplug by pulling on the Foot Control. 19. To unplug, grasp the plug, not the cord. 16.The sound pressure level under normal operating conditions is damaged, it must be supervised to the off ("O") position, then remove plug from the electrical outlet when...
Owner's Manual - Page 3

... when replacing or installing any other parts to turn OFF the power switch and unplug the cord when:
Operation is required, first follow the troubleshooting guide in the back of this machine, avoid direct sunlight and high humidity locations.
Replacing or removing the needle or any assemblies, the presser feet, needle or other parts...
Owner's Manual - Page 6
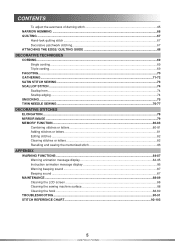
...cording...69
FAGOTING...70 GATHERING ...71-72 SATIN STITCH SEWING ...73 SCALLOP STITCH ...74
Scallop hem...74 Scallop edging...74 SMOCKING ...75 TWIN NEEDLE SEWING ...76-77
DECORATIVE STITCHES
ELONGATION...78 MIRROR IMAGE ...79...-89 Cleaning the LCD screen ...88 Cleaning the sewing machine surface 88 Cleaning the hook ...88-89
TROUBLESHOOTING ...90-91 STITCH REFERENCE CHART...92-103
5
INSTRUCTIONS
Owner's Manual - Page 8
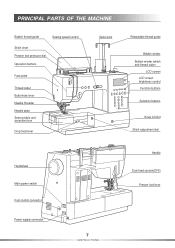
PRINCIPAL PARTS OF THE MACHINE
Bobbin thread guide
Sewing speed control
Stitch chart Presser foot pressure dial Operation buttons
Face plate
Thread cutter Buttonhole lever Needle threader Needle plate Sewing table and accessory box
Drop feed lever
Spool pins
Retractable thread guide
Bobbin winder Bobbin winder switch and thread cutter
LCD screen LCD screen brightness ...
Owner's Manual - Page 9
... manufactured by CHIEN HUNG TAIWAN., LTD.
8
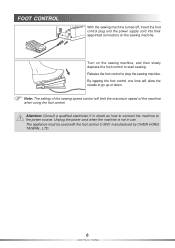
INSTRUCTIONS Note: The setting of the machine when using the foot control. FOOT CONTROL
With the sewing machine turned off, insert the foot control plug and the power supply cord into their appointed connectors on the sewing machine, and then slowly depress the foot control to start sewing.
Release the foot control to stop the sewing machine.
Owner's Manual - Page 10
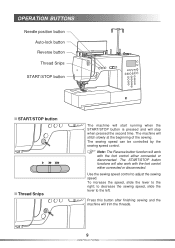
OPERATION BUTTONS
Needle position button Auto-lock button Reverse button Thread Snips
START/STOP button
START/STOP button Thread Snips
The machine will start running when the START/STOP button is pressed and will also work with the foot control either connected or disconnected. The START/STOP button functions will stop when pressed the second time.
To increase the...
Owner's Manual - Page 16
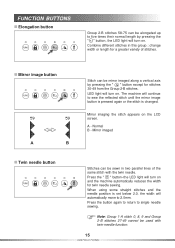
...turn on and the machine automatically reduces the width for stitches 30-49 from the Group 2-B stitches.
Press the button again to return to 2.0mm. Mirror imaging the stitch appears on . The machine will continue to five times their normal length by pressing the " " button except for twin needle sewing... elongated up to sew the reflected stitch until the mirror image button is...
Owner's Manual - Page 20

... while the machine is being operated, turn it off .
3. When restarting the machine, follow the necessary procedure to turn off the machine and unplug the power supply cord. The lamp comes on when the machine is turned on the right of the machine, the power switch is ON (" I "). Make sure the machine is turned off .
TURN MACHINE ON/ OFF
Turn on the machine
Press the...
Owner's Manual - Page 49
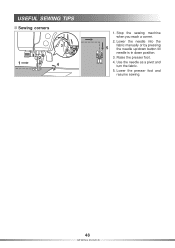
Lower the needle into the
5
fabric manually or by pressing the needle up/down button till
needle is in down position.
3. Use the needle as a pivot and turn the fabric.
5. Stop the sewing machine when you reach a corner.
2. Lower the presser foot and resume sewing.
48
SEWING BASICS Raise the presser foot.
4. USEFUL SEWING TIPS
Sewing corners
3
1.
Owner's Manual - Page 50
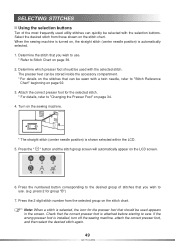
... screen will automatically appear on the stitch chart. SELECTING STITCHES
Using the selection buttons
Ten of stitches that the correct presser foot is installed, turn off the sewing machine, attach the correct presser foot, and then select the desired stitch again.
49
STITCHES Select the desired stitch from the selected group on page 34. 4. press...
Owner's Manual - Page 56
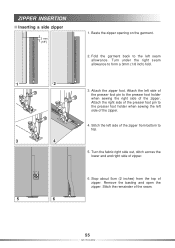
... the right seam allowance to the presser foot holder when sewing the left seam allowance. Attach the left side of the seam.
55
STITCHES Attach the right side of the presser foot pin to form a 3mm (1/8 inch) fold.
3. Remove the basting and open the zipper. Turn the fabric right side out, stitch across the lower...
Owner's Manual - Page 69

... that you desire. Secure the guide by tightening the screw. Sew the first row of stitching then move the fabric over placing the bar over the previous line of the presser foot ankle just enough to sew each consecutive row in the hole. Continue to insert the guide in this manner for equal distance between...
Owner's Manual - Page 70

... groove, then place the back end of the cord under the foot and sew. Select a narrow zig-zag, medium-long stitch length. CORDING
Sew over the cord, not into the grooves of the foot and pull about 5cm (2 inches) of the cords behind the foot. Pearl cotton, lightweight yarns, embroidery floss, etc, can be used...
Owner's Manual - Page 81
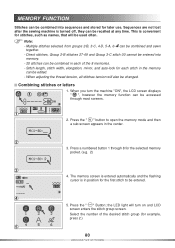
... 2-B, 3-C, 4-D, 5-A, 6- When you turn on and LCD screen enters the stitch group screen. When adjusting the thread tension, all stitches tension will turn the machine "ON", the LCD screen displays " ...-lock for the selected memory pocket. (e.g. 2)
3
4. Sequences are not lost after the sewing machine is in position for stitches, such as names, that will be edited. - Press a numbered...
Owner's Manual - Page 84
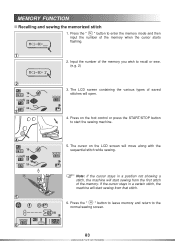
... the foot control or press the START/STOP button to enter the memory mode and then input the number of the memory. Press on the LCD screen will start sewing from the first stitch of the memory when the cursor starts flashing.
1
2. If the cursor stays in a position not showing a stitch, the machine will move...
Owner's Manual - Page 85
... find the solution.
WARNING FUNCTIONS
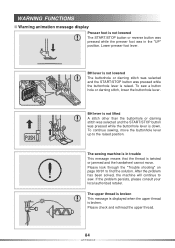
Warning animation message display
Presser foot is not lowered The START/STOP button or reverse button was pressed while the presser foot was in trouble This message means that the thread is twisted or jammed and the handwheel cannot move the buttonhole lever up to the raised position. To continue sewing, move .
Owner's Manual - Page 88
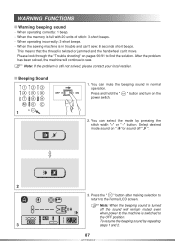
... the problem has been solved, the machine will remain muted even
when power to the machine is switched to sew. You can mute the beeping sound in trouble and can't sew: 8 seconds short beeps.
Note: If the problem is in normal operation. ON
Press and hold the " " button and turn on pages 90/91 to the...
Owner's Manual - Page 89
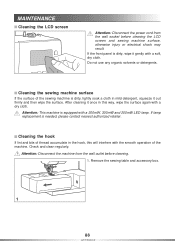
... and clean regularly.
If the front panel is equipped with the smooth operation of the machine. After cleaning it gently with a dry cloth. Cleaning the hook
If lint and bits of the sewing machine is needed, please contact nearest authorized retailer. Remove the sewing table and accessory box.
1
88
APPENDIX
Do not use any organic solvents...
Owner's Manual - Page 90
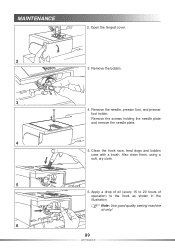
... to 20 hours of operation) to the hook as shown in the illustration. Remove the needle, presser foot, and presser foot holder. Also clean them, using a soft, dry cloth.
5
6. Remove the bobbin.
3
4. Clean the hook race, feed dogs and bobbin case with a brush. Note: Use good quality sewing machine oil only!
6 89
APPENDIX Remove the screws holding the...
Owner's Manual - Page 92
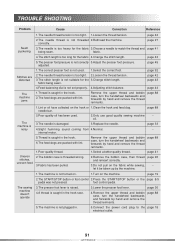
... the thread and page 41
being sewn.
correctly.
page 19
The sewing machine doesn't operate
2.The START/STOP button or foot control 2.Press the START/STOP button or the page 8/9
pedal was not pressed. page 42
2.The needle thread is damaged.
3.Replace the needle. page 41
2.Remove the bobbin case, then thread page 26 and reinsert correctly.
3.Do...
Similar Questions

I'm Trying To Make A Button Hole, The Sewing Machine Is Not Advancing The Fabric
(Posted by paulinegp22 4 years ago)

What Size Bobbin Does The Pfaff C1100 Pro Take?
I have gone through the manual several times and can't locate the information. I have also searched ...
I have gone through the manual several times and can't locate the information. I have also searched ...
(Posted by mbbellardini 8 years ago)

The Sewing Machine Will Say Calibrate Embroidery Unit. I Click The Check Mark T
when I click on calibrate the sewing machine goes into thinking mode & it just does it for a long ti...
when I click on calibrate the sewing machine goes into thinking mode & it just does it for a long ti...
(Posted by Anonymous-156748 8 years ago)

Pfaff C1100 Pro Sewing Machine Instruction
Can you please direct me to "easy" to understand instruction on how to "thread" my Pfaff C1100 Pro s...
Can you please direct me to "easy" to understand instruction on how to "thread" my Pfaff C1100 Pro s...
(Posted by magicfeathers55 10 years ago)

Sewing Machine Is Blinking Away And Not Able To Operate
Sewing machine was sewing constantly even after I removed my foot from the pedal. I had to switch it...
Sewing machine was sewing constantly even after I removed my foot from the pedal. I had to switch it...
(Posted by kasperflindt 11 years ago)