

Owner's Manual
Page 3
... Fig. 4. 4. Insert the full bobbin into the bobbin case so that the thread unwinds clockwise, as this would cause trouble if the bobbin is filled. Release the latch and remove the empty bobbin. Raise the needle bar, 2. The bobbin winder will stop automatically when the bobbin is placed on the transverse spool pin. 4. Lift latch A with thumb and forefinger, as you hold the latch open, the bobbin cannot fall...
... Fig. 4. 4. Insert the full bobbin into the bobbin case so that the thread unwinds clockwise, as this would cause trouble if the bobbin is filled. Release the latch and remove the empty bobbin. Raise the needle bar, 2. The bobbin winder will stop automatically when the bobbin is placed on the transverse spool pin. 4. Lift latch A with thumb and forefinger, as you hold the latch open, the bobbin cannot fall...

Owner's Manual
Page 5
... thread breaking, which may result in bobbn case or needle breakage. With the needte bar rasea, push the bobbm case on the center stud n the shuttle and turn it audibly snaps in the case of vertical spool pins when the thread SiES off the spooi. Push the bobbin case in until it until ifs position finger H is opposite the positcn s(ot (Fig. 4 8. Raise the presser bar...
... thread breaking, which may result in bobbn case or needle breakage. With the needte bar rasea, push the bobbm case on the center stud n the shuttle and turn it audibly snaps in the case of vertical spool pins when the thread SiES off the spooi. Push the bobbin case in until it until ifs position finger H is opposite the positcn s(ot (Fig. 4 8. Raise the presser bar...

Owner's Manual
Page 8
...: The needle and bobbin threads should be locked in the center of the fabric, as shown in restoring the correct tension for any particular sewing job. Regulating the Thread Tensions The tension on the tension regulator cup greatly help in Fig. 13. 8 Fig. 11 Fig, 12 The bobbin thread tension is regulated by turn ing it is n its highest position when beginning or end ing a seam. ing screw...
...: The needle and bobbin threads should be locked in the center of the fabric, as shown in restoring the correct tension for any particular sewing job. Regulating the Thread Tensions The tension on the tension regulator cup greatly help in Fig. 13. 8 Fig. 11 Fig, 12 The bobbin thread tension is regulated by turn ing it is n its highest position when beginning or end ing a seam. ing screw...

Owner's Manual
Page 10
... 1 e lower tension requWes adjus'ment, ;.rj' 'unirly whqn the thread forms sma.l knots or knks ii tap or bottom of stitches or thread breaking may oe too aveak or vie biter tl.read 'ens.on the opposite page. ChoosIng the Proper Noodle The Pfaff 30 use as tnin a needle as possible for oanory sewing operations, it .s ad visable ia se ect a neede one size...
... 1 e lower tension requWes adjus'ment, ;.rj' 'unirly whqn the thread forms sma.l knots or knks ii tap or bottom of stitches or thread breaking may oe too aveak or vie biter tl.read 'ens.on the opposite page. ChoosIng the Proper Noodle The Pfaff 30 use as tnin a needle as possible for oanory sewing operations, it .s ad visable ia se ect a neede one size...

Owner's Manual
Page 12
Changing the Needle See Fig. 16) . Setting the Length of its highest position. 2. Pull out the reedle with the flat side of Stitch The stitch length is regulated by tightening thumb nut S çFig. 2). 12 Li N __/ ( Fig. 16 10. Insert the new needle with your left hand. 4. lator lever up as far as it up or down and can be limited for forward and reverse sewing by moving the stitch regu. 9. Rase the reedle bar to its shank facing toward the needle bar and push it will go. 5. Loosen needle clamp screw N. 3. Tighten needle clamp screw N.
Changing the Needle See Fig. 16) . Setting the Length of its highest position. 2. Pull out the reedle with the flat side of Stitch The stitch length is regulated by tightening thumb nut S çFig. 2). 12 Li N __/ ( Fig. 16 10. Insert the new needle with your left hand. 4. lator lever up as far as it up or down and can be limited for forward and reverse sewing by moving the stitch regu. 9. Rase the reedle bar to its shank facing toward the needle bar and push it will go. 5. Loosen needle clamp screw N. 3. Tighten needle clamp screw N.

Owner's Manual
Page 13
... by the presser foot whether the work will occur. It has to be used for reverse). The numerals on the left of the stitch reguloor scale indicate the length of stitch in the shuttle race. Cleaning the Shuttle Race The Pfaff 30 is set on the underside of the fabric will feet smoothly and evenly or if staggering stitches and feed markings on R (for embroider ng and darning. Reverse feeding should am...
... by the presser foot whether the work will occur. It has to be used for reverse). The numerals on the left of the stitch reguloor scale indicate the length of stitch in the shuttle race. Cleaning the Shuttle Race The Pfaff 30 is set on the underside of the fabric will feet smoothly and evenly or if staggering stitches and feed markings on R (for embroider ng and darning. Reverse feeding should am...

Owner's Manual
Page 14
... sewing machine oil. Fig. 17 Cautiously remove pieces of loose thread with a stiletto, rinse the shuttle race with thumb and forefinger of your left hand. To replace the shuttle, insert it into the shuttle race from below, fitting it into place and tighten wing nut a securely so that it was removed. Swing cover R back into the position from which it will not get loose when sewing...
... sewing machine oil. Fig. 17 Cautiously remove pieces of loose thread with a stiletto, rinse the shuttle race with thumb and forefinger of your left hand. To replace the shuttle, insert it into the shuttle race from below, fitting it into place and tighten wing nut a securely so that it was removed. Swing cover R back into the position from which it will not get loose when sewing...

Owner's Manual
Page 15
... shuttle race will become time when lint and dust have accumulated in order to any seam sewn free-hand. This is located on the bed plate in the attach ment kit. Although it is not absolutely necessary to set the stitch regulator lever at "0" far embraidering and darning, it is attached to sewing position by turning this presser foot also for edge stitching, quilting, fell ing and hemming...
... shuttle race will become time when lint and dust have accumulated in order to any seam sewn free-hand. This is located on the bed plate in the attach ment kit. Although it is not absolutely necessary to set the stitch regulator lever at "0" far embraidering and darning, it is attached to sewing position by turning this presser foot also for edge stitching, quilting, fell ing and hemming...
Owner's Manual
Page 18
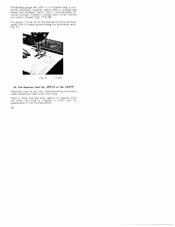
... be set at the desired distance between seams and its finger guided along the preceding seam. A A Fig. 21 R 4778 16. The Hemmer Feet Ne. 25576 or Ne. 25579 Hemming used to do it by hand. I . The gauge is indispensable for sewing blouses, childrens dresses and similar articles with elastic thread. (Figs. 19 & 20). The quilting gauge No. 25811 is a valuable help in...
... be set at the desired distance between seams and its finger guided along the preceding seam. A A Fig. 21 R 4778 16. The Hemmer Feet Ne. 25576 or Ne. 25579 Hemming used to do it by hand. I . The gauge is indispensable for sewing blouses, childrens dresses and similar articles with elastic thread. (Figs. 19 & 20). The quilting gauge No. 25811 is a valuable help in...

Owner's Manual
Page 20
... the needle plate in evenly feeding the fabric into the hemmer foot to aavcnrcge ri sewing light clothing, aprons and the To make a lap seam on with the left hand as the hem is sewn. To ovoid ugly corners at the end ot the hem, retard the feeding of the material shortly before the hem is pushed on a singie-needle sewing ma chine requires two operations...
... the needle plate in evenly feeding the fabric into the hemmer foot to aavcnrcge ri sewing light clothing, aprons and the To make a lap seam on with the left hand as the hem is sewn. To ovoid ugly corners at the end ot the hem, retard the feeding of the material shortly before the hem is pushed on a singie-needle sewing ma chine requires two operations...

Owner's Manual
Page 22
... very neat. Lightweight fabrics are darned by slipping the lower end of darning hook S (Fig. 2 over the presser foot set screw, raising the presser b< and inserting the top end of the hook into the felling foot an stitch ii down until the needle has risen clear of the materic In this operation. 18. Embroiderng and Darning Remove the presser foot and lower the feed dog. Having completed the first seam, open out the pli and...
... very neat. Lightweight fabrics are darned by slipping the lower end of darning hook S (Fig. 2 over the presser foot set screw, raising the presser b< and inserting the top end of the hook into the felling foot an stitch ii down until the needle has risen clear of the materic In this operation. 18. Embroiderng and Darning Remove the presser foot and lower the feed dog. Having completed the first seam, open out the pli and...

Owner's Manual
Page 25
.... Fig. 27 19. For the very hole large and holes, the patches are material. This will facilitate the guiding of the fabric and increase the tension of the patch. Cut the and attach it is advisable to the material in the hoop. Larger holes are cut larger than stitched to slip the small cover plate over the machine feed, even when the feed dog is dropped.
.... Fig. 27 19. For the very hole large and holes, the patches are material. This will facilitate the guiding of the fabric and increase the tension of the patch. Cut the and attach it is advisable to the material in the hoop. Larger holes are cut larger than stitched to slip the small cover plate over the machine feed, even when the feed dog is dropped.

Owner's Manual
Page 27
....nenrgYfooonrusdmur rwamfnaeaccllceehs.liunboerficwaailtlll. Fa. 29 Excess:ve oiing wl result n soing of face plate and put the takeup lever. Tshhue ttlleintracwehicshhoualdccbuemureamfeosvebdetfwreeqeunentfleye.d dog and Take a long screw driver to remove the needle plate 27 Lubricate your machine rnacine oil which you only w'th a firsm-rote can obtain from your sewro sewing machine dealer. Remove drop of tne sewight and the oil into the hinges of me work.
....nenrgYfooonrusdmur rwamfnaeaccllceehs.liunboerficwaailtlll. Fa. 29 Excess:ve oiing wl result n soing of face plate and put the takeup lever. Tshhue ttlleintracwehicshhoualdccbuemureamfeosvebdetfwreeqeunentfleye.d dog and Take a long screw driver to remove the needle plate 27 Lubricate your machine rnacine oil which you only w'th a firsm-rote can obtain from your sewro sewing machine dealer. Remove drop of tne sewight and the oil into the hinges of me work.

Owner's Manual
Page 29
D - be well cleaned and oiled at all central bobbin times to ensure perfect operation. 29 It is particularly important that came kept free of oil in removing dust. Ports that the shuttle be Do ore not forget to clean and arranged underneath the lubricate the bed plate of ports which receives me needle plate. Fig. 31 Fig. 32 A small brush will be recess which the machine. Take a stiletto and remove tween the tooth rows and in the the packed lint from be very useful in to contact prevent with the material should soiling of the work.
D - be well cleaned and oiled at all central bobbin times to ensure perfect operation. 29 It is particularly important that came kept free of oil in removing dust. Ports that the shuttle be Do ore not forget to clean and arranged underneath the lubricate the bed plate of ports which receives me needle plate. Fig. 31 Fig. 32 A small brush will be recess which the machine. Take a stiletto and remove tween the tooth rows and in the the packed lint from be very useful in to contact prevent with the material should soiling of the work.

Owner's Manual
Page 31
...See remedies listed above reasons. Machine improperly threaded. Check and correct threading as instructed in Chapter 4. Thread Breaking Cause Remedy Thread breaking may cause hard running of the mechanism. Thread tensions tao tight. ter 6. 3 Needle bent. Tcrfiaahngreiesh.alanAicdslql uttotheheranwtcioptioseatrpteohoqlefiusihmrtheaeidtchwtmioniatehcphrwaienisetsehorvfratee,qkuwtheiroereoosslgeelnnonosesc-lssoooptfhae.kctiehadel 21. Adjust upper and lower ten sions as instructed in Chap. Loose ends of thread may oc- Insert a new needle. Needle either...
...See remedies listed above reasons. Machine improperly threaded. Check and correct threading as instructed in Chapter 4. Thread Breaking Cause Remedy Thread breaking may cause hard running of the mechanism. Thread tensions tao tight. ter 6. 3 Needle bent. Tcrfiaahngreiesh.alanAicdslql uttotheheranwtcioptioseatrpteohoqlefiusihmrtheaeidtchwtmioniatehcphrwaienisetsehorvfratee,qkuwtheiroereoosslgeelnnonosesc-lssoooptfhae.kctiehadel 21. Adjust upper and lower ten sions as instructed in Chap. Loose ends of thread may oc- Insert a new needle. Needle either...

Owner's Manual
Page 32
... instructed in the feed Unscrew both the feed do slot. Shuttle race without oil or Dean and oil shuffle race. Cut the belt on the pressure on the transverse rather than the vertical spool pin. Peed dog jams in Chap race. wnen sewing. off the spool. Place the spool of silk. straight. and the needle plate an readjust properly. Thread snarled up by Use only Pfaff sewing ma infenor oiL chine oil...
... instructed in the feed Unscrew both the feed do slot. Shuttle race without oil or Dean and oil shuffle race. Cut the belt on the pressure on the transverse rather than the vertical spool pin. Peed dog jams in Chap race. wnen sewing. off the spool. Place the spool of silk. straight. and the needle plate an readjust properly. Thread snarled up by Use only Pfaff sewing ma infenor oiL chine oil...

Owner's Manual
Page 33
... or thread Study Needle and Thread too thick. Uneven Stitches Cause Remedy Tension regulated improperly. Don't force the feeding mo ban, just guide the material lightly. inserted in Chapter 6. Needle Breakage Cause Remedy Needle bent and by point of shuttle, struck Replace needle at once prevent more damage. Needle bent and strkes Either ease upper tension needle plate because up- Bobbin case correctly. or stiff. Adjust tension as instructed in - Don't run through the bobbin winder tension...
... or thread Study Needle and Thread too thick. Uneven Stitches Cause Remedy Tension regulated improperly. Don't force the feeding mo ban, just guide the material lightly. inserted in Chapter 6. Needle Breakage Cause Remedy Needle bent and by point of shuttle, struck Replace needle at once prevent more damage. Needle bent and strkes Either ease upper tension needle plate because up- Bobbin case correctly. or stiff. Adjust tension as instructed in - Don't run through the bobbin winder tension...

Owner's Manual
Page 34
f necessary, also feed doc then readjust. thread. Clean and oil machine a instructed in Cnapters 1 crd 20. Noisy Running Cause Remedy Accumuiatons of oil in the shuttle Apply one or two drops c race, oiL Thread accumulated be- Fig 35 34 Machine insufficiently oiled or oiled with kerosene. Release tension and remov tween tension discs. Caus Remedy Lock of packed Clean and oil snuttle roc mt in the shuttle raCe as instructed in Chapter Needle plate improperly Unscrew needle plate anc mounted.
f necessary, also feed doc then readjust. thread. Clean and oil machine a instructed in Cnapters 1 crd 20. Noisy Running Cause Remedy Accumuiatons of oil in the shuttle Apply one or two drops c race, oiL Thread accumulated be- Fig 35 34 Machine insufficiently oiled or oiled with kerosene. Release tension and remov tween tension discs. Caus Remedy Lock of packed Clean and oil snuttle roc mt in the shuttle raCe as instructed in Chapter Needle plate improperly Unscrew needle plate anc mounted.

Owner's Manual
Page 35
terial. if machine does not feed at all, check whether feed dog has been disengaged or stitch length lever set too low ,po Adjust position of the Screw in pressure regulat presser foot on the ma ing screw V. (Chapter 1 1). Improper Feeding Cause Remedy Feed dog set at zero. eve!. Insufficient pressure of feed dog that it does not rise suffi so that it shows a full tooth ciently above needle plate above the needle plate. Fig. 36 35 Accumulations of packed Take off needle plate and lint between tooth rows, remove lint with a stiletto.
terial. if machine does not feed at all, check whether feed dog has been disengaged or stitch length lever set too low ,po Adjust position of the Screw in pressure regulat presser foot on the ma ing screw V. (Chapter 1 1). Improper Feeding Cause Remedy Feed dog set at zero. eve!. Insufficient pressure of feed dog that it does not rise suffi so that it shows a full tooth ciently above needle plate above the needle plate. Fig. 36 35 Accumulations of packed Take off needle plate and lint between tooth rows, remove lint with a stiletto.

Owner's Manual
Page 37
... 31 Wmding the Bobbin 3. Settng the Length of Stitch 11, Regulating the Pressure on the Materiul 12. Care and Maintenance . . 21. Engagng and Dsengoging the Sewing Mechanism 2. Drawing Up the Bobbin Thread 6. Index Chapter 1. Dropping the Feed Dog 14. V 16. Choosing the Proper Needle B. The Felling Foot No. 25594 18. Changing the Bobbn 4. Threading the Needle 5. Needle and Thread Chart 9. Changing the Needle . 10. Cleaning the Shuttle Race 13. Using the Attachments 15. The...
... 31 Wmding the Bobbin 3. Settng the Length of Stitch 11, Regulating the Pressure on the Materiul 12. Care and Maintenance . . 21. Engagng and Dsengoging the Sewing Mechanism 2. Drawing Up the Bobbin Thread 6. Index Chapter 1. Dropping the Feed Dog 14. V 16. Choosing the Proper Needle B. The Felling Foot No. 25594 18. Changing the Bobbn 4. Threading the Needle 5. Needle and Thread Chart 9. Changing the Needle . 10. Cleaning the Shuttle Race 13. Using the Attachments 15. The...


