Pfaff hobbylock 795 Support and Manuals

Get Help and Manuals for this Pfaff item

View All Support Options Below
Free Pfaff hobbylock 795 manuals!
Problems with Pfaff hobbylock 795?

Ask a Question

Most Recent Pfaff hobbylock 795 Questions

I Have A Pfaff Quilt Expression 2038 & Foot Pedal Has Stopped Working. How Do I
Foot pedal has stopped working on 2038. How can I look inside pedal to see if wiring is faulty? I ha...
(Posted by anniecumbria 8 years ago)
New Needle
I have a hobbylock 795 and need a new right hand side needle it says it's a DB No 11-16 and doesn't ...
(Posted by Cherryann 9 years ago)
Wiring Diagram For Foot Pedal Pfaff 795. Thank You
I need the wiring diagram for the foot pedal for my pfaff 795. The foot pedal keeps blowing the fuse...
(Posted by eljibaro2 9 years ago)

Popular Pfaff hobbylock 795 Manual Pages

Owner's Manual - Page 2

... ging parts or accessories, the ma chine must never be disconnected from the power source. C) The maximum approved wattage of the needle, the user must take sufficient care to avoid injury and observe the sewing area continuously while sewing. D) The drive belt must be adjusted by anyone but an authorized Pfaff agent...
Owner's Manual - Page 3

... Adjusting the seam width Machine care Changing the needles Changing the lower knife Changing the upper knife Changing the light bulb Oiling the machine Accessories Specifications Sewing problems and solutions Changing the sewing feet 2, 3 4 4, 5 5 6, 7 7-11 8 9 10 11 12 13 14 15, 16 17 17 17 18, 19 20 21 21 22 21...
Owner's Manual - Page 5

...guide 3 Carrying handle 4 Left needle thread tension dial 5 Right needle thread tension dial 6 Right looper thread tension dial 7 Left looper thread tension dial 8 Thread tension cover 9 Upper knife 10 Knife guard 11 Presser foot lifter lever 12 Hand wheel 13 Looper cover 14 Looper cover lever 15 Work support 16 Stitch length setting... looper 33 Thread guide bar / 26 27 g 30 31 29° 32 /
Owner's Manual - Page 7

Foot control The speed of the Hobbylock is adjusted in two grades by the switch on and off simultaneously with the master switch. Machine and sewing light are switched off : Press switch ...
Owner's Manual - Page 9

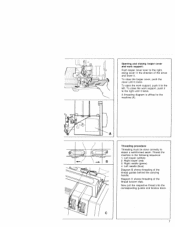
...looper (yellow) 2. Right needle (green) 4. To close the work support: Push looper cover lever to the right, swing cover in the following ...pull the respective thread into the corresponding guides and tension discs. Opening and closing looper cover and work support; To open the work support, push it . Diagram C shows threading of the thread guides behind the carrying handle. Thread the ...
Owner's Manual - Page 13

Now close the work support (1), push the handle down (2) and close the looper cover (3). 2 Inserting the lint box: Insert the tabs of the lint box into the slots (4) of the front cover. Use the reverse order to remove lint box. if Push the lint box up against the front cover until it snaps in place.
Owner's Manual - Page 17

Adjusting thread tension: Set all thread tension dials to fabric type and thread size. Examine the seam and make the necessary tension adjustments. Sew a test sample to be adjusted according to "N", standard setting. (See illustration below). Setting thread tension: The thread tension should be sure that the correct tension has been obtained. (See illustrations on the left).
Owner's Manual - Page 20

Remove knife guard (1) from the looper cover. Push the knife holder to set the knife in the lowest position. Open looper cover. Remove right needle. Disengaging ...move when you turn the knob clockwise until it locks. Caution: The overedge looper is in the highest position. Setting the machine for double chainstitch Remove the lint box, see page 11. Raising the upper knife: Turn the hand...
Owner's Manual - Page 21

... looper disengaging lever up (illustration below). Now the overedge looper is in the illustration. Set the upper knife in the looper cover and close it. Open the work support. Close the looper cover and work support and remove the fabric guide plate. Insert the knife guard in the normal cutting position. Insert DB x 1 (1738...
Owner's Manual - Page 23

... in mm. A = The red mark on the dial is the standard sewing foot pressure. Sewing foot pressure: Position "N" of the foot pressure dial is the setting mark. The normal stitch length is regulated by turning the stitch length dial. Thin fabrics: Reduce the sewing foot pressure by...
Owner's Manual - Page 24

...: After adjusting the seam width, it clicks. Push upper knife holder (1) to the lower (cutting) position and close the looper cover. Adjusting seam width: Standard setting is "N".
Owner's Manual - Page 26

Set the knife so that the cutting edge aligns with the cutting edge facing right. Return the upper knife to its normal position. •1 24 Tighten the lower knife clamp screw (1). Inserting lower knife: Insert a new knife into the groove of the lower knife holder with the surface of the needle plate. Loosen knife clamp screw (1) and pull the lower knife down.
Owner's Manual - Page 27

...the retaining screw securely. 25 Unplug the machine. Screw it clicks. It has to be 0.5 to be replaced with normal use. Push the upper knife holder to the far right and turn the knob clockwise until ... tipped and will not need to 1.0 mm lower in cutting position. Tighten slightly and set the upper knife in this position than the surface of the knife. Unscrew the knife retaining screw and...
Owner's Manual - Page 30

...: (not illustrated) Blindhem foot Elastic foot Specifications Max. sewing speed Seam width Stitch length Sewing foot Lubrication Needle system Dimensions Weight 1,300 stitches/mm. 3.0-7.0 mm 1-5 mm Snap-on manual JL x 1 and DR x 1 (or 1738) (sizes 9-14) 24 x 22 x 18.5 cm approx. 8,5 kg (19 lbs.) Sewing problems and solutions (see next page) This machine...
Owner's Manual - Page 31

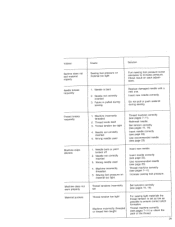
... machine correctly (see pages 7-11). Insert new needle. Increase sewing foot pressure. For sewing light materials the thread tension is set Thread tension too tight Machine incorrectly th or thread has caught. Replace damaged needle with a new one. Thread tension too tight 4. Rethread needle. Use recommended needle (see page 23). Insert needle...

Pfaff hobbylock 795 Reviews

Do you have an experience with the Pfaff hobbylock 795 that you would like to share?
Earn 750 points for your review!
We have not received any reviews for Pfaff yet.

Popular Pfaff hobbylock 795 Search Terms

The following terms are frequently used to search for Pfaff hobbylock 795 support:

Ask a New Question
Use the box below to post a new question about Pfaff hobbylock 795.
Manuals / Documents
Download any of our Pfaff hobbylock 795 manuals for free!

We have the following 1 documents available for the Pfaff hobbylock 795:
  • Owner's Manual

Points & Prizes
  • You can earn points for nearly everything you do on HelpOwl.com
  • You can trade in those points for gift cards at leading retailers such as Amazon.com and Walmart
  • It's that simple!
See How it Works
Create a Free Account

Pfaff Manuals

Find free Pfaff hobbylock 795 manuals and user guides available at ManualOwl.com. Try out our unique manual viewer allowing you to interact with manuals from directly within your browser!

Pfaff Reviews

View thousands of Pfaff hobbylock 795 user reviews and customer ratings available at ReviewOwl.com.

Contact Information

Complete Pfaff customer service contact information including steps to reach representatives, hours of operation, customer support links and more from ContactHelp.com.

Scoreboard Ratings

See detailed Pfaff customer service rankings, employee comments and much more from our sister site.