

Owner's Manual
Page 3
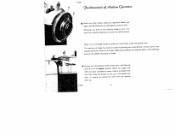
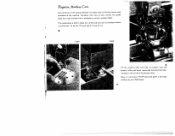
1 L j2 1 /4 12 11 1 Thread take-up lever 2 Thread retainer stud 3 Zigzag finger-tip control 4 Bobbin winder S Stop motion knob 6 Stitch length dial 7 Reverse feed control B Light switch 9 Drop feed control 10 Needle plate 11 Transverse rotary hook 12 Bed slide 2 13 Needle 14 Automatic needle threader 15 Needle thread tension 16 Sewlight 17 Stitch width dial 18 Needle position lever R 8290
1 L j2 1 /4 12 11 1 Thread take-up lever 2 Thread retainer stud 3 Zigzag finger-tip control 4 Bobbin winder S Stop motion knob 6 Stitch length dial 7 Reverse feed control B Light switch 9 Drop feed control 10 Needle plate 11 Transverse rotary hook 12 Bed slide 2 13 Needle 14 Automatic needle threader 15 Needle thread tension 16 Sewlight 17 Stitch width dial 18 Needle position lever R 8290

Owner's Manual
Page 4
19 IL- 20 21 / R 8292 19 Balance wheel 20 Collapsible spool pins 21 Top cover 22 Needle threader control t29 23 Face cover 24 Presser bar lifter 25 Sewing foot thumb screw 26 Sewing foot 3 27 Needle set screw 28 Bed plate 29 Space for built-in motor 30 Double receptacle for speed control and power cords
19 IL- 20 21 / R 8292 19 Balance wheel 20 Collapsible spool pins 21 Top cover 22 Needle threader control t29 23 Face cover 24 Presser bar lifter 25 Sewing foot thumb screw 26 Sewing foot 3 27 Needle set screw 28 Bed plate 29 Space for built-in motor 30 Double receptacle for speed control and power cords
Owner's Manual
Page 5
... you have completed a seam. d All Never run a threaded machine unless you (counter-clockwise as indicated by pushing or pulling the fabric while stitching because the needle may cause the thread to remove the work . Also, it to ward you have to observe this rule may bend or break. .4 Always turn it... lever up. The machine will feed the material under the presser foot. Whenever you until take-up lever d is easier to slip out of the needle eye. R 8251 4 Never try to hasten feeding by white arrow).
... you have completed a seam. d All Never run a threaded machine unless you (counter-clockwise as indicated by pushing or pulling the fabric while stitching because the needle may cause the thread to remove the work . Also, it to ward you have to observe this rule may bend or break. .4 Always turn it... lever up. The machine will feed the material under the presser foot. Whenever you until take-up lever d is easier to slip out of the needle eye. R 8251 4 Never try to hasten feeding by white arrow).
Owner's Manual
Page 8
...to the left , center, right) mdi cates the position of the slot, as desired. The position of lever B (left or right of the needle in the needle plate slot. Lever B changes the position of the stitch width set between /s and 2, you push the control up, the machine will sew straight..., regardless of the needle in the needle plate slat. 7 R7995 Dial G lengthens zigzag stitches or $- When dial A is set . When you can be moved from the center to desired...
...to the left , center, right) mdi cates the position of the slot, as desired. The position of lever B (left or right of the needle in the needle plate slot. Lever B changes the position of the stitch width set between /s and 2, you push the control up, the machine will sew straight..., regardless of the needle in the needle plate slat. 7 R7995 Dial G lengthens zigzag stitches or $- When dial A is set . When you can be moved from the center to desired...

Owner's Manual
Page 11
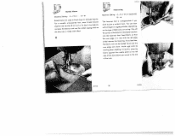
... shown in illustration 1, hold bobbin in the bobbin case and pull the thread into bobbin case. R$867 I R5869 2 R 8001 cot thc 73,66in Ctw A Raise needle to its open bed slide, so you release latch k the empty bobbin drops out. Hold the bobbin firmly in left hand and lift latch k with...
... shown in illustration 1, hold bobbin in the bobbin case and pull the thread into bobbin case. R$867 I R5869 2 R 8001 cot thc 73,66in Ctw A Raise needle to its open bed slide, so you release latch k the empty bobbin drops out. Hold the bobbin firmly in left hand and lift latch k with...

Owner's Manual
Page 12
... you will manage without tilting it snap into place. Release latch k and press against bobbin case until slot at its highest point. Make sure the needle is best to hold the loose end of thread so that it on center stud s of left . R 8006 A In replacing the bobbin case, itis best... of latch points up (see arrow). An improperly inserted bobbin case will not get jammed between bobbin case and hook. Then place it will cause needle breakage. 11 With the thumb and forefinger of hook.
... you will manage without tilting it snap into place. Release latch k and press against bobbin case until slot at its highest point. Make sure the needle is best to hold the loose end of thread so that it on center stud s of left . R 8006 A In replacing the bobbin case, itis best... of latch points up (see arrow). An improperly inserted bobbin case will not get jammed between bobbin case and hook. Then place it will cause needle breakage. 11 With the thumb and forefinger of hook.

Owner's Manual
Page 13
...) to 80 12 madras, muslin, brocades, heavy silks and rayon, gabardine. 70 ... However, the bobbin thread never should be thicker than the needle thread. Heavy Fabrics 40 such as dress silks and cottons, to sheer woolens, shirting, dro- 80 A& B twist 80 peries. Select the proper...Types of Fabrics Mercerized Cotton Fine Fabrics 80 such as georgette, chiflon, batiste, to voile, lawn, silk. 100 Silk 0 to ooo twist Needle Size 60 or 70 Lightweight Fabrics 70 such as coating, denim, corduroy, to slipcover fabrics, bed tickings, 50 lightweight canvas. Very Heavy ...
...) to 80 12 madras, muslin, brocades, heavy silks and rayon, gabardine. 70 ... However, the bobbin thread never should be thicker than the needle thread. Heavy Fabrics 40 such as dress silks and cottons, to sheer woolens, shirting, dro- 80 A& B twist 80 peries. Select the proper...Types of Fabrics Mercerized Cotton Fine Fabrics 80 such as georgette, chiflon, batiste, to voile, lawn, silk. 100 Silk 0 to ooo twist Needle Size 60 or 70 Lightweight Fabrics 70 such as coating, denim, corduroy, to slipcover fabrics, bed tickings, 50 lightweight canvas. Very Heavy ...
Owner's Manual
Page 14
...PFAFF 259 sewing machines, System 130 R, flat-shank needles are available from every Pfaff dealer. Inserl new needle into opening of needle clamp. R 6798 13 Bent or blunt needles should not be used for all ordinary sewing and embroidery work. Tighten needle set screw o half a turn and pull old needle out of needle... clamp and push it up as far as it will go. Genuine Pfaff needles, System 130 R, are used . Loosen needle set screw o. C 9 1hn 4n t4 Bring needle bar to its highest ...
...PFAFF 259 sewing machines, System 130 R, flat-shank needles are available from every Pfaff dealer. Inserl new needle into opening of needle clamp. R 6798 13 Bent or blunt needles should not be used for all ordinary sewing and embroidery work. Tighten needle set screw o half a turn and pull old needle out of needle... clamp and push it up as far as it will go. Genuine Pfaff needles, System 130 R, are used . Loosen needle set screw o. C 9 1hn 4n t4 Bring needle bar to its highest ...

Owner's Manual
Page 15
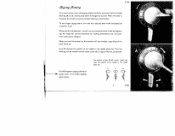
Bring take.up lever 6 as high as it between any two of the tension discs 5. Then thread needle, front to left through both thread retainer openings 4 (see illustration opposite). The automatic needle threader will go and pass thread from right to back. Lead thread clockwise around tension and pull it will do this for you easily and quickly. 14 Pull thread into slots at left of thread guides 7 and Band then into the slot at its end. Place spooi of thread on spool pin 3 and lead thread end through one of the holes at left of needle clamp 9.
Bring take.up lever 6 as high as it between any two of the tension discs 5. Then thread needle, front to left through both thread retainer openings 4 (see illustration opposite). The automatic needle threader will go and pass thread from right to back. Lead thread clockwise around tension and pull it will do this for you easily and quickly. 14 Pull thread into slots at left of thread guides 7 and Band then into the slot at its end. Place spooi of thread on spool pin 3 and lead thread end through one of the holes at left of needle clamp 9.

Owner's Manual
Page 17
... it behind hook of the top cover. Relese control slightly until threader prong w (see opposite page) penetrates needle eye. Hold thread loosely and lead it from left hand push needle threader control down again so the thread ioop will fall off the proflg. Keep control in line with the ...bottom edge of threader prong. Jerk control down until prong w reverses and pulls thread through needle eye and release control. Pull thread through needle eye. that the needle is in this position. Now lower the sewing foot and With your left around the small pin, then...
... it behind hook of the top cover. Relese control slightly until threader prong w (see opposite page) penetrates needle eye. Hold thread loosely and lead it from left hand push needle threader control down again so the thread ioop will fall off the proflg. Keep control in line with the ...bottom edge of threader prong. Jerk control down until prong w reverses and pulls thread through needle eye and release control. Pull thread through needle eye. that the needle is in this position. Now lower the sewing foot and With your left around the small pin, then...

Owner's Manual
Page 18
... about '/s inch to draw bobbin thread up lever reaches its highest point when you begin sewing. - Turn balance wheel toward you until the needle moves down and up again and take -up lever d is about four inches of the prong. V R 8011 w 7ain bti hz 3 c 6 16 n C7hzea? Place thread ...behind hook of the loop through needle plate slot. Prong w now pulls end of the thread ---instead of prong w so that its end is not at its highest position. Since take -up...
... about '/s inch to draw bobbin thread up lever reaches its highest point when you begin sewing. - Turn balance wheel toward you until the needle moves down and up again and take -up lever d is about four inches of the prong. V R 8011 w 7ain bti hz 3 c 6 16 n C7hzea? Place thread ...behind hook of the loop through needle plate slot. Prong w now pulls end of the thread ---instead of prong w so that its end is not at its highest position. Since take -up...
Owner's Manual
Page 20
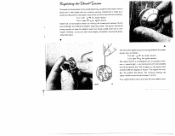
... between thumb and forefinger and letting the bobbin case hang freely. The tension should be a little tighter than for tighter tension. Turn right for two-needle work. 19 The upper tension is made by a small knurled screw on the tension dial indicate different degrees of ten sion -- loose to tight--can...
... between thumb and forefinger and letting the bobbin case hang freely. The tension should be a little tighter than for tighter tension. Turn right for two-needle work. 19 The upper tension is made by a small knurled screw on the tension dial indicate different degrees of ten sion -- loose to tight--can...

Owner's Manual
Page 22
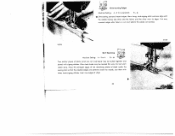
the ,i41ahLne 'Eee The machine feed is turned to the right as far as it will cease feeding. When control v is dropped for darning, hoop embroidery and button sew ing. To lower feed below the needle plate, turn drop feed control v clock wise. Fabric will go, feeding of the fabric resumes automatically when you start sewing. 21 R6705
the ,i41ahLne 'Eee The machine feed is turned to the right as far as it will cease feeding. When control v is dropped for darning, hoop embroidery and button sew ing. To lower feed below the needle plate, turn drop feed control v clock wise. Fabric will go, feeding of the fabric resumes automatically when you start sewing. 21 R6705

Owner's Manual
Page 23
....wthAact.ttaAcithttaisdcahbrendhianirngndinfotghoethfonrooemkeddltehaescrliaelmalurps. Tilt the foot and pull it down. Remember to the left. R 7086 9cc C1 hanJi,s1f ti $ivii Lift both and turn sideways needle and presser bars to their highest positions the sewing foot thumb screw to lifter lower e, the darn presser bar lifter e so that when ing foot...
....wthAact.ttaAcithttaisdcahbrendhianirngndinfotghoethfonrooemkeddltehaescrliaelmalurps. Tilt the foot and pull it down. Remember to the left. R 7086 9cc C1 hanJi,s1f ti $ivii Lift both and turn sideways needle and presser bars to their highest positions the sewing foot thumb screw to lifter lower e, the darn presser bar lifter e so that when ing foot...
Owner's Manual
Page 26
Therefore, from time to time, remove the needle plate and clean the feed with a toothpick or similar wooden object. To do this, lift back end first and tilt out. Once in place by your Pfaff dealer. 25 yi1a /ilac4iiw Cae Accumulations of lint pocked between the tooth rows of the ...feed cause noisy operation of the sewing hook. The needle plate is held in a while your PFAFF should be given a thorough checkup by a press stud and can be removed without a screwdriver. y I R 8031 R 8028 A Tilt the machine ...
Therefore, from time to time, remove the needle plate and clean the feed with a toothpick or similar wooden object. To do this, lift back end first and tilt out. Once in place by your Pfaff dealer. 25 yi1a /ilac4iiw Cae Accumulations of lint pocked between the tooth rows of the ...feed cause noisy operation of the sewing hook. The needle plate is held in a while your PFAFF should be given a thorough checkup by a press stud and can be removed without a screwdriver. y I R 8031 R 8028 A Tilt the machine ...

Owner's Manual
Page 28
...breakage. Thread tension too tight. Use good quolity threads only. Polish needle plate slot with thread or needs Clean and oil hook raceway. Machine Skips Stitches Cause: Remedy: Needle incorrectly inserted. Wrong needle. £ Needle bent. Needle too fine or too thick for the thread. Adjust tensions as ...instructed on pages 14 ond 15. Check and correct threading as instructed. oiling. The correct needle system is jammed with fine emery cloth. 27 '6 t7e ôti $/loctin 1. Push needle up as far as it will go and be sure that the long groove faces toward ...
...breakage. Thread tension too tight. Use good quolity threads only. Polish needle plate slot with thread or needs Clean and oil hook raceway. Machine Skips Stitches Cause: Remedy: Needle incorrectly inserted. Wrong needle. £ Needle bent. Needle too fine or too thick for the thread. Adjust tensions as ...instructed on pages 14 ond 15. Check and correct threading as instructed. oiling. The correct needle system is jammed with fine emery cloth. 27 '6 t7e ôti $/loctin 1. Push needle up as far as it will go and be sure that the long groove faces toward ...
Owner's Manual
Page 29
... once to prevent further damage. Use only first-rote thread-the correct size for the needle and fabric. Needle too thin or thread too heavy. Fabric pulls needle so it around thread retainer stud an top cover. Bobbin unevenly wound. Push bobbin case until you hear it ... into place. Faulty Stitch Formation Cause: Improper tension. Thread too heavy, knotty or hard. Remedy: Adjust tensions as instructed. Needle Breaks Co use: Bent needle strikes point of thread between feed teeth. Accumulations of lint packed between tension discs. Machine Feeds Improperly Cause: Feed dog set ...
... once to prevent further damage. Use only first-rote thread-the correct size for the needle and fabric. Needle too thin or thread too heavy. Fabric pulls needle so it around thread retainer stud an top cover. Bobbin unevenly wound. Push bobbin case until you hear it ... into place. Faulty Stitch Formation Cause: Improper tension. Thread too heavy, knotty or hard. Remedy: Adjust tensions as instructed. Needle Breaks Co use: Bent needle strikes point of thread between feed teeth. Accumulations of lint packed between tension discs. Machine Feeds Improperly Cause: Feed dog set ...

Owner's Manual
Page 32
... Loy pieces together with the wrong sides focing ond the bottom piece protruding /a inch. Second Seam Open the two pieces, place them under the needle right side up, insert seam ridge into felling foot, as illustrated, so that second seam is not folded twice. Make sure that protruding seam allowance... opening, and stitch down . Make sure that the bottom fobric is folded over edge of fobric. r The felling foot has aneedle slot, rather than a needle hole, to durably join two pieces of top piece and stitched down to the edge but not beyond it. Narrow zigzag stitches ore used to...
... Loy pieces together with the wrong sides focing ond the bottom piece protruding /a inch. Second Seam Open the two pieces, place them under the needle right side up, insert seam ridge into felling foot, as illustrated, so that second seam is not folded twice. Make sure that protruding seam allowance... opening, and stitch down . Make sure that the bottom fobric is folded over edge of fobric. r The felling foot has aneedle slot, rather than a needle hole, to durably join two pieces of top piece and stitched down to the edge but not beyond it. Narrow zigzag stitches ore used to...
Owner's Manual
Page 33
... not be folded twice and the row edge will show. Avoid ugly ends by slowing down feeding. To do this, press the fabric against the needle plate on 2 or 3. V IJT' Hemming Machine Setting: A- 0 or 2 to facilitate insertion into the hemmer foot.
... not be folded twice and the row edge will show. Avoid ugly ends by slowing down feeding. To do this, press the fabric against the needle plate on 2 or 3. V IJT' Hemming Machine Setting: A- 0 or 2 to facilitate insertion into the hemmer foot.
Owner's Manual
Page 34
... one stitch into the fabric and the other over its edge. Hem raw edges of sheet under the needle. You moy overcast edges after fabric is cut and before the pieces are centered under the sewing foot so that the abutted edges are loined. ...
... one stitch into the fabric and the other over its edge. Hem raw edges of sheet under the needle. You moy overcast edges after fabric is cut and before the pieces are centered under the sewing foot so that the abutted edges are loined. ...

