

Owner's Manual
Page 3
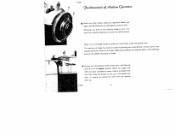
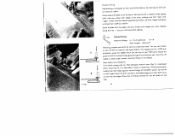
1 L j2 1 /4 12 11 1 Thread take-up lever 2 Thread retainer stud 3 Zigzag finger-tip control 4 Bobbin winder S Stop motion knob 6 Stitch length dial 7 Reverse feed control B Light switch 9 Drop feed control 10 Needle plate 11 Transverse rotary hook 12 Bed slide 2 13 Needle 14 Automatic needle threader 15 Needle thread tension 16 Sewlight 17 Stitch width dial 18 Needle position lever R 8290
1 L j2 1 /4 12 11 1 Thread take-up lever 2 Thread retainer stud 3 Zigzag finger-tip control 4 Bobbin winder S Stop motion knob 6 Stitch length dial 7 Reverse feed control B Light switch 9 Drop feed control 10 Needle plate 11 Transverse rotary hook 12 Bed slide 2 13 Needle 14 Automatic needle threader 15 Needle thread tension 16 Sewlight 17 Stitch width dial 18 Needle position lever R 8290

Owner's Manual
Page 4
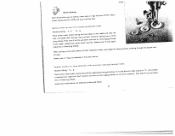
19 IL- 20 21 / R 8292 19 Balance wheel 20 Collapsible spool pins 21 Top cover 22 Needle threader control t29 23 Face cover 24 Presser bar lifter 25 Sewing foot thumb screw 26 Sewing foot 3 27 Needle set screw 28 Bed plate 29 Space for built-in motor 30 Double receptacle for speed control and power cords
19 IL- 20 21 / R 8292 19 Balance wheel 20 Collapsible spool pins 21 Top cover 22 Needle threader control t29 23 Face cover 24 Presser bar lifter 25 Sewing foot thumb screw 26 Sewing foot 3 27 Needle set screw 28 Bed plate 29 Space for built-in motor 30 Double receptacle for speed control and power cords
Owner's Manual
Page 5
... completed a seam. All you have fabric under the sewing foot automatically. Never try to do is guide the work with the take-up lever up. Also, it to ward you have to hasten feeding by white arrow). The machine will feed the material under the presser foot. Failure to observe this rule may bend or break. .4 Always turn it is at its highest position before...
... completed a seam. All you have fabric under the sewing foot automatically. Never try to do is guide the work with the take-up lever up. Also, it to ward you have to hasten feeding by white arrow). The machine will feed the material under the presser foot. Failure to observe this rule may bend or break. .4 Always turn it is at its highest position before...
Owner's Manual
Page 8
... the position of the stitch width set between /s and 2, you can double the stitch width by numbers 1 to sew a few wide zigzag stitches while the machine is set for making buttonholes and non-auto matic embroidery designs). Dial G lengthens zigzag stitches or $- When dial A is released, the machine resumes straight slitching automatically. When the lever is set . R 7999 2 iqa9 $eivin if you want to 4). The position of lever B (left or right of the needle in the needle plate slat...
... the position of the stitch width set between /s and 2, you can double the stitch width by numbers 1 to sew a few wide zigzag stitches while the machine is set for making buttonholes and non-auto matic embroidery designs). Dial G lengthens zigzag stitches or $- When dial A is released, the machine resumes straight slitching automatically. When the lever is set . R 7999 2 iqa9 $eivin if you want to 4). The position of lever B (left or right of the needle in the needle plate slat...

Owner's Manual
Page 13
..., gabardine. 70 ... The same size threads should be used in the needle and on the correct relationship between needle, thread and fabric. B&C 90 twist r C & D ioo twist usene ,"Vte 4F1 The appearance of the finished seam is dependent on the bobbin. However, the bobbin thread never should be thicker than the needle thread. Very Heavy Fabrics such as lightweight woolens. Heavy Fabrics 40 such as dress...
..., gabardine. 70 ... The same size threads should be used in the needle and on the correct relationship between needle, thread and fabric. B&C 90 twist r C & D ioo twist usene ,"Vte 4F1 The appearance of the finished seam is dependent on the bobbin. However, the bobbin thread never should be thicker than the needle thread. Very Heavy Fabrics such as lightweight woolens. Heavy Fabrics 40 such as dress...
Owner's Manual
Page 14
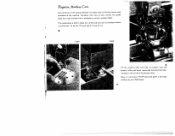
... t4 Bring needle bar to its highest point and lower sewing foot. Bent or blunt needles should not be used for all ordinary sewing and embroidery work. Loosen needle set screw o. Make sure that the flat side of the shank faces toward the back and long groove toward you. Genuine Pfaff needles, System 130 R, are used . R 6798 13 itant 9att.c a 6cut /??tc On PFAFF 259 sewing machines, System 130 R, flat-shank needles are available...
... t4 Bring needle bar to its highest point and lower sewing foot. Bent or blunt needles should not be used for all ordinary sewing and embroidery work. Loosen needle set screw o. Make sure that the flat side of the shank faces toward the back and long groove toward you. Genuine Pfaff needles, System 130 R, are used . R 6798 13 itant 9att.c a 6cut /??tc On PFAFF 259 sewing machines, System 130 R, flat-shank needles are available...

Owner's Manual
Page 15
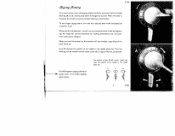
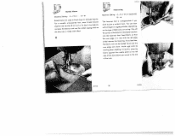
The automatic needle threader will go and pass thread from right to back. Bring take.up lever 6 as high as it between any two of needle clamp 9. Then thread needle, front to left through one of the holes at left of thread on spool pin 3 and lead thread end through both thread retainer openings 4 (see illustration opposite). Lead thread clockwise around tension and pull it will do this for you easily and quickly. 14 Pull thread into slots at left of the tension discs 5. Place spooi of thread guides 7 and Band then into the slot at its end.
The automatic needle threader will go and pass thread from right to back. Bring take.up lever 6 as high as it between any two of needle clamp 9. Then thread needle, front to left through one of the holes at left of thread on spool pin 3 and lead thread end through both thread retainer openings 4 (see illustration opposite). Lead thread clockwise around tension and pull it will do this for you easily and quickly. 14 Pull thread into slots at left of the tension discs 5. Place spooi of thread guides 7 and Band then into the slot at its end.

Owner's Manual
Page 18
... you begin sewing. - Prong w now pulls end of the thread ---instead of thread through the needle eye before you put fabric into machine. 17 V R 8011 w 7ain bti hz 3 c 6 16 n C7hzea? When you have hod sufficient needle threading practice, you may shorten the procedure as follows: Push needle threader control down and up again and take -up through needle plate slot. Place thread behind hook of...
... you begin sewing. - Prong w now pulls end of the thread ---instead of thread through the needle eye before you put fabric into machine. 17 V R 8011 w 7ain bti hz 3 c 6 16 n C7hzea? When you have hod sufficient needle threading practice, you may shorten the procedure as follows: Push needle threader control down and up again and take -up through needle plate slot. Place thread behind hook of...
Owner's Manual
Page 20
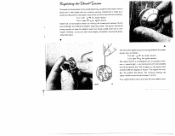
... the tension. R8029 A The final stitch appearance can be covered with the thumb tip. The numbers on the bobbin case which can be regulated by a small knurled screw on the tension dial indicate different degrees of the tension dial. Turn it left cE( for looser tension. Determine correct bobbin tension by its own weight. 7qutaeIF19 th '7.4e4? '7.€nsit,n The bobbin thread tension rarely needs adjusting, except for embroidery when...
... the tension. R8029 A The final stitch appearance can be covered with the thumb tip. The numbers on the bobbin case which can be regulated by a small knurled screw on the tension dial indicate different degrees of the tension dial. Turn it left cE( for looser tension. Determine correct bobbin tension by its own weight. 7qutaeIF19 th '7.4e4? '7.€nsit,n The bobbin thread tension rarely needs adjusting, except for embroidery when...
Owner's Manual
Page 21
... desired stitch length is released, the machine resumes forward sewing automatically. When the control is apposite the mark on 0.2. 7eo.ce ,5ewin6 Ta backtack the beginning or end of fabric and thread size used. This feature is placed neatly beside the other. In this , operate the control in rhythm and move the fabric slightly sideways. To facilitate satin stitching, the 0-I range on the type of a seam, simply...
... desired stitch length is released, the machine resumes forward sewing automatically. When the control is apposite the mark on 0.2. 7eo.ce ,5ewin6 Ta backtack the beginning or end of fabric and thread size used. This feature is placed neatly beside the other. In this , operate the control in rhythm and move the fabric slightly sideways. To facilitate satin stitching, the 0-I range on the type of a seam, simply...

Owner's Manual
Page 25
One or two drops of oil may soil the work and cause machine sluggishness. To pull cover up, tilt it back and lift. R 8063 Oiling points in the machine arm can be reached easily by removing the top cover, Oil should be applied sparingly. I? 8295 The oiling points in the machine head 24 Excessive quantities of oil usually will suffice.
One or two drops of oil may soil the work and cause machine sluggishness. To pull cover up, tilt it back and lift. R 8063 Oiling points in the machine arm can be reached easily by removing the top cover, Oil should be applied sparingly. I? 8295 The oiling points in the machine head 24 Excessive quantities of oil usually will suffice.
Owner's Manual
Page 26
... bobbin case and bobbin. yi1a /ilac4iiw Cae Accumulations of lint pocked between the tooth rows of the feed cause noisy operation of the sewing hook. To do this, lift back end first and tilt out. Once in a while your PFAFF should be removed without a screwdriver. The needle plate is held in the vicinity of the mochine. Therefore, from time to time, remove the needle plate and clean...
... bobbin case and bobbin. yi1a /ilac4iiw Cae Accumulations of lint pocked between the tooth rows of the feed cause noisy operation of the sewing hook. To do this, lift back end first and tilt out. Once in a while your PFAFF should be removed without a screwdriver. The needle plate is held in the vicinity of the mochine. Therefore, from time to time, remove the needle plate and clean...

Owner's Manual
Page 28
... remedies listed under 1. Thread tension too tight. Adjust tensions as it will go and be sure that the long groove faces toward you, and flat side of shank away from you. Hook raceway is stamped on pages 14 ond 15. Push needle up as far as instructed. Check and correct threading as instructed on bed slide. (For ordinary sewing, use System 130 R needles.) Insert new needle. Needle Thread Breaks Cause...
... remedies listed under 1. Thread tension too tight. Adjust tensions as it will go and be sure that the long groove faces toward you, and flat side of shank away from you. Hook raceway is stamped on pages 14 ond 15. Push needle up as far as instructed. Check and correct threading as instructed on bed slide. (For ordinary sewing, use System 130 R needles.) Insert new needle. Needle Thread Breaks Cause...
Owner's Manual
Page 29
... winding the bobbin, but lead it snap into place. Faulty Stitch Formation Cause: Improper tension. Machine Feeds Improperly Cause: Feed dog set too low, does not rise up enough above needle plate level. 3. Fabric pulls needle so it bends and strikes needle plate. Thread too heavy, knotty or hard. Don't force the feeding motion. Bobbin unevenly wound. Use only first-rote thread-the correct size for the needle and fabric. Accumulations of sewing hook. Needle Breaks Co use: Bent needle...
... winding the bobbin, but lead it snap into place. Faulty Stitch Formation Cause: Improper tension. Machine Feeds Improperly Cause: Feed dog set too low, does not rise up enough above needle plate level. 3. Fabric pulls needle so it bends and strikes needle plate. Thread too heavy, knotty or hard. Don't force the feeding motion. Bobbin unevenly wound. Use only first-rote thread-the correct size for the needle and fabric. Accumulations of sewing hook. Needle Breaks Co use: Bent needle...
Owner's Manual
Page 33
... of the fabric to 4 . V IJT' Hemming Machine Setting: A- 0 or 2 to finish sheer or delicate fabrics. The hemmer foot is in line with straight or zigzag stitches, depending on the type of fabric you come to sew o uniform hem. R7172 32 R 5915 Ta hem tricot fabrics, increase the tension and use the widest zigzag stitch so the hem has a rolled sheH effect. Avoid ugly ends by slowing down feeding. If you wont to the...
... of the fabric to 4 . V IJT' Hemming Machine Setting: A- 0 or 2 to finish sheer or delicate fabrics. The hemmer foot is in line with straight or zigzag stitches, depending on the type of fabric you come to sew o uniform hem. R7172 32 R 5915 Ta hem tricot fabrics, increase the tension and use the widest zigzag stitch so the hem has a rolled sheH effect. Avoid ugly ends by slowing down feeding. If you wont to the...
Owner's Manual
Page 42
... desire. You can buy at your PFAFF on your Pfoff store. Set machine for a medium-wide zigzag stitch and sew along this procedure: Turn fabric wrong side up to press or baste hem. Attach the guide so that 'zigs" and "zags" in both edges of the fabric. Use a No. 70 needle, a loose upper tension, and thin thread in the folded edge and right stitch up . Set stitch length according to 2 (optional) B -. Zigzag along both rows are...
... desire. You can buy at your PFAFF on your Pfoff store. Set machine for a medium-wide zigzag stitch and sew along this procedure: Turn fabric wrong side up to press or baste hem. Attach the guide so that 'zigs" and "zags" in both edges of the fabric. Use a No. 70 needle, a loose upper tension, and thin thread in the folded edge and right stitch up . Set stitch length according to 2 (optional) B -. Zigzag along both rows are...
Owner's Manual
Page 45
... some manner. When sewing on buttons, button sewing foot No. 46120 and hooks, eyes or rings drop machine feed. Start foot and machine let needle stitch through the second pair of holes. Attach I U Buttons with your PFAFF. and sew as many zigzag stitches Turn dial A ta the right, as discussed above process, stitching through left hole. R7160 .62O Button Sewing Don't be afraid to Push lever 3", until needle F up and make two or three tying stitches. Smaller buttons or snap fasteners...
... some manner. When sewing on buttons, button sewing foot No. 46120 and hooks, eyes or rings drop machine feed. Start foot and machine let needle stitch through the second pair of holes. Attach I U Buttons with your PFAFF. and sew as many zigzag stitches Turn dial A ta the right, as discussed above process, stitching through left hole. R7160 .62O Button Sewing Don't be afraid to Push lever 3", until needle F up and make two or three tying stitches. Smaller buttons or snap fasteners...
Owner's Manual
Page 46
... the feed cover plate to activate the tension, or the upper thread tension will be lowered to the machine, slip its finger into darning hoops. 45 Place fabric into the hole of the needle plate, as illustrated, turn, and fasten in hoops and permit free movement. B4 - Prepare your machine for darning as instructed on page 22, and suspend presser bar from the rear of fabric in position with darning hook No. 46128. Even though the presser bar...
... the feed cover plate to activate the tension, or the upper thread tension will be lowered to the machine, slip its finger into darning hoops. 45 Place fabric into the hole of the needle plate, as illustrated, turn, and fasten in hoops and permit free movement. B4 - Prepare your machine for darning as instructed on page 22, and suspend presser bar from the rear of fabric in position with darning hook No. 46128. Even though the presser bar...
Owner's Manual
Page 48
... thread ends and sew over outline, moving hoops slowly and evenly. The procedure below is primarily used for satin stitch. Raise machine feed and set machine for block letters. You will soon enjoy creative embroidery once you P FAF F's Ornamentograph, the ingeniously designed monogram and ornamental stitch attachment. Lower needle into fabric at its countless creative possibilities. 47 R7165 Attach cord stitcher and sew outlines of letters. B - according to 3 . To give your Pfaff...
... thread ends and sew over outline, moving hoops slowly and evenly. The procedure below is primarily used for satin stitch. Raise machine feed and set machine for block letters. You will soon enjoy creative embroidery once you P FAF F's Ornamentograph, the ingeniously designed monogram and ornamental stitch attachment. Lower needle into fabric at its countless creative possibilities. 47 R7165 Attach cord stitcher and sew outlines of letters. B - according to 3 . To give your Pfaff...
Owner's Manual
Page 53
... Operating the Needle Threader Drawing Up the Bobbin Thread CRoegrruelcattiTngentshioenThRreegaudlatTioennsion Stitch Length Regulation Reverse Sewing Dropping the Machine Feed. Overcasting Edges Butt Seaming . Openwork Embroidery Making Stuffed Animals Scrollwork Imitation Hemstitching * Hemstitching Blindstitching Sewing Buttonholes Button Sewing Darning Manogram Embroidery Sewing Monograms Cording Ornamental Sewing The The PFAFF 260 Transverse Automatic Spool Holder Page Attaching Lace Inserting Lace . Inserting Patches Single-Needle Cording Shirring Applique Work...
... Operating the Needle Threader Drawing Up the Bobbin Thread CRoegrruelcattiTngentshioenThRreegaudlatTioennsion Stitch Length Regulation Reverse Sewing Dropping the Machine Feed. Overcasting Edges Butt Seaming . Openwork Embroidery Making Stuffed Animals Scrollwork Imitation Hemstitching * Hemstitching Blindstitching Sewing Buttonholes Button Sewing Darning Manogram Embroidery Sewing Monograms Cording Ornamental Sewing The The PFAFF 260 Transverse Automatic Spool Holder Page Attaching Lace Inserting Lace . Inserting Patches Single-Needle Cording Shirring Applique Work...


