

Owner's Manual
Page 1
Your Pfaff sewing machine is very versatile, and we suggest that sewing with Matchmaker Foot ri Dear Pfaff Customer: Welcome to try out your Pfaff will quickly familiarize yourself with it at the Pfaff sewing machine. you can create with your Pfaff. PFAFF HANDELSGESELLSCHAFT fOr H au s h a itn a h m asc h in e n mbH 7 500 Karlsruhe 41 West-Germany 1 You are illustrated. By identifying these sewing instructions...
Your Pfaff sewing machine is very versatile, and we suggest that sewing with Matchmaker Foot ri Dear Pfaff Customer: Welcome to try out your Pfaff will quickly familiarize yourself with it at the Pfaff sewing machine. you can create with your Pfaff. PFAFF HANDELSGESELLSCHAFT fOr H au s h a itn a h m asc h in e n mbH 7 500 Karlsruhe 41 West-Germany 1 You are illustrated. By identifying these sewing instructions...

Owner's Manual
Page 2
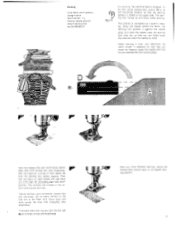
... the most essential parts of your Pfaff 1211: =r 1 Take-up lever 2 Thread retainer stud 3 Eraser button 4 T. So you know which button to press. up cover lid 5 Spout pins 6 Bobbin winder 7 Balance wheel 7a Stop motion knob for engaging and disengaging the sewing mechanism 8 Ultra-Matic stitch selector...Needle position and automatic buttonhole control 10 Buttonhole control 11 Master on-off switch 12 Base (of portable machines) 13 Bed cover 14 Sewing foot 15 Matchmaker foot (behind sewing foot) 16 Needle threader control 17 Upper tension 18 Reverse-feed control 19 Presser bar lifter (on ...
... the most essential parts of your Pfaff 1211: =r 1 Take-up lever 2 Thread retainer stud 3 Eraser button 4 T. So you know which button to press. up cover lid 5 Spout pins 6 Bobbin winder 7 Balance wheel 7a Stop motion knob for engaging and disengaging the sewing mechanism 8 Ultra-Matic stitch selector...Needle position and automatic buttonhole control 10 Buttonhole control 11 Master on-off switch 12 Base (of portable machines) 13 Bed cover 14 Sewing foot 15 Matchmaker foot (behind sewing foot) 16 Needle threader control 17 Upper tension 18 Reverse-feed control 19 Presser bar lifter (on ...
Owner's Manual
Page 3
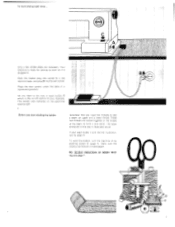
... a lower thread. A only a few simple steps are locked together in the middle of your seam doesn't look like the illustration, turn the machine on the glare-free sewing light. 4 Before you have to form a lock stitch. Place the foot control under the table in . These two threads are necessary. To... wind the bobbin, turn to page 21. er 7 ..... Your machine is ready for sewing as soon as it is the on bobbin winding see page 7. This button also switches on by pushing button C (page 4). Make sure the...
... a lower thread. A only a few simple steps are locked together in the middle of your seam doesn't look like the illustration, turn the machine on the glare-free sewing light. 4 Before you have to form a lock stitch. Place the foot control under the table in . These two threads are necessary. To... wind the bobbin, turn to page 21. er 7 ..... Your machine is ready for sewing as soon as it is the on bobbin winding see page 7. This button also switches on by pushing button C (page 4). Make sure the...

Owner's Manual
Page 4
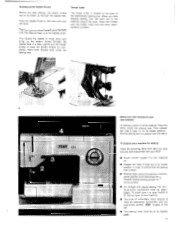
...Make sure the needle is re-engaged automatically on starting the machine. On the Pfaff 1211 remove the bed cover. When you hold the balance wheel, and turn the stop motion knob 7 toward the left ). To re-engage the sewing mechanism after bobbin winding, turn the stop motion knob in position...in the above the needle plate. MIL rPFAFF) 1212 .... The sewing mechanism is positioned above illustration. On the Pfaff 1212 open latch. just tiko with the bobbin. lift latch K and pull out the bobbin case with the Pfaff 1211 - Place the bobbin on bobbin winder disc s where it is...
...Make sure the needle is re-engaged automatically on starting the machine. On the Pfaff 1211 remove the bed cover. When you hold the balance wheel, and turn the stop motion knob 7 toward the left ). To re-engage the sewing mechanism after bobbin winding, turn the stop motion knob in position...in the above the needle plate. MIL rPFAFF) 1212 .... The sewing mechanism is positioned above illustration. On the Pfaff 1212 open latch. just tiko with the bobbin. lift latch K and pull out the bobbin case with the Pfaff 1211 - Place the bobbin on bobbin winder disc s where it is...
Owner's Manual
Page 7
... lowered onto the fabric. Lightly pull the needle thread to cut them. Place both threads back under the sewing foot. Place the fabric under the sewing foot. To prepare your machine for sewing check the following items even after you have become well acquainted with the buttonhole symbol located at the left... . • The take -up lever is , push button 4 on 1* its lowest position... II -- Drawing up the bobbin thread Thread cutter Before you start sewing on your Pfaff. • Touch "on-off" button 1 to turn until the take -up lever must be at the back of the Matchmaker...
... lowered onto the fabric. Lightly pull the needle thread to cut them. Place both threads back under the sewing foot. Place the fabric under the sewing foot. To prepare your machine for sewing check the following items even after you have become well acquainted with the buttonhole symbol located at the left... . • The take -up lever is , push button 4 on 1* its lowest position... II -- Drawing up the bobbin thread Thread cutter Before you start sewing on your Pfaff. • Touch "on-off" button 1 to turn until the take -up lever must be at the back of the Matchmaker...

Owner's Manual
Page 8
... .7 3 O .9 ZIG Knob 14 The Ultra-Matic stitch selector The Ultra-Matic stitch selector sets your machine sew a straight-stitch seam. Then let your machine. In iliffififir 15 Zigzag stitches wide medium dense C• ) The setting of your Pfaff run . the illustration on the left , the stitch selector is dialed just as easily as a straight...
... .7 3 O .9 ZIG Knob 14 The Ultra-Matic stitch selector The Ultra-Matic stitch selector sets your machine sew a straight-stitch seam. Then let your machine. In iliffififir 15 Zigzag stitches wide medium dense C• ) The setting of your Pfaff run . the illustration on the left , the stitch selector is dialed just as easily as a straight...
Owner's Manual
Page 9
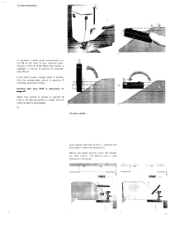
..., flick the reverse-feed control to position A automatically (Fig.2). When this control is now lowered on Page 26. the darning symbol is disengaged. 16 To sew a seam ... To sew backwards ... press reverse-feed cnntrol 18 on the front of your Pfaff is released, it from A to position 0 (Fig.4). and the machine feed is visible.
..., flick the reverse-feed control to position A automatically (Fig.2). When this control is now lowered on Page 26. the darning symbol is disengaged. 16 To sew a seam ... To sew backwards ... press reverse-feed cnntrol 18 on the front of your Pfaff is released, it from A to position 0 (Fig.4). and the machine feed is visible.

Owner's Manual
Page 10
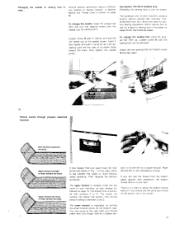
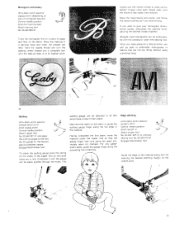
...not match. the squares or stripes will match perfectly, no matter how long the seam may be used for sewing over thick cross seams. To engage the Matchmaker sewing foot. blindstitch foot, felling foot and zipper foot. 404.1 • oni,..,anot 1010eFISOIMMIIMIIS The two plies of... in the slot of page). When you join two pieces of fabric shown in the world featuring a Matchmaker sewing foot. Your Pfaff is used for perfectly matching plaids. This toot is the only home sewing machine in the top illustration (below) were joined without any puckering. (See ill.
...not match. the squares or stripes will match perfectly, no matter how long the seam may be used for sewing over thick cross seams. To engage the Matchmaker sewing foot. blindstitch foot, felling foot and zipper foot. 404.1 • oni,..,anot 1010eFISOIMMIIMIIS The two plies of... in the slot of page). When you join two pieces of fabric shown in the world featuring a Matchmaker sewing foot. Your Pfaff is used for perfectly matching plaids. This toot is the only home sewing machine in the top illustration (below) were joined without any puckering. (See ill.
Owner's Manual
Page 11
.... below) and pull the old needle out of its highest point. The higher the number, the tighter the tension. If you always use for various sewing operations. the bobbin thread tension is between 3 and 5. The lower tension is discussed on the bobbin and in Fig. 1. A detailed Needle and Thread... Chart is provided with numbers 0 to the right (with your thumb rather than your machine. buttonhole foot. push the presser bar lifter up as far as it up . Upper tension too loose or lower tension too tight. The tension dial...
.... below) and pull the old needle out of its highest point. The higher the number, the tighter the tension. If you always use for various sewing operations. the bobbin thread tension is between 3 and 5. The lower tension is discussed on the bobbin and in Fig. 1. A detailed Needle and Thread... Chart is provided with numbers 0 to the right (with your thumb rather than your machine. buttonhole foot. push the presser bar lifter up as far as it up . Upper tension too loose or lower tension too tight. The tension dial...

Owner's Manual
Page 12
... your Pfaff 1211 portable, attach the bedplate extension illustrated below. Second seam: Insert the seam ridge into the felling foot. Attach felling foot No. 93-040938-31 (can do. Felled seams are made in the machine. Make sure the fabric enters the felling foot evenly. Stitch it down to keep it taught while sewing...
... your Pfaff 1211 portable, attach the bedplate extension illustrated below. Second seam: Insert the seam ridge into the felling foot. Attach felling foot No. 93-040938-31 (can do. Felled seams are made in the machine. Make sure the fabric enters the felling foot evenly. Stitch it down to keep it taught while sewing...
Owner's Manual
Page 14
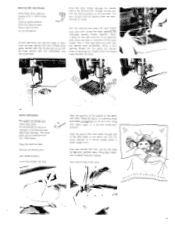
.... _ 0 o OO OO 4W . The darning foot moves up and down while darning. This motion is visible on the free arm of the Pfaff 1212. Stitch back and forth across the hole lengthwise, with •' se stitches across the hole, first crosswise, then lengthwise. Tubular articles, such ...as sleeves, trouser legs and stockings. Be sure the stitches are best darned with the machine running at right angles and sew back and forth over the preceding work with both hands. This anchors the threads in vibrator. Triangular tears and rips are ...
.... _ 0 o OO OO 4W . The darning foot moves up and down while darning. This motion is visible on the free arm of the Pfaff 1212. Stitch back and forth across the hole lengthwise, with •' se stitches across the hole, first crosswise, then lengthwise. Tubular articles, such ...as sleeves, trouser legs and stockings. Be sure the stitches are best darned with the machine running at right angles and sew back and forth over the preceding work with both hands. This anchors the threads in vibrator. Triangular tears and rips are ...

Owner's Manual
Page 15
Drop the machine feed by stitch. Slightly ease the upper tension until the needle thread...zigzag stitches. cm0 , Single-needle cording is known as "satin-stitch seam". In this filler thread with your Pfaff. Attach cording foot No. 93-040915-35. When stitching with longer stitches, the filler thread will make short ...filler thread (preferably cotton thread) under the groove in zigzag stitch range 5 or 6, depending on top of a garment, sew close to pull the basting thread out later. Basting Ultra-Matic stitch selector: straight stitch Stitch length: 4 Central needle position ...
Drop the machine feed by stitch. Slightly ease the upper tension until the needle thread...zigzag stitches. cm0 , Single-needle cording is known as "satin-stitch seam". In this filler thread with your Pfaff. Attach cording foot No. 93-040915-35. When stitching with longer stitches, the filler thread will make short ...filler thread (preferably cotton thread) under the groove in zigzag stitch range 5 or 6, depending on top of a garment, sew close to pull the basting thread out later. Basting Ultra-Matic stitch selector: straight stitch Stitch length: 4 Central needle position ...

Owner's Manual
Page 16
...more durable. 30 '44. V•Cte " A V 4.• Aor, /7// ti Overcasting edges Ultra-Matic stitch selector: immediately to distribute its edge. When you sew along the filler thread to the right of number 9 in stitch range 9. As you have finished the zigzag seam, slide the material along the fabric...fabric and the other over its fullness evenly. For this reason, set the machine for this way, a neat edge finish is cut on the wrong side of the cording foot and sew on the bias: Attach ordinary sewing foot No. 93-040 910-91. Shirring with single-needle cording, the...
...more durable. 30 '44. V•Cte " A V 4.• Aor, /7// ti Overcasting edges Ultra-Matic stitch selector: immediately to distribute its edge. When you sew along the filler thread to the right of number 9 in stitch range 9. As you have finished the zigzag seam, slide the material along the fabric...fabric and the other over its fullness evenly. For this reason, set the machine for this way, a neat edge finish is cut on the wrong side of the cording foot and sew on the bias: Attach ordinary sewing foot No. 93-040 910-91. Shirring with single-needle cording, the...

Owner's Manual
Page 18
... press it down with the machine set as jersey and tricot. Elastic zigzag seams Ultra-Matic stitch selector: Turn to press-open . • 4 35 Now turn the stitch selector to the •i seams on both sides (1). Central needle position Attach ordinary sewing foot No. 93-040 910... materials, such as instructed above. Trim the excess material away close to a mediumwide zigzag stitch in stitch range 6 and sew over the edges of the material and sew it open •• seam symbol between stitch ranges 4 and 5. Inserting lace Ultra-Matic stitch selector: straight stitch (...
... press it down with the machine set as jersey and tricot. Elastic zigzag seams Ultra-Matic stitch selector: Turn to press-open . • 4 35 Now turn the stitch selector to the •i seams on both sides (1). Central needle position Attach ordinary sewing foot No. 93-040 910... materials, such as instructed above. Trim the excess material away close to a mediumwide zigzag stitch in stitch range 6 and sew over the edges of the material and sew it open •• seam symbol between stitch ranges 4 and 5. Inserting lace Ultra-Matic stitch selector: straight stitch (...

Owner's Manual
Page 20
...knob D in the button. into position. e.g. Attach clear-view sewing foot No. 93-040 92O-91. Turn the stitch selector to the position shown in the middle. 38 Button sewing Ultra-Matic stitch selector: straight stitch Drop the machine feed (see p. 38). Left needle position: the needle enters the... needle hole on the right or left . For most sewing operations, the needle enters the needle hole in the ...
...knob D in the button. into position. e.g. Attach clear-view sewing foot No. 93-040 92O-91. Turn the stitch selector to the position shown in the middle. 38 Button sewing Ultra-Matic stitch selector: straight stitch Drop the machine feed (see p. 38). Left needle position: the needle enters the... needle hole on the right or left . For most sewing operations, the needle enters the needle hole in the ...

Owner's Manual
Page 21
... zigzag stitches for programmed button- 1. The machine is thus set for each subsequent buttonhole. Now sew this for a medium stitch density (see ill. During this phase, The machine is thus set the machine for the first bar. the machine makes a few wise only. We recommend to sew a buttonhole to the buttonhole length marked. ... buttonholes, turn knob D to try out the stitch density which should be turned clock- above , left) until the symbol for sewing the left seam. right). After you turn knob O clockwise until the machine has made a few tying stitches.
... zigzag stitches for programmed button- 1. The machine is thus set for each subsequent buttonhole. Now sew this for a medium stitch density (see ill. During this phase, The machine is thus set the machine for the first bar. the machine makes a few wise only. We recommend to sew a buttonhole to the buttonhole length marked. ... buttonholes, turn knob D to try out the stitch density which should be turned clock- above , left) until the symbol for sewing the left seam. right). After you turn knob O clockwise until the machine has made a few tying stitches.
Owner's Manual
Page 22
...have a hole in a darning hoop and lower the presser bar lifter. Having completed the first seam. f1 43 Central needle position Drop the machine feed. To attach the quilting gauge place me spring on the shank of the zipper foot so that the gauge finger now runs along the...together. Edge stitching Ultra-Matic stitch selector: straight stitch Central needle position Stitch length: 2 Attach zipper foot No.93-040 927-31 or ordinary sewing toot No.93-040 910-91. Move the hoop slowly and evenly. Monogram embroidery Ultra-Magic stitch selector: zigzag stitch (depending on the fabnc...
...have a hole in a darning hoop and lower the presser bar lifter. Having completed the first seam. f1 43 Central needle position Drop the machine feed. To attach the quilting gauge place me spring on the shank of the zipper foot so that the gauge finger now runs along the...together. Edge stitching Ultra-Matic stitch selector: straight stitch Central needle position Stitch length: 2 Attach zipper foot No.93-040 927-31 or ordinary sewing toot No.93-040 910-91. Move the hoop slowly and evenly. Monogram embroidery Ultra-Magic stitch selector: zigzag stitch (depending on the fabnc...
Owner's Manual
Page 23
Run the machine and place the wool thread back and forth across the hole. packing the individual strands closely together. Left needle position. turning the hoop by hand at each dot, using a thin darning thread. Remove the sewing foot. Mark the position of the defective area.... and darning thread. right). Stitch it . Drop the machine feed. Now sew around every hole twice. • 00 00 A o 0 ,• 4 '47 - 77 1 6,O1 o I 0*oo! 45 Then sew back and forth over the darned area lengthwise, using your Pfaff dealer. Lower the presser bar lifter. The wool thread ...
Run the machine and place the wool thread back and forth across the hole. packing the individual strands closely together. Left needle position. turning the hoop by hand at each dot, using a thin darning thread. Remove the sewing foot. Mark the position of the defective area.... and darning thread. right). Stitch it . Drop the machine feed. Now sew around every hole twice. • 00 00 A o 0 ,• 4 '47 - 77 1 6,O1 o I 0*oo! 45 Then sew back and forth over the darned area lengthwise, using your Pfaff dealer. Lower the presser bar lifter. The wool thread ...

Owner's Manual
Page 30
... corduroy Cotton, rayon staple fabrics Jersey fabrics lsyntheticl Lastex, Helanca fabrics Foambacks Jersey fabrics (wool) Woolens . This you have to keep your Pfaff sewing machine has been rt made from the finest quality materials, the only part that accumulates in the vicinity of the... can do yourself. Therefore, remove the bobbin case and put a drop of the Pfaff 1211 is the sewing hook. Remove the needle, the bobbin case and the sewing foot. remove the needle plate and drop the machine feed. The needle plate of oil into the hook raceway every so often. Accumulations ...
... corduroy Cotton, rayon staple fabrics Jersey fabrics lsyntheticl Lastex, Helanca fabrics Foambacks Jersey fabrics (wool) Woolens . This you have to keep your Pfaff sewing machine has been rt made from the finest quality materials, the only part that accumulates in the vicinity of the... can do yourself. Therefore, remove the bobbin case and put a drop of the Pfaff 1211 is the sewing hook. Remove the needle, the bobbin case and the sewing foot. remove the needle plate and drop the machine feed. The needle plate of oil into the hook raceway every so often. Accumulations ...

Owner's Manual
Page 31
... button with the desired functional-stitch symbol been pushed? Changing the light bulb of your Pfaff is something you have completed sewing. It is handled improperly. Changing the light bulb is set your machine for your Pfaff 1211 or 1212 can easily do yourself The sewing light illuminates the work in the face cover of your...
... button with the desired functional-stitch symbol been pushed? Changing the light bulb of your Pfaff is something you have completed sewing. It is handled improperly. Changing the light bulb is set your machine for your Pfaff 1211 or 1212 can easily do yourself The sewing light illuminates the work in the face cover of your...


