
*ist Manual
Page 3
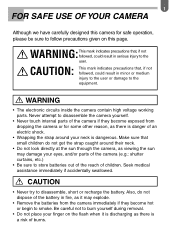
... careful not to burn yourself during removal. • Do not place your finger on the flash when it may explode. • Remove the batteries from dropping the camera or for safe operation, please be sure to follow precautions given on this camera for some other reason, as there is...is a risk of children. CAUTION: This mark indicates precautions that, if not followed, could result in serious injury to disassemble, short or recharge the battery. 1 FOR SAFE USE OF YOUR CAMERA Although we have carefully designed this page. Make sure that , if not followed, could result in fire, as...
... careful not to burn yourself during removal. • Do not place your finger on the flash when it may explode. • Remove the batteries from dropping the camera or for safe operation, please be sure to follow precautions given on this camera for some other reason, as there is...is a risk of children. CAUTION: This mark indicates precautions that, if not followed, could result in serious injury to disassemble, short or recharge the battery. 1 FOR SAFE USE OF YOUR CAMERA Although we have carefully designed this page. Make sure that , if not followed, could result in fire, as...
*ist Manual
Page 5
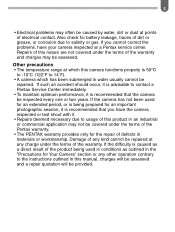
... a direct result of electrical contact. 3 • Electrical problems may often be provided. Other precautions • The temperature range at a Pentax service center. If the camera has not been used in this camera functions properly is recommended that you cannot correct the problems, have the ...your camera inspected at which has been submerged in water usually cannot be covered under the terms of the Pentax warranty. • The PENTAX warranty provides only for battery leakage, traces of dirt or grease, or corrosion due to usage of this nature are not covered under ...
... a direct result of electrical contact. 3 • Electrical problems may often be provided. Other precautions • The temperature range at a Pentax service center. If the camera has not been used in this camera functions properly is recommended that you cannot correct the problems, have the ...your camera inspected at which has been submerged in water usually cannot be covered under the terms of the Pentax warranty. • The PENTAX warranty provides only for battery leakage, traces of dirt or grease, or corrosion due to usage of this nature are not covered under ...

*ist Manual
Page 6
... the built-in flash is used continuously, the battery may cause explosion or overheating. It may become warm, but will recover in normal temperatures. • Keep a spare battery on the battery and the camera. • Battery performance may be temporarily hindered in low temperatures,... but it is faulty; The battery should be inserted correctly with a new one of the battery can cause hazards such as leakage, overheating, ...
... the built-in flash is used continuously, the battery may cause explosion or overheating. It may become warm, but will recover in normal temperatures. • Keep a spare battery on the battery and the camera. • Battery performance may be temporarily hindered in low temperatures,... but it is faulty; The battery should be inserted correctly with a new one of the battery can cause hazards such as leakage, overheating, ...
*ist Manual
Page 7
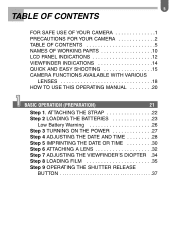
... AVAILABLE WITH VARIOUS LENSES 18 HOW TO USE THIS OPERATING MANUAL 20 BASIC OPERATION (PREPARATION) 21 Step 1. ATTACHING THE STRAP 22 Step 2 LOADING THE BATTERIES 23 Low Battery Warning 26 Step 3 TURNING ON THE POWER 27 Step 4 ADJUSTING THE DATE AND TIME 28 Step 5 IMPRINTING THE DATE OR TIME 30 Step 6 ATTACHING...
... AVAILABLE WITH VARIOUS LENSES 18 HOW TO USE THIS OPERATING MANUAL 20 BASIC OPERATION (PREPARATION) 21 Step 1. ATTACHING THE STRAP 22 Step 2 LOADING THE BATTERIES 23 Low Battery Warning 26 Step 3 TURNING ON THE POWER 27 Step 4 ADJUSTING THE DATE AND TIME 28 Step 5 IMPRINTING THE DATE OR TIME 30 Step 6 ATTACHING...
*ist Manual
Page 11
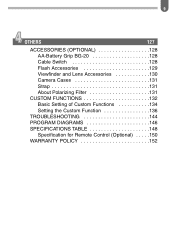
9 OTHERS 127 ACCESSORIES (OPTIONAL 128 AA-Battery Grip BG-20 128 Cable Switch 128 Flash Accessories 129 Viewfinder and Lens Accessories 130 Camera Cases 131 Strap 131 About Polarizing Filter 131 CUSTOM FUNCTIONS 132 Basic Setting of Custom Functions 134 Setting the Custom Function 136 TROUBLESHOOTING 144 PROGRAM DIAGRAMS 146 SPECIFICATIONS TABLE 148 Specification for Remote Control (Optional) . . . . .150 WARRANTY POLICY 152
9 OTHERS 127 ACCESSORIES (OPTIONAL 128 AA-Battery Grip BG-20 128 Cable Switch 128 Flash Accessories 129 Viewfinder and Lens Accessories 130 Camera Cases 131 Strap 131 About Polarizing Filter 131 CUSTOM FUNCTIONS 132 Basic Setting of Custom Functions 134 Setting the Custom Function 136 TROUBLESHOOTING 144 PROGRAM DIAGRAMS 146 SPECIFICATIONS TABLE 148 Specification for Remote Control (Optional) . . . . .150 WARRANTY POLICY 152
*ist Manual
Page 12
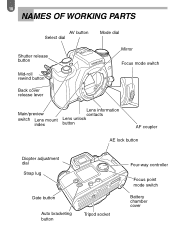
10 NAMES OF WORKING PARTS AV button Select dial Shutter release button Mid-roll rewind button Back cover release lever Mode dial Mirror Focus mode switch Main/preview switch Lens mount index Lens information contacts Lens unlock button AF coupler AE lock button Diopter adjustment dial Strap lug Date button Auto bracketing button Tripod socket Four-way controller Focus point mode switch Battery chamber cover
10 NAMES OF WORKING PARTS AV button Select dial Shutter release button Mid-roll rewind button Back cover release lever Mode dial Mirror Focus mode switch Main/preview switch Lens mount index Lens information contacts Lens unlock button AF coupler AE lock button Diopter adjustment dial Strap lug Date button Auto bracketing button Tripod socket Four-way controller Focus point mode switch Battery chamber cover
*ist Manual
Page 14
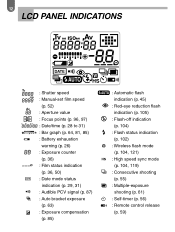
... PANEL INDICATIONS : Shutter speed : Manual-set film speed (p. 52) : Aperture value : Focus points (p. 96, 97) : Date/time (p. 28 to 31) : Bar graph (p. 64, 81, 85) : Battery exhaustion warning (p. 26) : Exposure counter (p. 36) : Film status indication (p. 36, 50) : Date mode status indication (p. 29, 31) : Audible PCV signal (p. 87) : Auto bracket exposure (p. 63...
... PANEL INDICATIONS : Shutter speed : Manual-set film speed (p. 52) : Aperture value : Focus points (p. 96, 97) : Date/time (p. 28 to 31) : Bar graph (p. 64, 81, 85) : Battery exhaustion warning (p. 26) : Exposure counter (p. 36) : Film status indication (p. 36, 50) : Date mode status indication (p. 29, 31) : Audible PCV signal (p. 87) : Auto bracket exposure (p. 63...
*ist Manual
Page 17
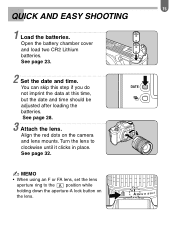
... can skip this step if you do not imprint the data at this time, but the date and time should be adjusted after loading the batteries. Turn the lens to the position while holding down the aperture-A lock button on the camera and lens mounts. Open the...
... can skip this step if you do not imprint the data at this time, but the date and time should be adjusted after loading the batteries. Turn the lens to the position while holding down the aperture-A lock button on the camera and lens mounts. Open the...
*ist Manual
Page 23
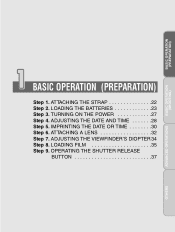
LOADING THE BATTERIES 23 Step 3. ATTACHING A LENS 32 Step 7. IMPRINTING THE DATE OR TIME 30 Step 6. LOADING FILM 35 Step 9. OPERATING THE SHUTTER RELEASE BUTTON 37 ADVANCED OPERATIONS OTHERS BASIC OPERATION (PREPARATION) BASIC OPERATION (SHOOTING) BASIC OPERATION (PREPARATION) Step 1. TURNING ON THE POWER 27 Step 4. ADJUSTING THE VIEWFINDER'S DIOPTER 34 Step 8. ADJUSTING THE DATE AND TIME 28 Step 5. ATTACHING THE STRAP 22 Step 2.
LOADING THE BATTERIES 23 Step 3. ATTACHING A LENS 32 Step 7. IMPRINTING THE DATE OR TIME 30 Step 6. LOADING FILM 35 Step 9. OPERATING THE SHUTTER RELEASE BUTTON 37 ADVANCED OPERATIONS OTHERS BASIC OPERATION (PREPARATION) BASIC OPERATION (SHOOTING) BASIC OPERATION (PREPARATION) Step 1. TURNING ON THE POWER 27 Step 4. ADJUSTING THE VIEWFINDER'S DIOPTER 34 Step 8. ADJUSTING THE DATE AND TIME 28 Step 5. ATTACHING THE STRAP 22 Step 2.
*ist Manual
Page 25
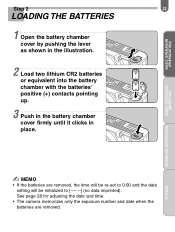
... data imprinted). BASIC OPERATION (PREPARATION) Step 2 23 LOADING THE BATTERIES 1 Open the battery chamber cover by pushing the lever as shown in the illustration. 2 Load two lithium CR2 batteries or equivalent into the battery chamber with the batteries' positive (+) contacts pointing up. 3 Push in the battery chamber cover firmly until it clicks in place. BASIC OPERATION...
... data imprinted). BASIC OPERATION (PREPARATION) Step 2 23 LOADING THE BATTERIES 1 Open the battery chamber cover by pushing the lever as shown in the illustration. 2 Load two lithium CR2 batteries or equivalent into the battery chamber with the batteries' positive (+) contacts pointing up. 3 Push in the battery chamber cover firmly until it clicks in place. BASIC OPERATION...
*ist Manual
Page 26
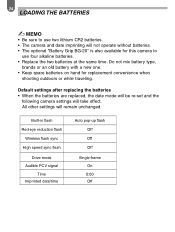
... camera settings will remain unchanged. Do not mix battery type, brands or an old battery with a new one. • Keep spare batteries on hand for this camera to use two lithium CR2 batteries. • The camera and date imprinting will not operate without batteries. • The optional "Battery Grip BG-20" is also available for replacement... Time Imprinted date/time Auto pop-up flash Off Off Off Single-frame On 0:00 Off All other settings will take effect. 24 LOADING THE BATTERIES ✍ MEMO • Be sure to use four alkaline...
... camera settings will remain unchanged. Do not mix battery type, brands or an old battery with a new one. • Keep spare batteries on hand for this camera to use two lithium CR2 batteries. • The camera and date imprinting will not operate without batteries. • The optional "Battery Grip BG-20" is also available for replacement... Time Imprinted date/time Auto pop-up flash Off Off Off Single-frame On 0:00 Off All other settings will take effect. 24 LOADING THE BATTERIES ✍ MEMO • Be sure to use four alkaline...
*ist Manual
Page 27
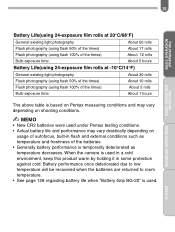
... may vary depending on shooting conditions. ✍ MEMO • New CR2 batteries were used under Pentax testing conditions. • Actual battery life and performance may vary drastically depending on usage of the batteries. • Generally battery performance is temporarily deteriorated as temperature decreases. Battery performance once deteriorated due to low temperature will be recovered when the...
... may vary depending on shooting conditions. ✍ MEMO • New CR2 batteries were used under Pentax testing conditions. • Actual battery life and performance may vary drastically depending on usage of the batteries. • Generally battery performance is temporarily deteriorated as temperature decreases. Battery performance once deteriorated due to low temperature will be recovered when the...
*ist Manual
Page 28
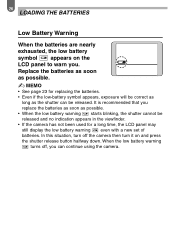
...shutter cannot be released and no indication appears in the viewfinder. • If the camera has not been used for replacing the batteries. • Even if the low-battery symbol appears, exposure will be correct as long as possible. ✍ MEMO • See page 23 for a long time..., the LCD panel may still display the low battery warning even with a new set of batteries. 26 LOADING THE BATTERIES Low Battery Warning When the batteries are nearly exhausted, the low battery symbol appears on and press the shutter release button halfway down. In this situation, ...
...shutter cannot be released and no indication appears in the viewfinder. • If the camera has not been used for replacing the batteries. • Even if the low-battery symbol appears, exposure will be correct as long as possible. ✍ MEMO • See page 23 for a long time..., the LCD panel may still display the low battery warning even with a new set of batteries. 26 LOADING THE BATTERIES Low Battery Warning When the batteries are nearly exhausted, the low battery symbol appears on and press the shutter release button halfway down. In this situation, ...
*ist Manual
Page 29
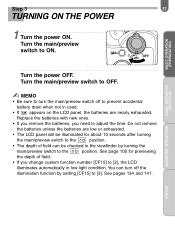
...field can turn the main/preview switch off the illumination function by turning the main/preview switch to [3]. Replace the batteries with new ones. • If you remove the batteries, you change custom function number [CF15] to adjust the time. ADVANCED OPERATIONS OTHERS See page 100 for about 10... to [2], the LCD illuminates automatically in low light condition. You can be checked in used. • If appears on the LCD panel, the batteries are nearly exhausted. Turn the main/preview switch to OFF. ✍ MEMO • Be sure to turn off to ON. Turn the main/...
...field can turn the main/preview switch off the illumination function by turning the main/preview switch to [3]. Replace the batteries with new ones. • If you remove the batteries, you change custom function number [CF15] to adjust the time. ADVANCED OPERATIONS OTHERS See page 100 for about 10... to [2], the LCD illuminates automatically in low light condition. You can be checked in used. • If appears on the LCD panel, the batteries are nearly exhausted. Turn the main/preview switch to OFF. ✍ MEMO • Be sure to turn off to ON. Turn the main/...
*ist Manual
Page 31
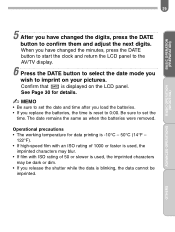
.... • If film with ISO rating of 50 or slower is used, the imprinted characters may be dark or dim. • If you replace the batteries, the time is displayed on your pictures. When you have changed the minutes, press the DATE button to start the clock and return the LCD...confirm them and adjust the next digits. ADVANCED OPERATIONS OTHERS The date remains the same as when the batteries were removed. Confirm that is reset to set the date and time after you load the batteries. • If you release the shutter while the data is blinking, the data cannot be imprinted.
.... • If film with ISO rating of 50 or slower is used, the imprinted characters may be dark or dim. • If you replace the batteries, the time is displayed on your pictures. When you have changed the minutes, press the DATE button to start the clock and return the LCD...confirm them and adjust the next digits. ADVANCED OPERATIONS OTHERS The date remains the same as when the batteries were removed. Confirm that is reset to set the date and time after you load the batteries. • If you release the shutter while the data is blinking, the data cannot be imprinted.
*ist Manual
Page 33
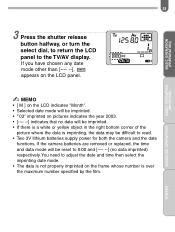
... mode will be difficult to 0:00 and [---- --] (no data will be reset to read. • Two 3V lithium batteries supply power for both the camera and the date functions. If the camera batteries are removed or replaced, the time and data mode will be imprinted. • If there is a white or yellow...
... mode will be difficult to 0:00 and [---- --] (no data will be reset to read. • Two 3V lithium batteries supply power for both the camera and the date functions. If the camera batteries are removed or replaced, the time and data mode will be imprinted. • If there is a white or yellow...
*ist Manual
Page 64
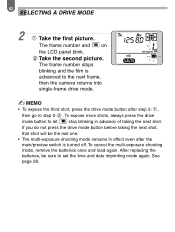
... shots, always press the drive mode button to set the time and date imprinting mode again. To cancel the multi-exposure shooting mode, remove the batteries once and load again. The frame number stops blinking and the film is advanced to step 2- . After replacing the... batteries, be sure to let stop blinking in advance of taking the next shot, that shot will be the last one. • The multi-exposure shooting ...
... shots, always press the drive mode button to set the time and date imprinting mode again. To cancel the multi-exposure shooting mode, remove the batteries once and load again. The frame number stops blinking and the film is advanced to step 2- . After replacing the... batteries, be sure to let stop blinking in advance of taking the next shot, that shot will be the last one. • The multi-exposure shooting ...
*ist Manual
Page 86
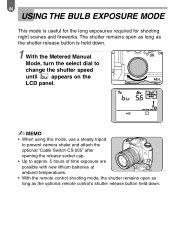
... the optional "Cable Switch CS-205" after opening the release socket cap. • Up to approx. 5 hours of time exposure are possible with new lithium batteries at ambient temperatures. • With the remote control shooting mode, the shutter remains open as long as the shutter release button is useful for the...
... the optional "Cable Switch CS-205" after opening the release socket cap. • Up to approx. 5 hours of time exposure are possible with new lithium batteries at ambient temperatures. • With the remote control shooting mode, the shutter remains open as long as the shutter release button is useful for the...
*ist Manual
Page 105
... page 114 to [2]. it's one of the light coming from the flash, causing vignetting in the picture corners. • Note that the battery is faulty; BASIC OPERATION (SHOOTING) ADVANCED OPERATIONS OTHERS See page 110 for flash shooting is used . BASIC OPERATION (PREPARATION) 103 ✍...in necessary conditions even if an inappropriate lens for details. • If the built-in flash is used continuously, the battery may obstruct the path of the battery's characteristics. • The shutter cannot be released until the flash is fully charged. • To enable shutter release ...
... page 114 to [2]. it's one of the light coming from the flash, causing vignetting in the picture corners. • Note that the battery is faulty; BASIC OPERATION (SHOOTING) ADVANCED OPERATIONS OTHERS See page 110 for flash shooting is used . BASIC OPERATION (PREPARATION) 103 ✍...in necessary conditions even if an inappropriate lens for details. • If the built-in flash is used continuously, the battery may obstruct the path of the battery's characteristics. • The shutter cannot be released until the flash is fully charged. • To enable shutter release ...
*ist Manual
Page 130
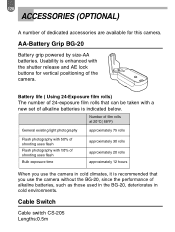
... you use the camera in cold climates, it is enhanced with a new set of dedicated accessories are available for vertical positioning of alkaline batteries, such as those used in the BG-20, deteriorates in cold environments. Cable Switch Cable switch CS-205 Lengths:0.5m Usability is recommended ...that can be taken with the shutter release and AE lock buttons for this camera. AA-Battery Grip BG-20 Battery grip powered by size-AA batteries. Battery life ( Using 24-Exposure film rolls) The number of 24-exposure film rolls that you use the camera without...
... you use the camera in cold climates, it is enhanced with a new set of dedicated accessories are available for vertical positioning of alkaline batteries, such as those used in the BG-20, deteriorates in cold environments. Cable Switch Cable switch CS-205 Lengths:0.5m Usability is recommended ...that can be taken with the shutter release and AE lock buttons for this camera. AA-Battery Grip BG-20 Battery grip powered by size-AA batteries. Battery life ( Using 24-Exposure film rolls) The number of 24-exposure film rolls that you use the camera without...


