Operation Manual
Page 8
... of the Operating Manual 9 Checking the Contents of the Package 10 Names of Parts 11 Names of Operating Parts 12 Getting Started 13 Attaching the Strap 13 Powering the Camera 14 Installing the Battery 14 Removing the Battery 14 Charging the Battery 15 Using the AC Adapter (optional 19 Installing...Back the Previous or Next Image 29 Rotating the Displayed Image 30 Common Operations 32 Turning the Camera On and Off 32 Turning the Camera On in the Playback Mode 33 Turning the Camera On in the Voice Recording Mode 33 Using the Button Functions 34 Capture Mode 34 Playback ...
... of the Operating Manual 9 Checking the Contents of the Package 10 Names of Parts 11 Names of Operating Parts 12 Getting Started 13 Attaching the Strap 13 Powering the Camera 14 Installing the Battery 14 Removing the Battery 14 Charging the Battery 15 Using the AC Adapter (optional 19 Installing...Back the Previous or Next Image 29 Rotating the Displayed Image 30 Common Operations 32 Turning the Camera On and Off 32 Turning the Camera On in the Playback Mode 33 Turning the Camera On in the Voice Recording Mode 33 Using the Button Functions 34 Capture Mode 34 Playback ...

Operation Manual
Page 14
The buttons are indicated as shown below. Four-way controller (2) Four-way controller (3) Four-way controller (4) Four-way controller (5) MENU button 2 Shutter release button 3 Zoom /f/y button 4 i button 5 OK button MENU Fn button SHUTTER y OK 12 Names of Operating Parts Mode dial b button Power switch qs/i button Shutter release button Q Playback button Zoom /f/y button gh button Four-way controller (2345) OK button Fn button MENU button Guide Indications A guide to available button operations appears on the LCD monitor during operation.
The buttons are indicated as shown below. Four-way controller (2) Four-way controller (3) Four-way controller (4) Four-way controller (5) MENU button 2 Shutter release button 3 Zoom /f/y button 4 i button 5 OK button MENU Fn button SHUTTER y OK 12 Names of Operating Parts Mode dial b button Power switch qs/i button Shutter release button Q Playback button Zoom /f/y button gh button Four-way controller (2345) OK button Fn button MENU button Guide Indications A guide to available button operations appears on the LCD monitor during operation.

Operation Manual
Page 27
...above and below the hour. Date Adjust 1 2 and 3 appear above and below "12h". 4 Press the four-way controller (23) to select [Time]. 12 Press the four-way controller (5). 2 and 3 appear above and below "mm/dd/ Date Style mm/dd/yy 12h yy". Date 07/09/2004 Time 07... Cancel OK OK Getting Started 2 Press the four-way controller (23) to select [Date]. 7 Press the four-way controller (5). hour display) or [12h] (12-hour display). 5 Press the four-way controller (5). 6 Press the four-way controller (23) to select the date style. 3 Press the four-way controller (5). ...
...above and below the hour. Date Adjust 1 2 and 3 appear above and below "12h". 4 Press the four-way controller (23) to select [Time]. 12 Press the four-way controller (5). 2 and 3 appear above and below "mm/dd/ Date Style mm/dd/yy 12h yy". Date 07/09/2004 Time 07... Cancel OK OK Getting Started 2 Press the four-way controller (23) to select [Date]. 7 Press the four-way controller (5). hour display) or [12h] (12-hour display). 5 Press the four-way controller (5). 6 Press the four-way controller (23) to select the date style. 3 Press the four-way controller (5). ...

Operation Manual
Page 28
... 00 seconds. • To set the date and time using the MENU button, you will appear next time you turn the camera on the TV, radio, etc.) reaches 00 seconds. • When the Initial Settings screen is ready to "Changing the Date... and Time" (p.147). 26 In this case, the screen will return to the menu screen. The camera is displayed, you have been made. Getting Started 13 Press the four-way controller (23) to change the minute. 15 ... switches automatically as you change the hour if you selected [12h] in Step 3. 1 14 Repeat Step 12 and 13 to change the hour.
... 00 seconds. • To set the date and time using the MENU button, you will appear next time you turn the camera on the TV, radio, etc.) reaches 00 seconds. • When the Initial Settings screen is ready to "Changing the Date... and Time" (p.147). 26 In this case, the screen will return to the menu screen. The camera is displayed, you have been made. Getting Started 13 Press the four-way controller (23) to change the minute. 15 ... switches automatically as you change the hour if you selected [12h] in Step 3. 1 14 Repeat Step 12 and 13 to change the hour.

Operation Manual
Page 31
... after taking a picture. displays the next image. 29 displays the previous image. The image appears on the LCD monitor. 100-0010 1/200 F4.7 Fn 7/ 7/2004 12:00 PM Zoom Display 1p.111 Playing Back the Previous or Next Image Still pictures can display the still picture you have just taken. 1 Press...
... after taking a picture. displays the next image. 29 displays the previous image. The image appears on the LCD monitor. 100-0010 1/200 F4.7 Fn 7/ 7/2004 12:00 PM Zoom Display 1p.111 Playing Back the Previous or Next Image Still pictures can display the still picture you have just taken. 1 Press...

Operation Manual
Page 66
... large or very small. Try different sizes until the right effect is achieved. • Never look at prints that they are about 11 cm or 12 cm wide and place the divider of the 3D image viewer in the middle of the two. 4 As the distance between the left and right...
... large or very small. Try different sizes until the right effect is achieved. • Never look at prints that they are about 11 cm or 12 cm wide and place the divider of the 3D image viewer in the middle of the two. 4 As the distance between the left and right...

Operation Manual
Page 83
... Voice Recording mode Lets you take pictures with one of the following: AbEOC.d Indicator 81 p.56 . p.55 d Picture mode Lets you use the camera as night views. Switching between the Capture Mode and Playback Mode • To change from the Capture mode to the Playback mode, press the Q ...mode Lets you take movies and sounds. Mode] menu. Night-Scene mode Lets you take dark scenes such as a voice recorder. There are 12 available p.58 modes in the Picture mode. 1 Turn the mode dial and match the indicator with settings appropriate for playing back or deleting images....
... Voice Recording mode Lets you take pictures with one of the following: AbEOC.d Indicator 81 p.56 . p.55 d Picture mode Lets you use the camera as night views. Switching between the Capture Mode and Playback Mode • To change from the Capture mode to the Playback mode, press the Q ...mode Lets you take movies and sounds. Mode] menu. Night-Scene mode Lets you take dark scenes such as a voice recorder. There are 12 available p.58 modes in the Picture mode. 1 Turn the mode dial and match the indicator with settings appropriate for playing back or deleting images....
Operation Manual
Page 84
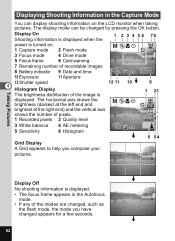
... 5 Focus frame 6 Card warning 7 Remaining number of recordable images 8 Battery indicator 9 Date and time 1/200 7/ 7/2004 F2.8 --0.6 3:00 PM 10 Exposure 11 Aperture 12 Shutter speed 4 Histogram Display 12 11 10 The brightness distribution of pixels. 9 1 23 046 2560 AWB 1 Recorded pixels 3 White balance 5 Sensitivity 2 Quality level 4 AE metering 6 Histogram 1/200 F2...
... 5 Focus frame 6 Card warning 7 Remaining number of recordable images 8 Battery indicator 9 Date and time 1/200 7/ 7/2004 F2.8 --0.6 3:00 PM 10 Exposure 11 Aperture 12 Shutter speed 4 Histogram Display 12 11 10 The brightness distribution of pixels. 9 1 23 046 2560 AWB 1 Recorded pixels 3 White balance 5 Sensitivity 2 Quality level 4 AE metering 6 Histogram 1/200 F2...

Operation Manual
Page 87
...button Four-way controller OK button Selecting the Focus Mode Focus modes (No icon) Autofocus mode The camera focuses on the object in .). The focus mode changes each time the button is changed. Use ...when the distance to the subject is used when the distance to take pictures in .). The camera focuses on the object in the autofocus area when the shutter release button is pressed halfway.... Manual Focus mode Adjust the focus manually with the four-way controller. The camera focuses on the object in the autofocus area when the shutter release button is pressed halfway. ...
...button Four-way controller OK button Selecting the Focus Mode Focus modes (No icon) Autofocus mode The camera focuses on the object in .). The focus mode changes each time the button is changed. Use ...when the distance to the subject is used when the distance to take pictures in .). The camera focuses on the object in the autofocus area when the shutter release button is pressed halfway.... Manual Focus mode Adjust the focus manually with the four-way controller. The camera focuses on the object in the autofocus area when the shutter release button is pressed halfway. ...
Operation Manual
Page 99
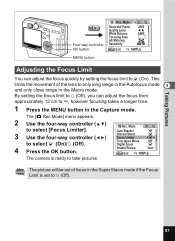
... Area AE Metering Sensitivity 2560 AWB AUTO MENU Exit SIMPLE MENU button Adjusting the Focus Limit You can adjust the focus from approximately 12 cm to take pictures. The camera is set to P (Off). 97 The [A Rec.Mode] menu appears. 2 Use the four-way controller (23) to select [Focus... Limiter]. 3 Use the four-way controller (45) to O (On). Rec. Mode Auto Bracket Interval Shoot Focus Limiter Time-lapse Movie Off Digital Zoom Instant Review...
... Area AE Metering Sensitivity 2560 AWB AUTO MENU Exit SIMPLE MENU button Adjusting the Focus Limit You can adjust the focus from approximately 12 cm to take pictures. The camera is set to P (Off). 97 The [A Rec.Mode] menu appears. 2 Use the four-way controller (23) to select [Focus... Limiter]. 3 Use the four-way controller (45) to O (On). Rec. Mode Auto Bracket Interval Shoot Focus Limiter Time-lapse Movie Off Digital Zoom Instant Review...
Operation Manual
Page 116
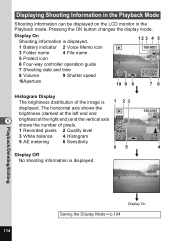
AWB 1 Recorded pixels 2 Quality level 3 White balance 4 Histogram 5 AE metering 6 Sensitivity ISO AUTO 1/200 F4.7 65 Display Off No shooting information is displayed. 12 3 4 5 1 Battery indicator 2 Voice Memo icon 100-0001 3 Folder name 4 File name 5 Protect icon 6 Four-way controller operation guide 7 Shooting date and time 8 Volume 9 Shutter speed 1/...
AWB 1 Recorded pixels 2 Quality level 3 White balance 4 Histogram 5 AE metering 6 Sensitivity ISO AUTO 1/200 F4.7 65 Display Off No shooting information is displayed. 12 3 4 5 1 Battery indicator 2 Voice Memo icon 100-0001 3 Folder name 4 File name 5 Protect icon 6 Four-way controller operation guide 7 Shooting date and time 8 Volume 9 Shutter speed 1/...

Operation Manual
Page 133
... check 100-0010 Print all images the images and make sure you want to choose the number of copies you choose applies to all . Total 12 3 Use the four-way controller (23) MENU Cancel Fn Date OK OK to print Copies 1 Date them all the images. 4 Use the Fn button to...
... check 100-0010 Print all images the images and make sure you want to choose the number of copies you choose applies to all . Total 12 3 Use the four-way controller (23) MENU Cancel Fn Date OK OK to print Copies 1 Date them all the images. 4 Use the Fn button to...

Operation Manual
Page 134
... the OK button. Playback/Deleting/Editing 132 Printing Using the DPOF Settings 1 Use the four-way controller (23) to confirm the print setting Copies 1 Total 12 MENU Cancel Date OK OK appears. Changing the Paper Size 6 1 Press the Fn button. Paper sizes displayed in white can be set . Proceed to "Changing... button. The Print w/DPOF Settings screen appears. Printing starts. Only paper sizes displayed in gray cannot be set , because they are not supported by the camera or printer. Use the four-way controller (45) to exit printing.
... the OK button. Playback/Deleting/Editing 132 Printing Using the DPOF Settings 1 Use the four-way controller (23) to confirm the print setting Copies 1 Total 12 MENU Cancel Date OK OK appears. Changing the Paper Size 6 1 Press the Fn button. Paper sizes displayed in white can be set . Proceed to "Changing... button. The Print w/DPOF Settings screen appears. Printing starts. Only paper sizes displayed in gray cannot be set , because they are not supported by the camera or printer. Use the four-way controller (45) to exit printing.

Operation Manual
Page 137
... 6 Press the four-way controller (5). 7 Use the four-way controller (23) to change the quality and press the OK button. 11 Press the OK button. 12 Use the four-way controller (23) to [Quality Level]. 9 Press the four-way controller (5).
... 6 Press the four-way controller (5). 7 Use the four-way controller (23) to change the quality and press the OK button. 11 Press the OK button. 12 Use the four-way controller (23) to [Quality Level]. 9 Press the four-way controller (5).
Operation Manual
Page 159
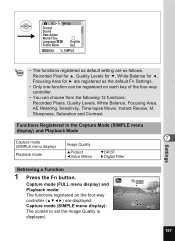
... (FULL menu display) and Playback mode: WB The functions registered on each key of the four-way controller. • You can choose from the following 12 functions: Recorded Pixels, Quality Levels, White Balance, Focusing Area, AE Metering, Sensitivity, Time-lapse Movie, Instant Review, M, Sharpness, Saturation and Contrast. Capture mode (SIMPLE menu...
... (FULL menu display) and Playback mode: WB The functions registered on each key of the four-way controller. • You can choose from the following 12 functions: Recorded Pixels, Quality Levels, White Balance, Focusing Area, AE Metering, Sensitivity, Time-lapse Movie, Instant Review, M, Sharpness, Saturation and Contrast. Capture mode (SIMPLE menu...

Operation Manual
Page 169
... - Playback Functions Single-frame, 9-frame index, enlargement (max. 4×), scroll, rotating, sound, slideshow, movie playback, histogram display, trimming, resizing Digital Filter Black-and-White, Sepia, 21 Color, Black-and-White + Red, Black-and-White + Green, Black-and-White + Blue, Illustration, Slim,...lens front) TTL contrast detection system by sensor 5-point autofocus (multi/spot autofocus possible) Normal: 0.6 m - ∞ (full zoom range) Macro: 0.12 m - 0.7 m (from wide angle position to approx. ×2.24 optical zoom) Super Macro: 0.03 m - 0.14 m (wide zoom Focus ...
... - Playback Functions Single-frame, 9-frame index, enlargement (max. 4×), scroll, rotating, sound, slideshow, movie playback, histogram display, trimming, resizing Digital Filter Black-and-White, Sepia, 21 Color, Black-and-White + Red, Black-and-White + Green, Black-and-White + Blue, Illustration, Slim,...lens front) TTL contrast detection system by sensor 5-point autofocus (multi/spot autofocus possible) Normal: 0.6 m - ∞ (full zoom range) Macro: 0.12 m - 0.7 m (from wide angle position to approx. ×2.24 optical zoom) Super Macro: 0.03 m - 0.14 m (wide zoom Focus ...

Operation Manual
Page 171
... under all guarantees or warranties, whether expressed or implied, is expressly agreed that you are sending it 8 serviced during the 12-month warranty period should be charged by defective material or workmanship or otherwise; and it will be made with the servicing. ..., please make sure that the liability of the manufacturer or its representatives will be borne by the sender. WARRANTY POLICY All PENTAX cameras purchased through authorized bona fide photographic distribution channels are guaranteed against defects of material or workmanship for a period of twelve months...
... under all guarantees or warranties, whether expressed or implied, is expressly agreed that you are sending it 8 serviced during the 12-month warranty period should be charged by defective material or workmanship or otherwise; and it will be made with the servicing. ..., please make sure that the liability of the manufacturer or its representatives will be borne by the sender. WARRANTY POLICY All PENTAX cameras purchased through authorized bona fide photographic distribution channels are guaranteed against defects of material or workmanship for a period of twelve months...
Operation Manual
Page 175
...102 D Date/Time 25, 147 DC input terminal 11 Delete button 12, 36 Delete Images 118 Delete the Displayed Image 30 Deleting All Images 121 Deleting Selected Images 120 Digital Filter 138 Digital Zoom 69 DPOF 125 Drive mode button 12, 35 E Editing 134 EV Compensation 103 F Flash 11 Flash ...button 12, 34 Flash Mode 84 Flash status lamp 11 Fn button 12, 35, 36 Fn Setting 156 Focus button 12, 34 Focus frame 28 Focus...
...102 D Date/Time 25, 147 DC input terminal 11 Delete button 12, 36 Delete Images 118 Delete the Displayed Image 30 Deleting All Images 121 Deleting Selected Images 120 Digital Filter 138 Digital Zoom 69 DPOF 125 Drive mode button 12, 35 E Editing 134 EV Compensation 103 F Flash 11 Flash ...button 12, 34 Flash Mode 84 Flash status lamp 11 Fn button 12, 35, 36 Fn Setting 156 Focus button 12, 34 Focus frame 28 Focus...

Operation Manual
Page 176
...17 Playing Back Movies 113 Playing Back Sounds 109 Playing Back Still Pictures 29 Playing Back the Previous or Next Image 29 Power switch 11, 12, 32 Press down fully (Shutter release button 28 Press halfway (Shutter release button 28 Printer 129 Printing Service 125 Program Mode 48 Protect 122... 11 Self-timer sound 148 Sensitivity 96 Set-up Menu 42 Sharpness 100 Shooting Conditions 74 Shooting Information 82, 114 Shutter release button 11, 12, 28, 34, 36, 37 Shutter sound 148 Shutter-Priority Mode 51 SIMPLE Menu 44, 47 Sleep Timeout 154 Slideshow 116 Sound 148 Speaker...
...17 Playing Back Movies 113 Playing Back Sounds 109 Playing Back Still Pictures 29 Playing Back the Previous or Next Image 29 Power switch 11, 12, 32 Press down fully (Shutter release button 28 Press halfway (Shutter release button 28 Printer 129 Printing Service 125 Program Mode 48 Protect 122... 11 Self-timer sound 148 Sensitivity 96 Set-up Menu 42 Sharpness 100 Shooting Conditions 74 Shooting Information 82, 114 Shutter release button 11, 12, 28, 34, 36, 37 Shutter sound 148 Shutter-Priority Mode 51 SIMPLE Menu 44, 47 Sleep Timeout 154 Slideshow 116 Sound 148 Speaker...
Operation Manual
Page 180
..., Unit H Golden, Colorado 80403, U.S.A. (http://www.pentaximaging.com) PENTAX Canada Inc. 1770 Argentia Road Mississauga, Ontario L5N 3S7, CANADA (http://www.pentaxcanada.ca) http://www.digital.pentax.co.jp • Specifications and external dimensions are subject to change without... notice. 57397 Copyright © PENTAX Corporation 2004 01-200408 Printed in Philippines Limited PENTAX House, Heron Drive, Langley, Slough, Berks SL3 8PN, U.K. (http://www.pentax.co.uk) PENTAX France S.A.S. 12...
..., Unit H Golden, Colorado 80403, U.S.A. (http://www.pentaximaging.com) PENTAX Canada Inc. 1770 Argentia Road Mississauga, Ontario L5N 3S7, CANADA (http://www.pentaxcanada.ca) http://www.digital.pentax.co.jp • Specifications and external dimensions are subject to change without... notice. 57397 Copyright © PENTAX Corporation 2004 01-200408 Printed in Philippines Limited PENTAX House, Heron Drive, Langley, Slough, Berks SL3 8PN, U.K. (http://www.pentax.co.uk) PENTAX France S.A.S. 12...